
Assembly Instructions

Transolid, Div. • 400 Dietz Road • Warren, OH 44483 • (800) 766-2452 • www.transolid.com
Tub & Shower Wall Installation Instructions
Thank you for purchasing Transolid
®
Tub & Shower Walls. Please read the instructions
carefully prior to installing the wall system. This manual will give you basic instructions for
the installation of tub and shower walls in a step-by-step sequence that will work in most
types of installations. If you have an installation that is not covered in this manual, please
contact your Transolid dealer or contact Transolid directly for additional information
to cover your application.
Warning - Please inspect all items for breakage and report any damage to the store of purchase. Store panels in
a at area to avoid warpage until the time of installation. Do not store the panels out of the original packaging
in a vertical position. Allow panels to acclimate to room temperature before installing.
Tools and Supplies Needed for Installation
• Circular Saw with Carbide Tip Blade (24-40 tooth) • Level
• Random Orbital Sander • Square
• Belt Sander with 80 Grit Belt • Jig Saw with Wood Finish Blade
• 150-320 Grit Sandpaper & Scotch Brite Pad • Compass or Scribe Tool
• Installation Kit or Hot Melt Gun & Glue Sticks • Denatured Alcohol
• Drill, Hole Saw, 1/2” Diameter Bit (Sharp) • Clean Shop Rags
• Caulk Gun & Silicone • 1 x 4 x 8’ Wood for Bracing (4 pcs.)
• Paintable Latex Caulk
Preparing the Installation Site
• Prepare the area with moisture resistant dry wall, marine grade plywood, or tile backer board.
Never install Transolid directly on any wall construction that is, or may become, damp.
• When installing over ceramic tile, check for loose tiles. If you nd any, correct the problem. Make sure that
the area to be covered is uniform in support. If not, build up the areas without tile. Remove the bottom row
of tile and cut a ventilation gap in the substrate.
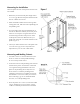
• On every installation, make sure that there is a 1/2” clearance between the top of the shower pan or tub deck
and the bottom of the substrate. This will allow for ventilation and keep water leaks from wicking up the
substrate. (Figure 1)
Preparation for Accessories
Recessed Accessories:
Make sure the accessories will t near, but not in, a stud and closer to the center of the sheet. Make sure no
electrical wiring or plumbing is present before cutting out for the accessories. Make the cutout in the substrate
to receive the accessory.
Surface Mounted Accessories:
If a surface mounted accessory, such as a grab bar, is going to be installed, make sure 2” x 6” wood blocking is
installed behind the substrate where the surface mounted accessory will be located. This will insure that there is
solid backing for any screws that need to be used in the installation.