
Assembly Instructions

• Clean all joints to be siliconed well with denatured alcohol
• Trim & Cove should be installed using silicone adhesive. Hot melt glue should be used to tack the trim in
place while silicone cures.
• Caulk all inside joints with the color matched silicone.
• Caulk outside joints with paintable caulk where wall surfaces are painted, or silicone if wall surfaces
are unpainted.
• Clean up silicone with denatured alcohol while silicone is still wet.
Cove moldings and trim pieces not only enhance the looks of a wet wall installation, but also provide extra
protection against water. Cove moldings and trim pieces can also be used to better t panels when walls are
not standard sizes. You can install the cove moldings and trim pieces using stretched out butyl tape or hot melt,
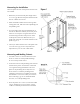
along with the color matched silicone. If adding cove moldings and a trim kit, start with the trim pieces and
nish with the corner cove moldings. (Figure 4)
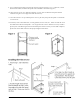
1. Dry t the trim pieces along the top of the wall panels, marking the measurements on each trim piece.
Outer corners should be mitered together, at 45 degree angles, while inner corners should rest ush against
the next trim piece. Make all necessary cuts. Decorative corner blocks can be used for nishing off the trim.
2. Adhere each trim piece to the outer wall and the Transolid wall panel, using spots of butyl tape or hot melt.
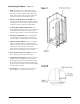
3. Dry t the cove strips into each corner, measuring the length from the pan ledge to the location where the
cove strip reaches the bottom of the top trim piece (or the top wall panel if a trim kit is not in use). The cove
strip should rest ush against the bottom of the trim pieces. Cut the cove piece to size.
4. Adhere the cove strip to the corner using pressure spots of butyl tape or hot melt.
5. Use the color matched silicone or caulk to seal all joint areas.
Sealing the Walls & Trim
1. Clean all joints to be siliconed well with denatured alcohol.
2. Using the color coordinated silicone in the installation kit, or silicone of your color choice, silicone all
internal joints with a uniform consistent bead. Use denatured alcohol for cleanup while silicone is still wet.
3. Using a paintable latex caulk (not supplied) caulk the outside perimeter of the shower wall and paint with
the exterior wall color. If a non-paintable surface butts up to the shower walls (i.e. tile or stone), silicone
can be used.
Transolid, Div. • 400 Dietz Road • Warren, OH 44483 • (800) 766-2452 • www.transolid.com