
User Manual


8
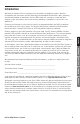
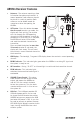
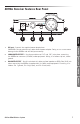
AH9 Headset Transmitter Callouts
1. Power/Mute Button - Press and hold for 3 seconds to turn the unit on or off. A quick press
and release will mute or un-mute the transmitter when the transmitter is on.
2. Status Indicator - This LED displays the operation mode, low battery and recharge status of
the transmitter. The chart below defines the LED colors for each function.
GREEN Normal Operation
AMBER Mute
Flashing RED
Low Battery
Charging
RED Fully Charged
3. Volume +/– Buttons - Press and hold either Volume button to adjust the volume. Pressing
the + or – button increases or decrease the level by one step with each push of the
button. There is a total 9 volume levels. The Status Indicator light will flash faster for each
increased step and slower for each decrease.
4. IR Lens - This window is used to capture the infrared signal sent from the receiver during
the IR SET to channelize the transmitter. The IR Lens is only active for the first 10 seconds
when the transmitter is powered on.
5. Charging Connector - Connect the supplied magnetic charging cable to this sealed, gold
contact charging connector to recharge the internal Lithium Ion battery. The AH9 can be
recharged by connecting the cable to the USB connector on the AR99m reciever or any
5-volt DC adapter that has a USB output.
1
5
34
2