Micro Wireless System AHXm Wind Instrument System OWNER'S MANUAL
Copyright 2019, Samson Technologies Corp V1.1 This product is covered by the US patent: US9,602,053 Samson Technologies Corp. 278-B Duffy Ave Hicksville, NY 11801 www.samsontech.
Important Safety Information 1. 2. 3. 4. 5. 6. 7. 8. 9. 10. 11. 12. 13. 14. 15. 16. 17. 18. 19. Read these instructions. Keep these instructions. Heed all warnings. Follow all instructions. Do not use this apparatus near water. Clean only with dry cloth. Do not block any ventilation openings. Install in accordance with the manufacturer’s instructions. Do not install near any heat sources such as radiators, heat registers, stoves, or other apparatus (including amplifiers) that produce heat.
Important Safety Information FCC Rules and Regulations Samson wireless receivers are certified under FCC Rules part 15 and transmitters are certified under FCC Rules part 74. Licensing of Samson equipment is the user’s responsibility and licensability depends on the user’s classification, application and frequency selected. This device complies with Part 15 of the FCC rules Class B and RSS-210 of Industry & Science Canada.
Introduction Welcome to Samson AirLine, the original micro-wireless microphone systems. Wireless microphone and instrument systems were originally developed to eliminate cables, providing unparalleled freedom of movement. AirLine ATX takes this concept to a new level with frequency agile transmitters and micro receiver, providing a completely “hassle-free” user experience.
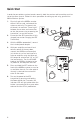
Quick Start In order for your wireless system to work correctly, both the receiver and transmitter must be set to the same channel. Follow this basic procedure for setting up and using your AirLine AWXm Wireless System: 1. Physically place the AR99m receiver where it will be used, and extend the antennas vertically. The general rule of thumb is to maintain “line of sight” between the receiver and transmitter so that the person using or wearing the transmitter can see the receiver. 2.
Quick Start 7. Position the ATX transmitter about 6-12” (15-30 cm) from the front of the AR99m with the transmitter’s IR window facing the IR transmitter on the front panel of the AR99m receiver 8. When the transmission is complete, the AR99m will receive RF signal and the tone key from the transmitter. The RF meter on the AR99m will light indicating that it is receiving wireless signal from the transmitter.
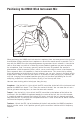
Positioning the HM60 Wind Instrument Mic When positioning the HM60 wind instrument microphone, there are some general rules that you should follow. Always position the microphone as close to the sound source as possible. This is easy with the HM60 since the integrated gooseneck guarantees the mic element is close to the source. Also, keep in mind that in order to minimize feedback problems you want to position the microphone, (and if necessary yourself), behind the main PA speakers.
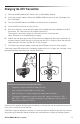
Charging the ATX Transmitter 1. With the AR99m powered off, connect the included power adapter. 2. Insert the magnetic power cable to the AR99m USB Port (or any 5-volt DC adapter that has a USB port). 3. Turn the VOLUME knob on the AR99m clockwise to turn its power on. 4. Place the ATX transmitter on a flat surface. 5. Attach the magnetic connector to the gold contact power port on the bottom of the ATX transmitter. The cable attaches to the port magnetically.
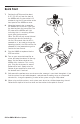
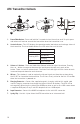
ATX Transmitter Callouts 8 5 1 4 6 3 2 7 1. Power/Mute Button - Press and hold for 3 seconds to turn the unit on or off. A quick press and release will mute or unmute the transmitter when the transmitter is on. 2. Status Indicator - This LED displays the operation mode, low battery and recharge status of the transmitter. The chart below defines the LED colors for each function. GREEN Normal Operation AMBER Mute Flashing RED RED Low Battery Charging Fully Charged 3.
AR99m Receiver Features 1. 2. 3. Antennas - The antenna mountings allow full rotation for optimum placement. In normal operation, both antennas should be placed in a vertical position. Both antennas can be folded inward for convenience when transporting the AR99m. 5 4 SET Button - Press this button to scan through the receiver’s 100 operating channels to find the optimal channel for performance.
AR99m Receiver Features Rear Panel 1 2 2 3 1. DC Input - Connect the supplied power adapter here. WARNING: Do not substitute any other kind of power adapter. Doing so can cause severe damage to the AR99m and will void your warranty. 2. UNBALANCED OUTPUTS - Use these unbalanced 1/4” and 1/8” jacks when connecting the AR99m to consumer (-10 dBV) audio equipment. Wiring is as follows: tip hot, sleeve ground. 3.
Connecting XPD Wireless 1. Plug the XPD USB receiver into the USB jack on the side of the AR99m receiver. 2. Place a fresh set of AA (LR6) batteries in the transmitter battery holder, taking care to observe the polarity markings. 3. Turn the AR99m receiver on by rotating the VOLUME control clockwise. The AR99m VOLUME control will affect the mix of the ATX and XPD transmitters. 4. Turn on the power to the XPD transmitter by pressing and holding Power switch; the indicator LED will light amber. 5.
Specifications System Working Range Audio Frequency Response T.H.D. (Overall) Dynamic Range Signal to Noise Operating Temperature Tone Key Frequency 300' (100m) line of sight 50 Hz - 15 kHz <1% (@AF 1 kHz, RF 46 dBu) >100 dB A-weighted >95 dB –10°C (14°F) to +60°C (+140°F) 35 kHz ATX Microphone Transmitter Input Connector Mini-XLR (P3) Input Impedance 3kΩ Input Gain Range 20dB RF Power 10mW EIRP Power Requirements 3.6V 500mAh Lithium Ion rechargeable battery Battery Life 8 hours Dimensions (LxWxH) 5.
Operating Bands and Frequency Ranges Band Frequency Range Kª 470–494 MHz Dª 542–566 MHz IL* 794–806 MHz B* 806–810 MHz G* 863–865 MHz * Not for use in the USA and Canada. European Frequency Operation Note: This equipment is intended for professional musical and similar applications, and may be capable of operating on some frequencies not authorized in your region.
Having Trouble with your AirLine Wireless System? We can help! CONTACT OUR SUPPORT TEAM: support@samsontech.com Our experts can help you resolve any issues. Follow us: @samson Samson Technologies 278-B Duffy Ave Hicksville, NY 11801 Phone: 1-800-3-SAMSON www.samsontech.