Headset Wireless Systems Qe Fitness Headset DE10x Headset OWNER'S MANUAL
Copyright 2019, Samson Technologies Corp V4 This product is covered by the US patent: US9,602,053 Samson Technologies Corp. 278-B Duffy Ave Hicksville, NY 11801 www.samsontech.
11. 12. 13. 14. 15. 16. 17. 18. 19. I f you want to dispose this product, do not mix it with general household waste. There is a separate collection system for used electronic products in accordance with legislation that requires proper treatment, recovery and recycling. Private household in the 28 member states of the EU, in Switzerland and Norway may return their used electronic products free of charge to designated collection facilities or to a retailer (if you purchase a similar new one).
Important Safety Information FCC Rules and Regulations Samson wireless receivers are certified under FCC Rules part 15 and transmitters are certified under FCC Rules part 74. Licensing of Samson equipment is the user’s responsibility and licensability depends on the user’s classification, application and frequency selected. This device complies with Part 15 of the FCC rules Class B and RSS-210 of Industry & Science Canada.
Introduction Welcome to Samson AirLine, the original micro-wireless microphone systems. Wireless microphone and instrument systems were originally developed to eliminate cables, providing unparalleled freedom of movement. AirLine 99m takes this concept to a new level with frequency agile transmitters and micro receiver, providing a completely “hassle-free” user experience.
AR99m Receiver Features 1. 2. Antennas - The antenna mountings allow full rotation for optimum placement. In normal operation, both antennas should be placed in a vertical position. Both antennas can be folded inward for convenience when transporting the AR99m. SET Button - Press this button for more than 2 seconds to enter scan mode, the display will flash quickly. The receiver will scan through the 100 operating channels to find the optimal channel for performance.
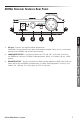
AR99m Receiver Features Rear Panel 3 DC Input - Connect the supplied power adapter here. WARNING: Do not substitute any other kind of power adapter. Doing so can cause severe damage to the AR99m and will void your warranty. 2. UNBALANCED OUTPUTS - Use these unbalanced 1/4” and 1/8” jacks when connecting the AR99m to consumer (-10 dBV) audio equipment. Wiring is as follows: tip hot, sleeve ground. 3.
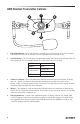
AH9 Headset Transmitter Callouts 1 4 3 2 5 1. Power/Mute Button - Press and hold for 3 seconds to turn the unit on or off. A quick press and release will mute or un-mute the transmitter when the transmitter is on. 2. Status Indicator - This LED displays the operation mode, low battery and recharge status of the transmitter. The chart below defines the LED colors for each function. GREEN Normal Operation AMBER Mute Flashing RED RED Low Battery Charging Fully Charged 3.
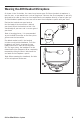
Wearing the AH9 Headset Microphone As shown in the illustration, the correct way to wear your Qe fitness headset microphone, is over the ears, as you would wear a pair of eyeglasses. Because the Qe microphone is specially designed to be used up close, be sure to position the microphone directly in front of your lips. To avoid feedback problems, take care not to cover the microphone capsule with your hand. Position the headset over your head so that the body of the transmitter is behind your head.
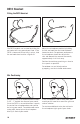
DE10 Headset Fitting the DE10 Headset he DE10 headset can be sized by sliding the T ear hooks to fit snug around your head. If the DE10 is loose and will not stay in place, slide the ear hook wires back for a tighter fit. Adjust the microphone position by holding the left ear hook wire and slide the boom forward or back. For optimum performance the microphone should be close to the skin and towards the corner of the mouth, approximately a half inch away.
Quick Start In order for your wireless system to work correctly, both the receiver and transmitter must be set to the same channel. Follow this basic procedure for setting up your AirLine 99 wireless system: AirLine 99m Wireless System 11 FRANÇAIS DEUTSCHE ESPAÑOL ITALIANO Physically place the AR99m receiver where it will be used, and extend the antennas vertically.
Connecting XPD Wireless 1. Plug the XPD USB receiver into the USB jack on the side of the AR99m receiver. 2. Place a fresh set of AA (LR6) batteries in the transmitter battery holder, taking care to observe the polarity markings. 3. Turn the AR99m receiver on by rotating the VOLUME control clockwise. The AR99m VOLUME control will affect the mix of the AH9 and XPD transmitters. 4. Turn on the power to the XPD transmitter by pressing and holding Power switch; the indicator LED will light amber. 5.
Charging the AH9 Transmitter 1. With the AR99m powered off, connect the included power adapter. 2. Insert the magnetic power cable to the AR99m USB Port (or any 5-volt DC adapter that has a USB port). 3. Turn the VOLUME knob on the AR99m clockwise to turn its power on. 4. Place the AH9 transmitter on a flat surface. 5. Attach the magnetic connector to the gold contact power port on the bottom of the AH9 transmitter. The cable attaches to the port magnetically.
Specifications System Working Range Audio Frequency Response T.H.D. (Overall) Dynamic Range Signal to Noise Operating Temperature Tone Key Frequency 300' (100m) line of sight 50 Hz - 15 kHz <1% (@AF 1 kHz, RF 46 dBu) >100 dB A-weighted >95 dB –10°C (14°F) to +60°C (+140°F) 35 kHz AH9 Transmitter Input Gain Range 20dB RF Power 10mW EIRP Power Requirements 3.6V 500mAh Lithium Ion rechargeable battery Battery Life 8 hours Dimensions (LxWxH) 5.9” x 6.7” x 3.9” 150mm x 170mm x 100mm Weight 0.
Operating Bands and Frequency Ranges Band Frequency Range Kª 470–494 MHz Dª 542–566 MHz IL* 794–806 MHz B* 806–810 MHz G* 863–865 MHz European Frequency Operation Note: This equipment is intended for professional musical and similar applications, and may be capable of operating on some frequencies not authorized in your region. Please contact your national authority to obtain information on authorized frequencies for wireless microphone products in your region.
Informations de sécurité importantes 1. 2. 3. 4. 5. 6. 7. 8. 9. 10. 11. 12. 13. 14. 15. 16. 17. 18. 19. Lisez ces instructions. Conservez ces instructions. Respectez tous les avertissements. Suivez les instructions. N'utilisez pas cet appareil à proximité d'eau. Nettoyez uniquement avec un chiffon sec. Ne bloquez aucune ouverture de ventilation. Installez conformément aux instructions du fabricant.
Informations de sécurité importantes Règlements de la FCC Les récepteurs sans fil Samson sont certifiés en vertu de la section 15 du règlement FCC et les émetteurs sont certifiés en vertu de la section 74 du règlement FCC. L'octroi d'une licence pour l'équipement Samson relève de la responsabilité de l'utilisateur et dépend de la classification, de l'application et de la fréquence choisie par l'utilisateur.
Introduction Bienvenue chez Samson AirLine, le système original de microphones sans fil. Les systèmes d'instrument et de microphone sans fil ont été développés à l'origine pour éliminer les câbles, offrant une liberté de mouvement inégalée. L'AirLine 99m élève ce concept à un niveau supérieur avec des émetteurs et micro-récepteurs flexibles sur les fréquences, offrant une expérience utilisateur sans aucun tracas.
Caractéristiques du récepteur AR99m 5 Bouton SET - Appuyez sur ce bouton pendant plus de 2 secondes pour 2 3 passer en mode balayage. L’affichage clignote rapidement. Le récepteur balayera les 100 canaux d’opération pour trouver le canal optimal en termes de performances. Une fois le balayage terminé, le AR99m passe en mode de configuration IR et envoie le canal 7 sélectionné à l’émetteur. Appuyez sur le bouton et maintenez-le enfoncé 1 pendant plus de 10 secondes pour passer en mode de réglage IR.
Caractéristiques du panneau arrière du récepteur AR99m 1 2 2 3 1. Entrée CC - Connectez ici l'adaptateur d'adaptateur d'alimentation fourni. AVERTISSEMENT : ne remplacez pas un autre type d'adaptateur d'alimentation. Cela pourrait endommager gravement l’AR99m et annulerait la garantie. 2. SORTIES ASYMÉTRIQUES - Utilisez ces prises asymétriques de 1/4 po et 1/8 po pour connecter l'AR99m à un équipement audio grand public (-10 dBV). Le câblage est le suivant : pointe positive, corps à la masse. 3.
Légendes de l'émetteur de casque AH9 1 4 3 2 Indicateur d'état - Ce voyant indique le mode de fonctionnement, le niveau de batterie faible et l'état de recharge de l'émetteur. Le tableau ci-dessous définit les couleurs des voyants pour chaque fonction. VERT Fonctionnement normal. AMBRÉ Sourdine ROUGE Batterie faible Chargement Entièrement chargé 3. Boutons de Volume +/– - Appuyez sur l'un des boutons Volume et maintenez-le enfoncé pour régler le volume.
Port du micro-casque AH9 Comme le montre l'illustration, la bonne façon de porter votre micro-casque de fitness Qe, est par-dessus les oreilles, comme vous le feriez avec une paire de lunettes. Parce que le microphone Qe est spécialement conçu pour être utilisé de près, assurez-vous de positionner le microphone directement devant vos lèvres. Pour éviter les problèmes de Larsen, veillez à ne pas couvrir la capsule du microphone avec votre main.
Casque DE10 ositionnez la bague de protection contre P l'humidité au plus près de la capsule que possible. our une utilisation en extérieur et pour aider P à réduire les plosives, utilisez les pare-vents fournis. ITALIANO Positionnement du micro DEUTSCHE Ajustez la position du microphone en tenant le câble du crochet de l'oreille gauche puis faites glisser le bras vers l'avant ou l'arrière.
Guide de démarrage rapide Pour que votre système sans fil fonctionne correctement, le récepteur et l'émetteur doivent être réglés sur le même canal. Suivez cette procédure de base pour configurer votre système sans fil AirLine 99 : 1. Placez physiquement le récepteur AR99m là où il sera utilisé puis déployez les antennes verticalement. La règle générale consiste à maintenir une « ligne de visée » entre le récepteur et l'émetteur afin que la personne utilisant ou portant l'émetteur puisse voir le récepteur.
8. Lorsque la transmission du canal d'opération est terminée, l'AR99m reçoit le signal RF et le voyant READY s'allume pour indiquer qu'il reçoit un signal sans fil de l'émetteur. Remarque : L'AH9 n'acceptera la transmission infrarouge du récepteur que durant les 10 secondes qui suivent sa mise sous tension. Si vous devez changer de canal, l'AH9 doit d'abord être mis hors tension, puis à nouveau mis sous tension pour recevoir le nouveau canal. 9.
Connexion sans fil du XPD 1. Branchez le récepteur USB XPD dans la prise USB située sur le côté du récepteur AR99m. 2. Placez un jeu de piles AA (LR6) neuves dans le logement de pile de l’émetteur, en respectant les indications de polarité. 3. Allumez le récepteur AR99m en tournant le bouton VOLUME dans le sens des aiguilles d’une montre. Le contrôle de VOLUME de l'AR99m affecte le mélange des émetteurs AH9 et XPD. 4.
Chargement de l'émetteur AH9 1. Mettez l'AR99m hors tension, puis connectez l'adaptateur d'alimentation fourni. 2. Insérez le câble d'alimentation magnétique sur le port USB de l'AR99m (ou tout autre adaptateur CC de 5 volts ayant un port USB). 3. Tournez le bouton du VOLUME de l’AR99m dans le sens des aiguilles d’une montre pour le mettre sous tension. 4. Placez l’émetteur AH9 sur une surface plane. 5.
Spécifications Système Distance de fonctionnement Réponse en fréquence audio T.H.D.
Bandes de fonctionnement et plages de fréquence Bande Gamme de fréquences Kª 470–494 MHz Dª 542–566 MHz IL* 794–806 MHz B* 806–810 MHz G* 863–865 MHz * Ne pas utiliser aux États-Unis et au Canada. ENGLISH Fonctionnement européen des fréquences Remarque: cet équipement est destiné à des applications musicales professionnelles et similaires, et peut être capable de fonctionner sur des fréquences non autorisées dans votre région.
Wichtige Sicherheitsinformationen 1. 2. 3. 4. 5. 6. 7. 8. 9. 10. 11. 12. 13. 14. 15. 16. 17. 18. 19. Lesen Sie diese Anleitung. Bewahren Sie diese Anleitung auf. Beachten Sie alle Warnungen. Befolgen Sie alle Anweisungen. Verwenden Sie dieses Gerät nicht in der Nähe von Wasser. Nur mit einem trockenen Tuch reinigen. Blockieren Sie keine Lüftungsöffnungen. Installieren Sie das Gerät nach den Anweisungen des Herstellers.
Wichtige Sicherheitsinformationen FCC-Regeln und -Bestimmungen Die Funkempfänger von Samson sind nach den FCC-Richtlinien Teil 15 und die Sender nach den FCC-Richtlinien Teil 74 zertifiziert. Die Lizenzierung von Samson-Geräten liegt in der Verantwortung des Benutzers, und die Lizenzierbarkeit hängt von der Klassifizierung, der Anwendung und der gewählten Frequenz des Benutzers ab. Dieses Gerät entspricht Teil 15 der FCC-Vorschriften Klasse B und den RSS-210 von Industry & Science Canada.
Einführung Willkommen bei Samson AirLine, dem original drahtlosen Mikrofonsystem. Drahtlose Mikrofonund Instrumentensysteme wurden ursprünglich entwickelt, um Kabel zu vermeiden und bieten eine beispiellose Bewegungsfreiheit. AirLine 99m hebt dieses Konzept mit frequenzagilen Sendern und Mikroempfängern auf ein neues Niveau und bietet eine völlig "problemlose" Benutzerführung.
Merkmale des Empfängers AR99m SET-Taste – Drücken Sie diese Taste länger als 2 Sekunden, um in den Scanmodus zu wechseln. Die Anzeige blinkt schnell. Der Receiver durchsucht die 100 Betriebskanäle, um den für die Leistung optimalen Kanal zu finden. Nach Abschluss des Suchlaufs wechselt der AR99m in den IR-Einstellmodus und sendet den ausgewählten Kanal an den Sender. Halten Sie die Taste länger als 10 Sekunden gedrückt, um in den IR-Einstellmodus zu wechseln. Die Anzeige blinkt langsam.
Merkmale Empfänger AR99m, Rückseite 1 2 2 3 1. DC-EINGANG – Schließen Sie hier das mitgelieferte Netzteil an. WARNUNG: Nur das mitgelieferte Netzteil verwenden. Andernfalls kann der AR99m schwer beschädigt werden und die Garantie erlischt. 2. UNSYMMETRISCHE AUSGÄNGE – Verwenden Sie die unsymmetrischen 1/4"- und 1/8"-Buchsen, wenn Sie den AR99m an ein Endverbraucheraudiogerät (-10 dBV) anschließen. Die Verdrahtung ist wie folgt: Spitze Hot, Hülle Masse. 3.
Beschriftungen Headset-Sender AH9 1 4 3 2 Power/Mute-Taste – Drücken Sie die Taste 3 Sekunden lang gedrückt, um das Gerät einoder auszuschalten. Ein kurzes Drücken und Loslassen schaltet den Sender stumm oder wieder laut, wenn der Sender eingeschaltet ist. 2. Statusanzeige – Diese LED zeigt den Betriebsmodus an, wenn die Batterie schwach ist, und den Ladezustand des Senders. Die folgende Tabelle definiert die LED-Farben für jede Funktion.
Headsetmikrofon AH9 tragen Wie in der Abbildung gezeigt, wird das Qe Fitness Headsetmikrofon über den Ohren getragen, so wie Sie eine Brille tragen würden. Da das Qe-Mikrofon speziell für einen nahen Einsatz entwickelt wurde, sollten Sie es direkt vor Ihren Lippen platzieren. Um Rückkopplungsprobleme zu vermeiden, achten Sie darauf, die Mikrofonkapsel nicht mit der Hand zu bedecken. Positionieren Sie das Headset über dem Kopf, so dass sich das Gehäuse des Senders hinter dem Kopf befindet.
Headset DE10 Stellen Sie die Mikrofonposition ein, indem Sie den linken Ohrbügeldraht halten und den Ausleger nach vorne oder hinten schieben. Für eine optimale Leistung sollte das Mikrofon nahe an der Haut und etwa 1,3 cm vom Mundwinkel entfernt sein. ositionieren Sie den Feuchtigkeitsschutzring P so nah wie möglich an der Kapsel. ESPAÑOL erwenden Sie für den Außeneinsatz und V zur Reduzierung von Plosivlauten den mitgelieferten Schutz.
Schnellstart Damit das drahtlose System ordnungsgemäß funktioniert, müssen sowohl der Empfänger als auch der Sender auf den gleichen Kanal eingestellt sein. Befolgen Sie diese grundlegende Vorgehensweise zur Einrichtung Ihres AirLine 99 Wireless System: 1. Platzieren Sie den AR99m-Empfänger dort, wo sie ihn verwenden möchten, und verlängern Sie die Antennen vertikal.
8. Wenn die Übertragung des Betriebskanals abgeschlossen ist, empfängt der AR99m das HF-Signal und die Anzeige READY leuchtet auf, was anzeigt, dass das drahtlose Signal vom Sender empfangen wird. Hinweis: Der AH9 akzeptiert eine Infrarotübertragung vom Empfänger nur für die ersten 10 Sekunden nach dem Einschalten. Wenn Sie den Betriebskanal wechseln müssen, muss das AH9 zuerst ausgeschaltet und dann wieder eingeschaltet werden, um den neuen Kanal zu empfangen. 9.
XPD Wireless anschließen 1. Stecken Sie den XPD-USB-Empfänger in die USB-Buchse an der Seite des Empfängers AR99m. 2. Legen Sie einen neuen Satz AA-(LR6)Batterien in den Batteriehalter des Senders ein und achten Sie dabei auf die Polaritätsmarkierungen. 3. Schalten Sie den Empfänger AR99m ein, indem Sie den VOLUME-Regler im Uhrzeigersinn drehen. Der VOLUMERegler des AR99m beeinflusst die Mischung der Sender AH9 und XPD. 4. Schalten Sie den Sender XPD durch Drücken und Halten des Netzschalters ein.
AH9-Sender aufladen 1. Schließen Sie bei ausgeschaltetem AR99m das mitgelieferte Netzteil an. 2. Stecken Sie das magnetische Netzkabel in den USB-Anschluss des AR99m (oder einen beliebigen 5-Volt-DC-Adapter mit USB-Anschluss). 3. Drehen Sie den VOLUME-Regler am AR99m im Uhrzeigersinn und schalten Sie das Gerät ein. 4. Stellen Sie den Sender AH9 auf eine ebene Fläche. 5. Verbinden Sie den Magnetstecker mit dem Goldkontakt-Powerport auf der Unterseite des Senders AH9 an.
Technische Daten System Arbeitsbereich Audio-Frequenzgang T.H.D.
Betriebsbereiche und Frequenzbereiche Band Frequenzbereich Kª 470–494 MHz Dª 542–566 MHz IL* 794–806 MHz B* 806–810 MHz G* 863–865 MHz Europäischer Frequenzbetrieb Hinweis: Dieses Gerät ist für professionelle Musik- und ähnliche Anwendungen vorgesehen und kann möglicherweise auf bestimmten Frequenzen betrieben werden, die in Ihrer Region nicht zugelassen sind.
Información de seguridad importante 1. 2. 3. 4. 5. 6. 7. 8. 9. 10. 11. 12. 13. 14. 15. 16. 17. 18. 19. Lea estas instrucciones. Conserve estas instrucciones. Preste atención a todas las advertencias. Siga todas las instrucciones. No utilice este aparato cerca del agua. Limpie solo con un paño seco. No bloquee ninguna de las aberturas de ventilación. Instálelo de acuerdo con las instrucciones del fabricante.
Información de seguridad importante Normas y reglamentos de la FCC Los receptores inalámbricos Samson están certificados bajo las reglas de la FCC parte 15 y los transmisores están certificados bajo las reglas de la FCC parte 74. La concesión de licencias de los equipos Samson es responsabilidad del usuario y depende de la clasificación, aplicación y frecuencia seleccionada por el usuario. Este dispositivo cumple con la Parte 15 de las normas FCC Clase B y RSS-210 para la industria y la ciencia de Canadá.
Introducción Bienvenido a Samson AirLine, los sistemas de micrófonos micro-inalámbricos originales. Los sistemas de micrófonos inalámbricos y de instrumentos fueron desarrollados originalmente para eliminar los cables y proporcionar una libertad de movimiento sin precedentes. El AirLine 99m lleva este concepto a un nuevo nivel con transmisores de frecuencia ágiles y un microrreceptor, lo que proporciona una experiencia de usuario completamente "sin problemas".
Características del receptor AR99m 4 2 6 3 ENGLISH Botón SET - Presione este botón durante más de 2 segundos para ingresar al modo de escaneo, la pantalla parpadeará rápidamente. El receptor escaneará los 100 canales operativos para encontrar el canal óptimo para el rendimiento. Una vez que se complete la exploración, el AR99m entrará en el modo de configuración de IR y enviará el canal seleccionado al transmisor.
Características del receptor AR99m, panel trasero 1 2 2 3 1. Entrada de CC - Conecte aquí el adaptador de corriente suministrado. ADVERTENCIA No sustituya con ningún otro tipo de adaptador de corriente. Si lo hace puede causar graves daños al AR99m y anulará la garantía. 2. SALIDAS NO BALANCEADAS - Utilice estas tomas no balanceadas de 1/4" y 1/8" cuando conecte el AR99m a equipos de audio domésticos (-10 dBV). El cableado es el siguiente: punta caliente, manguito de tierra. 3.
Características del transmisor de diadema AH9 1 4 3 2 Indicador de estado - Este LED muestra el modo de funcionamiento, la batería baja y el estado de recarga del transmisor. La siguiente tabla define los colores de los LEDs para cada función. VERDE Funcionamiento normal ÁMBAR Silencio ROJO Batería baja Carga Totalmente cargado ITALIANO Intermitente ROJO FRANÇAIS 2. DEUTSCHE Botón de encendido/silencio - Mantenga pulsado durante 3 segundos para encender o apagar la unidad.
Cómo usar el micrófono de diadema AH9 Como se muestra en la ilustración, la manera correcta de usar el micrófono de los auriculares Qe fitness, es sobre las orejas, como si usara un par de anteojos. Debido a que el micrófono Qe está especialmente diseñado para ser usado de cerca, asegúrese de colocarlo directamente frente a sus labios. Para evitar problemas de retroalimentación, tenga cuidado de no cubrir la cápsula del micrófono con la mano.
Auriculares DE10 oloque el anillo de protección contra la C humedad lo más cerca posible de la cápsula. ara uso al aire libre y para ayudar a reducir P el ruido, utilice los filtros de viento incluidos. ITALIANO Posicionamiento del micrófono DEUTSCHE Ajuste la posición del micrófono sosteniendo el cable del gancho de oreja izquierdo y deslice el brazo hacia adelante o hacia atrás.
Inicio rápido Para que su sistema inalámbrico funcione correctamente, tanto el receptor como el transmisor deben estar configurados en el mismo canal. Siga este procedimiento básico para configurar su sistema inalámbrico AirLine 99: 1. Coloque físicamente el receptor AR99m en el lugar donde se utilizará y extienda las antenas verticalmente. La regla general es mantener una "línea de visión" entre el receptor y el transmisor para que la persona que lo usa pueda ver el receptor. 2.
Inicio rápido 8. Cuando la transmisión del canal de operación esté completa, el AR99m recibirá la señal de RF y el indicador READY se iluminará para indicar que está recibiendo la señal inalámbrica del transmisor. Nota: El AH9 solo aceptará la transmisión de infrarrojos desde el receptor durante los primeros 10 segundos después de que el AH9 se enciende. Si necesita cambiar el canal de operación, primero debe apagar el AH9 y luego encenderlo de nuevo para recibir el nuevo canal. 9.
Conexión de XPD inalámbrico 1. Enchufe el receptor USB XPD en el conector USB situado en el lateral del receptor AR99m. 2. Coloque un juego de pilas AA (LR6) nuevas en el portapilas del transmisor, teniendo cuidado de observar las marcas de polaridad. 3. Encienda el receptor AR99m girando el control VOLUME en el sentido de las agujas del reloj. El control AR99m VOLUME afectará a la mezcla de los transmisores AH9 y XPD. 4.
Cómo cargar el transmisor AH9 1. Con el AR99m apagado, conecte el adaptador de corriente incluido. 2. Inserte el cable de alimentación magnético en el puerto USB AR99m (o en cualquier adaptador de corriente continua de 5 voltios que tenga un puerto USB). 3. Gire el mando VOLUME del AR99m en el sentido de las agujas del reloj para encenderlo. 4. Coloque el transmisor AH9 sobre una superficie plana. 5.
Especificaciones Sistema Rango de trabajo Respuesta de audiofrecuencia T.H.D. (General) Rango dinámico Señal a ruido Temperatura de operación Frecuencia de tono Línea de visión de 300' (100m) 50 Hz - 15 kHz <1% (@AF 1 kHz, RF 46 dBu) >100 dB con ponderación A >95 dB –10°C (14°F) a +60°C (+140°F) 35 kHz Transmisor AH9 Rango de ganancia de entrada 20dB Potencia RF 10mW EIRP Requisitos de alimentación 3.6V 500mAh Batería recargable de iones de litio Duración de la batería 8 horas Dimensiones (LxAnxAl) 5.
Bandas de operación y rangos de frecuencia Band Rango de frecuencia Kª 470–494 MHz Dª 542–566 MHz IL* 794–806 MHz B* 806–810 MHz G* 863–865 MHz Operación de frecuencia europea Nota: este equipo está diseñado para aplicaciones musicales profesionales y similares, y puede funcionar en algunas frecuencias no autorizadas en su región. Póngase en contacto con su autoridad nacional para obtener información sobre las frecuencias autorizadas para productos de micrófonos inalámbricos en su región.
Importanti informazioni di sicurezza 1. 2. 3. 4. 5. 6. 7. 8. 9. 10. 11. 12. 13. 14. 15. 16. 17. 18. 19. Leggere queste istruzioni. Conservare queste istruzioni. Rispettare tutti gli avvertimenti. Seguire tutte le istruzioni. Non utilizzare l'apparecchiatura vicino all'acqua. Pulire solo con un panno asciutto. Non bloccare le aperture di ventilazione. Installare attenendosi alle istruzioni del fabbricante.
Importanti informazioni di sicurezza Regolamento FCC I ricevitori wireless Samson sono certificati secondo le norme FCC Parte 15 e i trasmettitori sono certificati secondo le norme FCC Parte 74. La concessione di licenze delle apparecchiature Samson è responsabilità dell'utente e la concessione della licenza dipende dalla classificazione dell'utente, dall'applicazione e dalla frequenza selezionata. Questo dispositivo è conforme alla Parte 15 delle norme FCC Classe B e RSS-210 di Industry & Science Canada.
Introduzione Benvenuti a Samson AirLine, i sistemi microfonici micro-wireless. I sistemi microfonici e gli strumenti wireless sono stati originariamente sviluppati per eliminare i cavi, offrendo una libertà di movimento senza precedenti. AirLine 99m porta questo concetto a un nuovo livello con trasmettitori e microricevitori ad agilità di frequenza, offrendo un'esperienza utente completamente "senza problemi".
Caratteristiche del ricevitore AR99m 5 Pulsante SET - Premere questo pulsante 2 3 per più di 2 secondi per accedere alla modalità di scansione, il display lampeggerà velocemente. Il ricevitore eseguirà la scansione attraverso i 100 canali operativi per trovare il canale ottimale per le prestazioni. Una volta completata la scansione, AR99m entrerà 7 in modalità Set IR e invierà il canale selezionato al trasmettitore.
Caratteristiche del ricevitore AR99m Pannello posteriore 1 2 2 3 1. Ingresso DC - Collegare qui l'alimentatore in dotazione. AVVERTENZA: Non sostituire alcun altro tipo di adattatore di alimentazione. Così facendo, si possono causare gravi danni all'unità AR99m e rendere nulla la garanzia. 2. USCITA NON BILANCIATA* - Utilizzate questi connettori da 1/4" e 1/8" non bilanciati quando si collega l'unità AR99m ad apparecchiature audio di consumo (-10 dBV).
Callout del trasmettitore per cuffie AH9 1 4 3 2 Pulsante Power/Mute - Tenere premuto per 3 secondi per accendere o spegnere l'unità. Premendo e rilasciando rapidamente il pulsante, il trasmettitore viene disattivato o disattivato quando il trasmettitore è acceso. 2. Indicatore di stato - Questo LED indica la modalità di funzionamento, la batteria quasi scarica e lo stato di ricarica del trasmettitore. Il grafico seguente definisce i colori dei LED per ogni funzione.
Come indossare il microfono delle cuffie AH9 Come mostrato nell'illustrazione, il modo corretto di indossare il microfono per cuffie da fitness Qe è sopra le orecchie, come si indosserebbe un paio di occhiali da vista. Poiché il microfono Qe è stato appositamente progettato per essere utilizzato da vicino, assicurarsi di posizionare il microfono direttamente davanti alle labbra. Per evitare problemi di feedback, fare attenzione a non coprire la capsula microfonica con la mano.
Cuffie DE10 osizionare l'anello di protezione dall'umidità P il più vicino possibile alla capsula. er l'uso all'aperto e per contribuire a ridurre P il p-pop, utilizzare gli schermi di protezione in dotazione. ITALIANO Posizionamento del microfono DEUTSCHE Regolare la posizione del microfono tenendo il filo del gancio auricolare sinistro e facendo scorrere il braccio in avanti o indietro.
Avvio rapido Affinché il sistema wireless funzioni correttamente, sia il ricevitore che il trasmettitore devono essere impostati sullo stesso canale. Seguire questa procedura di base per configurare il sistema wireless AirLine 99: 1. Posizionare fisicamente il ricevitore AR99m dove sarà utilizzato ed estendere le antenne in verticale.
Avvio rapido 8. Quando la trasmissione del canale operativo è completa, l'AR99m riceverà il segnale RF e l'indicatore READY si accenderà per segnalare che sta ricevendo il segnale wireless dal trasmettitore. Nota: l'AH9 accetta la trasmissione a infrarossi dal ricevitore solo per i primi 10 secondi dopo l'accensione dell'AH9. Se occorre cambiare il canale operativo, l'AH9 deve prima essere spento, poi riacceso per ricevere il nuovo canale. 9.
Collegamento dell'XPD wireless 1. Inserire il ricevitore USB dell'XPD nella presa USB posta sul lato del ricevitore AR99m. 2. Inserire un nuovo set di batterie AA (LR6) nel vano batterie del trasmettitore, prestando attenzione a rispettare i segni di polarità. 3. Accendere il ricevitore AR99m ruotando il comando VOLUME in senso orario. Il controllo VOLUME dell'AR99m influenzerà il mix dei trasmettitori AH9 e XPD. 4.
Ricarica del trasmettitore AH9 1. Con l'AR99m spento, collegare l'adattatore di alimentazione in dotazione. 2. Inserire il cavo di alimentazione magnetico nella porta USB dell'AR99m (o qualsiasi adattatore CC da 5 Volt con porta USB). 3. Ruotare la manopola VOLUME sull'AR99m in senso orario per accenderne l'alimentazione. 4. Posizionare il trasmettitore AH9 su una superficie piana. 5. Collegare il connettore magnetico alla porta di alimentazione con contatti dorati sul fondo del trasmettitore AH9.
Specifiche Sistema Intervallo di esercizio Risposta in frequenza audio T.H.D.
Bande operative e gamme di frequenza Banda Intervallo di frequenze Kª 470–494 MHz Dª 542–566 MHz IL* 794–806 MHz B* 806–810 MHz G* 863–865 MHz Operazione europea di frequenza Nota: questa apparecchiatura è concepita per applicazioni musicali e simili professionali e può funzionare su alcune frequenze non autorizzate nella propria regione. Si prega di contattare le autorità nazionali per ottenere informazioni sulle frequenze autorizzate per i prodotti microfonici wireless nella propria regione.
Having Trouble with your AirLine Wireless System? We can help! CONTACT OUR SUPPORT TEAM: support@samsontech.com Our experts can help you resolve any issues. Follow us: @samson Samson Technologies 278-B Duffy Ave Hicksville, NY 11801 Phone: 1-800-3-SAMSON www.samsontech.