........................................................................................................................ LTM295W LTM405W SERVICE DIVISION 400 Valley Road, Suite 201 Mount Arlington, NJ 07856 TEL: 1-800-SAMSUNG (1-800-726-7864) www.samsungusa.com .............
Warning! Important Safety Instructions CAUTION RISK OF ELECTRIC SHOCK DO NOT OPEN CAUTION: TO REDUCE THE RISK OF ELECTRIC SHOCK, DO NOT REMOVE COVER (OR BACK). NO USER SERVICEABLE PARTS INSIDE. REFER SERVICING TO QUALIFIED SERVICE PERSONNEL. This symbol indicates high voltage is present inside. It is dangerous to make any kind of contact with any inside part of this product. This symbol alerts you that important literature concerning operation and maintenance has been included with this product.
Thank You for Choosing Samsung Thank you for choosing Samsung! Your new Samsung TV represents the latest in television technology. We designed it with easy-to-use on-screen menus and closed captioning capabilities, making it one of the best products in its class. We are proud to offer you a product that will provide convenient, dependable service and enjoyment for years to come. Important Safety Information Always be careful when using your TV receiver.
• Protect the power cord. Power supply cords should be routed so that they won’t be walked on or pinched by objects placed on or against them. Pay particular attention to cords at plugs, convenience receptacles, and the point where they exit from the unit. • Unplug the TV from the wall outlet and disconnect the antenna or cable system during a lightning storm or when left unattended and unused for long periods of time. This will prevent damage to the unit due to lightning and power-line surges.
CONTENTS Chapter 1: Your New TV . . . . . . . . . . . . . . .1.1 List of Features . . . . . . . . . . . . . . . . . . . . . . . . . . . . . . . . . . . . . . . . . .1.1 Accessories . . . . . . . . . . . . . . . . . . . . . . . . . . . . . . . . . . . . . . . . . . . . .1.1 Familiarizing Yourself with The TV . . . . . . . . . . . . . . . . . . . . . . . . . .1.2 Front Panel Buttons . . . . . . . . . . . . . . . . . . . . . . . . . . . . . . .1.2 Rear Panel Jacks . . . . . . . . . . . . . . . . . . . . . . .
CONTENTS Chapter 4: Special Features (cont.) . . . . . .4.4 Special Sound Options . . . . . . . . . . . . . . . . . . . . . . . . . . . . . . . . . . . .4.4 Choosing a Multichannel Television Stereo (MTS) Soundtrack .4.4 Dolby . . . . . . . . . . . . . . . . . . . . . . . . . . . . . . . . . . . . . . . . . .4.5 Setting the Sleep Timer . . . . . . . . . . . . . . . . . . . . . . . . . . . . . . . . . . .4.6 Viewing Closed Captions . . . . . . . . . . . . . . . . . . . . . . . . . . . . . . . . . .4.
Chapter 1 YOUR NEW TV List of Features Your TV was designed with the latest technology.
YOUR NEW TV Familiarizing Yourself with The TV Front Panel Buttons The buttons on the front panel control your TV’s basic features, including the on-screen menu. To use the more advanced features, you must use the remote control. Œ TV/VIDEO ˆ Indicator Press to display all of the available video sources. ´ MENU Yellow: Normal operation. Yellow, Blinking: Disconnected signal cable. Ø Remote Control Sensor Press to see an on-screen menu of your TV's features.
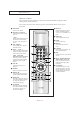
YOUR NEW TV Rear Panel Jacks Use the rear panel jacks to connect an A/V component that will be connected continuously, such as a VCR or a DVD player. For more information on connecting equipment, see pages 2.1 – 2.9. LTM405W LTM295W Œ POWER INPUT ∏ PCVIDEO INPUT (DVI-I) Connect to the video output port on your PC. ´ RF Connect to an antenna or to a cable TV system. ” PC AUDIO INPUT Connect to the audio output jacks on your PC. ˇ SUPER VIDEO INPUT Connects S-Video signal from a camcorder or VCR.
YOUR NEW TV Remote Control You can use the remote control up to about 23 feet from the TV. When using the remote, always point it directly at the TV. You can also use your remote control to operate your VCR and cable box. See page 4.1 for details. Œ POWER ˝ MODE Turns the TV on and off. Selects a target device to be controlled by the Samsung remote control (i.e., TV, VCR, Cable box, or DVD). ´ Number buttons Press to select channels directly on the TV. Ô PRE-CH +100 Tunes to the previous channel.
YOUR NEW TV Remote Control ˛ SET ¯ RESET Use this button when you are setting up your remote control to operate your VCR, Cable box, or DVD). If your remote control is not functioning properly, take out the batteries and press the reset button for about 2~3 seconds. Re-insert the batteries and try using the remote control again. ◊ CH.SCAN Press to memorize (scan) the available channels. ˘ CAPTION Press to set caption on/off. ± ADD/ERASE ¿ AUTO Press to add or erase channels in the TV’s memory.
2 Chapter 2 I N S TA L L AT I O N Connecting VHF and UHF Antennas If your antenna has a set of leads that look like this, see “Antennas with 300-ohm Flat Twin Leads,” below. If your antenna has one lead that looks like this, see “Antennas with 75-ohm Round Leads,” on page 2.2. If you have two antennas, see “Separate VHF and UHF Antennas,” on page 2.2.
I N S TA L L AT I O N Antennas with 75-ohm Round Leads 1 Plug the antenna lead into the TV ANTENNA terminal on the bottom of the back panel. Separate VHF and UHF Antennas If you have two separate antennas for your TV (one VHF and one UHF), you must combine the two antenna signals before connecting the antennas to the TV. This procedure requires an optional combiner-adaptor (available at most electronics shops). 1 Connect both antenna leads to the combiner.
I N S TA L L AT I O N Connecting to a Cable Box that Descrambles All Channels ▼ This terminal might be labeled “ANT OUT,” “VHF OUT,” or simply, “OUT.” 1 Find the cable that is connected to the ANTENNA OUT terminal on your cable box. 2 Connect the other end of this cable to the TV ANTENNA terminal on the back of the TV. Connecting to a Cable Box that Descrambles Some Channels If your cable box descrambles only some channels (such as premium channels), follow the instructions below.
I N S TA L L AT I O N 4 Connect a coaxial cable between the ANTENNA OUT terminal on the cable box and the B–IN terminal on the A/B switch. 5 Connect another cable between the other OUT terminal on the splitter and the A–IN terminal on the RF (A/B) switch. 6 Connect the last coaxial cable between the OUT terminal on the RF (A/B) switch and the VHF/UHF terminal on the rear of the TV. After you’ve made this connection, set the A/B switch to the “A” position for normal viewing.
I N S TA L L AT I O N Connecting a VCR These instructions assume that you have already connected your TV to an antenna or a cable TV system (according to the instructions on pages 2.1-2.3). Skip step 1 if you have not yet connected to an antenna or a cable system. 1 Unplug the cable or antenna from the back of the TV. 2 Connect the cable or antenna to the ANTENNA IN terminal on the back of the VCR. 3 Connect a coaxial cable between the ANTENNA OUT terminal on the VCR and the antenna terminal on the TV.
I N S TA L L AT I O N Connecting an S-VHS VCR Your Samsung TV can be connected to an S-Video signal from an S-VHS VCR. (This connection delivers a better picture as compared to a standard VHS VCR.) 1 To begin, follow steps 1–3 in the previous section to connect the antenna or cable to your VCR and your TV. 2 Connect a set of audio cables between the AUDIO OUT jacks on the VCR and the AUDIO INPUT jacks on the TV.
I N S TA L L AT I O N Connecting a DVD Player (480i, 480p) The rear panel jacks on your TV make it easy to connect a DVD player to your TV. 1 Connect a set of audio cables between the COMPONENT1(DVD) L, R AUDIO INPUT jacks on the TV and the AUDIO OUT jacks on the DVD player. 2 Connect a video cable between the COMPONENT1(DVD) Y, Pb, Pr jacks on the TV and the Y, Pb, Pr jacks on the DVD player. Note: For an explanation of Component video, see your DVD player owner's manual.
I N S TA L L AT I O N Connecting Speakers Connecting 1 Connect the speaker audio cable to the external speaker output jack on the rear of the TV matching the “+” and “-” ends of the cable with the diagram on the TV. Connecting 2 Connect a set of audio cables between the AUX L, R jacks on the AUDIO SYSTEM and the AUDIO OUTPUT L, R jacks on the TV. Connect a audio cable between the INPUT jack on the WOOFER SPEAKER and the WOOFER OUT jack on the TV. ENG 2.
I N S TA L L AT I O N Connecting a Camcorder The jacks on your TV make it easy to connect a camcorder. They allow you to view the camcorder tapes without using a VCR. (Also see “Viewing a VCR or Camcorder Tape” on page 3.17) 1 Locate the A/V output jacks on the camcorder. They are usually found on the side or back of the camcorder. 2 Connect a set of audio cables between the AUDIO OUTPUT jacks on the camcorder and the AUDIO jacks on the TV.
I N S TA L L AT I O N Installing Batteries in the Remote Control 1 Slide the cover out completely. ▼ Make sure to match the “+” and “–” ends of the batteries with the diagram inside the compartment. 2 Install two AAA size batteries. ▼ Remove the batteries and store them in a cool, dry place if you won’t be using the remote control for a long time. 3 Replace the cover. The remote control can be used up to about 23 feet from the TV. (Assuming typical TV usage, the batteries last for about one year.
Chapter 3 O P E R AT I O N Turning the TV On and Off Press the POWER button on the remote control. You can also use the Power button on the top panel. Viewing the Menus and On-Screen Displays Viewing the Menus The on-screen menus disappear from the screen after about thirty seconds. ▼ 1 With the power on, press the MENU button. Picture Mode D ynamic Contrast Brightness Sharpness The main menu appears on the screen. Its left side has five icons: Picture, Sound, Channel, Function and PC.
O P E R AT I O N Selecting a Menu Language 1 Press the MENU button to display the menu. Press the CH ▼ button to select “Function”, then press the VOL + button. Function Time Prefered Ch. ANT On time Vol. 14 3 PIP Caption V-Chip Language Move English Menu Select 2 Press the CH ▼ button to select Language. Function Time Prefered Ch. On time Vol.
O P E R AT I O N Memorizing the Channels Your TV can memorize and store all of the available channels for both “off-air” (antenna) and cable channels. After the available channels are memorized, use the CH ▲ and CH ▼ buttons to scan through the channels. This eliminates the need to change channels by entering the channel digits. There are three steps for memorizing channels: selecting a broadcast source, memorizing the channels (automatic) and adding and deleting channels (manual).
O P E R AT I O N Storing Channels in Memory (Automatic Method) 1 First, select the correct signal source (ANT, STD, HRC, IRC). See steps 1~4 on previous page. Press the MENU button. Channel ANT/CATV ANT Auto program Fine tune Add/Erase : LNA Move : 00 Erased Off Menu Select Press the CH ▼ button to select “Channel”, then press the VOL + button. 2 Press the CH ▼ button to select “Auto program”.
O P E R AT I O N Adding and Erasing Channels (Manual Method) 1 Use the number buttons to directly select the channel that will be added or erased. 2 Press the ADD/ERASE button. Repeatedly pressing this button will alternate between “Added” and “Erased.” You can view any channel (including an erased channel) by using the number buttons on the remote control. Changing Channels Using the Channel Buttons 1 Press the CH ▲ or CH ▼ buttons to change channels.
O P E R AT I O N Adjusting the Volume 1 Press the VOL + or VOL – buttons to increase or decrease the volume. Using Mute At any time, you can temporarily cut off the sound using the Mute button. 1 Press MUTE and the sound cuts off. The word “Mute” will appear in the lower-right corner of the screen. 2 To turn mute off, press the MUTE button again, or simply press either the VOL + or VOL – button. ENG 3.
O P E R AT I O N Setting the Clock Setting the clock is necessary in order to use the various timer features of the TV. Also, you can check the time while watching the TV. (Just press DISPLAY.) 1 Press the MENU button to display the on-screen menu. Function Time Prefered Ch. ANT On time Vol. 14 3 PIP Caption Press the CH ▼ button to select “Function”, then press the VOL + button. V-Chip Language Move English Select Menu 2 Press the VOL + button to select “Time”.
O P E R AT I O N Customizing the Picture You can use the on-screen menus to change the contrast, brightness, sharpness, color, tint and color tone according to personal preference. (Alternatively, you can use one of the “automatic” settings. See next page.) 1 Press the MENU button to display the menu. Picture Mode D ynamic Contrast Brightness Sharpness Press the VOL + button to display the Picture menu.
O P E R AT I O N Using Automatic Picture Settings Your TV has four automatic picture settings (“Dynamic”, “Standard”, “Movie” and “Custom”) that are preset at the factory. You can activate either Dynamic, Standard or Movie by pressing P.STD (or by making a selection from the menu). Or, you can select “Custom” which automatically recalls your personalized picture settings. Note: This function operates only in the TV, Video and S-Video modes. 1 Press the MENU button to display the menu.
O P E R AT I O N Customizing the Sound The sound settings can be adjusted to suit your personal preference. (Alternatively, you can use one of the “automatic” settings. See next page.) 1 Press the MENU button to display the menu. Sound Mode Virtual dolby MTS Setting MTS Press the CH ▼ button to select “Sound”, then press the VOL+ button.
O P E R AT I O N Using Automatic Sound Settings Your TV has four automatic sound settings (“Standard,” “Music,” “Movie” and “Speech”) that are preset at the factory. You can activate any of them by pressing the S.STD button (or by making a selection from the on-screen menu). 1 Press the MENU button to display the menu. Sound Mode Virtual dolby MTS Setting MTS Press the CH ▼ button to select “Sound”, then press the VOL+ button.
O P E R AT I O N Viewing an External Signal Source You must select the appropriate mode in order to view the external signal on the TV. Press the TV/VIDEO button. You will switch between viewing the signals coming from equipment connected to the TV’s A/V jacks, and the TV signal. Video ENG 3.
Chapter 4 S P E C I A L F E AT U R E S Customizing Your Remote Control Your TV comes equipped with a “universal” remote control. In addition to controlling the TV, the universal remote can also operate a VCR, DVD and a cable box (even if your VCR and cable box are made by manufacturers other than Samsung). Note: The remote control might not be compatible with all DVD Players, VCRs and Cable boxes. Setting Up Your Remote Control to Operate Your VCR (or DVD) 1 Turn off your VCR (or DVD.
S P E C I A L F E AT U R E S VCR Codes DVD Codes ENG 4.
S P E C I A L F E AT U R E S Setting Up Your Remote Control to Operate Your Cable Box 1 Turn off your cable box. The remote control has four “modes”: “TV,” “VCR,” “Cable” and “DVD.” Press the “MODE” button to switch the remote control to the “Cable” mode. ▼ 2 Press the MODE button and make sure that the CABLE LED is illuminated. 3 On your Samsung remote control, press the SET button. Make sure you enter 3 digits of the code, even if the first digit is a “0.
S P E C I A L F E AT U R E S Fine Tuning Channels Use fine tuning to manually adjust a particular channel for optimal reception. 1 Select the appropriate channel. Channel ANT/CATV ANT Auto program Fine tune Add/Erase 2 Press the MENU button to display the menu. : LNA Move 00 Erased : Off Menu Select Press the CH ▼ button to select “Channel”, then press the VOL + button. 3 Press the CH ▼ button to select “Fine tune.
S P E C I A L F E AT U R E S LNA (Low Noise Amplifier) If the TV is operating in a weak-signal area, sometimes the LNA function can improve the reception (a low-noise preamplifier boosts the incoming signal). 1 Press the MENU button to display the menu. Channel ANT/CATV ANT Auto program Fine tune Press the CH ▼ button to select “Channel”, then press the VOL + button. Add/Erase : LNA Move 00 Erased : Off Menu Select 2 Press the CH ▼ button to select “LNA.
S P E C I A L F E AT U R E S Selecting the Color Tone 1 Press the MENU button to display the menu. Picture Mode D ynamic Contrast Brightness Sharpness Press the VOL + button to display the Picture menu. Color Tint Color tone Cool 2 Move Menu Select 2 Press the CH ▼ button to select “Color tone.
S P E C I A L F E AT U R E S Changing the Screen Size 1 Press the P.SIZE button to change the screen size. • • • • • • Wide: Sets the picture to 16:9 wide mode. Panorama: Use this mode for the wide aspect ratio of a panoramic picture. Zoom 1: Expands the picture with a 4:3 aspect ratio. Use the Channel Up/Down buttons to move the screen. Zoom 2: Expands the Zoom 1 format picture. Use the Channel Up/Down buttons to move the screen. Normal 1: Set the picture to 4:3(16:9 for DTV) normal mode.
S P E C I A L F E AT U R E S Special Sound Options Setting a Multichannel Television Stereo (MTS) Soundtrack When MTS is set to “Auto”, MTS will be set automatically to "Mono" or "Stereo", according to the signal transmitted from the broadcasting company. If a channel is selected in an area where reception is poor, the sound might be distorted. When this occurs, set MTS Setting to "Manual" and MTS to "Mono". 1 Press the MENU button to display the menu.
S P E C I A L F E AT U R E S Choosing a Multichannel Television Stereo (MTS) Soundtrack Depending on the particular program being broadcast, you can listen to stereo, mono, or a Separate Audio Program. (SAP audio is usually a foreign-language translation. Sometimes SAP has unrelated information like news or weather.) 1 Press the MENU button to display the menu.
S P E C I A L F E AT U R E S Virtual Dolby This feature allows the TV’s L/R speakers to provide a Home Theater-like Dolby effect. The center and surround sounds are mixed into the L/R speakers. 1 Press the MENU button to display the menu. Sound Mode Virtual dolby MTS Setting MTS Press the CH▼ button to select “Sound”, then press the VOL + button : Auto Mono Sound select : Main Auto volume : On Sub woofer : Off Move Menu Select 2 Press the CH▼ button to select “Virtual dolby”.
S P E C I A L F E AT U R E S Auto Volume Each broadcasting station has its own signal conditions, and it is inconvenient to adjust the volume every time the channel is changed. “Auto volume” automatically adjusts the volume of the desired channel by lowering the sound output when the modulation signal is high or by raising the sound output when the modulation signal is low. 1 Press the MENU button to display the menu.
S P E C I A L F E AT U R E S Selecting the Sound Source You can select either Main or Sub when PIP is On. 1 Press the MENU button to display the menu. Sound Mode Virtual dolby MTS Setting MTS Press the CH▼ button to select “Sound”, then press the VOL + button : Off : Auto Mono Sound select : Main Auto volume : On Sub woofer : Off Move Menu Select 2 Press the CH▼ button to select “Sound select”.
S P E C I A L F E AT U R E S Subwoofer An attached subwoofer can be turned on or off in the menu. 1 Press the MENU button to display the menu. Sound Mode Virtual dolby MTS Setting MTS Press the CH▼ button to select “Sound”, then press the VOL + button : Off : Auto Mono Sound select : Main Auto volume : On Sub woofer : Off Move Menu Select 2 Press the CH▼ button to select “Sub woofer”.
S P E C I A L F E AT U R E S Setting the On/Off Timer Before using the timer, you must set the TV’s clock. (See “Setting the Clock” on page 3.7) ▼ 1 Press the MENU button to display the on-screen menu. Function Time Prefered Ch. ANT On time Vol. 14 3 PIP Caption V-Chip Press the CH ▼ button three times to select “Function”, then press the VOL + button. Language Move English Select Menu 2 Press the VOL + button to select “Time”.
S P E C I A L F E AT U R E S ▼ To deactivate the “On time,” select “Off” during this step. 5 Press the VOL + button to select “On/Off.” Function Time Clock On time Press the CH ▲ or CH ▼ buttons to turn the ontimer “On.” (Repeatedly pressing the CH ▲ or CH ▼ buttons will alternate between on and off.) Off time Sleep Move 06 : 30 pm 07 : 30 am On 12 : 00 am Off : Off Select Menu When finished, press the VOL + button. 6 To set the Off time, press the CH ▼ button to select “Off time.
S P E C I A L F E AT U R E S Setting the Preferred Channel Volume Level 1 Press the MENU button to display the on-screen menu. Function Time Prefered Ch. ANT On time Vol. 14 3 PIP Caption V-Chip Press the CH ▼ button to select “Function”, then press the VOL + button. Language Move English Menu Select 2 Press the CH ▼ button to select “Prefered Ch.”, Function Time Prefered Ch. ANT On time Vol. 3 14 PIP Press the VOL + or VOL button to select channel.
S P E C I A L F E AT U R E S Setting the Sleep Timer The sleep timer automatically shuts off the TV after a preset time (from 10 to 240 minutes). 1 Press the MENU button to display the on-screen menu. Function Time Prefered Ch. ANT On time Vol. 14 3 PIP Caption V-Chip Press the CH ▼ button three times to select “Function”, then press the VOL + button.
S P E C I A L F E AT U R E S Viewing Closed Captions Your TV decodes and displays the closed captions that are broadcast with certain TV shows. These captions are usually subtitles for the hearing impaired or foreign-language translations. All VCRs record the closed caption signal from television programs, so home-recorded video tapes also provide closed captions. Most pre-recorded commercial video tapes provide closed captions as well.
S P E C I A L F E AT U R E S Viewing Picture-in-Picture You can use the PIP feature to simultaneously watch two video sources. Note: While V-Chip is in operation, PIP function cannot be used. Activating Picture-in-Picture Press the MENU button to display the menu. Press the CH ▼ button to select “Function”, then press the VOL+ button. Quick way to access PIP: Simply press PIP button on the remote control. ▼ 1 Function Time Prefered Ch. ANT On time Vol.
S P E C I A L F E AT U R E S Selecting a Signal Source (External A/V) for PIP 1 Press the MENU button to display the menu. Press the CH ▼ button to select “Function”, then press the VOL+ button. Function Time Prefered Ch. ANT On time Vol. 14 3 PIP Caption V-Chip Language Move English Menu Select 2 Press the CH ▼ button to select “PIP”, then press the VOL+ button. Function Time Prefered Ch. ANT On time Vol.
S P E C I A L F E AT U R E S Selecting a Signal Source (Antenna or Cable) for PIP 1 Press the MENU button to display the menu. Press the CH ▼ button to select “Function”, then press the VOL+ button. Function Time Prefered Ch. ANT On time Vol. 14 3 PIP Caption V-Chip Language English Move Menu Select 2 Press the CH ▼ button to select “PIP”, then press the VOL+ button. Function Time Prefered Ch. ANT On time Vol.
S P E C I A L F E AT U R E S Changing the PIP Channel (LTM405W) Press the PIP CH▲ or CH▼ button to change the channel that appears in the PIP window. Changing the Location of the PIP Window When you press the LOCATE button repeatedly, the PIP window moves from corner to corner on the TV screen. Changing the Size of the PIP Window Press the SIZE button to alternate between a PIP, Double screen1, Double screen2 window. Note: The Double screen2 window doesn’t work in the PC mode.
S P E C I A L F E AT U R E S Using the V-Chip The V-Chip feature automatically locks out programming that is deemed inappropriate for children. The user must first enter a PIN (personal ID number) before any of the V-Chip restrictions can be set up or changed. Note: While V-Chip is in operation, PIP function cannot be used. If PIP does not operate, please check whether V-chip is in operation. Setting Up Your Personal ID Number (PIN) 1 Press the MENU button to display the menu. Function Time Prefered Ch.
S P E C I A L F E AT U R E S How to Enable/Disable the V-Chip 1 Press the MENU button to display the menu. Press the CH ▼ button to select “Function”, then press the VOL + button. Function Time Prefered Ch. ANT On time Vol. 14 3 PIP Caption V-Chip Language Move English Menu Select 2 Press the CH ▼ button to select “V-chip”, then press the VOL+ button. The “Enter pin” screen will appear. Enter your 4digit PIN number.
S P E C I A L F E AT U R E S 2 Press the CH ▼ button to select “V-chip”, then press the VOL+ button. The “Enter pin” screen will appear. Enter your 4digit PIN number. Function V-Chip Enter pin * * * * Menu 0~9 Select 3 Press the CH ▼ button, to select “TV Guidelines”, then press the VOL+ button.
S P E C I A L F E AT U R E S 6 How to set the FV, D, L, S and V sub-ratings. First, highlight one of these TV-Ratings: TV-Y7, TV-PG, TV-14 or TV-MA (See Step 4, on previous page). Next, while the TV-Rating is selected, repeatedly press the VOL+ button. This will cycle through the available sub-ratings (FV,L, S, D or V). A letter (“U” or “B”) will be displayed for each sub-rating. While the “U” or “B” is highlighted, press the CH ▲ or CH ▼ buttons to change the sub-rating.
S P E C I A L F E AT U R E S 3 Press the CH ▼ button to select “MPAA rating”, then press the VOL + button. Function V-Chip lock : Yes TV guidelines MPAA rating Change pin Move Select Menu 4 Repeatedly press the CH ▼ button to select a particular MPAA category. (When a category is selected, its color changes to blue.) Pressing the CH ▼ button will cycle through the MPAA categories: G General audience (no restrictions). PG Parental guidance suggested. PG-13 PG-13 (Parents strongly cautioned).
Chapter 5 P C D I S P L AY Using Your TV as a Computer (PC) Display How to Connect Your PC to the TV Note: This figure shows the Standard Connector-jack panel. The actual configuration on your TV may be different, depending on the model. TV rear panel PC rear Note: PC connections may depend on the user’s PC. • PC AUDIO INPUT Connect these to the audio-output jacks on your PC. • PC VIDEO INPUT Connect to the video output port on your PC.
P C D I S P L AY How to Set up Your PC Software (Windows only) The Windows display-settings for a typical computer are shown below. However, the actual screens on your PC will probably look different, depending upon your particular version of Windows and your particular video card. Even if your actual screens look different, the same, basic set-up information will apply in most cases. (If not, contact your computer manufacturer or Samsung Dealer.) First, click on “Settings” on the Windows start menu.
P C D I S P L AY Adjusting the Screen Quality The purpose of picture quality adjustment is to remove or reduce picture noise. If the noise is not removed by fine tuning alone, then do the frequency adjustments to the utmost and fine tune again. After the noise has been reduced, re-adjust the picture so that it is aligned on the center of screen. Press the TV/VIDEO button on the remote control to select the PC Analog mode. 1 Press the MENU button to display the menu.
P C D I S P L AY Changing the Screen Position Press the TV/VIDEO button on the remote control to select the PC Analog mode. 1 Press the MENU button to display the menu. PC Image Image lock Position Color adjust Press the CH ▼ button to select “PC”, then press the VOL + button. Recall 1024x768 48.3kHz 59.9Hz Move Menu Sel ect 2 Press the CH ▼ button to select “Position”, then press the VOL + button. PC Image Image lock Position Color adjust Recall 1024x768 48.3kHz 59.
P C D I S P L AY Changing the Screen Color Standard Press the TV/VIDEO button on the remote control to select the PC Analog mode. 1 Press the MENU button to display the menu. PC Image Image lock Position Color adjust Press the CH ▼ button to select “PC”, then press the VOL + button. Recall 1024x768 48.3kHz 59.9Hz Move Menu Sel ect 2 Press the CH ▼ button to select “Color adjust”. PC Image Image lock Position Color adjust Recall 1024x768 48.3kHz 59.
P C D I S P L AY Adjusting the Screen Color Settings Press the TV/VIDEO button on the remote control to select the PC Analog mode. 1 Press the MENU button to display the menu. PC Image Image lock Position Color adjust Press the CH ▼ button to select “PC”, then press the VOL + button. Recall 1024x768 48.3kHz 59.9Hz Move Menu Sel ect 2 Press the CH ▼ button to select “Color adjust”, then press the VOL + button. Repeatedly press VOL + to choose between Color 1,2, and 3 auto settings and Custom.
P C D I S P L AY To Initialize the Screen Position or Color Settings 1 Press the MENU button to display the menu. PC Image Image lock Position Color adjust Press the CH ▼ button to select “PC”, then press the VOL + button. Recall 1024x768 48.3kHz 59.9Hz Move Menu Sel ect 2 Press the CH ▼ button to select “Recall”, then press the VOL + button. PC Image Image lock Position Color adjust Recall 1024x768 48.3kHz 59.
Chapter Six TROUBLESHOOTING If the TV seems to have a problem, first try this list of possible problems and solutions. If none of these troubleshooting tips apply, call your nearest Samsung authorized service center. Identifying Problems Problem Poor picture Poor sound quality. No picture or sound. No color, wrong colors or tints. Picture rolls vertically. The TV operates erratically. The TV won’t turn on.
TROUBLESHOOTING Problem “Not Supported Mode!” message. The image is too light or too dark. Horizontal bars appear to flicker, jitter or shimmer on the image. Vertical bars appear to flicker, jitter or shimmer on the image. Screen is black and power indicator light blinks steadily. Image is not stable and may appear to vibrate. Image is not centered on the screen. You need the Monitor driver software. Possible Solution Check the maximum resolution and the frequency of the video Adapter.
APPENDIX Setting the Stand Note: A 29-inch TV set will be shipped with a stand attached, and a 40-inch TV set will be shipped with a stand detached. For 40-inch TV sets, assemble the stand in the following steps. 1 Fasten the stand support top onto both ends of the stand-swivel using screws (M4x12, yellow). Screw M4x12 (Yellow) 2 Fit the stand to the TV set by facing the arrow mark on the stand forward (LCD panel). 3 Fasten the stand into the TV set using screws (Mx25, black).
APPENDIX Using the Anti-Theft Kensington Lock Cable Figure 2 Figure 1 The Kensington lock is a device used to physically fix the system when using it in a public place. The locking device has to be purchased separately. The appearance and locking method may differ from the illustration depending on the manufacturer. Please refer to the manual provided with the Kensington lock for proper use.
APPENDIX Pin Assignments Pin D-Sub Connection PIN Separate H/V Composite H/V 1 Red Red 2 Green Green 3 Blue Blue 4 GND GND 5 GND (DDC Return) GND (DDC Return) 6 GND-Red GND-Red 7 GND-Green GND-Green 8 GND-Blue GND-Blue 9 No Connection No Connection 10 GND-Sync/Self Test GND-Sync/Self Test 11 GND GND 12 DDC-SDA DDC-SDA 13 H_Sync H/V_Sync 14 V_Sync Not used 15 DDC-SCL DDC-SCL ENG A.
APPENDIX Display Modes If the signal from the system equals the standard signal mode, the screen is adjusted automatically. If the signal from the system doesn’t equal the standard signal mode, adjust the mode by referring to your Videocard user guide; otherwise there may be no video. For the display modes listed below, the screen image has been optimized during manufacture.
APPENDIX Cleaning and Maintaining Your TV With proper care, your TV unit will give you many years of service. Please follow these guidelines to get the maximum performance from your TV. Placement • Do not place the TV near extremely hot, cold, humid or dusty places. • Do not place the TV near appliances with electric motors that create magnetic fields, such as vacuum cleaners. • Keep the ventilation openings clear; do not place the TV on a soft surface, such as cloth or paper.
APPENDIX .Specifications LTM295 LTM405 Size 29.0” Diagonal 40.0” Diagonal Pixel Pitch 0.4935(H) X 0.4935(V)mm 0.6735(H) X 0.6735(V)mm Type a-si TFT active matrix a-si TFT active matrix Display area 631.68(H) X 397.01(V)mm 862.080(H) x 517.
FCC Information User Instructions Warning The Federal Communications Commission Radio Frequency Interference Statement includes the following warning: NOTE: This equipment has been tested and found to comply with the limits for a Class B digital device, pursuant to Part 15 of the FCC Rules. These limits are designed to provide reasonable protection against harmful interference in a residential installation.