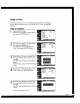
Sating the Timers This TV can be set to turn on or off automatically af specific times that you choose. Before using the timers, you must set the TV's clock, as described previously. Setting the On/Off Timer 1 Press the MENU button. Press the A or '¥ button fo select “Setup”, then press the ENTER button Longhouse Time Chip English» > > Caption Blue Screen OM Melody son Carol Weakness 2 Press the A or ¥ button fo select “Time”, ij then press the ENTER button.
J —. Operation Setting the Sleep Timer The sleep timer automatically shuts off the TV offer a preset time (from 30 fo 180 minutes). 1 Press the MENU bunion. Press the A or ¥ bunion lo select “Setup”, then press the| ENTER button. Language Time we Chip Caption Blue Screen OF Tomato on Color Weakness oc {English pi Press the A or '¥ button to select “Time”, then press the ENTER bunion. Press the A or '¥ bunion to select “Sleep Timer”, then press the ENTER button.
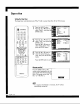
Viewing an External Signal Source Use the remote control to switch between viewing signals from connected equipment, such as VCR, DVD, Set Top box and the TV source (broadcast or cable). Setting the Signal Source 1 Press the MENU bitten. Press the ENTER bunion to select “Input”. 360: @ 2 "396008 BEEBE Press the ENTER button to select “Source List”. Press the A or ¥ button fo select a signal source, then press the ENTER button.
Operation Assigning Names to External Input Mode This feature enables you to name the input source you have connected. 1 Press the MENU bunion. ; — Press the ENTER button to Sari select “Input”. Ac fs goes ist + to select “Edit Name”, then a Se press the ENTER bunion. 2 Press the A or ¥ button fo 3 Press the A or ¥ button fo select o signal source, then Avz press the ENTER button. Seo! Tp Press the A or ¥ bunion to Component! posts Component? Gris select an external device, then press the ENTER bunion.
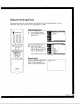
Freezing the Current Picture You can freeze the picture when watching a television program simply by pressing the STILL bunion. To return to normal viewing, press it again. NOTE « In the PIP mode, the main and sub pictures are stilled ot the same dime. SUNNING Remote Control VCR/DVD Buttons Slide the cover of the remote control up to access buttons that can control the tape functions of a connected YCR or DVD, including Rewind, Stop, Play/Pause and Fast Forward.
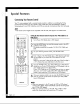
Special Features Customizing Your Remote Control Your TV comes equipped with a universal remote control. In addition to controlling the TV, the universal remote control can also operate a VCR, Cable box, DVD and Set Top Box made by Samsung {even if your VCR, Cable box and DVD are made by manufacturers other than Samsung). NOTE * The remote control might not be compatible with oll VCR, DYD players and Cable boxes.
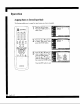
Special Features Fine Tuning Channels The Fine Tuning function lets you manually adjust the TV's tuner if you have difficulty tuning channels. 1 Using the number buttons on the remote control, select the a unwary channel you want to fine tune. @ E55 por pti) 9) Press the MENU tutor. wR = =z Press the A or ¥ button to naan jie ’ select “Channel”, then press Auto Program » Adele » the ENTER button. Forts thanes .
LNA (Low Noise Amplifier) When a weak broadcast signal causes a noisy picture, effing the “INA” saturates “On” improves the picture quality. 1 Press the MENU bunion. ~ po” senna “am. 2 mv anon Press the A or '¥ button to RAN a Qc select “Channel”, then press Auto Program Sandlotter awn SE the ENTER button. Favorites Channels Nan Fine Tune 9960 386808 BREED Ef 2 Press the A or '¥ bunion to select “LUNA, then press the ENTER bunion.
Special Features Selecting the Color Tone 1 Press the MENU button. Press the A or ¥ button Color Tons Warm CEE “Picture” sae Wide select “Picture”, then press Sa nn iw the ENTER button Dale on My Carol Control Film Mode on wo ® E57 Press the A or ¥ bunion to select "Color Tone”, then press the ENTER bunion.
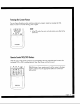
Changing the Picture Size You can select the picture size which best corresponds to your viewing requirements. SAMSUNG NOTES 1 Press the MENU button. Press the A or ¥ button to oe ns pardner ¥ select “Picture”, then press Siz Wide . igh NR
Special Features Digital Noise Reduction If the broadcast signal received by your TV is weak, you can activate the Digital Noise Reduction feature to help reduce any static and ghosting that may appear on the screen. 1 Press the MENU button. Mods Standard b Press the & or ¥ bunion to Color Tone Warm > “Picture” Size wide > select “Picture”, then press NR Wid : the ENTER button.
DNle™ {Digital Natural Image engine) This feature brings you a more detailed image with 30 noise reduction and detail, contrast and white enhancement. 1 Press the MENU button, Made “Standard Press the A or ¥ button lo Color Tone watermill » “Picture”, Size wide ¥ select “Picture”, then press en (wid ’ the ENTER bunion. Dale ion v My Color Control » Fim Mode: TTT RR 2 Press the A or '¥ bunion to nla Mod Nonstandard > select “Dniester, then press the Soto Tone _. Sia Wide» ENTER button.
Special Features Effing the My Color Control Mode This feature allows users to adjust colors according to their preferences, by adjusting skin, sky, and gross tones using the predefined settings (“Blue”, “Green”, “Pink”, “Standard”, “Custom”} without affecting other colors on the screen. NOTES ¢ Depending on the input source, this feature may not operate. This feature operates when “Dale” is set to “On” or “Demo” mode.
Custom Settings a SUNTANS 1 Press the MENU button. Press the A or ¥ button to select “Picture”, then press the ENTER bunion. Press the A or '¥ bunion to select "My Color Control”, then press the ENTER button Press the A or '¥ button fo select “Detail Control”, then press the ENTER button.
Special Features Setting the Film Mode You can automatically sense and process film signals from all sources and adjust the picture for optimum quality. 1 Press the MENU bunion. Press the A or '¥ bunion to ona} select “Picture”, then press size Wide» . Digs NR OH > pone) the ENTER button, Color Ontology > Film Mods » > 2? Press the A or ¥ bunion to select “Film Mode”, then press the ENTER button. Carol Tone Size Digital Nit Rte.
Viewing Picture-In-Picture One of the most best features of your TV is the Picture-n-Picture (PIP) feature. The advanced PIP system allows you to watch two different pictures at once, even if you don't have a VCR or DVD connected fo your TV. SAMSUNG NOTES Vatting the PIP 1 Press the MENU button. Press the A or ¥ button to el Crone select “Picture”, then press § Sie wn the ENTER button.
Special Features Selecting an External Source You can use PIP to view a signal from an external source, such as a VCR. 1 Press the MENU button. Mode sundress Press the A or '¥ button fo Coronas swarm “Picture” sie wide» select “Picture”, then press a. se ’ the ENTER button. One son » My Color Control > Fim Mods Press the A or ¥ button to pip Honda Standard » select “PIP”, then press the Colorful widower b Size wide» ENTER button.
Swapping the Sub Picture and Main Picture SUNDERED NOTE * Swap does not work in “ANT 2 IN”, “Component, “Component, “PC*, “DVI” and “HDMI” modes. Press the MENU button. Press the A or ¥ button fo select “Picture”, then press the ENTER bunion. Press the A or ¥ button to select “PIP”, then press the ENTER button.
Special Features Changing the Size of the Sub Picture 1 Press the MENU bunion. Press the A or ¥ button to select “Picture”, then press the ENTER button. Digital NR Nie : #y Color Control Film Moa. ot Pip 2 Press the A or ¥ button More :Swordsman select “PIP”, then press the Color tone swan mt Site Wide > ENTER button. Digital NR Of >» One ‘on » My Color Control > Fim Mode ott > op > FIP Source Sep sae Position Channel Select Sound 3 Press the A or ¥ bunion lo select “Size”, then press the ENTER button.
Changing the Location of the Sub Picture 1 Press the MENU bunion. Press the A or '¥ bunion to select “Picture”, then press the ENTER button. Press the A or '¥ button to select “PIP”, then press the ENTER button. Press the A or ¥ bunion to select “Position”, then press the ENTER bunion. Press the A or '¥ bunion to select a position you want, then press the ENTER button. Press the EXIT button lo exit.
Special Features Changing the Channel of the Sub Picture After you set the signal source {antenna or cable) of the sub picture, it is easy to change channels, 1 Press the MENU button. ® Como Press the 4 or ¥ bunion to Crone ton — select “Picture”, then press Se ne ‘ide 5 wer woo) ; pm pe the ENTER button. ODE Press the A or '¥ bunion psd select “PIP”, then press the | I iii ENTER butane. Se os Bom FO pe My Carol Control Mods 10 : 3 Press the A or ¥ bunion to select “Channel”, then press the ENTER button.
Selecting the Sound Source You can use this feature to hear sound from the main or sub picture 1 Press the MENU bunion. 5 » Press the A or ¥ bunion to Ho oe inboard 3 select “Picture”, then press Size wide > Digital NR £0 > the ENTER button. Dit on > Wy Color Control > Fim Made Of » PIP > Press the A or ¥ button lo select "PIP*, then press the ENTER bunion.
Special Features Setting the SRS TEXT Sensurround XT is @ patented SRS technology that solves the problem of playing 5.1 multichannel consent over two speakers. Sensurround delivers a compelling, virtual surround sound experience through any two-speaker playback system, including internal television speakers. It is fully compatible with all multichannel formats. 1 Press the MENU bunion.
Choosing a Multi-Channel Sound (MTS) track Depending on the particular program being broadcast, you can listen to “Mona”, “Stereo” or “SAP (Separate Audio Program}”. “SAP” audio is usually a foreign-language translation. Sometimes “SAP” has unrelated information like news or weather. 1 Press the MENU button. ode s y Press the A or '¥ bunion to pail Standard > select “Sound”, then press SUCRETS on : Stereo the ENTER button.
Special Features Auto Volume Each broadcasting station has its own signal conditions, and it is inconvenient to adjust the volume every time the channel is changed. “Auto Volume” automatically adjusts the volume of the desired channel by lowering the sound output when the modulation signal is high or by raising the sound output when the modulation signal is low.
Enjoying the Sound of External Speakers When using a device such as Home Theater or Amplifier with external speakers, you can set “Internal Mute” to “On” to cutoff sound from the TV's infernal speakers. 1 Press the MENU button. Press the A or ¥ button to Equalizer select “Sound”, then press Sheathe the ENTER button, Wl alto volume Internal Auto 2 Press the A or ¥ button to [8 select “Internal Mute”, then Cin press the ENTER button.
Special Features Using the V-Chip (USA) Access to channels and programs is controlled by a password a 4-digit secret aced that is defined by the user). The on-screen menu will instruct you to assign a password [you can change it later, if necessary). NOTE » The V-Chip doesn’t function when the PIP is active. How to Change Your Password 1 Press the MENU button. Press the A or ¥ bunion someone select “Setup”, then press the| Behind r @ == ENTER button.
How to Indispensable the Rating Controls SAMSUNG Press the MENU button. Press the A or ¥ bunion fo select “Setup”, then press the| ENTER button. Press the A or ¥ bunion to select "V-Chip”, then press the ENTER bunion, Press the number buttons fo enter your current digit pin number. {The default pin number for a new TV set is } The “V:Chip” menu is displayed. Press the ENTER button to select “V-Chip Lock”. Press the A or ¥ button fo select "On", then press the ENTER bunion. Press the EXIT bitten fo exit.
Special Features How to Set up Restrictions Using the “TV Parental Guidelines” The parental restrictions can be set up using either of two methods: The “TV Parental Guidelines” or "PAMPAS Rating”. + English {Longueuil » Tin » Chip » Caption v Blu Scranton Press the MENU bunion. Press the A or ¥ bunion to select “Setup”, then press th ENTER button. BIKES] Melody ion Color Woefulness PC FREED Press the A or '¥ button to select "V-Chip”, then press the ENTER bunion.
You can independently lock the TV ratings. The locked TV (FCC) ratings are indicated by the symbol “6”. Press the buttons and the ENTER button to activate the appropriate restrictions for TV [FCC] rating system. TVY : Young children TV : Children 7 and over TV-G: General audience TV: Parent Guidance TV-14 : Viewers 14 and over TY-MA : Mature Audience Press the EXIT button to exit.
~ Special Features How to Set up Restrictions Using the “PAMPAS Rating” The Movie rating system uses the “PAMPAS” [Motion Picture Association of America) system, and its main application is for navies. When the rating control is on, the TV will automatically block any programs that are coded with objectionable ratings {either "PAMPAS Rating” or “TV Parental Guidelines”). 1 Press the MENU button.
important Notes About Parental Lacks Explanation of the PAMPAS and TV {FCC] Rating System TV (FCC) Age-Bused Ratings TV-MA Mature audiences only. This program may contain mature themes, profane language, graphic violence and explicit sexual content. ™v-14 Parents strongly cautioned. This program may contain sophisticated themes, sexual content, strong language and more intense violence. TV-PG Parental guidance suggested.
=, Special Features Viewing Closed Caption information Your TV decodes and displays the closed captions information that is broadcast along with some television shows. These captions are usually subtitles for the hearing impaired or translations into other languages. All VCR record the closed caption signal from television programs, so prerecorded video tapes can also deliver closed caption information. Check for the closed caption symbol on the tape’s package of your TV program-schedule.
SAMSUNG Depending on the particular 0 Caption ‘on » broadcast, it might be age emotion + necessary fo make changes Chan not “Channel” and “Field”. Press the A or ¥ button fo select “Channel”, then press the ENTER hut ion. 5 Press the A or '¥ button lo 6 Press the A or '¥ button to NTT NOTES Caption on Mode = Caption Chen net 1 Filial an select “1” or “2”, then press the ENTER bunion. Option : Mode + Caption Channel it Filet select “Field”, then press the ENTER button.
Special Features Seining the Blue Screen Mode If no signal is being received or the signal is very weak, a blue screen automatically replaces the noisy picture background. If you wish to continue viewing the poor picture, you must set the “Blue Screen” mode fo “Of”. SINGALONG English 74 Press the MENU button. Press the A or ¥ button io select “Setup”, then press the ENTER button.
Setting The On/Off Melody A melody sound can be set fo come on when the TV is powered On or Off. SAMSUNG 3 Press the MENU bunion. Press the A or ¥ button fo select “Setup”, then press hel, ENTER button, Press the A or ¥ button to select “Melody”, then press the ENTER button.
Special Features Using the Color Weakness Enhancement Feature This feature adjusts the Red, Blue or Green color fo enhance the picture according to the user's particular color weakness. 1 Press the MENU butane. v Press the A or '¥ button to Time > " v.Chi v select “Setup”, then press Canon y the ENTER bunion. Blue Loren OK v Melody ion > Color Weakness v v 2 Press the A or ¥ button to select “Color Weakness”, § then press the ENTER button.
| PC Display Using Your TV as a Computer (PC) Display How to Connect Your PC to the TV This figure shows the Standard Connector-jock panel. The actual configuration on your TV may be different, depending on the model.
Setting up Your PC Software (Based on Windows 98) The Windows display-settings for a typical compiler are shown below. The actual screens on your PC will probably be different, depending upon your particular version of Windows and your particular video card, However, even if your actual screens look different, the same basic setup information will apply in almost all cases. {If not, contact your computer manufacturer or Samsung Dealer.) First, click on “Settings” on the Windows start menu.
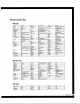
III, PC Display Display Modes Mode | Resolution | Horizontal Frequency [KHz] | Vertical Frequency [Hz] | Pixel Clock [MHz] | Sync Polarity {H/V) VGA | 640x350 31.47 70.00 25.175 +f 720 x 400 31.47 70.00 28.322 37.93 85.00 355 640 x 480 31.47 60.00 25.175 + 35.00 6670 3024 37.86 72.80 31.50 37.50 75.00 31.50 4327 85.00 36.00 f= SAGA [800 x 600 35.16 56.30 36.00 37.88 40.30 40.00 af 48.08 72.20 50.00 44.87 75.00 49.50 53.67 85.10 56.25 832 x 624 4273 74.60 57.284 XGA | 1024 x 768 48.36 60.00 65.00 /56.40 70.
Adjusting the Picture Quality The purpose of picture quality adjustment is to remove or reduce picture noises. If the noise is not removed by fine tuning alone, then do the frequency adjustments to the utmost and fine tune again. After the noise has been reduced, re-adjust the picture so that it is aligned on the center of screen. 2 Press the MENU bunion, SAMSUNG 1 Press the SOURCE button Io select “PC”. Press the A or ¥ bunion to Language + English select “Setup”, then press the one ENTER button.
PC Display Changing the Picture Position Alter connecting the TV to your PC, adjust the position of picture if it is not well-aligned. 1 Press the SOURCE button fo select "PC". ? Press the MENU bunion. Press the A or '¥ button fo Language Henan aig vic select “Setup”, then press the] Can ENTER button. Blue Scranton OH > Melody ion > Color Weakness Press the A or ¥ bunion fo 8 select “PC”, then press the ENTER bunion.
Adjusting the Picture Quality and Position Automatically This feature allows the TV to self adjust to the incoming video signal. The values of fine, coarse and position are adjusted automatically. 1 Press the SOURCE button to select “PC”. 2 Press the MENU bunion. LE N Press the A or ¥ bunion to {in gen singly select “Setup”, then press the ene : ENTER button. Slug Serena: ft » Milady Zon » Color Weakness v 3 > Press the A or ¥ bunion to select "PC", then press the ENTER button.
PC Display Initializing the Picture Settings You can replace all picture fingerings with the factory default values. 1 Press the SOURCE bunion to select “PC”, 2 Press the MENU button. Press the A or ¥ button to select “Setup”, then press the ENTER bunion. Language Time vi Chip + English 5 > > Caption > Blue Screen off > Melody on > Color Weariness Press the A or '¥ bunion to select “PC”, then press the ENTER button.
Changing the Picture Size (PC Mode) You can select the picture size which best corresponds te your viewing requirements. SAMSUNG NOTES » The “Wide PC” and “Expand” modes are recommended for the PC mode, In VGA (640x480) and SAGA (800x600) modes, the "Wide" and “4:3” modes are available. In XGA (1024x758) mode, the “Wide” mode is available. 2 Press the MENU button. 3 Press the 4 or » bunion to Press the SOURCE bunion fo select "PC".
Appendix Troubleshooting If the TV seems to have a problem, first try this list of possible problems and solutions. If none of these troubleshooting tips apply, then call your nearest Samsung authorized service center. Problem Possible Solution Door picture quality. Try another channel. Adjust the antenna. Check all wire connections. Poor sound quality. Try another channel. Adjust the antenna. Make sure the MUTE bunion is off. No picture or sound. Try another channel. Press the SOURCE bunion.
Replacing the Lamp * Why do | need to replace the lamp? The lamp used in a projection TV has o limited lifespan. For the best screen quality it needs to be replaced periodically. After replacing the lamp, the screen quality will be bright and clear as new. + Check before lamp replacement 1. The lamp must be the same code number and type. 2. The lamp type is indicated on the right side of the TV. It is also indicated on the lamp case. 3.
J —. o Appendix « For replacement, you will need a 5.91 Inches-long Philips screwdriver and o pair of gloves. 1 Unplug TV, then remove the 7 screws, ; ? Remove the rear cover. 3 Remove the 2 pres spin screws the lamp. 4 Separate the Lamp from the engine by holding the handle ond pulling it out. 5 To reinstall the Lamp, follow these steps in reverse order. NOTES * Be sure the replacement Lamp is the same type. * Afr replacing the lamp, align the lamp cover with the groove and secure the screws.
(leaning ond Maintaining Your TV With proper care, your TY will give you many years of service. Please follow these guidelines fo get the maximum performance from your TV, Placement + Do not put the TV near extremely hot, cold, humid or dusty places. + Do not place the TV near appliances with electric motors that create magnetic fields, such as vacuum cleaners. * Keep the ventilation openings clear; do not place the TV on a soft surface, such as cloth or paper. * Place the TV in a vertical position only.
rage 10f 1 Mia Kan From: JA aVi® To: Sent: Monday, June 28, 2004 1:04 PM Attach: photographs pdf; Block diagrammed; Subject: Fwd: FCC Application for ASLANT Helios! Randy, Please check oul the below. Thank you. Sincerely, Waldoes Ch (Original Message Sender : 2 &l G5( TE )/0A Leb. (ROI TEAT Date © 2004-08-23 01:46 Title © FOG Application for STATELY Dear Randy, Please find the attached for DLP PROJECTION TV. 1. Mo def © ATS6L7 2. Product : DLP PROJECTION TV 3.