Before you begin reading a chapter This chapter explains all the features available for this series' models to help users easily understand the features. You can check the features available for each model in the Basic Guide (see "Menu overview" on page 27). The following are tips for using this chapter • The control panel provides access to various menus to set up the machine or use the machine’s functions.
Information Some menus may not appear in the display depending on options or models. If so, it is not applicable to your machine (see "Menu overview" on page 27). To change the menu options: • Press (Menu) > Information on the control panel. Item Description Menu Map Prints the menu map which shows the layout and current settings of this machine. Configuration Prints a report on the machine's overall configuration. Supplies Info. Prints supplies’ information page.
Layout Item Some menus may not appear in the display depending on options or models. If so, it is not applicable to your machine (see "Menu overview" on page 27). • Simplex: Sets the margin for one-sided printing. • Duplex: Sets the margin for double-sided printing. Common Margin To change the menu options: • Press (Menu) > Layout on the control panel. Item Description Selects the direction in which information is printed on a page.
Layout Item Description To print on both sides of the paper, choose the binding edge. • Off: Disables this option. • Long Edge Duplex • Short Edge 3.
Paper Some menus may not appear in the display depending on options or models. If so, it is not applicable to your machine (see "Menu overview" on page 27). To change the menu options: • Press (Menu) > Paper on the control panel. Item Copies Description Selects the number of copies. • Paper Size: Selects the default paper size. MP Tray / [Tray] • Paper Type: Selects the paper type currently loaded in the tray. Sets the default paper tray to use.
Graphic Some menus may not appear in the display depending on options or models. If so, it is not applicable to your machine (see "Menu overview" on page 27). To change the menu options: • Press (Menu) > Graphic on the control panel. Item Description Resolution Specifies the number of dots printed per inch (dpi). The higher the setting, the sharper printed characters and graphics. Clear Text Prints text darker than on a normal document.
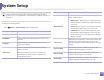
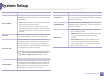
System Setup Some menus may not appear in the display depending on options or models. If so, it is not applicable to your machine (see "Menu overview" on page 27). Item You can set the condition to wake up from power-save mode. Set the item on. • ButtonGPress: GWhen you press any button except power button, the machine wake up from the power save mode. To change the menu options: • Press (Menu) > System Setup on the control panel. Item Wakeup Event Sets the date and time.
System Setup Item Description Determine whether or not the machine continues printing when it detects the paper does not match the paper settings. Auto Continue • Off: If a paper mismatch occurs, the machine waits until you insert the correct paper. Item Tray Protect Decides to use or not use the Auto Tray Swi. feature. If you set tray 1 to on, for example, then tray 1 is excluded during tray switching.
System Setup Item Description Allows you to save print resources and enables ecofriendly printing (see "Eco printing" on page 48). • Default Mode: Select whether to turn the Eco mode on or off. Eco Setup Onforce: Sets the Eco mode on. If a user wants to turn the Eco mode off, the user needs to enter the password. • Change Temp.: Selects the eco template set from the SyncThru™ Web Service. Clear Setting Restores the machine’s factory default settings. 3.
Emulation Some menus may not appear in the display depending on options or models. If so, it is not applicable to your machine (see "Menu overview" on page 27). To change the menu options: • Press (Menu) > Emulation on the control panel. Item Description Emulation Type The machine language defines how the computer communicates with the machine. Setup Sets the detailed settings for the selected emulation type. 3.
Image Mgr. Some menus may not appear in the display depending on options or models. If so, it is not applicable to your machine (see "Menu overview" on page 27). Option Auto Color Reg. To change the menu options: • Press Description The machine virtually prints certain patterned image to calibrate the color printing position. This feature enhances the colored image sharper and clearer,which means the machine prints the colored image on the paper more like the one in the monitor. (Menu) > Image Mgr.
Network Network Some menus may not appear in the display depending on options or models. If so, it is not applicable to your machine (see "Menu overview" on page 27). Option Selects the appropriate protocol and configure parameters to use the network environment (see "Setting IP address" on page 136). TCP/IP (IPv4) There are lots of parameters to be set. If you are not sure, leave as is, or consult the network administrator.
Option Http Activate Option Description You can sets whether to use SyncThru™ Web Service or not. Description WINS You can configure the WINS server. WINS(Windows Internet Name Service) is used in the Windows operating system. SNMP V1/V2 You can set SNMP (Simple Network Management Protocol). Administrator’s can use SNMP to monitor and manage machines on the network. SNTP You can set SNTP (Simple Network Time Protocol) settings.
Direct USB Direct USB Some menus may not appear in the display depending on options or models. If so, it is not applicable to your machine (see "Menu overview" on page 27). If you want to use this feature, you need to insert a USB memory device into the USB memory port on your machine. To change the menu options: • Press (Menu) > Direct USB on the control panel (see "Using USB memory device" on page 50). Item Description USB Print You can directly print files stored on a USB memory device.
Job Manage Some menus may not appear in the display depending on options or models. If so, it is not applicable to your machine (see "Menu overview" on page 27). To change the menu options: • Press (Menu) > Job Manage on the control panel. Item Description Active Job Shows the print job lists that are waiting to be printed. Secured Job Shows the print job lists that are secured on the disk. Stored Job Shows the print job lists that are stored on the disk.
Custom This menu appears only when the XOA (eXtensible Open Architecture) web application is installed. Contact the administrator to use this menu. To change the menu options: • Press (Menu) > Custom on the control panel. 3.
3.
4. Special Features This chapter explains special printing features. • Altitude adjustment 204 • Entering various characters 205 • Printing features 206 • Using optional device features 221 • The procedures in this chapter are mainly based on Windows 7. • It may be necessary to press OK to navigate to lower-level menus for some models.
Altitude adjustment Print quality is affected by atmospheric pressure, which is determined by the height of the machine above sea level. The following information will guide you on how to set your machine for the best print quality. You can set the altitude value from Device Settings in 6DPVXQJ (DV\ 3ULQWHU 0DQDJHU program. • Before you set the altitude value, determine the altitude where you are.
Entering various characters As you perform various tasks, you may need to enter names and numbers. 1 Entering alphanumeric characters Press the button until the correct letter appears on the display. For example, to enter the letter O, press 6, labeled with MNO. Each time you press 6, the display shows a different letter, M, N, O, m, n, o and finally 6. To find the letter that you want to enter, see "Keypad letters and numbers" on page 205.
Printing features • For basic printing features, refer to the Basic Guide (see "Basic printing" on page 44). If you want to change the settings for each print job, change it in Printing Preferences. • This feature may not be available depending on model or optional goods (see "Features by models" on page 7). 4 Setting your machine as a default machine 3 Changing the default print settings 1 2 3 4 Click the Windows Start menu. Select Control Panel > Devices and Printers. Right-click on your machine.
Printing features 5 Using advanced print features 1 Check the Print to file box in the Print window. 2 3 Click Print. • See "Features by models" on page 7. • XPS printer driver: used to print XPS file format. - The XPS printer driver can be installed only on Windows Vista OS or higher. - Install optional memory when an XPS job does not print because the printer is out of memory. - You can install the XPS printer driver when you insert the software CD into your CD-ROM drive.
Printing features Understanding special printer features You can use advanced printing features when using your machine. To take advantage of the printer features provided by your printer driver, click Properties or Preferences in the application’s Print window to change the print settings. The machine name, that appears in the printer properties window may differ depending on the machine in use. • Some menus may not appear on the display depending on options or models.
Printing features Item Poster Printing Description Prints a single-page document onto 4 (Poster 2x2), 9 (Poster 3x3), or 16 (Poster 4x4) sheets of paper, for the purpose of pasting the sheets together to form one poster-size document. Select the Poster Overlap value. Specify Poster Overlap in millimeters or inches by selecting the radio button on the upper right of Basic tab to make it easier to paste the sheets together.
Printing features Item Description • Double-sided Printing • Printer Default: If you select this option, this feature is determined by the settings you have selected on the control panel of the machine. This option is available only when you use the PCL/XPS printer driver. • Double-sided • None: Disables this feature. a Printing (Manual) • Long Edge: This option is the conventional layout used in bookbinding. • Short Edge: This option is the conventional layout used in calendars.
Printing features Item Watermark (Creating a watermark) Watermark (Editing a watermark) Watermark (Deleting a watermark) Description a To change the print settings from your software application, access Printing Preferences. b Click the Advanced tab, select Edit from the Watermark drop-down list. The Edit Watermarks window appears. c Enter a text message in the Watermark Message box. You can enter up to 256 characters. The message displays in the preview window.
Printing features Item Overlaya (Creating a new page overlay) Description a b c d To save the document as an overlay, access Printing Preferences. Click the Advanced tab, and select Edit from the Text drop-down list. Edit Overlay window appears. In the Edit Overlay window, click Create. In the Save As window, type a name up to eight characters in the File name box. Select the destination path, if necessary (The default is C:\Formover). e Click Save. The name appears on the Overlay List.
Printing features Item Description • This feature is available only if you have installed the optional memory or mass storage device (HDD) (see "Variety feature" on page 8). • Some menus may not appear on the display depending on options or models. If so, it is not applicable to your machine. • To enable this feature, check Storage Options (see "Setting Device Options" on page 69).
Printing features Item Description This option allows you to print with the given permission. • User permission: If you check this option, only users with user permission can start a print job. • Group permission: If you check this option, only groups with group permission can start a print job. Job Accounting • Click the question mark( ) from the upper-right corner of the window and click on any option you want to know about.
Printing features Printing 6 Using Direct Printing Utility There are several ways you can print using the Direct Printing Utility. • Direct Printing Utility may not be available depending on model or optional goods (see "Software" on page 7). 1 • Available for Windows OS users only. The Direct Printing Utility window appears. 2 Select your machine from the Select Printer drop-down list and click Browse. 3 Select the file you wish to print and click Open.
Printing features 4 Click Print. The selected PDF file is sent to the machine. Changing printer settings You can use advanced printing features when using your machine. 7 Macintosh printing Some features may not be available depending on models or options. It means that the features are not supported. Open an application and select Print from the File menu. The machine name, which appears in the printer properties window, may differ depending on the machine in use.
Printing features Printing on both sides of the paper Some features may not be available depending on models or options. It means that the features are not supported (see "Variety feature" on page 8). Using help Click the question mark on the bottom-left corner of the window and click on the topic you want to know about. A pop-up window appears with information about that option's feature, which is provided from the driver.
Printing features Printing from applications There are a lot of Linux applications that allow you to print using Common UNIX Printing System (CUPS). You can print on your machine from any such application. 1 2 3 Open an application, and select Print from the File menu 4 Change the print job properties using the following four tabs displayed at the top of the window. • 5 6 7 • General: Changes the paper size, the paper type, and the orientation of the documents.
Printing features Configuring Printer Properties Using the Printer Properties window provided by the Printers configuration, you can change the various properties for your machine as a printer. 1 4 9 Unix printing Open the Unified Driver Configurator. If necessary, switch to Printers configuration. 2 3 Click OK to apply the changes and close the Printer Properties window. Some features may not be available depending on models or options.
Printing features To take advantage of the printer features provided by your printer driver, press Properties. 5 Press OK to start the print job. Changing the machine settings The UNIX printer driver Print Job Manager in which the user can select various print options in printer Properties. The following hot keys may also be used: “H” for Help, “O” for OK, “A” for Apply, and “C” for Cancel. Automatic/manual duplex printing may not be available depending on models.
Using optional device features • CLP-68xND Series/ CLP-68xDW Series only. 3 Select your printer driver from the Select Printer list. 4 5 6 Click Properties or Preferences . • Some features may not be available depending depending on model or optional goods (see "Variety feature" on page 8). 10 From the printer driver If you install the optional device, you can use advanced printing features, such as proofing a job and printing a private job in the Print window.
Using optional device features Some menus may not appear on the display depending on options or models. If so, it is not applicable to your machine. • Active Job All of the print jobs waiting to be printed are listed in the active job queue in the order you sent them to the printer. You can delete a job from the queue before printing, or promote a job to print sooner. • Secured Job: You can print or delete a secured job. Shows the list of secured jobs the user has set in the printer driver.
5. Useful Management Tools This chapter introduces management tools provided to help you make full use of your machine.
Easy Capture Manager • This feature may not be available depending on model or optional goods (see "Software" on page 7). • Available for Windows OS users only (see "Software" on page 7). Capture your screen and launch Easy Capture Manager by simply pressing the Print Screen key. Now you can easily print your captured screen as captured or edited. 5.
Samsung AnyWeb Print • This feature may not be available depending on model or optional goods (see "Software" on page 7). • Available for Windows and Macintosh OS users only (see "Software" on page 7). This tool helps you screen-capture, preview, scrap, and print Windows Internet Explorer pages more easily, than when you use an ordinary program. Click Start > All programs > Samsung Printers > Samsung AnyWeb Print > Download the latest version to link to the website where the tool is available for download.
Samsung Easy Color Manager Samsung Easy Color Manager helps users do fine adjustments with 6 color tones and other properties, such as brightness, contrast, and saturation. Color tone changes can be saved as a profile and can be used from the driver or from inside of the machine. • This feature may not be available depending on model or optional goods (see "Software" on page 7). • Available for Windows and Macintosh OS users only (see "Software" on page 7).
Easy Eco Driver • This feature may not be available depending on model or optional goods (see "Software" on page 7). • Available for Windows OS users only (see "Software" on page 7). With the Easy Eco Driver, you can apply Eco features to save paper and toner before printing. To use this application, Start Easy Eco Driver before printing job checkbox in the printer properties should be checked. Easy Eco Driver also allows you simple editing such as removing images and texts, changing fonts, and more.
Using SyncThru™ Web Service 1 2 • Internet Explorer 6.0 or higher is the minimum requirement for SyncThru™ Web Service. • SyncThru™ Web Service explanation in this user’s guide may differ from your machine depending on its options or models. • Network model only (see "Software" on page 7). Click Login on the upper right of the SyncThru™ Web Service website. Type in the ID and Password then click Login. Type in the below default ID and password.
Using SyncThru™ Web Service Information tab Security tab This tab gives you general information about your machine. You can check things, such as remaining amount of toner. You can also print reports, such as an error report. This tab allows you to set system and network security information. You need to log-in as an administrator to view this tab. • • Active Alerts: Shows the alerts that have occurred in the machine and their severity.
Using SyncThru™ Web Service 5 3 E-mail notification setup Set the recipient name and e-mail address(es) with notification items you want to receive an alert for. You can receive emails about your machine’s status by setting this option. By setting information such as IP address, host name, e-mail address and SMTP server information, the machine status (toner cartridge shortage or machine error) will be sent to a certain person's e-mail automatically.
4 Enter the name of the administrator, phone number, location, and email address. 5 Click Apply. 5.
Using Samsung Easy Printer Manager Using Samsung Easy Printer Manager • This feature may not be available depending on model or optional goods (see "Software" on page 7). Select Start > Programs or All Programs > Samsung Printers > Samsung Easy Printer Manager > Samsung Easy Printer Manager. For Macintosh, Open the Applications folder > Samsung folder > Samsung Easy Printer Manager.
Using Samsung Easy Printer Manager Printer list The Printer List displays printers installed on your computer and network printers added by network discovery (Windows only). Printer information This area gives you general information about your machine. You can check information, such as the machine’s model name, IP address (or Port name), and machine status. 1 Quick links 4 If you connect your machine to a network, the SyncThru™ Web Service icon is enabled. You can view the online User’s Guide.
Some menus may not appear in the display depending on options or models. If so, it is not applicable to your machine. Device Settings You can configure various machine settings such as machine setup, paper, layout, emulation, network, and print information. Alert Settings (Windows only) This menu includes settings related to error alerting. • Printer Alert: Provides settings related to when alerts will be received. • Email Alert: Provides options relating to receiving alerts via email.
Using Samsung Printer Status Using Samsung Printer Status Icon Mean Description Normal The machine is in ready mode and experiencing no errors or warnings. Warning The machine is in a state where an error might occur in the future. For example, it might be in toner low status, which may lead to toner empty status. Error The machine has at least one error. The Samsung Printer Status is a program that monitors and informs you of the machine status.
2 3 Option You can set printing job alert related settings. Order Supplies You can order replacement toner cartridge(s) from online. User’s Guide You can view the online User’s Guide. This button opens the Troubleshooting Guide when an error occurs. You can directly open the troubleshooting section in the user’s guide. 4 5 Close Close the window. 5.
Using the Linux Unified Driver Configurator The Unified Driver Configurator is a tool primarily intended for configuring machine devices. You need to install Unified Linux Driver to use Unified Driver Configurator (see "Installation for Linux" on page 132). After the driver is installed on your Linux system, the Unified Driver Configurator icon will automatically be created on your desktop. 8 Opening Unified Driver Configurator 1 Double-click the Unified Driver Configurator on the desktop.
Using the Linux Unified Driver Configurator Printers tab To use the on screen help, the Help or 3 button from the window. After changing the configurations, click Exit to close the Unified Driver Configurator. View the current system’s printer configuration by clicking on the machine icon button on the left side of the Unified Driver Configurator window. 9 Printers configuration Printers configuration has the two tabs: Printers and Classes. 1 Switches to Printers configuration.
Using the Linux Unified Driver Configurator The printer control buttons are, as follows: • Refresh: Renews the available machines list. • Add Printer: Allows you to add a new machines. • Remove Printer: Removes the selected machine. • Set as Default: Sets the current selected machine as a default machine. • Stop/Start: Stops/starts the machine. • Test: Allows you to print a test page to ensure the machine is working properly. • Properties: Allows you to view and change the printer’s properties.
Using the Linux Unified Driver Configurator 10 Ports configuration In this window, you can view the list of available ports, check the status of each port and release a port that is stalled in a busy state when its owner has terminated the job for any reason. 1 Switches to Ports configuration. 2 Shows all of the available ports. 3 Shows the port type, device connected to the port, and status. • Refresh: Renews the available ports list. • Release port: Releases the selected port. 5.
6. Troubleshooting This chapter gives helpful information for what to do if you encounter an error. • Paper feeding problems 242 • Power and cable connecting problems 243 • Printing problems 244 • Printing quality problems 248 • Operating system problems 256 For errors that occur during the wireless software installation and settings, refer to the troubleshotting section in the wireless setting chapter (see "Troubleshooting for wireless network" on page 179).
Paper feeding problems Condition Suggested solutions Paper jams during printing. Clear the paper jam. Paper sticks together. • Check the maximum paper capacity of the tray. • Make sure that you are using the correct type of paper. • Remove paper from the tray and flex or fan the paper. • Humid conditions may cause some paper to stick together. Multiple sheets of paper do not feed. Different types of paper may be stacked in the tray. Load paper of only one type, size, and weight.
Power and cable connecting problems Click this link to open an animation about solving power problems. Condition The machine is not receiving power, or the connection cable between the computer and the machine is not connected properly. Suggested solutions • Connect the machine to the electricity supply first. If the machine has a (Power) button on the control, press it. • Disconnect the machine’s cable and reconnect it. 6.
Printing problems Condition The machine does not print. Possible cause The machine is not receiving power. Suggested solutions Connect the machine to the electricity supply first. If the machine has a (Power) button on the control, press it. The machine is not selected as the default machine. Select your machine as your default machine in Windows. Check the machine for the following: • The cover is not closed. Close the cover. • Paper is jammed.
Printing problems Condition The machine does not print. Possible cause Suggested solutions The machine may be configured incorrectly. Check the Printing Preferences to ensure that all of the print settings are correct. The printer driver may be incorrectly installed. Uninstall and reinstall the machine’s driver. The machine is malfunctioning. Check the display message on the control panel to see if the machine is indicating a system error. Contact a service representative.
Printing problems Condition Pages print, but they are blank. Possible cause Suggested solutions The wrong printer driver was selected. Check the application’s printer selection menu to ensure that your machine is selected. The software application is malfunctioning. Try printing a job from another application. The operating system is malfunctioning. Exit Windows and reboot the computer. Turn the machine off and back on again. The toner cartridge is defective or out of toner.
Printing problems Condition Possible cause Suggested solutions The machine does not print special-sized paper, such as billing paper. Paper size and paper size setting do not match. Set the correct paper size in the Custom in Paper tab in Printing Preferences (see "Opening printing preferences" on page 46). The printed billing paper is curled. The paper type setting does not match. Change the printer option and try again.
Printing quality problems If the inside of the machine is dirty or paper has been loaded improperly, there might be a reduction in print quality. See the table below to clear the problem. Condition Light or faded print Suggested solutions • If a vertical white streak or faded area appears on the page, the toner supply is low. Install a new toner cartridge (see "Replacing the toner cartridge" on page 64). • The paper may not meet paper specifications; for example, the paper may be too moist or rough.
Printing quality problems Condition Toner specks A aB bC c A aB bC c A aB bC c A aB bC c A aB bC c Dropouts A aBb C A aBb C A aBb C A aBb C A aBb C Suggested solutions • The paper may not meet specifications; for example, the paper may be too moist or rough. • The transfer roller may be dirty. Clean the inside of your machine (see "Cleaning the machine" on page 75). • The paper path may need cleaning. Contact a service representative (see "Cleaning the machine" on page 75).
Printing quality problems Condition Vertical lines Suggested solutions If black vertical streaks appear on the page: • The surface (drum part) of the toner cartridge inside the machine has probably been scratched. Remove the toner cartridge and install a new one (see "Replacing the toner cartridge" on page 64). If white vertical streaks appear on the page: • The surface of the LSU part inside the machine may be dirty. Clean the inside of your machine (see "Cleaning the machine" on page 75).
Printing quality problems Condition Vertical repetitive defects Suggested solutions If marks repeatedly appear on the printed side of the page at even intervals: • The toner cartridge may be damaged. If you still have the same problem, remove the toner cartridge and, install a new one (see "Replacing the toner cartridge" on page 64). • Parts of the machine may have toner on them. If the defects occur on the back of the page, the problem will likely correct itself after a few more pages.
Printing quality problems Condition Suggested solutions Misformed characters • If characters are improperly formed and producing hollow images, the paper stock may be too slick. Try different paper. Page skew • Ensure that the paper is loaded properly. A aBb A aBb C A aBb C A aBb C A aBb C Cc Curl or wave • Check the paper type and quality. • Ensure that the guides are not too tight or too loose against the paper stack. • Ensure that the paper is loaded properly. • Check the paper type and quality.
Printing quality problems Condition Wrinkles or creases Suggested solutions • Ensure that the paper is loaded properly. • Check the paper type and quality. • Turn the stack of paper over in the tray. Also try rotating the paper 180° in the tray. Back of printouts are dirty • Check for leaking toner. Clean the inside of the machine (see "Cleaning the machine" on page 75). Solid color or black pages • The toner cartridge may not be installed properly. Remove the cartridge and reinsert it.
Printing quality problems Condition Loose toner Suggested solutions • Clean the inside of the machine (see "Cleaning the machine" on page 75). • Check the paper type and quality. • Remove the toner cartridge and then, install a new one (see "Replacing the toner cartridge" on page 64). If the problem persists, the machine may require repair. Contact a service representative.
Printing quality problems Condition Curl Suggested solutions If the printed paper is curled or paper does not feed into the machine: • Turn the stack of paper over in the tray. Also try rotating the paper 180° in the tray. • Change the printer’s paper option and try again. Go to Printing Preferences, click the Paper tab, and set type to Thin (see "Opening printing preferences" on page 46).
Operating system problems 1 Common Windows problems Condition Suggested solutions “File in Use” message appears during installation. Exit all software applications. Remove all software from the startup group, then restart Windows. Reinstall the printer driver. “General Protection Fault”, “Exception OE”, “Spool 32”, or “Illegal Operation” messages appear. Close all other applications, reboot Windows and try printing again. “Fail To Print”, “A printer timeout error occurred” message appear.
Operating system problems 2 Common Macintosh problems Condition The machine does not print PDF files correctly. Some parts of graphics, text, or illustrations are missing. Suggested solutions Printing the PDF file as an image may enable the file to print. Turn on Print As Image from the Acrobat printing options. It will take longer to print when you print a PDF file as an image. Some letters are not displayed normally during cover page printing.
Operating system problems 3 Common Linux problems condition The machine does not print. Suggested solutions • Check if the printer driver is installed in your system. Open Unified Driver Configurator and switch to the Printers tab in Printers configuration window to look at the list of available machines. Make sure that your machine is displayed on the list. If not, open Add new printer wizard to set up your device. • Check if the machine is started.
Operating system problems condition Suggested solutions I encounter error “Cannot open port device file” when printing a document. Avoid changing print job parameters (via LPR GUI, for example) while a print job is in progress. Known versions of CUPS (Common UNIX Printing System) server break the print job whenever print options are changed and then try to restart the job from the beginning.
Operating system problems 4 Common PostScript problems The following situations are PS language specific and may occur when several printer languages are used. Problem The PostScript file cannot be printed Possible cause The PostScript driver may not be installed correctly. Solution • Install the PostScript driver (see "Software Installation" on page 129). • Print a configuration page and verify that the PS version is available for printing. • If the problem persists, contact a service representative.
Contact SAMSUNG worldwide If you have any comments or questions regarding Samsung products, contact the Samsung customer care center. Country/Region CAMEROON Country/Region Customer Care Center Web Site ALBANIA 42 27 5755 www.samsung.com ARGENTINE 0800-333-3733 www.samsung.com ARMENIA 0-800-05-555 www.samsung.com AUSTRALIA 1300 362 603 www.samsung.com AUSTRIA 0810-SAMSUNG (7267864, € 0.07/min) www.samsung.com AZERBAIJAN 088-55-55-555 www.samsung.com BAHRAIN 8000-4726 www.samsung.
Contact SAMSUNG worldwide Country/Region Customer Care Center Web Site EIRE 0818 717100 www.samsung.com EL SALVADOR 800-6225 www.samsung.com ESTONIA 800-7267 www.samsung.com FINLAND 030-6227 515 www.samsung.com FRANCE 01 48 63 00 00 www.samsung.com GERMANY 01805 - SAMSUNG (726-7864 € 0,14/min) www.samsung.com GEORGIA 8-800-555-555 www.samsung.com 0800-10077 www.samsung.com Country/Region Customer Care Center 1800 1100 11 INDIA Web Site www.samsung.
Contact SAMSUNG worldwide Country/Region Customer Care Center Web Site MALAYSIA 1800-88-9999 www.samsung.com MACEDONIA 023 207 777 www.samsung.com MEXICO 01-800-SAMSUNG (726-7864) www.samsung.com MOLDOVA 00-800-500-55-500 www.samsung.com MONGOLIA MONTENEGRO Country/Region 1-800-10-SAMSUNG(726-7864) for PLDT PHILIPPINES 080 100 2255 www.samsung.com NIGERIA 0800-726-7864 www.samsung.com NETHERLANDS 0900-SAMSUNG (0900-7267864) (€ 0,10/min) www.samsung.
Contact SAMSUNG worldwide Country/Region Customer Care Center Web Site SOUTH AFRICA 0860-SAMSUNG (726-7864) www.samsung.com SPAIN 902-1-SAMSUNG(902 172 678) www.samsung.com SWEDEN 0771 726 7864 (SAMSUNG) www.samsung.com www.samsung.com/ch SWITZERLAND 0848-SAMSUNG (7267864, CHF 0.08/min) TADJIKISTAN TAIWAN TANZANIA THAILAND www.samsung.com/ ch_fr(French) 8-10-800-500-55-500 www.samsung.com 0800-329-999 www.samsung.
Glossary ADF The following glossary helps you get familiar with the product by understanding the terminologies commonly used with printing as well as mentioned in this user’s guide. 802.11 802.11 is a set of standards for wireless local area network (WLAN) communication, developed by the IEEE LAN/MAN Standards Committee (IEEE 802). 802.11b/g/n 802.11b/g/n can share same hardware and use the 2.4 GHz band. 802.11b supports bandwidth up to 11 Mbps, 802.11n supports bandwidth up to 150 Mbps. 802.
Glossary BOOTP Coverage Bootstrap Protocol. A network protocol used by a network client to obtain its IP address automatically. This is usually done in the bootstrap process of computers or operating systems running on them. The BOOTP servers assign the IP address from a pool of addresses to each client. BOOTP enables 'diskless workstation' computers to obtain an IP address prior to loading any advanced operating system. It is the printing term used for a toner usage measurement on printing.
Glossary DHCP DPI A Dynamic Host Configuration Protocol (DHCP) is a client-server networking protocol. A DHCP server provides configuration parameters specific to the DHCP client host requesting, generally, information required by the client host to participate on an IP network. DHCP also provides a mechanism for allocation of IP addresses to client hosts. Dots Per Inch (DPI) is a measurement of resolution that is used for scanning and printing.
Glossary ECM EtherTalk Error Correction Mode (ECM) is an optional transmission mode built into Class 1 fax machines or fax modems. It automatically detects and corrects errors in the fax transmission process that are sometimes caused by telephone line noise. A suite of protocols developed by Apple Computer for computer networking. It was included in the original Macintosh (1984) and is now deprecated by Apple in favor of TCP/IP networking.
Glossary Gateway IEEE A connection between computer networks, or between a computer network and a telephone line. It is very popular, as it is a computer or a network that allows access to another computer or network. The Institute of Electrical and Electronics Engineers (IEEE) is an international non-profit, professional organization for the advancement of technology related to electricity.
Glossary IPM ITU-T The Images Per Minute (IPM) is a way of measuring the speed of a printer. An IPM rate indicates the number of single-sided sheets a printer can complete within one minute. The International Telecommunication Union is an international organization established to standardize and regulate international radio and telecommunications.
Glossary LDAP MH The Lightweight Directory Access Protocol (LDAP) is a networking protocol for querying and modifying directory services running over TCP/IP. Modified Huffman (MH) is a compression method for decreasing the amount of data that needs to be transmitted between the fax machines to transfer the image recommended by ITU-T T.4. MH is a codebook-based run-length encoding scheme optimized to efficiently compress white space.
Glossary NetWare OSI A network operating system developed by Novell, Inc. It initially used cooperative multitasking to run various services on a PC, and the network protocols were based on the archetypal Xerox XNS stack. Today NetWare supports TCP/IP as well as IPX/SPX. Open Systems Interconnection (OSI) is a model developed by the International Organization for Standardization (ISO) for communications.
Glossary PostScript Protocol PostScript (PS) is a page description language and programming language used primarily in the electronic and desktop publishing areas. - that is run in an interpreter to generate an image. A convention or standard that controls or enables the connection, communication, and data transfer between two computing endpoints. PS Printer Driver See PostScript. A program used to send commands and transfer data from the computer to the printer.
Glossary SMB TCP/IP Server Message Block (SMB) is a network protocol mainly applied to share files, printers, serial ports, and miscellaneous communications between nodes on a network. It also provides an authenticated Inter-process communication mechanism. The Transmission Control Protocol (TCP) and the Internet Protocol (IP); the set of communications protocols that implement the protocol stack on which the Internet and most commercial networks run.
Glossary TWAIN Watermark An industry standard for scanners and software. By using a TWAIN-compliant scanner with a TWAIN-compliant program, a scan can be initiated from within the program. It is an image capture API for Microsoft Windows and Apple Macintosh operating systems. A watermark is a recognizable image or pattern in paper that appears lighter when viewed by transmitted light.
Glossary WPA-PSK WPA-PSK (WPA Pre-Shared Key) is special mode of WPA for small business or home users. A shared key, or password, is configured in the wireless access point (WAP) and any wireless laptop or desktop devices. WPA-PSK generates a unique key for each session between a wireless client and the associated WAP for more advanced security. WPS The Wi-Fi Protected Setup (WPS) is a standard for establishing a wireless home network.
Index A D J accessories default settings jam installingG 69 orderingG 58 tray settingG direct printing utilityG AirPrintG 184 divice optionsG AnyWeb PrintG 225 driver installation UnixG B 42 215 69 144 clearing paperG 82 tips for avoiding paper jamsG 81 L layoutG 188 Linux backing up dataG 52 buttons E common Linux problemsG eco printingG ecoG 19 entering characterG print screenG 19 error messageG wpsG 19 48 205 96 favorites settings, for printingG cleaning driver
Index special mediaG 37 M informationG 187 n-up printing job managementG 200 MacintoshG 216 optional trayG 58 orderingG 58 menu mapG machine overview menu overviewG front viewG 17 rear viewG 18 257 35 tips on usingG 36 output supportG using special mediaG 37 overlay printing N driver installation for USB cable connectedG 130 network printingG 216 system requirementsG 111 using SetIPG 137 maintenance partsG 59 ManagingG 51 managing USB memoryG 51 memory memory upgra
Index card stockG 41 envelopeG S 38 printing on both sides of paper MacintoshG 217 glossy paperG 42 printing to a fileG 207 labelsG 40 setting as a default machineG 206 special printer featuresG 208 output supportG 105 safety informationG 11 symbolsG 11 Samsung Printer StatusG 235 service contact numbersG 261 preprinted paperG 41 UNIXG 219 setting the paper sizeG 42 using direct printing utilityG 215 setting the paper typeG 42 special mediaG 37 LinuxG 217 Special fea
Index T USB cable driver installationG toner cartridge wireless 21SG22SG130SG132 driver reinstallationG 131SG133 estimated lifeG 61 handling instructionsG 60 non-Samsung and refilledG 60 how to back upG 52 redistributing tonerG 62 how to manageG 51 replacing the cartridgeG 64 USB memory device storingG 60 tray adjusting the width and lengthG 32 changing the tray sizeG 32 loading paper in multi-purpose (or manual 35 feeder) trayG printingG 51 using helpG 47SG217 68 createG 2