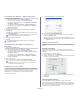
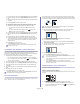
CHANGING THE DEFAULT PRINT SETTINGS 1. Check the Print to file box at the Print window. 1. Click the Windows Start menu. 2. For Windows Server 2000, select Settings > Printers. • For Windows XP/Server 2003, select Printer and Faxes. • For Windows Server 2008/Vista, select Control Panel > Hardware and Sound > Printers. • For Windows 7, select Control Panel > Devices and Printers. • For Windows Server 2008 R2, select Control Panel > Hardware > Devices and Printers. 3. Right-click your machine. 4.
• The setting options may differ depending on models or Macintosh OS versions. • The following pane may differ depending on your operating system or the application you are using. The following pane is the first pane you will see when you open the printer properties pane. Select other advanced features from the drop-down list. • • the settings in the RGB Color option. Screen: This option allows you to select options to convert continuous-tone image into printable binary image.
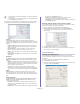
4. Change the print job properties using the following four tabs displayed at the top of the window. • General: This option allows you to change the paper size, the paper type, and the orientation of the documents. It enables the duplex feature, adds start and end banners, and changes the number of pages per sheet. • Text: This option allows you to specify the page margins and set the text options, such as spacing or columns.
copying 8. This chapter gives you step-by-step instructions for copying documents. This chapter includes: • • • • • • Basic copying Changing the settings for each copy Changing the default copy settings Darkness The supported setting options may differ according to your model. Check your model name. If you have an original containing faint marking and dark images, you can adjust the brightness to make a copy that is easier to read. 1. Depending on the model, the operating procedure may differ.
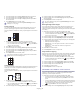
2. Press the left/right arrow until Copy Feature appears and press OK. 3. Press the left/right arrow until Reduce/Enlarge appears and press OK. 4. Press the left/right arrow until the size setting you want appears and press OK. 5. Press Stop/Clear to return to ready mode. The machine prints one side of the original on the upper half of the paper and the other side on the lower half without reducing the size of the original. This feature is helpful for copying a small-sized item such as business card.
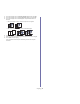
3. Press the left/right arrow until Layout appears and press OK. 4. Press the left/right arrow until Clone Copy appears and press OK to save the selection. 5. Press Stop/Clear to return to ready mode. 2. Press the left/right arrow until Copy Feature appears and press OK. 3. Press the left/right arrow until Layout appears and press OK. 4. Press the left/right arrow until 2-Up or 4-Up appears and press OK to save the selection. 5. Press Stop/Clear to return to ready mode.
3. Press the left/right arrow until Change Default appears and press OK. 4. Press the left/right arrow until Copy Collation appears and press OK. 5. Press the left/right arrow until On appears and press OK to save the selection. • On: Prints output in sets to match the sequence of originals. • Off: Prints output sorted into stacks of individual pages. 6. Press Stop/Clear to return to ready mode. 7. Enter the number of copies using the left/right arrow or numeric keypad. 8. Press Start to begin copying.
scanning 9. Scanning with your machine lets you turn pictures and text into digital files that can be stored on your computer.
For network connected machine (CLX-3185N/CLX-3185FN/CLX-3185FW only) Make sure the printer driver is installed on your computer using the software CD, since the printer driver includes the scan program (See "Installing wired network-connected machine’s driver" on page 46). 1. Make sure that your machine and the computer are connected to a network and Samsung Scan and Fax Manager is installed on the computer. 2.
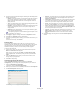
3. Press CHANGING THE DEFAULT SCAN SETTINGS (Scan) on the control panel. 4. Press the left/right arrow until Scan to Email appears on the bottom line of the display and press OK. If you registered login ID (user name) and password on SyncThru™ Web Service, My Log in ID and Password appear. Enter the login ID and password to your machine. Go to step 6. 5. When From appears on the top line of the display, enter the sender’s email address and press OK. 6.
• Searching with a particular first letter Password: sec00000 1. Press Address Book until Search & Send appears on the bottom line of the display and press OK. 2. Press the left/right arrow until the number category you want appears and press OK. 3. Press the left/right arrow until ID appears and press OK. 4. Enter the first few letters of the name you want appears and press OK. 5. Press the left/right arrow until the name you want appears and press OK.
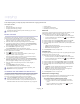
Set Scan Button tab Change Port tab Scan Destination Local Scanner • Select when your machine is connected via USB port. • • • • Available Destination List: Shows the list of applications currently linked to scanned images in the PC’s registry. Select the program you want to use and click the right arrow and add to Front Panel Destination List. Front Panel Destination List: Shows the list of applications to open scanned image.
scanning area will be automatically adjusted to the image size. Preview on program start: If this option is checked, the scanning area will be selected automatically as shown in the preview. - Blank page detection: This operation automatically detects whether the scanned image is blank or not. - Delete page: Blank pages will be deleted at the end of the scanning process. - Separate files: Blank page will work as a scan job separator.
MACINTOSH SCANNING • • You can scan documents using Image Capture program. Mac OS offers Image Capture program. • • Scanning with USB 1. Make sure that the machine is connected to your computer and powered on. 2. Load originals face up into the document feeder, or place a single original face down on the scanner glass. (See "Loading originals" on page 65). 3. Start Applications and click Image Capture.
To save a Job Type setting for the next scan job the device options and start the image acquisition simultaneously. 4. Click Properties. 5. Load originals face up into the document feeder, or place a single original face down on the scanner glass. (See "Loading originals" on page 65). 6. From the Scanner Properties window, click Preview. The document is scanned and the image preview appears in the Preview Pane. 1. Select the setting you want to use from the Job Type drop-down list. 2.
TOOLS NAME FUNCTION Save Saves the image. Undo Cancels your last action. Redo Restores the action you canceled. Scroll Allows you to scroll through the image. Crop Crops the selected image area. Zoom Out Zooms the image out. Zoom In Zooms the image in. Scale Allows you to scale the image size; you can enter the size manually, or set the rate to scale proportionally, vertically, or horizontally.
faxing (clx-3185fn/clx-3185fw only) 10. This chapter gives you information about using your machine as a fax machine. This chapter includes: • • • • • • • • Preparing to fax Using a fax in your computer Sending a fax in your machine Receiving a fax in your machine • • You cannot use this machine as a fax via the internet phone. For more information ask your internet service provider.
In case of Mac OS X 10.3 or 10.4, select PDF and Fax PDF. 3. Select CLX-3180 Series fax-USB from the drop-down list in Printer. 4. Choose the number of copies you want and indicate which pages you want to fax. 5. Choose your paper size, orientation, and scale. 6. Enter the recipients’ fax number into To’s input area. You can also use Addresses pressing button, if you have stored frequently used fax numbers. 7. If necessary, enter the access code in Dialing Prefix input area. 8.
Sending a fax to multiple destinations You can use the Multiple Send feature, which allows you to send a fax to multiple locations. Originals are automatically stored in memory and sent to a remote station. After transmission, the originals are automatically erased from memory. You cannot send a color fax using this feature. 1. Press (Fax) on the control panel. 2. Load originals face up into the document feeder, or place a single original face down on the scanner glass. 3.
6. Press the left/right arrow until Priority Send appears and press OK. 7. Enter the number of the receiving fax machine and press OK. You can press speed dial numbers or select group dial number using Address book button. For details, see "Setting up Address Book" on page 97. 8. Enter the job name you want and press OK. The original is scanned into memory before transmission. 9. If an original is placed on the scanner glass, select Yes to add another pages. Load another original and press OK.
3. Enter the four-digit password and press OK. The machine prints all of the faxes stored in memory. answered as a fax call, and all other ringing patterns will be forwarded to the extension telephone or answering machine plugged into the EXT socket. You can easily suspend or change DRPD at any time. Before using the DRPD option, Distinctive Ring service must be installed on your telephone line by the telephone company.
The resolution setting is applied to the current fax job. To change the default setting, see "Change Default" on page 104. Darkness 10. Enter the ending time using left/right arrow or numeric keypad and press OK. 11. Press Stop/Clear to return to ready mode. Subsequent sent faxes will be forwarded to the specified fax machine. You can select the degree of darkness of the original document. 1. Press Forwarding a sent fax to email address (Fax) on the control panel. 2. 3. 4. 5.
Registering a speed dial number 1. Press (Fax) on the control panel. 2. 3. 4. 5. Press Address Book on the control panel. Press the left/right arrow until New & Edit appears and press OK. Press the left/right arrow until Speed Dial appears and press OK. Enter a speed dial number between 1 and 240 and press OK. If an entry is already stored in the number you choose, the display shows the message to allow you to change it. To start over with another speed dial number, press Back. 6.
4. Press the left/right arrow until the number category you want appears and press OK. 5. Press the left/right arrow until ID appears and press OK. 6. Enter the first few letters of the name you want. 7. Press the left/right arrow until the name and number you want appears. Deleting a Address Book for entry 1. Press (Fax) on the control panel. 2. Press Address Book on the control panel. 3. Press the left/right arrow until Delete appears and press OK. 4.
using usb memory device (clx-3185n/clx-3185fn/clx-3185wk/clx-3185fw only) 11. This chapter explains how to use a USB memory device with your machine.
customized (See “"Customizing Scan to USB" on page 101). Your machine begins scanning the original, and then asks if you want to scan another page. 5. Press OK when Yes appears to scan more pages. Load another original to be scanned and press Color Start or Black Start. Regardless of the button you press, the color mode is decided as customized (See “"Customizing Scan to USB" on page 101). Otherwise, press the left/right arrow to select No and press OK.
For CLX-3185N, Setup Data option is only available. For CLX-3185FN/3185FW, Setup Data and Address Book options are available. 7. Press the left/right arrow until the file containing the data you want to restore appears and press OK. 8. Press OK when Yes appears to restore the backup file to the machine. 9. Press Stop/Clear to return to ready mode. MANAGING USB MEMORY You can delete image files stored on a USB memory device one by one or all at once by reformatting the device.
machine status and advanced feature 12. This chapter explains how to browse the current status of your machine, and the method of setting for the advanced machine setup. Read this chapter carefully in order to use your machine's diverse features. This chapter includes: • • • • • • Fax setup (CLX-3185FN/CLX-3185FW only) Copy setup Printing a report Some menus may not appear on the display depending on options or models. If so, it is not applicable to your machine.
OPTION Auto Reduction Discard Size Junk Fax Setup DRPD Mode DESCRIPTION When receiving a fax containing pages as long as or longer than the paper loaded in the paper tray, the machine can reduce the size of the original to fit the size of the paper loaded in the machine. Turn on this feature if you want to automatically reduce an incoming page. With this feature set to Off, the machine cannot reduce the original to fit onto one page.
5. Press the left/right arrow until the setup option you want appears and press OK. 6. Press the left/right arrow until the setting you want appears and press OK. 7. Repeat steps 4 through 6, as needed. 8. Press Stop/Clear to return to ready mode. Change Default OPTION DESCRIPTION OPTION DESCRIPTION Sent Report This report shows information on the faxes you have recently sent. You can set the machine to automatically print this report every 50 communications (See "Sending" on page 103).
OPTION DESCRIPTION Scan Setup Restores all of the scan options to the factory default. System Setup Restores all of the system options to the factory default. Network Setup Restores all of the network options to the factory default. Address Book Clears all of the fax numbers entries stored in memory. Sent Report Clears all records of sent faxes. Fax RCV Report Clears all records of received faxes.
ITEMS System Setup OPTION Machine Setup Machine ID Machine Fax Nob Date & Timeb Clock Modeb Language Default Mode Power Save Timeout Altitude Adj. Auto Continue Import Setting Export Setting Paper Setup Paper Size Paper Type Sound/Volume Key Sound Alarm Sound Speakerb Ringerb Report All Report Configuration Supplies Info Address Bookb Send Reportb Sent Reportb Fax RCV Reportb Schedule Jobsb Junk Fax Reportb Network Info.
management tools 13. This chapter introduces management tools provided to help you make full use of your machine. This chapter includes: • • • • • Introducing useful management tools Using SyncThru™ Web Service (CLX-3185N/CLX-3185FN/CLX-3185FW only) Supported optional devices and features may differ according to your model. Check your model name. (See "Features by Models" on page 28).
• or exceed specification (See "System requirements" on page 39). Mac OS X 10.3 or higher. Check that your computer’s CPU, RAM and HDD meet or exceed specification (See "System requirements" on page 39). • Linux. Check that your computer’s CPU, RAM and HDD meet or exceed specification (See "System requirements" on page 39). • Internet Explorer version 5.0 or higher for flash animation in HTML Help. If you need to know the exact model name of your machine, you can check the supplied software CD.
User’s Guide You can view the online User’s Guide. This button changes to Troubleshooting Guide when error occurs. You can directly open the troubleshooting sectionGin the user’s guide. 3 Printer Setting You can configure various machine settings in the Printer Settings Utility window. Some machines do not have this feature. 4 If you connect your machine to a network, the SyncThru™ Web Service window appears instead of the Printer Settings Utility window.
Printing Printers tab 1. 2. 3. 4. View the current system’s printer configuration by clicking on the machine icon button on the left side of the Unified Driver Configurator window. Click Print. Select the file you want to print. Select the machine you want to use for printing. Click Print to start the job. USING THE LINUX UNIFIED DRIVER CONFIGURATOR The Unified Driver Configurator is a tool primarily intended for configuring machine devices.
Classes tab • Properties: Allows you to change the scan properties and scan a document. The Classes tab shows a list of available machine classes. Ports configuration In this window, you can view the list of available ports, check the status of each port, and release a port that is stalled in a busy state when its owner has terminated the job for any reason. 1 Shows all of the machine classes. 2 Shows the status of the class and the number of machines in the class.
maintenance 14. This chapter provides information about maintaining your machine and the toner cartridge. This chapter includes: • • • • • • • Printing a machine report Adjusting the color contrast Finding the serial number Cleaning the machine Storing the toner cartridge Maintenance parts Tips for moving & storing your machine PRINTING A MACHINE REPORT CLEANING THE MACHINE You can print the machine's information and job report. 1. Press Menu on the control panel. 2.
6. With a dry and lint-free cloth, wipe away any dust and spilled toner from the toner cartridges area and their cavities. 3. Grasp the handles on the toner cartridge and pull to remove four cartridges from the machine. • 4. Pull the waste toner container out of the machine using the handle. • If toner gets on your clothing, wipe it off with a dry cloth and wash it in cold water. Hot water sets toner into fabric.
9. Slide four toner cartridges back into the machine. 4 3 1 2 1 2 3 4 10. Reinstall all the compartments into the machine and close the front door. If the front door is not completely closed, the machine will not operate. Scanner lid Scanner glass ADF sheet White sheet 4. Wipe the underside of the scanner lid and white sheet until it is clean and dry. 5. Push the ADF sheet with any tool such as tweezers carefully. 11. Plug in the power cord and turn the machine on.
Use of non-Samsung and refilled toner cartridge 7. Push the ADF sheet back into the machine smoothly. Samsung Electronics does not recommend or approve the use of non-Samsung brand toner cartridges in your printer including generic, store brand, refilled or remanufactured toner cartridges. Samsung’s printer warranty does not cover damage to the machine caused by the use of a refilled, remanufactured or non-Samsung brand toner cartridge.
7. Press Stop/Clear to return to ready mode. TIPS FOR MOVING & STORING YOUR MACHINE • • When moving the machine, do not tilt or turn it upside down. Otherwise, the inside of the machine may be contaminated by toner, which can cause damage to the machine or reduce print quality. When moving the machine, make sure at least two people are holding the machine securely.
troubleshooting 15. This chapter gives helpful information for what to do if you encounter an error. This chapter includes: • • • Redistributing toner Tips for avoiding paper jams Clearing original document jams (CLX-3185FN/CLX-3185FW only) REDISTRIBUTING TONER • • • Clearing paper jams Understanding display messages Solving other problems 3. Thoroughly roll the cartridge five or six times to distribute the toner evenly inside the cartridge.
• • • • • • • paper in the tray" on page 68). Do not overload the tray. Ensure that the paper level is below the paper capacity mark on the inside of the tray. Do not remove paper from the tray while your machine is printing. Flex, fan, and straighten paper before loading. Do not use creased, damp, or highly curled paper. Do not mix paper types in a tray. Use only recommended print media (See "Setting the paper size and type" on page 70).
Some messages may not appear on the display depending on options or models. 1. Open the scan unit first and then inner cover. To avoid tearing the paper, pull the jammed paper out slowly and carefully. Follow the instructions in the following sections to clear the jam. 1 In the tray Click this link to open an animation about clearing a jam. 2 1. Open and close the front door. The jammed paper is automatically ejected from the machine. If the paper does not eject, go to the next step. 2.
3. Carefully remove the paper by pulling in the direction as shown below. Most of the jammed paper can be removed in this step. 4. If you see the jammed paper, pull it straight up. Skip to step 10. If you do not see the paper or if there is any resistance when you pull, stop and go to the next step. 5. Pull up the fuser lever. 4. Close the rear door. Printing automatically resumes. In the paper exit area Click this link to open an animation about clearing a jam. 1. Open and close the front door.
UNDERSTANDING DISPLAY MESSAGES 7. Carefully take the jammed paper out of the machine. Messages appear on the control panel display to indicate the machine’s status or errors. Refer to the tables below to understand the messages’ and their meaning, and correct the problem, if necessary. Checking display messages • • • 8. Lower down the scan unit gently and slowly until it completely closed. Make sure that it is securely latched.
MESSAGE MEANING SUGGESTED SOLUTIONS DHCP problem: Auto IP Run The IP address assignment is failed. This happens when Auto IP for DHCP is set in SyncThru Web Service. Change the IP address assignment method to BOOTP or Static. If you do not change this option, the DHCP server continually asks to assign the IP address. DHCP problem Reconfigure BOOTP The IP address assignment is failed. This happens when Auto IP for DHCP is not set SyncThru Web Service.
MESSAGE MEANING SUGGESTED SOLUTIONS Replace new Transfer roller The transfer roller has almost reached its estimated life. Replace the transfer roller with a new one (See "Available maintenance parts" on page 135). Prepare toner ź Small amount of toner is left in the indicated cartridge. The estimated cartridge life of toner is close. Prepare a new cartridge for a replacement. You may temporarily increase the printing quality by redistributing the toner (See "Redistributing toner" on page 118).
MESSAGE MEANING SUGGESTED SOLUTIONS Replace new Fuser unit The fuser unit has almost reached its estimated life. Replace the fuser unit with a new one (See "Available maintenance parts" on page 135). Replace IMG unit ź The imaging unit has almost reached its estimated life. Replace the imaging unit with a new one (See "Replacing the imaging unit" on page 137). Self Diagnostics Please wait The engine in your printer is checking some problems detected. Please wait a few minutes. Toner Supply Err.
CONDITION The machine is not receiving power, or the connection cable between the computer and the machine is not connected properly. CONDITION SUGGESTED SOLUTIONS • Plug in the power cord and press the control panel. (power) on Paper sticks together. SUGGESTED SOLUTIONS • • • • • Multiple sheets of paper do not feed. Different types of paper may be stacked in the tray. Load paper of only one type, size and weight. Paper does not feed into the machine.
Printing problems CONDITION The machine does not print. CONDITION POSSIBLE CAUSE SUGGESTED SOLUTIONS The machine is not receiving power. Check the power cord connections. Check the power switch and the power source. The machine is not selected as the default machine. Select your machine as your default machine in your Windows. Check the machine for the following. • The front door or rear door is not closed. Close the door. • Paper is jammed.
CONDITION POSSIBLE CAUSE SUGGESTED SOLUTIONS The toner cartridge is defective or out of toner. Redistribute the toner, if necessary (See "Redistributing toner" on page 118). If necessary, replace the toner cartridge (See "Replacing the toner cartridge" on page 136). The file may have blank pages. Check the file to ensure that it does not contain blank pages. Some parts such as the controller or the board may be defective. Contact a service representative.
CONDITION White Spots Vertical lines SUGGESTED SOLUTIONS CONDITION If white spots appear on the page: • The paper is too rough and a lot of dirt from a paper falls to the inner devices within the machine, which means the transfer belt may be dirty. Clean the inside of your machine. Contact a service representative. • The paper path may need cleaning. Contact a service representative. If black vertical streaks appear on the page: • The drum inside the toner cartridge has probably been scratched.
CONDITION Wrinkles or creases SUGGESTED SOLUTIONS • • • Back of printouts are dirty Solid Color or Black pages Loose toner • • • • • • Character Voids A Ensure that the paper is loaded properly. Check the paper type and quality (See "Selecting print media" on page 66). Turn the stack of paper over in the tray. Also try rotating the paper 180° in the tray. Check for leaking toner. Clean the inside of the machine (See "Cleaning the inside" on page 113).
CONDITION Image rubs off the copy easily. SUGGESTED SOLUTION • Replace the paper in the tray with paper from a new package. In high humidity areas, do not leave paper in the machine for extended periods of time. • Frequent copy paper jams occur. • Fan the stack of paper, then turn it over in the tray. Replace the paper in the tray with a fresh supply. Check/adjust the paper guides, if necessary. Ensure that the paper is the proper paper weight.
CONDITION The incoming fax has blank spaces or is of poor-quality. SUGGESTED SOLUTIONS • • • • CONDITION The fax machine sending you the fax may be faulty. A noisy phone line can cause line errors. Check your machine by making a copy. A toner cartridge has reached its estimated cartridge life. Replace the toner cartridge (See "Replacing the toner cartridge" on page 136). Some of the words on an incoming fax are stretched. The fax machine sending the fax had a temporary document jam.
Common Linux problems CONDITION The machine does not print. SUGGESTED SOLUTIONS • • • • • The machine does not print whole pages, and output is printed on half the page. CONDITION Check if the printer driver is installed in your system. Open Unified Driver Configurator and switch to the Printers tab in Printers configuration window to look at the list of available machines. Make sure that your machine is displayed on the list. If not, open Add new printer wizard to set up your device.
CONDITION The machine does not scan. SUGGESTED SOLUTIONS • • Ensure a document is loaded into the machine, ensure your machine is connected to the computer. If there is an I/O error while scanning. Refer to the Linux User’s Guide that came with your computer for further information on Linux error messages. Common Macintosh problems CONDITION SUGGESTED SOLUTIONS The machine does not print PDF files correctly. Some parts of graphics, text, or illustrations are missing.
supplies and accessories 16. This chapter provides information about purchasing suppliesS accessories and maintenance parts available for your machine. This chapter includes: • • • • • • • How to purchase Available supplies Available maintenance parts Checking replaceable’s lifespan • Illustrations on this user’s guide may differ from your machine depending on its options or models. Check your model name. • Available accessories may differ from country to country.
CHECKING REPLACEABLE’S LIFESPAN 3. Grasp the handles on the toner cartridge and pull to remove the cartridge from the machine. If you experience frequent paper jams or printing problems, check the number of pages the machine has printed. Replace the corresponding parts, if necessary. 1. Press Menu on the control panel. 2. Press the left/right arrow until System Setup appears and press OK. 3. Press the left/right arrow until Maintenance appears and press OK. 4.
If toner gets on your clothing, wipe it off with a dry cloth and wash it in cold water. Hot water sets toner into fabric. 3. Grasp the handles on the front cartridge and pull to remove four cartridges from the machine. 8. Make sure that the color of the toner cartridge matches the color slot and then grasp the handles on the toner cartridge. Insert the cartridge until it clicks into place. 4. Pull the waste toner container out of the machine using its handle. 9. Close the front door.
7. Holding the groove on the front of the imaging unit, push imaging unit in to the machine. REPLACING THE WASTE TONER CONTAINER When the life span of the waste toner container has expired, the Smart Panel program window appears on the computer, indicating the waste toner container needs to be replaced. Otherwise your machine stops printing. 1. Turn the machine off, then wait a few minutes for the machine to cool. 2. Using the handle, completely open the front door. 8.
6. Insert the new container into position and then push it to make sure that it is firmly seated in place. 7. Close the front door firmly. If the front door is not completely closed, the machine will not operate. Please, make sure all toner cartridges are installed properly. If any toner cartridge is installed improperly, the front door do not close. 8. Turn the machine on.
specifications 17. This chapter covers the machine’s primary specifications. This chapter includes: • • • • Hardware specifications Environmental specifications Electrical specifications Print media specifications The specification values are listed below: specifications are subject to change without notice. See www.samsung.com/printer for possible changes in information. HARDWARE SPECIFICATIONS ITEM Dimensions DESCRIPTION Height • • CLX-3185/CLX-3185N/CLX-3185WK: 308 mm (12.
ITEM Humidity DESCRIPTION Operation 20 to 80% RH Storage (packed) 10 to 90% RH a. Sound Pressure Level, ISO 7779. Configuration tested: machine basic installation, A4 paper, simplex printing. ELECTRICAL SPECIFICATIONS Power requirements are based on the country/region where the device is sold. Do not convert operating voltages. Doing so might damage the device and void the product warranty.
PRINT MEDIA SPECIFICATIONS TYPE SIZE Plain paper Envelope WEIGHTa DIMENSIONS Letter 216 x 279 mm (8.50 x 11.00 inches) Legal 216 x 356 mm (8.50 x 14.00 inches) US Folio 216 x 330 mm (8.50 x 13.00 inches) A4 210 x 297 mm (8.27 x 11.69 inches) Oficio 216 x 343 mm (8.50 x 13.50 inches) JIS B5 182 x 257 mm (7.17 x 10.12 inches) ISO B5 176 x 250 mm (6.93 x 9.84 inches) Executive 184 x 267 mm (7.25 x 10.50 inches) Statement 140 x 216 mm (5.5 x 8.50 inches) A5 148 x 210 mm (5.83 x 8.
contact samsung worldwide If you have any comments or questions regarding Samsung products, contact the Samsung customer care center. COUNTRY/REG ION CUSTOMER CARE CENTER WEB SITE COUNTRY/REG ION CUSTOMER CARE CENTER WEB SITE HONG KONG 3698-4698 www.samsung.com/hk www.samsung.com/hk_e n/ www.samsung.com/at HUNGARY 06-80-SAMSUNG (726-7864) www.samsung.com/hu 810-800-500-55-500 www.samsung.ua www.samsung.com/ua_r u INDIA 3030 8282 1800 110011 1800 3000 8282 www.samsung.
COUNTRY/REG ION CUSTOMER CARE CENTER WEB SITE PORTUGAL 80820-SAMSUNG (726-7864) www.samsung.com/pt PUERTO RICO 1-800-682-3180 www.samsung.com/latin REP. DOMINICA 1-800-751-2676 www.samsung.com/latin EIRE 0818 717 100 www.samsung.com/ie RUSSIA 8-800-555-55-55 www.samsung.ru SINGAPORE 1800-SAMSUNG (726-7864) www.samsung.com/sg SLOVAKIA 0800-SAMSUNG (726-7864) www.samsung.com/sk SOUTH AFRICA 0860 SAMSUNG (726-7864) www.samsung.com/za SPAIN 902-1-SAMSUNG(902 172 678) www.samsung.
glossary The following glossary helps you get familiar with the product by understanding the terminologies commonly used with printing as well as mentioned in this user’s guide. CCD Charge Coupled Device (CCD) is a hardware which enables the scan job. CCD Locking mechanism is also used to hold the CCD module to prevent any damage when you move the machine. 802.11 802.11 is a set of standards for wireless local area network (WLAN) communication, developed by the IEEE LAN/MAN Standards Committee (IEEE 802).
DLNA Ethernet The Digital Living Network Alliance (DLNA) is a standard that allows devices on a home network to share information with each other across the network. DNS Ethernet is a frame-based computer networking technology for local area networks (LANs). It defines wiring and signaling for the physical layer, and frame formats and protocols for the media access control (MAC)/data link layer of the OSI model. Ethernet is mostly standardized as IEEE 802.3.
IEEE 1284 JBIG The 1284 parallel port standard was developed by the Institute of Electrical and Electronics Engineers (IEEE). The term "1284-B" refers to a specific connector type on the end of the parallel cable that attaches to the peripheral (for example, a printer). Joint Bi-level Image Experts Group (JBIG) is an image compression standard with no loss of accuracy or quality, which was designed for compression of binary images, particularly for faxes, but can also be used on other images.
NetWare Print Media A network operating system developed by Novell, Inc. It initially used cooperative multitasking to run various services on a PC, and the network protocols were based on the archetypal Xerox XNS stack. Today NetWare supports TCP/IP as well as IPX/SPX. The media like paper, envelopes, labels, and transparencies which can be used in a printer, a scanner, a fax or, a copier.
Subnet Mask Watermark The subnet mask is used in conjunction with the network address to determine which part of the address is the network address and which part is the host address. A watermark is a recognizable image or pattern in paper that appears lighter when viewed by transmitted light.
index A D address book 34 date and time setting 61 answering machine/fax 95 default settings changing the fax setup 103 delaying a fax transmission 94 forwarding faxes 97 group dial 98 preparing to fax 92 receiving 95 receiving a fax in memory 96 receiving in Ans/Fax mode 95 receiving in Tel mode 95 receiving with an extension telephone 95 redialing the last number 93 sending 93 sending a priority fax 94 setting the fax header 93 speed dial 97 changing the default mode 62 setting a fax header 93 tray
left/right arrow 31, 34 N-up printing Linux common Linux problems 133 driver installation for network connected 48 driver installation for USB cable connected 41 printer properties 78 printing 77 scanning 89 supplied software 39 system requirements 40 unified driver configurator 111 using SetIP 46 loading in the document feeder 65 originals on the scanner glass 65 special media 68 M O on hook dial 34 original document clearing jam 119 loading in the document feeder 65 on the scanner glass 65 output su
serial number 113 create 74 delete 75 edit 74 print 74 service contact numbers 143 SetIP program 45, 46, 57, 58 setting default paper 63 Smart Panel general information 109 specifications general 140 print media 142 start button (black) 31, 34 start button (color) 31, 34 status LED 31, 34 stop/clear button 31, 34 supplies available supplies 135 estimated toner cartridge life 116 ordering 135 WIA scan 88 Wi-Fi Protected Setup™ (WPS) 37 Windows common Windows problems 132 driver installation for networ