Using USB memory device 3 Select the folder or file you want and press OK. After deleting files or reformatting a USB memory device, files cannot be restored. Therefore, confirm that you no longer need the data before deleting it. If you see [+] or [D] in the front of a folder name, there are one or more files or folders in the selected folder. 4 5 Select the number of copies to be printed or enter the number. Press OK, Start or Print to start printing the selected file.
Using USB memory device 4 Press (Stop/Clear) to return to ready mode. Viewing the USB memory status You can check the amount of memory space available for scanning and saving documents. 1 Insert a USB memory device into the USB memory port on your machine, and then press Direct USB. 2 3 4 Select Check Space . The available memory space appears on the display. Press (Stop/Clear) to return to ready mode. 2.
. Maintenance This chapter provides information about purchasing supplies, accessories and maintenance parts available for your machine.
Ordering supplies and accessories Available accessories may differ from country to country. Contact your sales representatives to obtain the list of available supplies, and maintenance parts. To order Samsung-authorized supplies, accessories, and maintenance parts, contact your local Samsung dealer or the retailer where you purchased your machine. You can also visit www.samsung.com/supplies, and then select your country/region to obtain the contact information for service. 3.
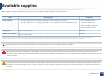
Available supplies When supplies reach the end of their life spans, you can order the followings of supplies for your machine: Average yielda Type Toner cartridge Part name • Average continuous black cartridge yield: Approx. 1,500 standard pages (Black) • K406 (CLT-K406S): Black • Average continuous color cartridge yield: Approx. 1,000 standard pages (Yellow/Magenta/Cyan) • C406 (CLT-C406S): Cyan • M406 (CLT-M406S): Magenta • Y406 (CLT-Y406S): Yellow Imaging unit Approx.
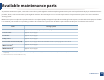
Available maintenance parts To purchase maintenance parts, contact the source where you bought the machine. Replacing maintenance parts can be performed only by an authorized service provider, dealer, or the retailer where you bought the machine. The warranty does not cover the replacement of any maintenance parts once it has reached its “Average yield”. Maintenance parts are replaced at specific intervals to avoid print quality and paper feed problems resulting from worn parts, see table below.
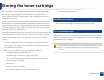
Storing the toner cartridge Toner cartridges contain components that are sensitive to light, temperature and humidity. Samsung suggests users follow these recommendations to ensure optimal performance, highest quality, and longest life from your new Samsung toner cartridge. Store this cartridge in the same environment in which the printer will be used. This should be in controlled temperature and humidity conditions.
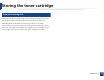
Storing the toner cartridge 3 Estimated cartridge life Estimated cartridge life (the life of the toner cartridge yield) depends on the amount of toner that print jobs require. The actual print yield may vary depending on the print density of the pages you print on, operating environment, percentage of image area, printing interval, media type and/or media size. For example, if you print a lot of graphics, the consumption of the toner is higher and you may need to change the cartridge more often. 3.
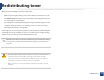
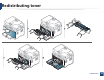
Redistributing toner When the toner cartridge is near the end of its life: • White streaks or light printing occurs and/or density variation side to side. • The Status LED blinks red. The toner-related message saying that the toner is low may appear on the display. • The computers’s Samsung Printing Status program window appears on the computer telling you which color cartridge is low on tonerG(see "Using Samsung Printer Status" on page 269).
Redistributing toner 3.
Replacing the toner cartridge Click this link to open an animation about replacing a toner cartridge. • Shake the toner cartridge thoroughly, it will increase the initial print quality. • Illustrations on this user’s guide may differ from your machine depending on its options or models. Check your machine type (see "Front view" on page 20). • Do not use sharp objects such as a knife or scissors to open the toner cartridge package. They might scratch the drum of the cartridge.
Replacing the toner cartridge 3.
Replacing the waste toner container When the life span of the waste toner container has expired, waste toner container-related message appears on the screen display of the control panel, indicating the waste toner container needs to be replaced. Check the waste toner container for your machine (see "Available supplies" on page 75). For information about installing the waste toner container, refer to the waste toner container installation guide included on the package.
Replacing the waste toner container 3.
Replacing the imaging unit When the life span of the imaging unit has expired, the Printing Status window appears on the computer, indicating the imaging unit needs to be placed. Otherwise, your machine stops printing. • Don’t use sharp objects such as a knife or scissors to open the imaging unit package. You could damage the surface of the imaging unit. • Be careful not to scratch the surface of the imaging unit. • To prevent damage, do not expose the imaging unit to light for more than a few minutes.
Replacing the imaging unit 3.
Monitoring the supplies life If you experience frequent paper jams or printing problems, check the number of pages the machine has printed or scanned. Replace the corresponding parts, if necessary. It may be necessary to press OK to navigate to lower-level menus for some models. 1 2 3 Select (Menu) > System Setup > Maintenance > Supplies Life on the control panel. Select the option you want and press OK. • Total: Displays the total number of pages printed.
Setting the toner low alert If the amount of toner in the cartridge is low, a message or LED informing the user to change the toner cartridge appears. You can set the option for whether or not this message or LED appears. • You can set the machine’s settings by using the Device Settings in 6DPVXQJ (DV\ 3ULQWHU 0DQDJHU program. - For Windows and Macintosh users, you set from Samsung Easy Printer Manager ! Settings" on page 263.
Cleaning the machine If printing quality problems occur or if you use your machine in a dusty environment, you need to clean your machine regularly to keep it in the best printing condition and use your machine longer. • Cleaning the cabinet of the machine with cleaning materials containing large amounts of alcohol, solvents, or other strong substances can discolor or distort the cabinet.
Cleaning the machine 5 Cleaning the inside During the printing process, paper, toner, and dust particles can accumulate inside the machine. This buildup can cause print quality problems, such as toner specks or smearing. Cleaning the inside of the machine clears and reduces these problems. • To prevent damage to the imaging unit, do not expose it to light for more than a few minutes. Cover it with a piece of paper, if necessary. • Do not touch the green area of the imaging unit.
Cleaning the machine 1 2 1 2 3.
Cleaning the machine 6 Cleaning the scan unit Keeping the scan unit clean helps ensure the best possible copies. We suggest that you clean the scan unit at the start of each day and during the day as needed. • Turn the machine off and unplug the power cord. Wait for the machine to cool down. If your machine has a power switch, turn the power switch off before cleaning the machine. • Illustrations on this user’s guide may differ from your machine depending on its options or models.
Cleaning the machine 3 Wipe the surface of the scanner until it is clean and dry. 1 3 2 4 5 1 2 3 4 5 4 White bar Document feeder glass White sheet Scanner lid Scanner glass Close the scanner lid. 3.
Tips for moving & storing your machine • When moving the machine, do not tilt or turn it upside down. Otherwise, the inside of the machine may be contaminated by toner, which can cause damage to the machine or reduce print quality. • When moving the machine, make sure at least two people are holding the machine securely. 3.
4. Troubleshooting This chapter gives helpful information for what to do if you encounter an error. • Tips for avoiding paper jams 96 • Clearing original document jams 97 • Clearing paper jams 102 • Understanding the status LED 106 • Understanding display messages 108 This chapter gives helpful information for what to do if you encounter an error. If your machine has a display screen, check the message on the display screen first to solve the error.
Tips for avoiding paper jams By selecting the correct media s, most paper jams can be avoided. To avoid paper jams, refer to the following guidelines: • Ensure that the adjustable guides are positioned correctly (see "Tray overview" on page 41). • Do not remove paper from the tray while your machine is printing. • Flex, fan, and straighten paper before loading. • Do not use creased, damp, or highly curled paper. • Do not mix papers in a tray.
Clearing original document jams When an original document jams in the document feeder, a warning message appears on the display. To avoid tearing the document, remove the jammed document slowly and carefully. To prevent document jams, use the scanner glass for thick, thin or mixed paper- originals. 4.
Clearing original document jams 1 Original paper jam in front of scanner • Illustrations on this user’s guide may differ from your machine depending on its options or models. Check your machine type (see "Front view" on page 20). • This troubleshooting may not be available depending on model or optional goods (see "Variety feature" on page 9). 4.
Clearing original document jams 2 Original paper jam inside of scanner • Illustrations on this user’s guide may differ from your machine depending on its options or models. Check your machine type (see "Front view" on page 20). • This troubleshooting may not be available depending on model or optional goods (see "Variety feature" on page 9). 4.
Clearing original document jams 4.
Clearing original document jams 3 Original paper jam in exit area of scanner • Illustrations on this user’s guide may differ from your machine depending on its options or models. Check your machine type (see "Front view" on page 20). • This troubleshooting may not be available depending on model or optional goods (see "Front view" on page 20). 1 2 Remove any remaining pages from the document feeder. Gently remove the jammed paper from the document feeder. 4.
Clearing paper jams To avoid tearing the paper, pull the jammed paper out slowly and gently. 4 In tray Click this link to open an animation about clearing a jam. Illustrations on this user’s guide may differ from your machine depending on its options or models. Check your machine type (see "Front view" on page 20). 4.
Clearing paper jams 4.
Clearing paper jams 5 Inside the machine Click this link to open an animation about clearing a jam. • The fuser area is hot. Take care when removing paper from the machine. • Illustrations on this user’s guide may differ from your machine depending on its options or models. Check your machine type (see "Front view" on page 20). 4.
Clearing paper jams If you do not see the paper in this area, stop and go to next step: 4.
Understanding the status LED The color of the LED indicates the machine's current status. • Some LEDs may not be available depending on model or country (see "Control panel overview" on page 23). • To resolve the error, look at the error message and its instructions from the troubleshooting part (see "Understanding display messages" on page 108). • You also can resolve the error with the guideline from the computers’s Samsung Printing Status window (see "Using Samsung Printer Status" on page 269).
Understanding the status LED LED Status Wirelessb Power/Wakeup ( Eco Scan to Blue ) Description Blinking The machine is connecting to a wireless network. On The machine is connected to a wireless networkG(see "Wireless network setup" on page 160). Off The machine is disconnected from a wireless network. On The machine is in power save mode. Off The machine is in ready mode or machine’s power is off. On Eco mode is on. Blue The default setting of Eco mode is 2-up and toner save.
Understanding display messages Messages appear on the control panel display to indicate the machine’s status or errors. Refer to the tables below to understand the messages’ and their meaning, and correct the problem, if necessary. 6 Paper Jam-related messages Message • This function is not supported for the devices which has a control panel display. You can resolve the error with the guideline from the computers’s Printing Status window (see "Using Samsung Printer Status" on page 269). Document jam.
Understanding display messages 7 Message Toner-related messages • Replace toner Message • Install Toner • Install toner cartridge • Not Compatible [color] toner • Not Compatible toner cartridge Not original [color] toner • Prepare toner • Prepare new cartridge Meaning Suggested solutions A toner cartridge is not installed. Install a toner cartridge. The toner cartridge is not suitable for your machine. Install the corresponding toner cartridge with aSamsung-genuine cartridge.
Understanding display messages a. Estimated cartridge life means the expected or estimated toner cartridge life, which indicates the average capacity of print-outs and is designed pursuant to ISO/IEC 19752 (see "Available supplies" on page 75). The number of pages may be affected by operating environment, percentage of image area, printing interval, media, percentage of image area, and media size.
Understanding display messages 8 Message Tray-related messages • BOOTP problem: Auto IP Run Message Jam or empty Door open&close Meaning • Clear the jam (see "In tray" on page 102). • There is no paper in tray. • Load paper in tray (see "Loading paper in the tray" on page 42). • BOOTP problem: Reconfigure DHCP • DHCP problem: Reconfigure DHCP 9 Network-related messages There is a problem with the network. Change the Auto IPU The IP address assignment is failed.
Understanding display messages Message Calibrating Meaning Suggested solutions The machine is calibrating the image density. Wait a few minutes. The cover is not securely latched. Close the cover until it locks into place. Close it The document feeder cover is not securely latched. Close the cover until it locks into place. Door of scanner is open. The cover of scanner is not securely latched. Close the cover until it locks into place.
Understanding display messages Message Replace new Transfer belt Transfer Belt Error Prepare new Transfer roller Replace new Transfer roller Replace Fuser Soon Replace new Fuser unit Meaning Suggested solutions The life of the transfer belt has expired. Replace the transfer belt with a new one. Contact the service representatives. The transfer belt cannot be controlled. Reboot the power and try the printing job again. If the problem persists, please call for service.
5. Appendix This chapter provides product specifications and information concerning applicable regulations.
Specifications 1 General specifications The specification values listed below are subject to change without notice. See www.samsung.com for possible changes in information. Items Dimension Width x Length x Height Description CLX-330x Series 406 x 362 x 293.5 mm (16 x 14.3 x 11.6 inches) CLX-330xW Series CLX-330xFN Series 406 x 362 x 333.5 mm (16 x 14.3 x 13.1 inches) CLX-330xFW Series Weight Machine with consumables CLX-330x Series 14.5 Kg (32 lbs) CLX-330xW Series CLX-330xFN Series 15.
Specifications Items Humidity Power ratingb Power consumption Description Operation 20 to 80% RH Storage (packed) 10 to 90% RH 110 volt models AC 110 - 127 V 220 volt models AC 220 - 240 V Average operating mode Less than 290 W Ready mode Less than 60 W Power save mode • CLX-330x Series: Less than 1.2 W • CLX-330xFN Series: Less than 1.6 W • CLX-330xW/CLX-330xFW Series: Less than 2.1 W Wirelessc Power off mode Less than 0.45 W Module T77H262/SPW-B4319S a. Sound Pressure Level, ISO 7779.
Specifications 2 Print media specifications Print media weight/Capacitya Type Size Dimensions Tray Letter 216 x 279 mm (8.5 x 11 inches) Legal 216 x 356 mm (8.5 x 14 inches) US Folio 216 x 330 mm (8.5 x 13 inches) A4 210 x 297 mm (8.27 x 11.69 inches) Oficio 216 x 343 mm (8.5 x 13.5 inches) JIS B5 182 x 257 mm (7.17 x 10.12 inches) ISO B5 176 x 250 mm (6.93 x 9.84 inches) Executive 184 x 267 mm (7.25 x 10.5 inches) A5 148 x 210 mm (5.83 x 8.27 inches) A6 105 x 148 mm (4.13 x 5.
Specifications Print media weight/Capacitya Type Size Dimensions Tray Refer to the Plain paper section Thin paper Refer to the Plain paper section Cotton Refer to the Plain paper section Pre-printed, Refer to the Plain paper section Recycled Labelsc Card stock Letter, Legal, Oficio, US Folio, A4, JIS B5, ISO B5, Executive, A5 Refer to the Plain paper section Letter, Legal, Oficio, US Folio, A4, JIS B5, ISO B5, Executive, A5, Refer to the Plain paper section • 1 sheet 75 to 90 g/m2 (20 to 24
Specifications Print media weight/Capacitya Type Size Dimensions Tray Refer to the Plain paper section Archive Refer to the Plain paper section 70 to 90 g/m2 (18.6 to 24 lbs bond) Manual feeding in trayb • 1 sheet • 100 sheets Glossy Photo, Letter, A4, Matte Photo Postcard 4x6 Refer to the Plain paper section 111 to 220 g/m2 (30 to 58 lbs bond) 111 to 220 g/m2 (30 to 58 lbs bond) • 1 sheet • 1 sheets Minimum size (custom) 76 x 152 mm (3 x 6 inches) Maximum size (custom) 216 x 356 mm (8.
Specifications 3 System requirements Microsoft® Windows® Requirement (recommended) Operating system CPU RAM free HDD space Windows® 2000 Intel® Pentium® II 400 MHz (Pentium III 933 MHz) 64 MB (128 MB) 600 MB Windows® XP Intel® Pentium® III 933 MHz (Pentium IV 1 GHz) 128 MB (256 MB) 1.5 GB Windows Server® 2003 Intel® Pentium® III 933 MHz (Pentium IV 1 GHz) 128 MB (512 MB) 1.
Specifications • Windows Terminal Services is compatible with your machine. • For Windows 2000, Services Pack 4 or higher is required. Macintosh Requirements (Recommended) Operating system CPU Mac OS X 10.4 Mac OS X 10.5 RAM Free HDD space • Intel® processors • 128 MB for a powerPC based Mac (512 MB) • PowerPC G4/G5 • 512 MB for an Intel-based Mac (1 GB) • Intel® processors 512 MB (1 GB) 1 GB 1 GB • 867 MHz or faster Power PC G4/G5 Mac OS X 10.
Specifications Linux Items Operating system Requirements Redhat® Enterprise Linux WS 4, 5 (32/64 bit) Fedora 5 ~ 13 (32/64 bit) SuSE Linux 10.1 (32 bit) OpenSuSE® 10.2, 10.3, 11.0, 11.1, 11.2 (32/64 bit) Mandriva 2007, 2008, 2009, 2009.1, 2010 (32/64 bit) Ubuntu 6.06, 6.10, 7.04, 7.10, 8.04, 8.10, 9.04, 9.10, 10.04 (32/64 bit) SuSE Linux Enterprise Desktop 10, 11 (32/64 bit) Debian 4.0, 5.0 (32/64 bit) CPU Pentium IV 2.4GHz (Intel Core™2) RAM 512 MB (1 GB) Free HDD space 1 GB (2 GB) 5.
Specifications 4 Network environment Network and wireless models only (see "Features by models" on page 7). You need to set up the network protocols on the machine to use it as your network machine. The following table shows the network environments supported by the machine. Items Network interface Specifications • Ethernet 10/100 Base-TX Wired Lan • 802.
Regulatory information This machine is designed for a normal work environment and certified with several regulatory statements. When using this product, these basic safety precautions should always be followed to reduce risk of fire, electric shock, and injury to persons: 5 Laser safety statement The printer is certified in the U.S.
Regulatory information 6 8 Ozone safety Power saver This product’s ozone emission rate is under 0.1 ppm. Because ozone is heavier than air, keep the product in a place with good ventilation. This printer contains advanced energy conservation technology that reduces power consumption when it is not in active use. When the printer does not receive data for an extended period of time, power consumption is automatically lowered. ENERGY STAR and the ENERGY STAR mark are registered U.S. marks.
Regulatory information 10 11 China only Correct disposal of this product (Waste electrical & electronic equipment) (Applicable in the european union and other european countries with separate collection systems) This marking on the product, accessories or literature indicates that the product and its electronic accessories (e.g. charger, headset, USB cable) should not be disposed of with other household waste at the end of their working life.
Regulatory information (The United States of America only) Dispose unwanted electronics through an approved recycler. To find the nearest recycling location, go to our website: www.samsung.com/recyclingdirect Or call, (877) 278 - 0799 12 Taiwan only 13 This equipment has been tested and found to comply with the limits for a Class B digital device, pursuant to Part 15 of the FCC Rules. These limits are designed to provide reasonable protection against harmful interference in a residential installation.
Regulatory information Canadian radio interference regulations This digital apparatus does not exceed the Class B limits for radio noise emissions from digital apparatus as set out in the interference-causing equipment standard entitled “Digital Apparatus”, ICES-003 of the Industry and Science Canada.
Regulatory information FCC Statement for Wireless LAN use: 16 Germany only While installing and operating this transmitter and antenna combination the radio frequency exposure limit of 1m W/cm2 may be exceeded at distances close to the antenna installed. Therefore, the user must maintain a minimum distance of 20cm from the antenna at all times. This device cannot be colocated with another transmitter and transmitting antenna.
Regulatory information The Ringer Equivalence Number (REN) is an indication of the maximum number of devices allowed to be connected to a telephone interface. The termination of an interface may consist of any combination of devices subject only to the requirement that the sum of the RENs of all the devices not exceed five. / L’indice d’equivalence de la sonnerie (IES) sert a indiquer le nombre maximal de terminaux qui peuvent etre raccordes a une interface telephonique.
Regulatory information The equipment complies with Part 68 of the FCC rules and the requirements adopted by the ACTA. On the rear of this equipment is a label that contains, among other information, a product identifier in the format US:AAAEQ##TXXXX. If requested, this number must be provided to the telephone company. FCC Regulations state that changes or modifications to this equipment not expressly approved by the manufacturer could void the user’s authority to operate this equipment.
Regulatory information The 13 amp plug is the most widely used in the UK and should be suitable. However, some buildings (mainly old ones) do not have normal 13 amp plug sockets. You need to buy a suitable plug adaptor. Do not remove the moulded plug. You must connect the brown wire to the pin which is marked with the letter “L” or colored red. You must have a 13 amp fuse in the plug, adaptor, or at the distribution board. 22 If you cut off the moulded plug, get rid of it straight away.
Regulatory information March 9, 1999: Council Directive 1999/5/EC on radio equipment and telecommunications terminal equipment and the mutual recognition of their conformity. A full declaration, defining the relevant Directives and referenced standards can be obtained from your Samsung Electronics Co., Ltd. representative.
Regulatory information No limitations at this time 23 Israel only The power output of the wireless device or devices that may be embedded in your printer is well below the RF exposure limits as known at this time. Because the wireless devices (which may be embedded into your printer) emit less energy than is allowed in radio frequency safety standards and recommendations, manufacturer believes these devices are safe for use.
Regulatory information In environments where the risk of interference to other devices or services is harmful or perceived as harmful, the option to use a wireless device may be restricted or eliminated. Airports, Hospitals, and Oxygen or flammable gas laden atmospheres are limited examples where use of wireless devices may be restricted or eliminated.
Regulatory information 25 China only 5.
Copyright © 2012 Samsung Electronics Co., Ltd. All rights reserved. This user’s guide is provided for information purposes only. All information included herein is subject to change without notice. Samsung Electronics is not responsible for any direct or indirect damages, arising from or related to use of this user’s guide. • Samsung and the Samsung logo are trademarks of Samsung Electronics Co., Ltd.