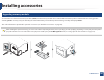
Installing accessories 6 Upgrading a memory module Your machine has a dual in-line memory module (DIMM). Use this memory module slot to install additional memory. We recommend the use of only genuine Samsung DIMM's. You may void your warranty if it is determined that your machine problem is being caused by third party DIMM's. The order information is provided for optional accessories (see "Available accessories" on page 89).
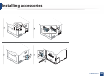
Installing accessories 2 1 2 1 3.
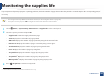
Monitoring the supplies life If you experience frequent paper jams or printing problems, check the number of pages the machine has printed or scanned. Replace the corresponding parts, if necessary. • Accessing menus may differ from model to model (see "Accessing the menu" on page 36). • It may be necessary to press OK to navigate to lower-level menus for some models. 1 2 3 Select (Menu) > System Setup > Maintenance > Supplies Life on the control panel. Select the option you want and press OK.
Setting the toner low alert If the amount of toner in the cartridge is low, a message or LED informing the user to change the toner cartridge appears. You can set the option for whether or not this message or LED appears. • Accessing menus may differ from model to model (see "Accessing the menu" on page 36). • It may be necessary to press OK to navigate to lower-level menus for some models. • You can set the machine’s settings by using the Device Settings in 6DPVXQJ (DV\ 3ULQWHU 0DQDJHU program.
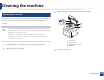
Cleaning the machine If printing quality problems occur or if you use your machine in a dusty environment, you need to clean your machine regularly to keep it in the best printing condition and use your machine longer. • Cleaning the cabinet of the machine with cleaning materials containing large amounts of alcohol, solvents, or other strong substances can discolor or distort the cabinet.
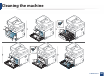
Cleaning the machine 8 Cleaning the inside During the printing process, paper, toner, and dust particles can accumulate inside the machine. This buildup can cause print quality problems, such as toner specks or smearing. Cleaning the inside of the machine clears and reduces these problems. • To prevent damage to the toner cartridge, do not expose it to light for more than a few minutes. Cover it with a piece of paper, if necessary. • Do not touch the green area of the toner cartridge.
Cleaning the machine 3.
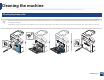
Cleaning the machine 9 Cleaning the pickup roller • Turn the machine off and unplug the power cord. Wait for the machine to cool down. If your machine has a power switch, turn the power switch off before cleaning the machine. • Illustrations on this user’s guide may differ from your machine depending on its options or models. Check your machine type (see "Front view" on page 22). 3.
Cleaning the machine 10 Cleaning the scan unit 3 Keeping the scan unit clean helps ensure the best possible copies. We suggest that you clean the scan unit at the start of each day and during the day as needed. Wipe the surface of the scanner until it is clean and dry. 4 3 1 2 • Turn the machine off and unplug the power cord. Wait for the machine to cool down. If your machine has a power switch, turn the power switch off before cleaning the machine.
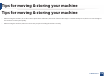
Tips for moving & storing your machine Tips for moving & storing your machine • When moving the machine, do not tilt or turn it upside down. Otherwise, the inside of the machine may be contaminated by toner, which can cause damage to the machine or reduce print quality. • When moving the machine, make sure at least two people are holding the machine securely. 3.
3.
4. Troubleshooting This chapter gives helpful information for what to do if you encounter an error. • Tips for avoiding paper jams 113 • Clearing original document jams 114 • Clearing paper jams 119 • Understanding the status LED 131 • Understanding display messages 133 This chapter gives helpful information for what to do if you encounter an error. If your machine has a display screen, check the message on the display screen first to solve the error.
Tips for avoiding paper jams By selecting the correct media s, most paper jams can be avoided. To avoid paper jams, refer to the following guidelines: • Ensure that the adjustable guides are positioned correctly (see "Tray overview" on page 48). • Do not remove paper from the tray while your machine is printing. • Flex, fan, and straighten paper before loading. • Do not use creased, damp, or highly curled paper. • Do not mix papers in a tray.
Clearing original document jams When an original document jams in the document feeder, a warning message appears on the display. To avoid tearing the document, remove the jammed document slowly and carefully. To prevent document jams, use the scanner glass for thick, thin or mixed paper- originals. 4.
Clearing original document jams 1 Original paper jam in front of scanner • Illustrations on this user’s guide may differ from your machine depending on its options or models. Check your machine type (see "Front view" on page 22). • This troubleshooting may not be available depending on model or optional goods (see "Variety feature" on page 10). 4.
Clearing original document jams 2 Original paper jam inside of scanner • Illustrations on this user’s guide may differ from your machine depending on its options or models. Check your machine type (see "Front view" on page 22). • This troubleshooting may not be available depending on model or optional goods (see "Variety feature" on page 10). 4.
Clearing original document jams 3 Original paper jam in exit area of scanner • Illustrations on this user’s guide may differ from your machine depending on its options or models. Check your machine type (see "Front view" on page 22). • This troubleshooting may not be available depending on model or optional goods (see "Front view" on page 22). 1 2 Remove any remaining pages from the document feeder. Gently remove the jammed paper from the document feeder. 4.
Clearing original document jams 4 Original paper jam in scanner duplex path • CLX-626xFR/CLX-626xFW Series only. • Illustrations on this user’s guide may differ from your machine depending on its options or models. Check your machine type (see "Front view" on page 22). • This troubleshooting may not be available depending on model or optional goods (see "Front view" on page 22). 2 1 4.
Clearing paper jams To avoid tearing the paper, pull the jammed paper out slowly and gently. 5 In tray1 Click this link to open an animation about clearing a jam. Illustrations on this user’s guide may differ from your machine depending on its options or models. Check your machine type (see "Front view" on page 22). 4.
Clearing paper jams 6 In optional tray Click this link to open an animation about clearing a jam. • CLX-626xND/CLX-626xFD/CLX-626xFR/CLX-626xFW Series only. • Illustrations on this user’s guide may differ from your machine depending on its options or models (see "Available accessories" on page 89). 4.
Clearing paper jams If you do not see the paper in this area, stop and go to next step: 4.
Clearing paper jams 7 In the manual feeder/multi-purpose tray CLX-419xN/CLX-419xFN/CLX-419xFW Series Click this link to open an animation about clearing a jam. CLX-626xND/CLX-626xFD/CLX-626xFR/CLX-626xFW Series Click this link to open an animation about clearing a jam. 4.
Clearing paper jams When you print using the multi-purpose tray and the machine detects that there is either no paper or that the paper has been improperly loaded, follow the next steps to release the jammed paper. 4.
Clearing paper jams If you do not see the paper in this area, stop and go to next step: 1 2 3 4.