User’s Guide CLX-419xN/CLX-419xFN Series CLX-419xFW Series CLX-626xND/CLX-626xFD/CLX-626xFR Series CLX-626xFW Series BASIC BASIC This guide provides information concerning installation, basic operation and troubleshooting on windows. ADVANCED This guide provides information about installation, advanced configuration, operation and troubleshooting on various OS environments. Some features may not be available depending on models or countries.
BASIC Using USB memory device 79 1. Introduction Key benefits 5 Features by models 7 Useful to know 14 About this user’s guide 15 Safety information 16 Machine overview 21 Control panel overview 26 Turning on the machine 31 Installing the driver locally 32 Reinstalling the driver 33 2. Menu Overview and Basic Setup Menu overview 36 Machine’s basic settings 45 Media and tray 47 Basic printing 63 Basic copying 70 Basic scanning 74 Basic faxing 75 3.
BASIC Understanding the status LED 131 Understanding display messages 133 5.
1. Introduction This chapter provides information you need to know before using the machine.
Key benefits Environmentally friendly - CLX-626xND/CLX-626xFD/CLX-626xFR/CLX-626xFW Series ƒ For single-side printing, 24 ppm (A4) or 25 ppm (Letter). ƒ For duplex printing, 12 ppm (A4) or 12 ppm (Letter). Convenience • To save toner and paper, this machine supports Eco feature (see "Eco printing" on page 68). • To save paper, you can print multiple pages on one single sheet of paper (see "Using advanced print features" on page 275).
Key benefits • If you have Internet access, you can get help, support application, machine drivers, manuals, and order information from the Samsung website, www.samsung.com > find your product > Support or Downloads. • Using the USB cable or a network cable - You can connect and set various wireless network settings using a USB cable or a network cable.
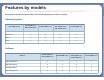
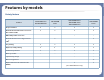
Features by models Some features and optional goods may not be available depending on model or country.
Features by models Software CLX-419xN Series CLX-419xFN Series CLX-419xFW Series CLX-626xND Series CLX-626xFD Series CLX-626xFR Series Ɣ Direct Printing Utility Samsung Easy Printer Manager CLX-626xFW Series Scan to PC settings Ɣ Ɣ Ɣ Ɣ Fax to PC settings Ɣ Ɣ Ɣ Ɣ (CLX-419xFN Series only) (CLX-626xFD/CLX626xFR Series only) Ɣ Ɣ Ɣ Ɣ Samsung Printer Status Ɣ Ɣ Ɣ Ɣ AnyWeb Print Ɣ Ɣ Ɣ Ɣ Samsung Easy Document Creator Ɣ Ɣ Ɣ Ɣ Easy Capture Manager Ɣ Ɣ Ɣ Ɣ Samgung Easy Color
Features by models CLX-419xFW Series CLX-626xND Series CLX-626xFD Series CLX-626xFR Series CLX-626xFW Series Ɣ Ɣ Ɣ Ɣ WIA scan driver Ɣ Ɣ Ɣ Ɣ Samsung Scan Assistant Ɣ Ɣ Ɣ Ɣ CLX-419xN Series CLX-419xFN Series Twain scan driver Software Scan a. For XPS/PS driver, You can install the XPS/PS printer driverGin the Custom Installation window (Refer to Software CD that was provided with your machine).
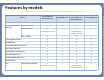
Features by models Variety feature CLX-419xN Series CLX-419xFN Series CLX-419xFW Series CLX-626xND Series CLX-626xFD Series CLX-626xFR Series CLX-626xFW Series Hi-Speed USB 2.0 Ɣ Ɣ Ɣ Ɣ Network Interface Ethernet 10/100/1000 Base TX wired LAN Ɣ Ɣ Ɣ Ɣ ż ż Features IEEE 1284 parallel connectora Ɣ Network Interface 802.
Features by models Features Automatic Document Feeder (ADF) CLX-419xN Series CLX-419xFN Series CLX-419xFW Series CLX-626xND Series CLX-626xFD Series CLX-626xFR Series Ɣ Ɣ Ɣ CLX-626xFW Series (CLX-626xND/ CLX-626xFD Series only) Handset Fax Multi-send Ɣ Ɣ (CLX-419xFN Series only) Delay send Ɣ Ɣ Ɣ (CLX-626xFD/CLX-626xFR Series only) Ɣ (CLX-419xFN Series only) Ɣ Ɣ (CLX-626xFD/CLX-626xFR Series only) Priority send Ɣ Duplex send Ɣ (CLX-626xFR Series only) Secure receive Ɣ Ɣ (CLX-419xF
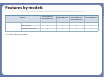
Features by models Features CLX-419xN Series CLX-419xFN Series CLX-419xFW Series Send/ Receive forward - server CLX-626xND Series CLX-626xFD Series CLX-626xFR Series CLX-626xFW Series Ɣ Ɣ (CLX-626xFD/CLX-626xFR Series only) Scan Scanning to email Ɣ Ɣ Ɣ Ɣ Scanning to SMB server Ɣ Ɣ Ɣ Ɣ Scanning to FTP server Ɣ Ɣ Ɣ Ɣ Ɣ Ɣ Duplex scan (CLX-626xFR Series only) Copy Scan to PC Ɣ Ɣ Ɣ Ɣ ID card copying Ɣ Ɣ Ɣ Ɣ Reduced or enlarged copying Ɣ Ɣ Ɣ Ɣ Ɣ Collation Ɣ Poster Cl
Features by models Features CLX-419xN Series CLX-419xFN Series Edge erase CLX-419xFW Series CLX-626xND Series CLX-626xFD Series CLX-626xFR Series CLX-626xFW Series Ɣ Ɣ Ɣ Ɣ Gray enhance Duplex copy a. If you use the parallel port, you cannot use the USB cable. b. Depending on your country, wireless LAN card may not be available. For some counties, only 802.11 b/g can be applied. Contact your local Samsung dealer or the retailer where you bought your machine. c.
Useful to know The machine does not print. A paper jam has occurred. • Open the print queue list and remove the document from the list (see "Canceling a print job" on page 65). • Open and close the door (see "Front view" on page 22). • Remove the driver and install it again (see "Installing the driver locally" on page 32). • Check the instructions on removing jammed paper in this manual and troubleshoot accordingly (see "Clearing paper jams" on page 119).
About this user’s guide This user's guide provides information for your basic understanding of the machine as well as detailed steps to explain machine usage. • Read the safety information before using the machine. • If you have a problem using the machine, refer to the troubleshooting chapter. • Terms used in this user’s guide are explained in the glossary chapter. • All illustrations in this user’s guide may differ from your machine depending on its options or model you purchased.
Safety information These warnings and precautions are included to prevent injury to you and others, and to prevent any potential damage to your machine. Be sure to read and understand all of these instructions before using the machine. After reading this section, keep it in a safe place for future reference. 4 Operating environment Warning 3 Important safety symbols Do not use if the power cord is damaged or if the electrical outlet is not grounded.
Safety information 5 Caution During an electrical storm or for a period of non-operation, remove the power plug from the electrical outlet. Operating method Caution This could result in electric shock or fire. Be careful, the paper output area is hot. Do not forcefully pull the paper out during printing. Burns could occur. It can cause damage to the machine.
Safety information Do not block or push objects into the ventilation opening. Caution This could result in elevated component temperatures which can cause damage or fire. Use of controls or adjustments or performance of procedures other than those specified herein may result in hazardous radiation exposure. This machine's power reception device is the power cord. To switch off the power supply, remove the power cord from the electrical outlet.
Safety information 7 Use the power cord supplied with your machine for safe operation. If you are using a cord which is longer than 2 meters (6 feet) with a 110V machine, then the gauge should be 16 AWG or larger. Otherwise, it can cause damage to the machine, and could result in electric shock or fire. Do not put a cover over the machine or place it in an airtight location, such as a closet. If the machine is not well-ventilated, this could result in fire. Do not overload wall outlets and extension cords.
Safety information Keep the power cable and the contact surface of the plug clean from dust or water. When storing supplies such as toner cartridges, keep them away from children. Otherwise, this could result in electric shock or fire. Toner dust can be dangerous if inhaled or ingested. • Do not remove any covers or guards that are fastened with screws. Using recycled supplies, such as toner, can cause damage to the machine. • Fuser units should only be repaired by a certified service technician.
Machine overview 9 Accessories Power cord Quick installation guide Software CDa Misc. accessoriesb a. The software CD contains the print drivers, user’s guide, and software applications. b. Miscellaneous accessories included with your machine may vary by country of purchase and specific model. 1.
Machine overview 10 1 Front view • This illustration may differ from your machine depending on your model. There are various types of machine. • Some features and optional goods may not be available depending on model or country (see "Features by models" on page 7).
Machine overview CLX-626xFR/CLX-626xFW Series 1 2 3 4 Dual Automatic Document Feeder(DADF) output tray 16 5 Control panel 17 Scanner glass 18 Paper width guides on a multipurpose tray 6 16 15 14 13 4 5 6 7 8 12 23 11 10 9 17 18 22 1 Dual Automatic Document Feeder(DADF) cover 13 2 Dual Automatic Document Feeder(DADF) width guide 14 3 Dual Automatic Document Feeder(DADF) input tray 15 7 Control board cover 19 Multi-purpose support tray 8 Front cover 20 Toner cartridge 9 T
Machine overview 11 Rear view • This illustration may differ from your machine depending on your model. There are various types of machine. • Some features and optional goods may not be available depending on model or country (see "Features by models" on page 7). CLX-419xN/ CLX-419xFN/ CLX-419xFW Series 9 CLX-626xND/CLX-626xFD/CLX-626xFR/CLX-626xFW Series 9 10 10 8 8 7 7 6 5 4 5 1 1 4 3 2 1 3 2 1.
Machine overview 1 Waster toner container 4 Power receptacle 7 USB portb 2 Rear cover 5 Power-switch 8 Network port 6 5V output port for IEEE 1284 parallel 9 3 Rear cover handle connectorab 10 Extension telephone socket (EXT.)c Telephone line socket (LINE)c a. This is an optional feature.GCLX-626xND/CLX-626xFD/CLX-626xFR/CLX-626xFW SeriesGonly. b. The optional IEEE 1284 paraller connector can be used by plugging in both the USB port and the 5V output port. c.
Control panel overview • This control panel may differ from your machine depending on its model. There are various types of control panels. • Some features and optional goods may not be available depending on model or country (see "Features by models" on page 7). • Some buttons may not work depending on the mode (copy, fax, or scan).
Control panel overview 3 Display screen Shows the current status and prompts during an operation. 4 Faxa Switches to Fax mode. 5 Switches to Copy mode. Copya 6 Arrows Scroll through the options available in the selected menu, and increase or decrease values. 7 OK Confirms the selection on the screen. 8 Numeric keypad Dials a number or enters alphanumeric characters (see "Keypad letters and numbers" on page 269).
Control panel overview 15 16 17 Back Menu Scana 18 19 20 21 Sends you back to the upper menu level. Enters Menu mode and scrolls through the available menus (see "Menu overview" on page 36). Switches to Scan mode. Toner colors Show the status of each toner cartridge. If the toner cartridge is low or needs to be replaced, the Status LED turns red and the display shows the message.
Control panel overview 13 Type B(CLX-419xFW/ CLX-626xFW Series) 1 Display screen Shows the current status and displays prompts during an operation. 2 Numeric keypad Dials a number or enters alphanumeric characters (see "Keypad letters and numbers" on page 269). 3 Clear Deletes characters in the edit area. 4 5 Stop/Clear Power Stops an operations at any time. Turns the power on or off, or wakes up the machine from the power save mode.
Control panel overview 6 7 Start Starts a job in black or color mode. On Hook Dial When you press this button, you can hear a dial tone. Then enter a fax number. It is similar to making a call using speaker phone (see "Receiving manually in Tel mode" on page 306). 8 Help Gives detailed information about this machine’s menus or status. 9 Reset Resets the current machine’s setup.
Turning on the machine Illustrations on this user’s guide may differ from your machine depending on its options or models. Check your machine type (see "Front view" on page 22). 1 2 Connect the machine to the electricity supply first. Turn the power switch on. 2 1 1.
Installing the driver locally A locally connected machine is a machine directly attached to your computer using the cable. If your machine is attached to a network, skip the following steps below and go on to installing a network connected machine’s driver (see "Installing driver over the network" on page 183).
Reinstalling the driver If the printer driver does not work properly, follow the steps below to reinstall the driver. 15 Windows 1 Make sure that the machine is connected to your computer and powered on. 2 From the Start menu, select Programs or All Programs > Samsung Printers > your printer driver name > Uninstall. 3 4 Follow the instructions in the installation window. Insert the software CD into your CD-ROM drive and install the driver again (see "Installing the driver locally" on page 32). 1.
Reinstalling the driver 1.
2. Menu Overview and Basic Setup This chapter provides information about the overall menu structure and the basic setup options.
Menu overview The control panel provides access to various menus to set up the machine or use the machine’s functions. • An checked (√) appears next to the currently selected menu. • Some menus may not appear on the display depending on options or models. If so, it is not applicable to your machine. • Some menu names may differ from your machine depending on its options or the models. • The menus are described in the Advanced Guide (see "Useful Setting Menus" on page 232).
Menu overview Fax Featurea Darkness Light+5- Light+1 Normal Dark+1- Dark+5 Original Type Send Forward Fax Setupa Sending Forward to Faxc Redial Times Forward to Emailc Redial Term Prefix Dial Forward to Serverc ECM Mode Receive Forward Forward to Faxc Fax Confirmation Forward to PC Image TCR Forward to Emailc Dial Moded Standard Forward to Serverc Toll Save Fine Forward & Print Text Text/Photo Photo Resolution Super Fine Receiving Secure Receive Copy Feature Discard Size Original Si
Menu overview e. CLX-419xFN Series only.
Menu overview System Setup Machine Setup Network TCP/IP (IPv4) Stampb Supplies Info. Auto Tone Adj. Machine ID Import Setting Demo Page Manual Tone Adj. DHCP Net. Activate Fax Numbera Export Setting Address Book Standard tone BOOTP Http Activate Date & Time Eco Settings Fax Send Confirmationa Cal.
Menu overview a. b. c. d. e. f. CLX-419xFN/ CLX-626xFD/ CLX-626xFR Series only. CLX-626xND/ CLX-626xFD/ CLX-626xFR Series only. This option only appears if “Auto Continue > 0 sec “ is enabled. This is an optional feature.CLX-626xND/ CLX-626xFD/ CLX-626xFR Series only. CLX-419xN/ CLX-419xFN Series only. This option only appears when small amount of toner is left in the cartridge. Introducing the Home Screen 2 CLX-419xFW/ CLX-626xFW Series You can set menus easily using the touch screen.
Menu overview • (Setup): You can browse current machine settings or change machine values. • (Job Status): Job status shows the jobs currently running, completed job or in queue. • • • (Eco): You can view the eco settings. (Direct USB): Enters the USB menu when USB memory is inserted into the USB memory port on your machine. (Document Box): You can store the printing data, print the secure page or shared folder. • : Shows the toner statusU • : Selects the LCD brightness, language, and diagnostic.
Menu overview Copy Basic Copy Fax Layout Color Mode Darkness Adjust Background Original Size To To To Original Type Edge Erasea Original Type Darkness Darkness Darkness Resolution Resolution Resolution Duplexa Duplexa Duplexa Duplexa Darkness Original Type Original Type Original Type Color Mode Original Size Original Size Original Size Original Size Color Mode Text Text/Photo Photo Magazine Color Mode Auto Color Mono Custom Copy Duplexa Reduce/Enlarge Darkness Color Mode Ori
Menu overview Scan Scan to Local PC Scan to Email Eco Duplexa Original Type Scan to Shared Foldera Eco-On Destination To Darkness Original Size Original Size On Resolution Original Type File Name Resolution Resolution Off Color Mode Original Size Color Mode Color Mode On-Forced File Format Resolution File Format File Name PDF Encryptiona Color Mode Original Type PDF Encryptiona File Format Default Mode Duplexa File Format Original Size Duplexa PDF Encryptiona Feature C
Menu overview Direct USB Print From File Navigation Setup Machine Setup Print Fax Setup SNMP V1/V2 WLAN Defaults Send Forward SNTP WLAN Signal Receive Forward UPNP Default Setting Reset Auto Fit Copy Default Reports Copies Scan Default Cofiguration Toll Save MDNS Duplexa Fax Default Supplies Information Secure Receive SetIP Orientation Demo Page Prefix Dial SLP Copies Tray1 Help List Stmp Rcvd Name Wireless Resolution Tray2b Address Book ECM Mode Wi-Fi ON/OFF Clear Te
Menu overview Setup Initial Setup Toner Status Alert Machine ID Skip Blank Pages Select Country Job Timeout Language Altitude Adjustment Date&Time Job Status Admin Setup Copy Document Boxa System Boxes Show Job List Stored Print Off Detail Infor Secured Print Job Cancel Auto CR Network Authentication Manaul Fax Tx Box list navigation Clock Mode Firmware Version Local Authentication Memory Fax Tx Search/Sort Default Mode PDF Type Network Accounting Fax Reserved Job Duplex Soun
Machine’s basic settings You can set the machine’s settings by using the Device Settings in 6DPVXQJ (DV\ 3ULQWHU 0DQDJHU program. • For Windows and Macintosh users, see "Device Settings" on page 329. - For Windows and Macintosh users, you set from Samsung Easy Printer Manager ! 3 Select the option you want, then press OK. • Language: change the language that is displayed on the control panel. • Date & Time: When you set the time and date, they are used in delay fax and delay print.
Machine’s basic settings • When you press the power button, start printing, or a fax is received, the product will wake up from the power saving mode. • Press (Menu) > System Setup > MachineGSetupG>GWakeup EventG >GButton Press >GOn on the control panel. When you press any button except power button, the machine wake up from the power save mode.
Media and tray This chapter provides information on how to load print media into your machine. • Using print media that does not meet these specifications may cause problems or require repairs. Such repairs are not covered by Samsung’s warranty or service agreements. • Make sure not to use the inkjet photo paper with this machine. It could cause damage to the machine. • Using inflammable print media can cause a fire. • Use designated print mediaG(see "Print media specifications" on page 143).
Media and tray 4 For Legal-sized paper Loading paper in the tray Push button as shown and pull out the tray. Illustrations on this user’s guide may differ from your machine depending on its options or models. Check your machine type (see "Front view" on page 22). Tray 1 / optional tray 1 Pull out the paper tray. LGL Illustrations on this user’s guide may differ from your machine depending on its options or models. Check your machine type (see "Tray overview" on page 48).
Media and tray 2 Hold the tray with one hand, and with the other hand squeeze and slide the paper length guide to locate them in the correct paper size slot marked at the bottom of the tray (see "Tray overview" on page 48)U 4 After inserting paper into the tray, squeeze the paper width guides and paper length guide.
Media and tray • Do not push the paper width guide too far causing the media to warp. 5 Insert the tray back into the machine. 6 When you print a document, set the paper type and size for tray (see "Setting the paper size and type" on page 58). • If you do not adjust the paper width guide, it may cause paper jams. • Do not use a paper with a leading-edge curl, it may cause a paper jam or the paper can be wrinkled. The settings set from the machine driver override the settings on the control panel.
Media and tray Multi-purpose (or Manual feeder ) tray 1 Hold the handle of multi-purpose tray and pull it down to open. OR The multi-purpose (or manual feeder) tray can hold special sizes and types of print material, such as postcards, note cards, and envelopes (see "Print media specifications" on page 143). Pull out the paper tray for manual feeding. If you want to print from the manual feeder for CLX-419xN/ CLX-419xFN/ CLX-419xFW Series, there should be paper in the tray1.
Media and tray 2 3 Load the paper. Squeeze the multi-purpose (or manual feeder) tray paper width guides and adjust them to the width of the paper. Do not force them too much, or the paper will bent resulting in a paper jam or skew.
Media and tray 4 When you print a document, set the paper type and size for the multipurpose tray. For example, if you want to print on labels, select Labels for Paper Type. For information about setting the paper type and size on the control panel (see "Setting the paper size and type" on page 58). • When using special media, we recommend you feed one sheet at a time (see "Print media specifications" on page 143).
Media and tray Types Tray 1 a Optional tray Manual feeder/ Multipurpose tray Envelope Ɣ Ɣ Preprinted Ɣ Ɣ Cotton Ɣ Ɣ Recycled Ɣ Ɣ Ɣ Archive Ɣ Ɣ Ɣ Letterhead Ɣ Ɣ Ɣ Punched Ɣ Ɣ Ɣ Glossy Photo Ɣ Ɣ To print an envelope, place it as shown in the following figure. Ɣ • CLX-419xN/ CLX-419xFN Series CLX-626xND/ CLX-626xFD Series CLX-419xFW Series CLX-626xFR/ CLX-626xFW Series When selecting envelopes, consider the following factors: a.