Hints & Shortcuts Press GUIDE to see the DIRECTV Advanced Program Guide™, then press INFO (while the guide is visible) to see Guide Options and change the day or time, or show only a category of programs. INSTANT REPLAY replays the last 8 seconds of a program. EXIT clears all menus and goes to the last channel or recorded program you were watching. If you press it while you are watching a program, it clears things that aren't part of the program (like the channel banner and status bar).
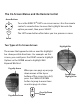
The On-Screen Menus and the Remote Control Arrow Buttons To use the DIRECTV® DVR's on-screen menus: Use the remote control’s arrow buttons to move the highlight bar onto the option you want, then press SELECT. S ele ct The LEFT arrow button often takes you to a previous screen. Select Two Types of On-Screen Arrows Highlight Bar The arrows that appear beside or near the highlight bar show possible directions.
Welcome to DIRECTV
SDOC-00072-501 Rev. A AH68-01335A SAMSUNG ELECTRONICS AMERICA, INC. HEADQUARTERS 105 Challenger Road, Ridgefield Park, NJ 07660-0511 TEL : 1-800-SAMSUNG SERVICE DIVISION 400 Valley Road, Suite 201, Mount Arlington, NJ 07856 1-800-SAMSUNG(1-800-726-7864) www.SAMSUNGUSA.com DIRECTV and the Cyclone Design logo, DIRECTV SPORTS THIS WEEK, and Advanced Program Guide are trademarks of DIRECTV, Inc., a unit of Hughes Electronics Corp., and are used with permission. All rights reserved.
Welcome to the DIRECTV family! DIRECTV offers you more Hollywood hits, classic movies, family programming, news, and a wide range of exciting sports action. Plus access to 36 commercial-free audio channels. And that’s only the beginning. More Choices than ever before. With access to over 225 channels, it’s easy to see why DIRECTV has become the entertainment choice for millions of American families.
Table of Contents Using this Guide . . . . . . . . . . . . . . . . . . . . . . . . . . . . . . . . . . . . . . . . . . . . . . . . . . . . . . . . . . . . . . . . . . . . . . . . . . . . . vii Chapter 1: Connecting . . . . . . . . . . . . . . . . . . . . . . . . . . . . . . . . . . . . . . . . . . . . . . . . . . . . . . . . . . . . . . . . . . . .1 Overview . . . . . . . . . . . . . . . . . . . . . . . . . . . . . . . . . . . . . . . . . . . . . . . . . . . . . . . . . . . . . . . . . . . . . . . . . . .
Channel Banner . . . . . . . . . . . . . . . . . . . . . . . . . . . . . . . . . . . . . . . . . . . . . . . . . . . . . . . . . . . . . . . . . . . . . . . . . . . . . 51 Play with Live TV . . . . . . . . . . . . . . . . . . . . . . . . . . . . . . . . . . . . . . . . . . . . . . . . . . . . . . . . . . . . . . . . . . . . . . . . . . . 52 Status Bar . . . . . . . . . . . . . . . . . . . . . . . . . . . . . . . . . . . . . . . . . . . . . . . . . . . . . . . . . . . . . . . . . . . . . . . . . . . . . . .
Chapter 8: Troubleshooting . . . . . . . . . . . . . . . . . . . . . . . . . . . . . . . . . . . . . . . . . . . . . . . . . . . . . . . . . . . . .117 Contacting Customer Care . . . . . . . . . . . . . . . . . . . . . . . . . . . . . . . . . . . . . . . . . . . . . . . . . . . . . . . . . . . . . . . . . . . . 118 Questions About Installation . . . . . . . . . . . . . . . . . . . . . . . . . . . . . . . . . . . . . . . . . . . . . . . . . . . . . . . . . . . . . . . . . .
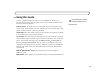
Using this Guide This User’s Guide describes how to connect your new DIRECTV® DVR to your television and other audio/video equipment. It also provides valuable information about the features and use of the DVR. Throughout this guide, you will see important and helpful notes and tips in this format. Glossary of Icons. The inside front cover of this guide provides an introduction to the remote control.
The TiVo Logo. As you use your DIRECTV DVR, you’ll see the TiVo logo in places like the Now Playing List and TiVo Suggestions. Your new DVR incorporates the latest DVR (Digital Video Recorder) technology from TiVo. This means you have access to exclusive TiVo features such as WishList™ searches, Season Pass™ recordings, Thumbs Up™ and Thumbs Down™, TiVo Suggestions, and TiVolution Magazine®, all in one seamlessly integrated product that will change the way you watch television.
CHAPTER 1 Connecting Overview 2 Before You Begin 3 Useful Terms 5 Cables and Accessories 9 Setup Examples 10
C h a p t e r 1 C o n n e c t i n g Jacks are places where cables can be connected. Overview TV used to be simple: no color, no digital video, no stereo sound, no digital audio, no choices. All you needed was an antenna and a TV. The antenna captured pictures and sounds. A wire connected the antenna to the TV to transfer pictures and sounds. OUT IN Always connect cables from the OUT jack of one device to the IN jack of the next. Never connect an IN to an IN or an OUT to an OUT.
B e f o r e Y o u B e g i n Before You Begin Make sure that all of your equipment is turned off and the DIRECTV DVR is unplugged. Connecting to a Phone Line You will need access to a standard analog phone jack. Your DVR needs to be connected to a phone line to communicate with DIRECTV. The DVR occasionally makes a brief phone call to get updates to the DVR service and Showcases, and for pay per view functionality.
C h a p t e r 1 C o n n e c t i n g If you currently own a Dual LNB satellite dish antenna that is already connected to two TVs, you can purchase a multiswitch (described on page 6) that will allow you to connect two cables to your new DVR as well as one to an existing receiver for your second TV. For information on how to switch between watching antenna or cable channels and watching DIRECTV channels, see the connection example in Chapter 2 that is most appropriate to your configuration.
U s e f ul T e r m s Useful Terms 1 If you’re not an audio/video wizard, you may find yourself stumbling over some of the names, features and functions of various pieces of equipment. Here’s a quick reference to help you understand some of the terms you may encounter during installation. Satellite Dish Antennas—Types and Terms Single LNB and Dual LNB Satellite Dish Antennas: Single LNB and Dual LNB refer to the number of independent signals a dish can send to your audio/video equipment.
C h a p t e r 1 C o n n e c t i n g Dual Tuner: A tuner picks one channel out of all of your available channels. This allows you to view a single channel and to change channels. “Dual tuner” means your DIRECTV DVR has two tuners. It can pick out two channels at once, allowing you to record programs on two channels at the same time. Multiswitch: A multiswitch lets you use the signal from one satellite dish antenna for more than two TVs.
U s e f ul T e r m s Coaxial RF Cable: A coaxial RF cable transfers both audio and video on a single cable. 1 Optical (or Digital) Audio Cable: An optical (or digital) audio cable transfers audio only. This cable transfers audio at the highest possible quality from your DIRECTV DVR to an A/V receiver. If you have a home theater, own an A/V receiver capable of receiving Dolby Digital audio, and wish to use Dolby Digital audio, then you must use this cable.
C h a p t e r 1 C o n n e c t i n g between viewing DIRECTV channels, viewing video from your DVD player, or running your game system by changing the input source. Dolby Digital Audio: Dolby® Digital audio is recorded on six separate channels, each of which can be heard on one of six separate speakers. To use Dolby® Digital audio, you must use an optical audio cable to connect your DIRECTV DVR to an A/V receiver capable of supporting Dolby® Digital audio.
C a b l e s a n d A c ce ss o r ie s Cables and Accessories 1 In addition to your television and the equipment that shipped with this DIRECTV DVR (shown below), you’ll need a satellite dish antenna—which should be properly mounted before you connect the DVR—and a standard, analog phone line (see page 3 for details). 1. These are the basics: 2. See page 10 to choose audio/video cables. The carton contains one of each of the following: LIV E 3.
C h a p t e r 1 C o n n e c t i n g Setup Examples Audio and Video Cables If your TV has only one audio connector, connect just the white and yellow ends of the Composite A/V cable (don’t connect the red end). Composite. Many TVs and VCRs have connectors for Composite A/V cables. If your equipment has them, you can use the Composite A/V cables for both audio and video. Composite Video and L/R Audio Cables Connect to Composite Video and L/R Audio Jacks (red) (white) (yellow) RF Coaxial.
S e t u p E x a m p l e s Digital Audio. The receiver includes a Digital Audio Out jack for compatibility with Dolby Digital audio. To use this feature, you will need an optical audio cable (not supplied), and a device that accepts Dolby Digital input. The optical audio cable will carry the audio signal. To complete the setup, you'll also need a connection for the video signal. You can use an S-Video cable to make the connection (for the best video signal), or the yellow ends of a composite cable.
C h a p t e r 1 C o n n e c t i n g Example 1: VCR, DVD and/or Game System, and Switch Box or A/V Receiver Television RF In IN Audio R Audio L Video Switch Box or A/V Receiver VCR Audio R INPUT OUTPUT Audio R L DVD Player or Game System Video Audio R Video L Audio R Video R L Audio R IN L DIRECTV DVR L Video Ch 3/4 RF Out Ch 3/4 RF Out RF In AC~In 12 L Video OUT Video OUT Audio Note: Audio/Video cables shown are examples only.
S e t up E x a m p l e s Example 1: VCR, DVD and/or Game System, and Switch Box or A/V Receiver 1 Connect the coaxial RF cables from your satellite dish antenna to the DIRECTV DVR. Connect one coaxial RF cable that comes from your satellite dish antenna to the jack labeled “Satellite In 1” on the DVR. If you have a second coaxial RF cable from your satellite dish antenna, connect it to the jack labeled “Satellite In 2.” 2 Connect the DVR’s output to the switch box or A/V receiver’s input.
C h a p t e r 1 C o n n e c t i n g Example 2: DVR with VCR To switch between watching your VCR and watching video from your Television DVR, you will need to use the “Input,” “Source,” or “TV/Video” button on your TV or TV’s remote control to change the video source. Some TVs also have a Antenna In INPUT “Menu” button that allows you to change R L VIDEO S-VIDEO the video source using an on-screen menu.
S e t up E x a m p l e s Example 2: DVR with VCR 1 1 Connect the coaxial RF cables from your satellite dish antenna to the DIRECTV DVR. Connect one coaxial RF cable that comes from your satellite dish antenna to the jack labeled “Satellite In 1” on the DVR. If you have a second coaxial RF cable from your satellite dish antenna, connect it to the jack labeled “Satellite In 2.” 2 Connect the DVR to your TV. Look at the back of your TV and see what types of jacks are available.
C h a p t e r 1 C o n n e c t i n g Example 3: DVR Only Television Antenna In INPUT R L VIDEO S-VIDEO DIRECTV DVR AC~In 16 Note: Audio/Video cables shown are examples only. Use the best connections available on your equipment.
S e t up E x a m p l e s Example 3: DVR Only 1 1 Connect the coaxial RF cables from your satellite dish antenna to the DIRECTV DVR. Connect one coaxial RF cable that comes from your satellite dish antenna to the jack labeled “Satellite In 1” on the DVR. If you have a second coaxial RF cable from your satellite dish antenna, connect it to the jack labeled “Satellite In 2.” 2 Connect the DVR to your TV. Look at the back of your TV and see what types of jacks are available.
C h a p t e r 1 C o n n e c t i n g To switch between watching DIRECTV channels and antenna/ cable channels, or tapes on your VCR, use Example 4: DVR, VCR, Antenna or Cable, and Multiple Input TV Television the “Input,” “Source,” or “TV/Video” button on your TV’s remote to change the video source. Some TVs have a “Menu” Antenna In INPUT button and an on-screen menu that lets you change the video source.
S e t up E x a m p l e s Example 4: DVR, VCR, Antenna or Cable, and Multiple Input TV “Multiple input” means the TV has If your TV has both coaxial RF and composite video inputs, follow this connection example to connect your antenna or cable to your TV. You will NOT be able to use DIRECTV DVR functions while watching antenna or cable channels, even if you connect your antenna or cable directly to your DVR. multiple input plugs for A/V connectors.
C h a p t e r 1 C o n n e c t i n g To switch between watching DIRECTV channels and watching Example 5: DVR with VCR, Antenna or Cable, and Single Input TV antenna/cable channels, or watching Television tapes on your VCR, use the “Input,” “Source,” or “TV/Video” button on your TV’s remote control to change the video RF In source. Some TVs have a “Menu” button that allows you to change the video source with an on-screen menu.
S e t up E x a m p l e s Example 5: DVR with VCR, Antenna or Cable, and Single Input TV If you have a DVD player or game If your TV has composite video inputs, use the example on page 18. You will NOT be able to use DIRECTV Receiver functions while watching antenna or cable channels. system in addition to your TV, VCR 1 and DIRECTV DVR, you may need to use a 1 Connect the coaxial RF cables from your satellite dish antenna to the DVR.
C h a p t e r 22 1 C o n n e c t i n g
CHAPTER 2 Guided Setup Overview 24 Satellite Dish Guided Setup 25 Activate 29 Phone Setup 30
C h a p t e r 2 Satellite Dish Guided Setup is used to test signal strength, position the satellite dish antenna and configure the DVR for use with a multiswitch or new multi-satellite dish antenna. If you have connected your G u i d e d S e t u p Overview Now that you have finished connecting your DIRECTV DVR, you are ready to begin Guided Setup. When you first plug in the DVR, screens appear which display its progress as it starts up.
S a t e l l i t e D i s h G u i d e d S e t u p Satellite Dish Guided Setup Satellite Dish Guided Setup tells the DIRECTV DVR what type of satellite dish antenna you are using, so you must go through it at least once, even if you are only replacing a DVR that was already working. Satellite Dish Guided Setup usually takes about five minutes, plus whatever time you may need to position your dish. Notice the progress bar at the 2 bottom of the screen.
C h a p t e r 2 G u i d e d S e t u p Satellite Connections. If you connected an RF coaxial cable to each of the DIRECTV DVR “Satellite In” jacks, select “Two cables.” If you connected only one RF coaxial cable (to the “Satellite In 1” jack), select “One cable.” To be able to record two programs at the same time, you must connect an RF coaxial cable from the satellite dish antenna (or a multiswitch) to both of the “Satellite In” jacks and then choose “Two cables” on this screen. ZIP Code.
S a t e l l i t e D i s h G u i d e d S e t u p Note: You can check signal strength while you adjust the position of your satellite dish antenna. The signal strength meter on this screen provides audio feedback—a tone that becomes higher pitched as the signal gets stronger. You may be able to turn the volume on your TV up so you can hear the tone while you adjust your satellite dish antenna.
C h a p t e r 2 G u i d e d S e t u p Program Guide Data. Over the first 1 to 2 days, the DIRECTV DVR will gather and process up to two weeks of program data from the DIRECTV satellites. Program data includes program titles, times, channels, program descriptions, and more. Many of the DVR’s features use program data. Although you may be able to use such features immediately, you may not be able to find all the programs you are looking for right away.
Act i vate Activate Now it’s time to activate services for your DIRECTV DVR. Before you make the phone call: • The DVR should be on, tuned to channel 100, and receiving a signal from the satellite dish antenna. (Channel 100 shows preview programming from DIRECTV.) • You will need: a valid service address, social security number, and a major credit card (deposit or prepayment may be required).