C h a p t e r 5 F in d i n g a n d R e c o r d i n g P r o g r a m s When there is empty space in the Now Playing List, the DVR service may record TiVo Suggestions for you. Suggestions are marked in the Now Playing List with a TiVo icon ( ). The DVR never deletes a program you requested to make room for a suggestion. Instead, suggestions are deleted to make room for recordings you schedule. A preference that prevents TiVo Suggestions from recording automatically is described on page 97.
He l p M e F i n d N e w P r o g r a m s 4. Use the CHAN DOWN button to see themes that are not visible at first. When you highlight a theme, a short description of it appears at the top of the screen. Select a theme. A list of programs appears. 5. You can use the CHAN DOWN button to see programs that are not visible at first. When you highlight a program, a short description of it appears at the top of the screen. Select a program to see its Program Information screen.
C h a p t e r 82 5 F in d i n g a n d R e c o r d i n g P r o g r a m s
CHAPTER 6 Messages and Setup Messages from DIRECTV 84 Purchases 85 My Preferences 89 Recorder & Phone Setup 99 System Information 106 Troubleshooting 107 Restart or Reset System 108
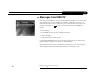
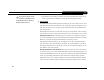
C h a p t e r 6 M e s s a g e s a n d S e t u p Messages from DIRECTV From time to time DIRECTV may send you messages about updates to your service and other important notices. These messages are important, useful and easy to get to—we made them that way because we really want you to read them. When you receive a new message, a message icon ( ) appears on the channel banner and in DIRECTV Central. To read a message: 1. From DIRECTV Central, select “Messages and Setup.” 2. Select “Messages.” 3.
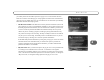
P u r c h a s e s Purchases To see the Purchases screen, first press the DIRECTV Button, then Messages and Setup, then select “Purchases.” The Purchases screen displays a list of all pay per view programs you have purchased, along with their date and time. Each program in the list is also marked either “Upcoming,” “Purchased,” “Canceled,” or “Unviewed.” • Upcoming. These programs are scheduled to be purchased but have not aired yet. You have not yet been charged for them.
C h a p t e r 6 If a pay per view program exceeds spending or rating limits you have M e s s a g e s • a n d S e t u p Press SELECT. The purchase is canceled. You return to the Purchases screen. If you cancel a purchase that is scheduled to record, the recording is also canceled. set with Parental Controls, a password Pay Per View will be required to purchase it. Your DIRECTV® DVR makes buying and recording pay per view events a snap.
P u r c h a s e s you usually cannot use the DVR to purchase a pay per view event more than 24 hours before the event airs. Recorded pay per view programs are marked “Save Until I Delete” (the green icon) by default. That way your recorded movies are saved until you manually delete them from the Now Playing screen. • Purchase & record info. If the DVR does not have purchase information (such as the price of the pay per view event) immediately available, it can do a short check for it.
C h a p t e r 88 6 M e s s a g e s a n d S e t u p • Buy; don’t record. When you select this option, you purchase the pay per view event. A verification screen appears with a description of any scheduling conflicts. • View upcoming showings. Press SELECT to display a list of upcoming showings for the program. Highlighting one of these showings and pressing SELECT displays the Program Information screen for that showing. LEFT arrow from the list returns to the previous screen. • Watch Now.
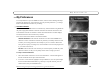
M y P re f e r e n c e s My Preferences To see My Preferences, press the DIRECTV button, and then select “Messages & Setup” and then “My Preferences.” My Preferences are your personal preferences—you change them to make the DVR work more to your liking. Customize Channels What are channel lists for? Features such as Search by Title and Search Using WishLists only look at programs available on channels selected in the Channels You Receive list.
C h a p t e r 6 M e s s a g e s a n d S e t u p Your changes are saved automatically. Press the LEFT or the RIGHT arrow to return to the Customize Channels screen. The large version of the channel Parental Controls banner has a shortcut to Parental Parental Controls allow you to set limits on movie and television ratings and to lock specific channels so that a password is required to view them.
M y To turn on Parental Controls and define a password ( P re f e r e n c e s ) 1. Select “Turn on Parental Controls.” 2. Use the number buttons on the remote control to enter a four-digit password. 3. Enter the same password again for confirmation.
C h a p t e r 6 M e s s a g e s a n d S e t u p To turn off Auto Re-lock: Go to Messages & Setup, then My Preferences, then Parental Controls. Press the DOWN arrow to highlight “Auto Re-lock,” then press SELECT. Enter your password, then highlight and select “Auto Re-lock off.” Rating Settings for TV and Movies ( ) Movies that are originally meant for release to theaters have a different rating system from programs that are made for TV.
M y P re f e r e n c e s To set Rating Limits for Specific TV Content: 1. From Parental Controls, select “Rating Settings,” then enter the password and press SELECT. 2. Select Block by TV Content. 3. A list of categories appears on the next screen. Select a category (for example, V-Violence). 4. A box containing all the possible ratings appears. Ratings in green are not locked; ratings in red are locked. (Ratings in gray do not apply to the category.
C h a p t e r 6 M e s s a g e s a n d S e t u p Motion Picture Association of America ratings for movies G: General Audiences. Most parents would find this material suitable for all ages. R: Restricted. This material is specifically designed to be viewed by adults and therefore may be unsuitable for children under 17. PG: Parental Guidance Suggested. Parents may find portions of this material unsuitable for younger children. NC-17: Adult Content.
M y Channel Lock for Live TV ( P re f e r e n c e s ) You can lock individual channels so that a password is required to view any program on those channels. To lock or unlock channels: 1. From the Parental Controls screen, select “Channel Lock,” and then enter the password. 2. A channel list appears with a padlock icon to the left of any locked channels. Highlight a channel and press SELECT to add or remove a padlock icon. Use CHAN UP/DOWN to move through the list quickly.
C h a p t e r 6 M e s s a g e s To change the Password ( a n d S e t u p ) To change the password for Parental Controls, Parental Controls must be on. 1. Select Change Password on the Parental Controls screen. When you turn Parental Controls 2. Enter a new password. off, you don’t need to know a 3. Re-enter the new password. password to turn them back on.
M y P re f e r e n c e s Sound Effects Volume. Allows you to change the volume or turn off your DVR’s sound effects (the tones played when you press buttons on the remote control). The default setting is Medium. Sounds effects are not currently available from the DVR’s digital audio output. Audio Language. This sets your DVR’s default to automatically play the sound track in the language chosen, if that language is available.
C h a p t e r 6 M e s s a g e s a n d S e t u p TV Aspect Ratio 4:3 Standard Screen 16:9 Wide Screen This screen lets you choose one of two settings, the default Standard Screen–4:3 or Wide Screen–16:9. If you have a normal television, you should leave this setting at the default. If you have a wide screen set, select “Wide Screen–16:9.” Doing this allows programs transmitted in a wide screen format to fill the wider screen.
R e c o r d e r & Ph o n e S e t u p Recorder & Phone Setup Options under Recorder & Phone Setup affect the basic functioning of the DVR. Most of these settings were established before or during Guided Setup, and you may not ever need to change them.
C h a p t e r 6 M e s s a g e s a n d S e t u p then reporting through a cell phone or walkie-talkie to the person who is adjusting the satellite dish antenna. When you first come to this screen, it shows signal strength for the transponder that carries the current channel. If you are having trouble with a specific channel, tune to that channel, then come to this screen to check the signal for that transponder. • To change the transponder, use the UP arrow to highlight the transponder number.
R e c o r d e r & Ph o n e S e t u p Phone Connection The DVR makes a daily call to communicate with the DIRECTV® DVR with TiVo® service, so a telephone line should be connected to it. The DVR occasionally makes a brief phone call to get updates to the DVR service, Showcases, and pay per view functionality. You can see details of the daily call on the Phone Connection screen, including the time of the last successful call and last call attempt, and the status of the last call.
C h a p t e r 6 M e s s a g e s a n d S e t u p Phone Dialing Options Set Dial-In Number. The number your DVR is currently using to call the DVR service is displayed on the Phone Dialing Options screen. To change it: 1. Select Set Dial-In Number on the Phone Dialing Options screen. 2. Use the number keypad on the remote to set the area code, then press SELECT.
R e c o r d e r & Ph o n e S e t u p 5. The Dialing Format screen appears after you have chosen a dial-in number. You should use this screen to tell the DVR which dialing format to use. For example, should the dial-in number be preceded by your area code and should a “1” precede the area code? In some areas, even local numbers must be dialed using the area code. Press SELECT to return to the Phone Dialing Options screen. 6. To test your new dial-in number, select “Test Phone Connection Now.
C h a p t e r 6 M e s s a g e s a n d S e t u p Set ‘Phone Avail.’ Detection. Off by default. When Set ‘Phone Avail.’ Detection is on, the DVR determines whether the phone line is in use by detecting voltage on the line. This allows it to avoid disrupting a call in progress (such as another modem call). However, if you are experiencing “Failed, Line unavailable” errors, or if the DVR is not making daily calls, you may have a low-voltage phone system that the DVR cannot detect.
R e c o r d e r & Ph o n e S e t u p Time Zone/Daylight Savings DIRECTV sets the time on your DVR to be accurate at your billing address. If you temporarily move the DVR to a new location, you can change the time zone here. After changing the time zone, you can change the Daylight Savings setting. Replace Access Card If you need to replace your DIRECTV access card, follow the on-screen instructions.
C h a p t e r 6 M e s s a g e s a n d S e t u p System Information This is where you can find the DVR’s serial number, Receiver ID number, the manufacturer and model number, the software version, information about recent service calls, and the DVR’s storage capacity. You’ll need some of this information if you call Customer Care for support. You can use CHAN UP/DOWN to see all of the screen. Remember, you can use CHAN UP/ DOWN to see text below or above what is displaying on the current screen.
T r o u b l e s h o o t i n g Troubleshooting Parental Controls Troubleshooting This screen provides a brief description of how to use Parental Controls. Use CHAN UP/ DOWN to see all of the text on the screen. Phone Troubleshooting This screen provides tips to help you troubleshoot problems with your phone connection. Use CHAN UP/DOWN to see all of the text on the screen.
C h a p t e r 6 M e s s a g e s a n d S e t u p Restart or Reset System You may need to restart the DVR as a routine troubleshooting step. These options erase information and restore original factory settings. Selecting a reset option brings you to a warning screen. To continue press THUMBS DOWN three times, then press ENTER. Restart the DVR. Shuts down the DVR and starts it up again. It will not affect recorded programs, Season Pass items, WishList searches, or TiVo Suggestions.
CHAPTER 7 Programming the Remote Control Introduction 110 Instructions: TV Power, Volume, and TV Input 111 Resetting the Programmable Buttons 114 Setting a Remote Address 115
C h a p t e r P r og r a m mi n g 7 th e R e m o te Co n t r o l Introduction DIRECTV do Win w Live TV Info Exit Guid e List Select For information about the individual buttons on the remote control, please refer to the inside front cover of this guide. Before programming the remote control, you must first insert the batteries and complete Guided Setup. Mute Vol Using the Remote with a TV and A/V Stereo System Chan Record The DIRECTV remote will already work with your DVR.
I n s t r u c t i o n s : T V P o w er , V o l u m e , a n d T V I n p u t Instructions: TV Power, Volume, and TV Input 1. Go to the Remote Control Setup screen. Press the DIRECTV button; then select “Messages & Setup,” then Recorder & Phone Setup, then Remote Control Setup.
C h a p t e r P r og r a m mi n g 7 th e R e m o te Co n t r o l 4. Enter a code. Use the number buttons on the remote control to enter a four-digit code (starting with the first code in the list on the screen). After you press the fourth digit of the code, the red light on the end of the remote control should flash. If it doesn’t, try the next code. 5. Test the code.
I n s t r u c t i o n s : T V P o w er , V o l u m e , a n d T V I n p u t 2. Enter the search code. Refer to the table below and use the number keys on your remote control to enter the appropriate code. To Test: TV power, volume, TV input and muting Enter: 0999 0999 A/V system power, A/V system volume volume, and mute and mute only 1999 1999 After you press the fourth digit of the code, the red light on the end of the remote control will flash twice, then remain on. 3.
C h a p t e r 7 P r og r a m mi n g th e R e m o te Co n t r o l Resetting the Programmable Buttons If you make a mistake, or are having difficulty, you can reset the programmable buttons. Once you do so, all the buttons on the remote will return to the unprogrammed state of a new remote. 1. Prepare the remote control. Point the remote away from your DVR.
S e t t i n g a R e m o t e A d d r e s s Setting a Remote Address If you have two DVRs in the same house, you may want to assign a remote address to each remote control. This will prevent the crossing of signals between one DVR’s remote and the other’s. 1. If the DVRs are both in the same room, cover the area around the shiny, dark plastic window on the front of one DVR. You can use a dark piece of cloth, a magazine, or anything thick and opaque. This prevents the DVR from receiving signals. 2.
C h a p t e r 116 7 P r og r a m mi n g th e R e m o te Co n t r o l
CHAPTER 8 Troubleshooting Contacting Customer Care 118 Questions About Installation 119 Questions About Live TV (Including Satellite Signal) 120 Questions About Pick Programs to Record 125 Questions About Parental Controls 131 Questions About the DVR’s Phone Calls 132 Questions About Audio 135 Questions About Pay Per View 136 Questions About the Remote Control 138 Questions About the DIRECTV® DVR with TiVo® Service 139
C h a p t e r 8 T r o u b l e sh o o t in g Contacting Customer Care For questions about your SAMSUNG DVR After checking the Troubleshooting chapter of this guide, you can call the Samsung customer care center at 1-800-726-7864 if you need help: • Connecting your Receiver to your TV and other A/V equipment. • With Guided Setup or daily phone calls that are failing. • With a Receiver that does not function properly even after restarting it.
Q u e s t i o n s A b o u t I n s t a ll a t i o n Questions About Installation I do not see the Welcome screen If you do not see the Welcome screen, you may need to change channels or change the video source your TV uses: • If you used coaxial RF cable to connect your DVR to the TV, make sure you’re viewing the same channel (3 or 4) that you selected using the switch on the back of your DVR.
C h a p t e r 8 T r o u b l e s h o o t i n g Questions About Live TV (Including Satellite Signal) During Satellite Guided Setup, the screen got stuck on the Satellite Info screen. • Press the DIRECTV button, then select “Messages and Setup,” then select “Recorder & Phone Setup,” then “Satellite Dish Setup,” then choose “Reset Satellite Information.” The screen will warn you not to proceed unless you have been instructed to do so by a customer care representative.
Q u e s t i o n s A b o u t L i v e T V ( I n c l u d i n g S a t e l l i t e S i g n a l ) Can I watch TV while a program is recording? • Yes, you can watch what is recording as it is being recorded. You can also watch any program stored in the Now Playing List while another program is being recorded. If you have dual tuner, you can record one program while watching another. See page 3 for information about Dual Tuner.
C h a p t e r 8 T r o u b l e s h o o t i n g How do I get back to the last channel I was watching? • When watching live TV, typing a channel number jumps the DVR to that channel. Press ENTER/LAST if you want to go back to the prior channel. I can’t tune to one of my channels. • You may be using a channel list that does not include the channel you want. Use the number buttons on the remote control to enter the channel number, then press the ENTER button.