filename[Z:\2003combo\3083945111-0228\3083945111SLVD300PUC\010COV.fm] 010COV.book Page 1 Saturday, March 15, 2003 4:29 PM 3-083-945-11 (1) US DVD Player/ Video Cassette Recorder Operating Instructions For customers in the USA If you have any questions about your Sony DVD-VCR, you may call Sony Customer Information Services Company at 1-800-VHS-SONY (847-7669). For all other Sony product questions, please call Sony Customer Information Services Company at 1-800-222-SONY (7669).
filename[Z:\2003combo\3083945111-0228\3083945111SLVD300PUC\010WAR.fm] 010COV.book Page 2 Saturday, March 15, 2003 4:29 PM WARNING To prevent fire or shock hazard, do not expose the unit to rain or moisture. To avoid electrical shock, do not open the cabinet. Refer servicing to qualified personnel only. To prevent fire or shock hazard, do not place objects filled with liquids, such as vases, on the apparatus. CAUTION The use of optical instruments with this product will increase eye hazard.
filename[Z:\2003combo\3083945111-0228\3083945111SLVD300PUC\010WAR.fm] 010COV.book Page 3 Saturday, March 15, 2003 4:29 PM Important Safeguards For your protection, please read these safety instructions completely before operating the appliance, and keep this manual for future reference. Carefully observe all warnings, precautions and instructions on the appliance, or the one described in the operating instructions and adhere to them.
filename[Z:\2003combo\3083945111-0228\3083945111SLVD300PUC\010WAR.fm] 010COV.book Page 4 Saturday, March 15, 2003 4:29 PM Service • Never place the set in a confined space, such as a bookcase, or built-in cabinet, unless proper ventilation is provided. • Do not place the set near or over a radiator or heat register, or where it is exposed to direct sunlight.
filename[Z:\2003combo\3083945111-0228\3083945111SLVD300PUC\010WAR.fm] 010COV.book Page 5 Saturday, March 15, 2003 4:29 PM DVD Precautions On safety • Caution – The use of optical instruments with this product will increase eye hazard. • To prevent fire or shock hazard, do not place objects filled with liquids, such as vases, on the apparatus. • Should any solid object or liquid fall into the cabinet, unplug the player and have it checked by qualified personnel before operating it any further.
filename[Z:\2003combo\3083945111-0228\3083945111SLVD300PUC\010COVTOC.fm] 010COV.
filename[Z:\2003combo\3083945111-0228\3083945111SLVD300PUC\010COVTOC.fm] 010COV.
filename[Z:\2003combo\3083945111-0228\3083945111SLVD300PUC\010PRE.fm] 010COV.book Page 8 Saturday, March 15, 2003 4:29 PM Region code About this manual • The meaning of the icons used in this manual is described below: Icon Your player has a region code printed on the back of the unit and only will play DVD VIDEO discs (playback only) labeled with identical region codes. This system is used to protect copyrights.
filename[Z:\2003combo\3083945111-0228\3083945111SLVD300PUC\010PRE.fm] 010COV.book Page 9 Saturday, March 15, 2003 4:29 PM Note Some DVD-RWs/DVD-Rs, DVD+RWs/DVD+Rs or CD-Rs/CD-RWs cannot be played on this player due to the recording quality or physical condition of the disc, or the characteristics of the recording device. Furthermore, the disc will not play if it has not been correctly finalized. For more information, see the operating instructions for the recording device.
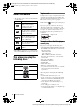
filename[Z:\2003combo\3083945111-0228\3083945111SLVD300PUC\010GET.fm] 010COV.book Page 10 Saturday, March 15, 2003 4:29 PM Getting Started Step 1 : Unpacking Check that you have received the following items with the DVD-VCR: • Remote commander • Size AA (R6) batteries • 75-ohm coaxial cable with F-type connectors • Audio/video cord (pinplug ×3 y pinplug ×3) 10 Unpacking filename[010GET.
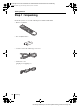
filename[Z:\2003combo\3083945111-0228\3083945111SLVD300PUC\010GET.fm] 010COV.book Page 11 Saturday, March 15, 2003 4:29 PM Step 2 : Setting up the remote commander Inserting the batteries Getting Started Insert two size AA (R6) batteries by matching the + and – on the batteries to the diagram inside the battery compartment. Insert the negative (–) end first, then push in and down until the positive (+) end clicks into position.
filename[Z:\2003combo\3083945111-0228\3083945111SLVD300PUC\010GET.fm] 010COV.book Page 12 Saturday, March 15, 2003 4:29 PM Controlling other TVs with the remote commander The remote commander is preprogramed to control non-Sony TVs. If your TV is listed in the following table, set the appropriate manufacturer’s code number. 1 Set TV / DVD·VIDEO at the top of the remote commander to TV. Hold down ?/1, and enter your TV’s code number using the number buttons. 2 Then release ?/1.
filename[Z:\2003combo\3083945111-0228\3083945111SLVD300PUC\010GET.fm] 010COV.book Page 13 Saturday, March 15, 2003 4:29 PM Notes • If you enter a new code number, the code number previously entered will be erased. • If the TV uses a different remote control system from the one programed to work with the DVD-VCR, you cannot control your TV with the remote commander. • When you replace the batteries of the remote commander, the code number may change.
filename[Z:\2003combo\3083945111-0228\3083945111SLVD300PUC\010GET.fm] 010COV.book Page 14 Saturday, March 15, 2003 4:29 PM Step 3 : Basic hookups Before you get started • Be sure to disconnect the AC power cord of each component before connecting. • Turn off the power to all equipment. • Do not connect the AC power cords until all of the connections are completed. If you connect the AC power cord before the connections are completed, you may not be able to use the Plug and Play function.
filename[Z:\2003combo\3083945111-0228\3083945111SLVD300PUC\010GET.fm] 010COV.book Page 15 Saturday, March 15, 2003 4:29 PM Audio/video (A/V) hookup If you are not planning to use your DVD-VCR to record programs, you only need to make the connections shown on this page. If you want to record regular or cable TV programs, complete these connections first, and then go to the following pages for antenna or cable hookups.
filename[Z:\2003combo\3083945111-0228\3083945111SLVD300PUC\010GET.fm] 010COV.book Page 16 Saturday, March 15, 2003 4:29 PM Hookup 1 (Plug and Play) Antenna hookup Make the following connections if you are using an antenna (if you do not have cable TV).
filename[Z:\2003combo\3083945111-0228\3083945111SLVD300PUC\010GET.fm] 010COV.book Page 17 Saturday, March 15, 2003 4:29 PM Hookup 1 : DVD-VCR setup Plug the DVD-VCR into an AC outlet. The DVD-VCR automatically presets the DVD-VCR’s clock and TV channels when the DVD-VCR is plugged into the AC outlet. Getting Started AC power cord to AC outlet The DVD-VCR starts presetting the clock and channels. When Auto preset is completed, the current time appears in the display window.
filename[Z:\2003combo\3083945111-0228\3083945111SLVD300PUC\010GET.fm] 010COV.book Page 18 Saturday, March 15, 2003 4:29 PM Hookup 2 (Plug and Play) You have no cable box, or a cable box with only a few scrambled channels Recommended use Use this hookup if you do not have a cable box. Also use this hookup if your cable system scrambles only a few channels.
filename[Z:\2003combo\3083945111-0228\3083945111SLVD300PUC\010GET.fm] 010COV.book Page 19 Saturday, March 15, 2003 4:29 PM Hookup 2 : DVD-VCR setup Plug the DVD-VCR into an AC outlet. The DVD-VCR automatically presets the DVD-VCR’s clock and TV channels when the DVD-VCR is plugged into the AC outlet. Getting Started AC power cord to AC outlet The DVD-VCR starts presetting the clock and channels. When Auto preset is completed, the current time appears in the display window.
filename[Z:\2003combo\3083945111-0228\3083945111SLVD300PUC\010GET.fm] 010COV.book Page 20 Saturday, March 15, 2003 4:29 PM Hookup 3 Connecting a cable box with many scrambled channels Recommended use Use this hookup if your cable system scrambles all or most channels.
filename[\\Win-78\got78\2003combo\3083945111\3083945111SLVD300PUC\010GET.fm] 010GET.fm Page 21 Thursday, March 20, 2003 1:34 PM Step 4 : Selecting a language Before you start… • Turn on the DVD-VCR and your TV. • To control the DVD-VCR, set TV / DVD·VIDEO to DVD·VIDEO on the remote (page 11). • Set the “RF Output Channel” to “3CH” or “4CH” in “OPTION SETUP” menu (page 91). If your TV is connected to the DVD-VCR using A/V connections, set the TV to video input.
filename[Z:\2003combo\3083945111-0228\3083945111SLVD300PUC\010GET.fm] 010COV.book Page 22 Saturday, March 15, 2003 4:29 PM Step 5 : Setting the clock Using the Auto Clock Set feature SET UP Some TV and cable channels transmit time signals with their broadcasts. Your DVDVCR can pick up this time signal to automatically set the clock. The Auto Clock Set feature works only if a channel in your area is broadcasting a time signal.
filename[Z:\2003combo\3083945111-0228\3083945111SLVD300PUC\010GET.fm] 010COV.book Page 23 Saturday, March 15, 2003 4:29 PM Press V/v to select “Auto”, then press ENTER. 4 Press V/v to select the item you want. Then press B/b to make the setting. • For “Clock data CH” Leave the setting to “Auto” to have the DVD-VCR automatically search for a channel that carries a time signal. Press B/b to select a channel that carries a time signal. Use this option if you know of a channel that carries a time signal.
filename[Z:\2003combo\3083945111-0228\3083945111SLVD300PUC\010GET.fm] 010COV.book Page 24 Saturday, March 15, 2003 4:29 PM Notes • The clock cannot be set automatically if you do not receive a channel that carries a time signal in your area. If so, set the clock manually (page 24). • If there are only a few channels in your area that carry time signals, setting the clock automatically may take up to about 20 minutes. If nothing happens even after you wait about 20 minutes, set the clock manually (page 24).
filename[Z:\2003combo\3083945111-0228\3083945111SLVD300PUC\010GET.fm] 010COV.book Page 25 Saturday, March 15, 2003 4:29 PM Press V/v to select “Manual,” then press ENTER. 4 Press V/v to set the hour. 5 Press b to select the minutes and press V/v to set the minutes. 6 Set the month, day, and year in the same way as the minutes. 7 Press O RETURN to save the clock setting. Getting Started 3 The day of the week is set automatically.
filename[Z:\2003combo\3083945111-0228\3083945111SLVD300PUC\010GET.fm] 010COV.book Page 26 Saturday, March 15, 2003 4:29 PM Step 6 : Presetting channels This DVD-VCR is capable of receiving VHF channels 2 to 13, UHF channels 14 to 69 and unscrambled CATV channels 1 to 125. First, we recommend that you preset the receivable channels in your area using automatic presetting methods. Then, if there are any unwanted channels, disable them manually.
filename[Z:\2003combo\3083945111-0228\3083945111SLVD300PUC\010GET.fm] 010COV.book Page 27 Saturday, March 15, 2003 4:29 PM Press V/v to select “Ant/Cable.” 4 • To preset cable TV channels: Press B/b to select “Cable TV.” Getting Started 3 • To preset VHF and UHF channels: Press B/b to select “Antenna.” 5 Press V/v to select “Auto channel memory,” then press ENTER. All receivable channels are preset in numerical sequence.
filename[Z:\2003combo\3083945111-0228\3083945111SLVD300PUC\010GET.fm] 010COV.book Page 28 Saturday, March 15, 2003 4:29 PM Presetting/disabling channels manually Before you start… • Turn on the DVD-VCR and your TV. When using a cable box, turn it on. • To control the DVD-VCR, set TV / DVD·VIDEO to DVD·VIDEO on the remote (page 11). • Set the “RF Output Channel” to “3CH” or “4CH” in “OPTION SETUP” menu (page 91). If your TV is connected to the DVD-VCR using A/V connections, set the TV to video input.
filename[Z:\2003combo\3083945111-0228\3083945111SLVD300PUC\010GET.fm] 010COV.book Page 29 Saturday, March 15, 2003 4:29 PM 4 To preset/disable a channel: Channel to be preset 1 Press CH +/– or number buttons to enter the channel number. 2 Press B/b to select ADD (in memory) or Channel to be disabled 5 Getting Started DELETE (deleted). 3 Press ENTER. Press O RETURN repeatedly to exit the menu. Presetting channels 29 filename[010GET.
filename[Z:\2003combo\3083945111-0228\3083945111SLVD300PUC\010BAS.fm] 010COV.book Page 30 Saturday, March 15, 2003 4:29 PM Basic Operations Playing discs Depending on the disc, some operations may be different or restricted. Refer to the operating instructions supplied with your disc. ?/1 Z Before you start ... • Turn on the DVD-VCR and your TV. • Switch the input selector on your TV so that the signal from the player appears on the TV screen.
filename[Z:\2003combo\3083945111-0228\3083945111SLVD300PUC\010BAS.fm] 010COV.book Page 31 Saturday, March 15, 2003 4:29 PM 2 Press H PLAY. The disc tray closes and the DVD player starts playback. The display window shows the playback time*. Hour Minute Second Depending on the disc, a menu may appear on the TV screen. For DVDs, see page 61. For VIDEO CDs, see page 81. * “– – – – –” appears when no disc is loaded.
filename[Z:\2003combo\3083945111-0228\3083945111SLVD300PUC\010BAS.fm] 010COV.book Page 32 Saturday, March 15, 2003 4:29 PM To watch slow motion in continuous play mode (DVD and VIDEO CD only) Press X PAUSE, then press M SLOW y. With each press, the playback speed changes cyclically as follows. To resume normal playback, press H PLAY. Notes • You can change the screen type using the “SCREEN SETUP” menu. (See “Screen Setup” on page 53) • Do not perform VIDEO playback while playing back a disc.
filename[Z:\2003combo\3083945111-0228\3083945111SLVD300PUC\010BAS.fm] 010COV.book Page 33 Saturday, March 15, 2003 4:29 PM Guide to the on-screen display You can check disc information during playback. V/v/B/b ENTER The displayed contents differ according to the type of disc being played. O RETURN DISPLAY Type of disc Current title/track number Current chapter number Counter position Voice language Subtitle language Surround setting Basic Operations Press DISPLAY.
filename[Z:\2003combo\3083945111-0228\3083945111SLVD300PUC\010BAS.fm] 010COV.book Page 34 Saturday, March 15, 2003 4:29 PM To playback from the desired counter position Press V/v to select the counter position icon. 1 2 Enter the desired position using the number buttons. 3 Press ENTER to start playback. 4 Press DISPLAY or O RETURN to turn off the menu. Tip • You can change the counter position information (playing time or remaining time) using B/b (DVD, VIDEO CD and CD only).
filename[Z:\2003combo\3083945111-0228\3083945111SLVD300PUC\010BAS.fm] 010COV.book Page 35 Saturday, March 15, 2003 4:29 PM Playing a tape Before you start ... • Turn on the DVD-VCR and your TV. • Switch the input selector on your TV so that the signal from the player appears on the TV screen. • Set TV / DVD·VIDEO to DVD·VIDEO, then press SELECT VIDEO to control the VCR (page 11). ?/1 Z TRACKING +/– CLEAR Basic Operations REPLAY MSLOWy m ./ > C SKIP X PAUSE x STOP H PLAY DISPLAY 1 Insert a tape.
filename[Z:\2003combo\3083945111-0228\3083945111SLVD300PUC\010BAS.fm] 010COV.book Page 36 Saturday, March 15, 2003 4:29 PM 2 Press H PLAY. The display window shows the playback time. When the tape reaches the end, it will rewind automatically.
filename[Z:\2003combo\3083945111-0228\3083945111SLVD300PUC\010BAS.fm] 010COV.book Page 37 Saturday, March 15, 2003 4:29 PM Playback options Operation Play in slow motion During pause, press MSLOW y. Play frame by frame During pause, press C SKIP. Play at various speeds (Shuttle play) During playback, press .or > SHUTTLE. You can change the playback speed as follows. –× 7 y –× 5 y –× 3 y STILL y SLOW y PLAY y ×2 y ×3 y ×5 y ×7 To resume normal playback Press H PLAY.
filename[Z:\2003combo\3083945111-0228\3083945111SLVD300PUC\010BAS.fm] 010COV.book Page 38 Saturday, March 15, 2003 4:29 PM Recording TV programs Before you start ... • Turn on the DVD-VCR and your TV. • Switch the input selector on your TV so that the signal from the player appears on the TV screen. • Set TV / DVD·VIDEO to DVD·VIDEO, then press SELECT VIDEO to control the VCR (page 11). • To record from a cable box, turn it on. • Make sure the tape is longer than the total recording time.
filename[H:\2003combo\3083945111-0228\3083945111SLVD300PUC\010BAS.fm] 010COV.book Page 39 Saturday, March 15, 2003 9:03 PM 3 Press SP/EP to select the tape speed, SP or EP. 4 Press z REC to start recording. EP (Extended Play) provides recording time three times as long as SP (Standard Play). However, SP produces better picture and audio quality. “REC” appears in the display window. To check the remaining tape length Press DISPLAY to display the time counter.
filename[Z:\2003combo\3083945111-0228\3083945111SLVD300PUC\010BAS.fm] 010COV.book Page 40 Saturday, March 15, 2003 4:29 PM To watch another TV program while recording 1 Press TV/VIDEO to display “TV” in the display window. your TV is connected to the VCR using A/V connections, set the TV to the 2 IfTV’s antenna input; if not, skip this step. Select another channel on the TV. 3 To watch a DVD while recording 1 Press SELECT DVD to control the DVD player. 2 Press Z and place the disc on the disc tray.
filename[Z:\2003combo\3083945111-0228\3083945111SLVD300PUC\010BAS.fm] 010COV.book Page 41 Saturday, March 15, 2003 4:29 PM Recording TV programs using the timer You can preset up to eight programs at a time. ?/1 Before you start… • Check that the DVD-VCR clock is set to the correct time. • Turn on the DVD-VCR and your TV. • Switch the input selector on your TV so that the signal from the player appears on the TV screen.
filename[Z:\2003combo\3083945111-0228\3083945111SLVD300PUC\010BAS.fm] 010COV.book Page 42 Saturday, March 15, 2003 4:29 PM 2 Press V/v/B/b to select (Set Timer Recording), then press ENTER. The program menu appears. 3 If necessary, press V/v to select the row that is to be set. 4 Set the channel number, start and stop time, date, and tape speed: 1 Press b to flash each item in turn. 2 Press V/v to set each item. To correct a setting, press B to return to that setting and reset.
filename[\\Win-78\got78\2003combo\3083945111\3083945111SLVD300PUC\010BAS.fm] 010BAS.fm Page 43 Thursday, March 20, 2003 1:35 PM To stop recording To stop the DVD-VCR while recording, press SELECT VIDEO and then press x STOP. Daily/weekly recording In step 4 above, press v to select the recording pattern. Each time you press v, the indication changes as shown below. Press V to change the indication in reverse order. MO~FR t SUN’S t MON’S t .....
filename[Z:\2003combo\3083945111-0228\3083945111SLVD300PUC\010BAS.fm] 010COV.book Page 44 Saturday, March 15, 2003 4:29 PM Checking/changing/canceling timer settings ?/1 CLEAR SET UP TIMER V/v/B/b ENTER O RETURN 1 Press SET UP when the DVD player is in stop mode. The “SETUP MENU” appears. You can also use the TIMER button in VIDEO mode, then you can skip step 2. 44 Checking/changing/canceling timer settings filename[010BAS.
filename[Z:\2003combo\3083945111-0228\3083945111SLVD300PUC\010BAS.fm] 010COV.book Page 45 Saturday, March 15, 2003 4:29 PM 2 Press V/v/B/b to select “Set Timer Recording”, then press ENTER. • If you want to change a setting, go on to the next step. • If you do not need to change the settings, press O RETURN repeatedly to exit the menu, then turn off the VCR to return to recording standby. 3 Press V/v to select setting you want to change or cancel.
filename[Z:\2003combo\3083945111-0228\3083945111SLVD300PUC\010ADV.fm] 010COV.book Page 46 Saturday, March 15, 2003 4:29 PM Advanced Hookups A/V Receiver hookup A Use this hookup if your A/V receiver has a Dolby* Surround (Pro Logic) decoder and 3 to 6 speakers You can enjoy the Dolby Surround effects only when playing Dolby Surround audio or multi-channel audio (Dolby Digital) discs. ∗ Manufactured under license from Dolby Laboratories.
filename[Z:\2003combo\3083945111-0228\3083945111SLVD300PUC\010ADV.fm] 010COV.book Page 47 Saturday, March 15, 2003 4:29 PM B Use this hookup if your A/V reciever has a Dolby Digital or DTS* decoder, a digital input jack and 6 speakers This connection will allow you to use the Dolby Digital or DTS decoder function of your AV amplifier (receiver). You are not able to enjoy the surround sound effects of this player. You must make connections using B-1 and B-2 .
filename[Z:\2003combo\3083945111-0228\3083945111SLVD300PUC\010ADV.fm] 010COV.book Page 48 Saturday, March 15, 2003 4:29 PM S-Video/Component Video hookup Make audio connections using the LINE OUT AUDIO L/R jacks or DIGITAL AUDIO OUT (OPTICAL or COAXIAL) jacks on the right side of the DVD-VCR when you use S-VIDEO/ Component Video hookup. A Use this hookup if your TV has an S VIDEO input jack Connect an S VIDEO cord (not supplied). You will enjoy high quality images.
filename[Z:\2003combo\3083945111-0228\3083945111SLVD300PUC\010ADV.fm] 010COV.book Page 49 Saturday, March 15, 2003 4:29 PM B Use this hookup if your TV has component video input jacks Connect your TV via the COMPONENT VIDEO OUT jacks using a component video cord (not supplied) or three video cords (not supplied) of the same kind and length. You will enjoy accurate color reproduction and high quality images. See page 48 for audio connections.
filename[Z:\2003combo\3083945111-0228\3083945111SLVD300PUC\010SET.fm] 010COV.book Page 50 Saturday, March 15, 2003 4:29 PM DVD Settings and Adjustements Audio Setup “Audio Setup” allows you to set the sound according to the playback and connection conditions. SET UP V/v/B/b ENTER O RETURN 1 Press SET UP when the DVD player is in stop mode. The “SETUP MENU” appears. 2 Press V/v/B/b to select then press ENTER. (DVD Setup), The “DVD SETUP” menu appears.
filename[Z:\2003combo\3083945111-0228\3083945111SLVD300PUC\010SET.fm] 010COV.book Page 51 Saturday, March 15, 2003 4:29 PM 4 Press V/v to select the setup item from the displayed list: “Dolby Digital,” “DTS,” or “Audio DRC.” 5 Press B/b to select an item, then press O RETURN to confirm the setting. 6 Press O RETURN repeatedly to exit the menu. Menu choices • Dolby Digital (DVD only) Selects the type of Dolby Digital signal. The default setting is indicated in bold print.
filename[Z:\2003combo\3083945111-0228\3083945111SLVD300PUC\010SET.fm] 010COV.book Page 52 Saturday, March 15, 2003 4:29 PM Notes • If you select surround setting while playing a DVD, the player does not output Dolby Digital signals from the DIGITAL AUDIO OUT (OPTICAL or COAXIAL) jack (when you set “Dolby Digital” to “D-PCM”).
filename[Z:\2003combo\3083945111-0228\3083945111SLVD300PUC\010SET.fm] 010COV.book Page 53 Saturday, March 15, 2003 4:29 PM Screen Setup “Screen Setup” allows you to set the screen according to the playback and connection conditions. SET UP V/v/B/b ENTER O RETURN DVD Settings and Adjustements 1 Press SET UP when the DVD player is in stop mode. The “SETUP MENU” appears. 2 Press V/v/B/b to select then press ENTER. (DVD Setup), The “DVD SETUP” menu appears.
filename[Z:\2003combo\3083945111-0228\3083945111SLVD300PUC\010SET.fm] 010COV.book Page 54 Saturday, March 15, 2003 4:29 PM 4 Press V/v to select the setup item from the displayed list: “TV Type,” “Black Level,” or “Video Out.” 5 Press B/b to select an item, then press O RETURN to confirm the setting. 6 Press O RETURN repeatedly to exit the menu. Menu choices • TV Type (DVD only) Selects the aspect ratio of the connected TV (4:3 standard or wide). The default setting is indicated in bold print.
filename[Z:\2003combo\3083945111-0228\3083945111SLVD300PUC\010SET.fm] 010COV.book Page 55 Saturday, March 15, 2003 4:29 PM • Video Out You must set this setting when you use S VIDEO OUT or COMPONENT VIDEO OUT jacks to connect to the TV. The default setting is indicated in bold print. S-Video Select this when you use the S VIDEO OUT jack on the rear panel to connect to the TV. Component Select this when you use the COMPONENT VIDEO OUT jacks on the rear panel to connect to the TV.
filename[Z:\2003combo\3083945111-0228\3083945111SLVD300PUC\010SET.fm] 010COV.book Page 56 Saturday, March 15, 2003 4:29 PM Setting the display or sound track language You can set various languages for the disc’s menu, sound track or subtitle. SET UP V/v/B/b ENTER O RETURN 1 Press SET UP when the DVD player is in stop mode. The “SETUP MENU” appears. 2 Press V/v/B/b to select then press ENTER. (DVD Setup), The “DVD SETUP” menu appears.
filename[Z:\2003combo\3083945111-0228\3083945111SLVD300PUC\010SET.fm] 010COV.book Page 57 Saturday, March 15, 2003 4:29 PM 4 Press V/v to select the desired language, then press ENTER. • DVD MENU LANGUAGE You can select the desired language for the disc’s menu. • AUDIO LANGUAGE Switches the language of the sound track. When you select “Original,” the language given priority in the disc is selected. • SUBTITLE LANGUAGE Switches the language of the subtitle recorded on the DVD.
filename[Z:\2003combo\3083945111-0228\3083945111SLVD300PUC\010SET.fm] 010COV.book Page 58 Saturday, March 15, 2003 4:29 PM Parental Control (limiting playback by children) Playback of some DVDs can be limited according to a predetermined level such as the age of the users. The “PARENTAL CONTROL” function allows you to set a playback limitation level. Number buttons SET UP V/v/B/b ENTER 1 Press SET UP when the DVD player is in stop mode. The “SETUP MENU” appears.
filename[Z:\2003combo\3083945111-0228\3083945111SLVD300PUC\010SET.fm] 010COV.book Page 59 Saturday, March 15, 2003 4:29 PM 3 Press V/v to select “Parental,” then press ENTER. 4 Press b to select “Yes”. • If you have not entered a password The display for registering a new password appears. Enter a 4-digit password using the number buttons. The display for confirming the password appears. Re-enter the password.
filename[Z:\2003combo\3083945111-0228\3083945111SLVD300PUC\010SET.fm] 010COV.book Page 60 Saturday, March 15, 2003 4:29 PM 6 Press V/v to select the level you want, then press ENTER. The options are as follows. Level 8 (Adult) y Level 7 y Level 6 y Level 5 y Level 4 y Level 3 y Level 2 y Level 1 (Kids Safe) The higher the value, the stricter the limitation. 7 Press O RETURN repeatedly to exit the menu. To change the password “Change Password” in step 4.