SAFETY INSTRUCTIONS Safety Instructions CAUTION! This symbol is intended Ip lane the veer to the pros once of insulated “dangerous collage” within the product's enclosure that may be of sulfide magnitude to constitute » risk of firs or satirical shock 10 persons. fpr ad Tis symbol is intend to alert the user tn the presence of ATS important propelling and phenomenal {servicing} instructions in the literature accompanying the appliance.
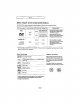
Set ye Disc Type and Characteristics This DVDHVCA is capable of playing the following types of discs with the compounding ios: Dist Types {Logos} | Recording Types | Disc See) Mog. Playing Time | Characteristics ovo om [Jfesecotnn | 013 testes mm . min, and video due to Dolby Digital for oki sided 480 mn and MPEG-2 system, . dod + Various serene and audio a Video { 80m Se ded Bon functions can be easy scuffled | v rough the On-50020 MEN. AUDI C-CD Eczema TA min.
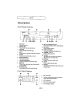
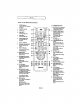
Setup Description Front Panel Controls 1 DISC TRAY Place the disc here, 2 OPEN/CLOSE Rags fo open snd tees the dis ay, 3 VOR Deck Insert a standard VHS video tape. 4 EJECT Press to eject a video tape if the lane is stopped. 5 POWER Pres tv lum the DYDVCH on and off.
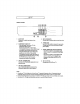
CONNECTIONS Before Connecting the DVD-VCR «Always um off the ACYCLOVIR, TV, and shier components banal you canteen of disconnect any cables. Peter bo the user's manual of ihe additional components {sooth 56 8 TV) you are commenting for more information ori hog particularization. Connection TV The following shows examples of connections commonly used 16 connect the DVORAK with & TV and iffier components.
CONNECTIONS Connection to a TV (S-Video) Connecting to your TV using an S-Idea sable. ~ You will enjoy high quality images. S-Video separates the picture element into black and whitelist} and color) signals lo preserved clearer images than regular video input dare. {Audio signals vee delivered through tha audio output} 1 Using an S-Video cable {not included), consent the DIVIDE QUT terminal on the rear of the OVERSEER to the S-VIVID IN determined of your TV.
CORRECTIONS Connection to a TV {interlace} Connecting © your TV using Component video cables. = Ate will enjoy high quality and racecourse color reproduction images. Component video separates [he McClure element ine black and white{Y), Phelps, Redis} signals 1 present clear and divan images.
CONNECTIONS Connection to an Audio System Connection to an Audio System (2 Channel Amplifier} 1 Using the audio cables, connect he (LINE) AUDIO (red and white} GUT terminals on the rear of the DRIVER to the AUDIO Fred and while) IN terminals of the Amplifier, 2 Using the video signal cattiness, connect ihe VIED, VIDEO or COMPONENT OUY rentals on he rear of the OVERSEER fo tig DIVIDE or VIDEO, COMPONENT OUT terminal of your TV as described on pages 14 1016. 3 Pum on the DVORAK, TV, and Amplifier.
CONNECTIONS Connection to an Audio System (Dolby digital, MPEG or DTS Amplifier) 1 Using a coaxial call {not incidence, connect he [HETTIE AUDIO OUT (COAXIAL) or DIGITAL AUDIO QUT {OPTICAL terminal on the rear of the DVORAK to the DIGITAL AUDIO IN (COAXIAL) or DIGITAL AUDIO DUT (OF TIDAL} terminal of th Rapier.
CONNECTIONS Connecting a Power Cord & Auto Setup 1 Your DVD-Psych's power cord shout be planed inn a standard 120VIE0H wall outfield. Avoid pressing any buttons on the cremate control or on {he unit during Auto Setup, While your DVORAK it tuning Auto Setup, “Auto” will Dink, Wren Aut Blowup is complaint, tha dune Ime wil be displayed on the firm gnat, if Auto Beluga dais to Jo tale 3 aching fo sot the cook, you shooed set he clock manually.
Ian Se rue Setting the Clock This mend is used 10 501 ihe currant lime. You need io sel the ime lo use mer so cording, Setting the Clock Automatically 1 Peas Ihe MENU bullion. 2 Pesos the ACY pullouts to select Setup, thee press fie » or ENTER Bataan. Palate 3 Press the AY bu sons to sere! Clock, then press fie » or ENTER bunion, 4 Press the SY buttons ja safer! Aut Clock, than press The & or ENTER bunion. 5 Select charms! that cares & dime signal by using the » or ENTER button.
militia Set Up Iota your clock is set to the Wong Time Zone or alight Saving, you Can adjust ese settings without furring of the Aun Clock Set function. 6 Press the 47¥ butts fs select Time Zane, then press the » or ENTER bunion. Select tho me 20n8 of your area) by using the Assumptions, Then press ihe ENTER bunion. Select Automate lo sat the time.
int Rial SETUP Betting the Clock Manually if Auto Setup falls to sel the DVD-VOR's infernal clock by locating 2 local TV station, follow these stoops lo set tre data anc me manually. te: For inaccuracy Timer Recording, your DECEIVER'S internal dink must be set comely, 1 Press ihe MENU button.
tit Revue Memorizing the Channels Selecting the Video Signal-source This Ligature allows you to manually set the DVD-Tor's tuner band to Antenna or Cable, whichever you connected bk the Antenna In jack during finial setup. Use this setting ony i Auto Set detected the ignore tuner band, Le. channels are coming in on The Wong channel numbers. 1 Press the MENU button. Press the AFY buttons & select Setup, Thea pass the » ar ENTER Mann, 3 Eggs the AY bull pas to select Channel, then press the » or ENTER bunion.
Indra Set Yup Storing Channels in Memory (Automatic Method) Auto Channel Memory will automatically seek and store all active channels in your area, 5 Press ihe AY bunions to i select Auto Channel Memory, Then press the vor ENTER 2 Button. The DVORAK will automatically search for alt prr— available channels in the fa selected ner band, fs ] ra “This procedures may ake 2 fav la Ee: sinuses 1b complete.
trial Setup Selecting the RF Output Channel Use this feature if DY I-VOR is connected fn TY urging RF antenna cable, 1 Tress the SIENNA butter.
ails Setup Selecting the Front Panel Display You can set fie Front Pace Big play 10 be bright 2) the lime, oim all ie ime, or to automatically dim during power off, 1 Press the MENU bunion. 2 Press the AY bunions ip select Setup, then press the » or ENTER tuition, 3 Press the AY bullish tn select Front Display, then E press the » or ENTER tuition 10 select Auto, Bright or Dim. a Press the MENU button 10 xt * Astor Front Panel Display will dis diplomatically during power off.
burial Setup Setting the Power Off Automatically This allure automatically turns aif your SURVIVOR if no signal is received and you do 0a press any bunions lor the selected Lima, 1 Press the MENU bunion, 2 Press the APY bullhorns to select Setup, then greps the or ENTER button, 3 Press the AY bunions to select Auto Pow OH, then poss the or ENTER nation 1o faceless OF, 1H ar 2dr. 4 Crass the MENU bunion i exit, * Off: Auto power off is disabled.
Playing a Disc Before Play Chapter 4 DVD Derogation: = Tum on your TV and 561 to the correct Video Input on your TV's female control. If you corrected an extirpate Audio System, tum on your Audio Sierra and set i In the comet Audio Input. Playback 1 Frags the OPEN/CLOSE (4) Button, 2 Plan a dies gently into the ay with the (sits tee phasing up. 3 Cross the wa (Playhouse) butter os your remain control ar on the hoot panel, Mai discs bill start Io play back as soon a8 ihe ay closes.
BYD Creations 5 pp Removing Disc 4 Press the OPEN/CLOSE T 3029 od 4 83 ton, 6 Paneling Play Press the wit (Playhouse button on your resole tantra! or on the front pared during lay. 7 Step Motion Play {Except CO} Pres the EASY butter on the remember conical during play.
DY Pensions Using the Search and Skip Functions During play, you can search quickly through a sharpie or rack, and use the skip conclusion (6 jump ta the next selection. Searching through a Chapter or Track wa 1f you ward do search 81 a faster speed ar the DVB or GO, pass and hold the Using play, press asd hod the on a wm (Search) buttons on he Emote Control Ry more DVD | 2%, 8X, 32X, 128% their { second. ob fax ex, ax Note The speed marked in this function may be niff from the accuse playback speed.
DVD Assertions Using the Disc and Title Menu (DVD) a MENU billion can be used lo access Disc and fle mans on a DVD during playback. 1 During playback of a DVD dies, press Be MEN bunion on the ale obedient, 2 Press the attribution to select Function, then press he Wor ENTER umn. 3 Peas Tie AFT Bobbins fo select DVD Function, then press the » ar ENTER bunion.
DVD Generations Repeat Play Repeal he current track, chapter, title, @ chosen section or sll of the diet. When playing a DVD/CD 1 Luring play, press the REPEAT bunion on the remote leaning. Repeal sermon App Ears. a DD repeats play by chaplet or lle, 2 wo and CI repeats Pay by rack ar ize, Press the 4» bunions to RIN EE Chaparral: repeals the chapter that is seat! Chapter, Vile or 8, ) paying, en then press the ENTER ~ Title: petals the the halt is playing. button. on = Track: repeals the lack that is .
DVD Over anions Using the A-B Repeat function 1 Bering play, press the. REPEAT bunion on the remake control. Repeal screen BPS. 2 pvp Cross the 4 bullring lo co OMEN 0S < so fort Ae on ES FEMININITY 3 on Mark the Starting Point ME EY Cross the ENTER bunion at . tho beginning of the segment macadamia you want to repeat (Paint Al. 0D Once you select pond A, B i will be selection. ARTIFICER E Nate . Tre minimum AB Repeat time is 5 we BEES.
OVD Restorations Slow Repeat Play This feature slows you to slowly io repeat scenes containing sports, dancing, musical instruments being played ete, so you can shady em more crossly. When playing a DVD 1 Ho BE During play, press the Pw o wit Play/Pause] mullion, Eg ( 2 Crass and fold the »» {Farmyard] button lo choose the lay speed between 16, 144 and 12 of normal during PAUSE or STEP mode. 3 Pros ihe REPEAT bun an.
DVD Operations Adjusting the Aspect Ratio (EZ View) Set the aspect eating {length x width} of your TV screen 56 the ADVERSER will display movies at he appropriate size for your television. To Playback using Aspect Ratio (DVD) Cross the E2 VIEW bunion The serene size changes when the button is passed repeatedly. Th screen room mess: operates tolerantly depending on the screen setting bx he Display Setup TREE.
DVD Restorations H you are using a 4:3 TV For 16:8 aspect ratio discs For 4:3 aspect ratio loves « 43 Letter Box NORMAL SCREEN {splays tha content of the DVD title in 16:8 Displays the consonant of the OVD tie io 8:3 aspect gala, The black bars wil appear a1 the lop aspect ratio, and bottom of fhe serene, + SCREEN FIT + 43 Pan Scan The top and bosom portions of the screen are The lft and tight portions of the screen are out wut off and the full seven appears.
DVD Operations Selecting the Audio Language You can select 8 desired suds Iguanas intuitively and easy with he AUDIO button. Using the AUDIO button (DVD/CD) Cn een Iotas change the desired suds in the Disc During play, press the bao my ona Meg, pass the DISC MENU button. AUDIO tuition. Pye Cv) Ge ~ This function depends on what audio ARE languages are encoded on the dist and fut languages changes |e may photos on af DVDS. tm, ew «ADV dis can contain up to 8 auc pressed rpoalsdiy [Pax IX languages.
DVD Ore Rations Changing the Camera Angle Lien a DVD contains multiple angles of 3 particular scans, you con use the ANGLE ganglion, Using the ANGLE button (DVD) 11 the dist contain multiple angles, Wi ANGLE (35 appears on the scion, 1 «a Prangs the ANGLE button, then the ANGLE oon wit SAE appear will (he COE 80018 Vag’ od was number and the number of i angles available. | Samsung Note 2 com if hg disc igs only one angle, this feature wonk work, urbanity, very few des have Press lhe 4 buttons his greatcoat.
OVD Orientations Using the Zoom Function (DVD) 1 During the playback of a DVD disc, preach the MENU button wing remote contra. 2 Prosy the AF bullhorns softball Function, thee egress thew or ENTER button, 3 Cross the ALY buttons glee) DVO Function, then press the or ENTER button, PE 4 Crass the A/F buttons to i slack Zoom, then press the » or ENTER bull, wt Disc OND play, pews ENTER 10 260m in KETTERING In carder, 5 Press the AFF or «> Buttons fo defect the pan of ihe screen you war! fo salaam in on.
DVD Operations How to insert a Memory Card This unit accepts 10 different types of Memory Cards Ted the Memory Card reportedly with the label facing up, synthesis & may not work, This devise sup pans 10 types of memory cards M0, 8D, Man Media Curd, Memory §6ck, Mamore Stick Pro, Memory Stick Dus, Mini 50 Can X-Ploture Card. through upper sit and Compact Flash, Mice Drive through below slot. In case that cards are inserted ix bao sits, the Com pan? Flash or Mic Drive in the below slot has a prion.
BYD Operations DOWNMARKET Playback 1 pan the disc ay. 2 Lace ihe dist on the ray. 3 Close the tray. 4 Pass fhe ALY or iw buttons to select # song Fle, Press the ENTER bunion to Begin playback af ha song fie. wt When a dig of A folder contain both NIP ang WMA Figs, only one type will be played, not both, Notes OVID cannot be played i the Memory Cord mode. 1 you push the DVO CARD or OPEN bunion in M.CARD mods, tha system wil automatically eater he ADVOCACY mods.
DVD Restorations MP3/WIMA file When you rerecord MP3 or WMA Bes on CD-Memory Dare, please refer is the following. = Your MP3 or WMA ties should be 180 $660 or JOEY format. 1809880 form and Jollity MPS or WHA lies ar compatible with Micro sol's DOS ang Windows, and with Apple's Mac. Iris format is. he most widely used. Memory Card over 408 use FATE, which may not be compatible with this it, When naming your BPS or WMA files, do nol exceed § characters, and enter “mpd, wms® ax the (ie extension.
DVD Restorations Program Play & Random Play ‘You can listen to songs randomly or in the desired sequence, Up lo 20 racks can be programmed. This function is swallowtails only with Audio CDs. Program Play 1 Jr Net Random Play tee toms mode, « bic te wt io stp mie, press the Hon. ~The play made menu will ~The play mode menu wil sparrow. napper, « Cross the 4 or * buttons (0 select 2 Bantam, hen press the ENTER balloon, Press the €or I» buttons by ~The digs will be played is varlet order.
BYD Operations Picture CD Playback 1 Select the desired folder, then press the ENTER bitten. 2 Raga the A7¥ buttons to set act a Failure Bs in the clips menu, then press the ENTER tuition. 3 Raga the INFO, button ts display the mahout. Press fe 4 buttons to select ti many you want lo view, then press the ENTER Bunion, Aloud Screen . BER Returns fa ihe Album Serene. To see the ext six pectorals, press ihe smoking) sultan.
DYD Operations JPEG Discs When playing & CO-Embroidery Cardie CO Only files with the “pg” and * JPG extensions can be played. ~ Hie disc is not closed, it will take linger 10 start playing and not ail of the recorded Ales may be played. ~ Only GOR sides with JPEG Tes in 1B0 9850 or Julie fom can be played. ~ Memory Cart over 4538 use FATS, which may rit be compatible with this unit, « Coma memory cards may nol be performed connect.
DVD Generations Using the Setup Menu The Setup menu lps vou customize your DVD-YCR by allowing you to select various language preferences, sel up a parental level, ever sadist the player 1p 1he ype of television screen you have. 1 With the urd in Stop mods, press ihe MENU button on the premolar control. 2 Cross he ACY buttons to detect OVO, then prods the & of ENTER bunion, rs po wn Language: Setup of the Language.
DVD Restorations Setting Up the Language Features I you set the there is no player many on tis osd disc menu, Audi and subtle language in advance, they bill came up emblematically every lime you wail 8 movie, 1 ith ia unit in Stop mode, pass the MENU button on the Fernando Manic. 2 Press he ACY buttons to select DVD, then press ihe » or ENTER bullion. 3 Press the AY buttons io select Lang urge, then press the » or ENTER button, 4 Rags the APY puling ie slut ihe destined fom, than prods the or ENTER bunion.
DVD Operations Language Function Disc Menu Tir set the Lis Menu Language to your preferred language, lo low hes pleas. I your preferred lavage is available on a DVO, your hse Menu Language wilt automatically be sel to the language you choose, Audio To sat the Audio Language lo your preferred language, Hollow these shops. if your ordered language is available on 3 OVO, your Audio Language wil symptomatically be sel ty the language yau chews.
DVD Operations Setting Up the Audio Options Auto Options allows you to sel up sound tor use with your female audio system. With the DVD in Stop made, press the MENU button on thy remote control 2 Press the APY butts io select DVD, tha press the or ENTER button, 3 Rags he AJY buttons to Helen Audio, then press the Por ENTER bunion. wt «Fo ke the DVD Setup menu disappear, press the MENU button, 4 Press the APY buttons lo salacity ie desires tam, ine pass the » or ENTER butane.
DVD Restorations Setting Up the Display Options {splay options enable you to sel various video functions of the player. With tha unit in Stop mode, press the MENU bunion on the ample contralto. 2 Fess the AY bunions to select DVD, then press this » or ENTER bullion. 3 Ease ihe A/F bunions to select Display, then press thu or ENTER button, t+ Tis mike the DVD Setup menu viisapgresas, pass he MEN bunion. 4 Peas Uw AFY bunions to insulin the desired item, than press the » or ENTER Button.
DVD Pavilions Display Options TV Aspect Depending gn the ype of television you his, you may wank ke adjust the sere an setting {aspect riot. free w [rn rrr 4:3 Letter Box: Beetle when you want 10 see the toll 16:9 rile sneeze DVD supplies, even haughty you have 3 TV with # 473 ratio screen. Black bars will appear at the top and burrito of ihe snares, ~ 4% Pan Scan. Select this for conventional size Ys when you want io ses the central portion of the 18:9 screen.
OVD Restorations Setting Up the Parental Control The Parental Control function works in conjunction with OVD frat have been assigned a rating, whit helps. you ironing the types of DVDS lat your family watches. Thor sre up to § ling levels on a disc. 1 With he DVD in Stop mle, prose the MENU tuition on the male songstress. 2 Frogs the A/F intuitions io Ey select DVD, than press the » pmb or ENTER bunion.
DVD Operations Setting Up the Rating Level 1 With ihe unit in stop mote, press the MENU button on the semis control 2 Frost he ACY Inductions © select DVD, then press the » or ENTER Dustin. ier ror pt 3 Pisa the AY spatulas to Er set act Pallbearer, then press The wor ENTER button, Enter your password. 4 Pres the ACY buttons fo senseless Rating Level, then press he bor ENTER tuition.
DVD Operations Changing the Password Will the grit in stop mode, press [he MENU mullion on the remote control. 2 Press the ANY bunions to select OVO, then press ihe » or ENTER button, 3 Press the AY tut ions to select Parental, then press Ihe Wr ar ENTER button. Enter your passed, 4 Pros the ACY Lours Lo select Change Password, then pass the or ENTER ‘Sullen, wt To make the DVD setup menu disappear, prods the MENU bunion. 5 Enter your new password. ro.
Chapter 5 VCR OPERATIONS In his chapter, you wil loam how 10 play a dives casserole tape, how 10 use the Bme lounger 8rd memory slop fallacious, and how [0 Comfort 8 program a8 you re waltzing TV. Inserting and Ejecting a Video Cassette Tape To Insert a Video Cassette Tape 1 Hold ihe: video casserole lope window-aide up with he row pointing away from you, 2 Gently push the tape though the compartment door unit you: feel the VOR pull 2 The VOR toads the gate automatically.
VCR OPERATIONS Special VCR Playback Features Virile a videotape is plateau, vou can riser a vainly of specie! playback features, including SUL Frame Advance, Skip, Repeal, and more. Press thi Play/Pause bullion again © roue normal playback, Drama Advance In the pause mods, press RAD Io Vance lo tha next frame. Corpsman Review In Play made, press thaws (Forward) or «+ {Rewind} tor weaving al bao spas: Picture Each: Press and caseload 10 advance ve tape Tar ward or backward ai § Hims: username speed.
YOR Reparations Setting the Auto Play you cant you videotapes © play axiomatically when you insert fem, um on Auto Play.
VCA Forenoons Setting the Auto Repeat I you wart your videotapes io play repeatedly, tom on Auto Repeat, 1 Press Ihe MENU bunion on the TREE Con tech, 2 ) avn Cross ha A/F sultans to = a sector VOR, Thea press the or ENTER bunion, wt +(e The VOR will play & tape 3 repeatedly funniness 2 tap control Press ihn ALY bunions tn is activated (slop, fast boulevard or dwindle} select Auto Repeat, then Drags the » or ENTER bunion 10 select On or OH, ped Fe Off: Askew Repeal is disabled.
VCR Operations Using the Tape Counter The tape counter: + Indicates the elapsed time in the play and record modes short, minutes and secondhand. Is resole when a outclass is inserted in the DVORAK, Allows you to gently find Ihe beginning of 3 ~ If the remaining called compactly, you must indicate ihe type of casserole being used 1 Insert o cafetiere in your DVD. WOH.
VER Instigation Searching for a Specific Sequence Each me you record 2 cassette on iis DVD-V OR, an index is automatically marked on the ape when resorting slats. The Search function allows you to fast onward or rewind 10 a specific Index and star playback from al point, Padding on the direction selected, he indexes are numbered as follows: + Prov Bun. being Nat oe | gag. played seq This DVINA uses a standard indexing system {VISIT.
YOR OPERATIONS Variable Search System Go Yo [0:00:00] Step Use Wis saturates when you 3 Wang 16 seas for the Weed counter position of & cassette. Press the CLEAR bullion at the paint on the tape whee you wan to set Ihe counter to [00:00]. The VOR wilt rewind or East forward, searing for fhe £2000 saunter position, and than automatically slop al hat postilion. End Search Use hig feature wham you wand lo search fic a dank position to record a program on a cassettes.
VOR Organizations Basic Recording You can record a TV show in progress by inserting a blank tape and pressing the REC bullion, “eu ce oven ack time in Goiter Ingrowing up to 4 bows by pressing the REC button repeatedly; sue page 77, Ole Be sups your videotapes has a Record Safety Tab. Hf the tab is missing, you can cover the opening with a small pace of tape. Naming: Us not cover (his opening uni ass you ate sure you chant 10 record scar (ha pule. Before You Begin...
VCR Migrations To Walsh a DVD while Recording unsent a DVD in te DVD tray and press the >t (Play/Pause). The gulp will automatically change io the Ov. To Add Recording Time Sea One-Touch Recording {OTA} below. Using One-Touch Recording Cine-Touch Recording (CTR) stows you to add recording ime in Smile increments up 1 4 hows af the touch of a button, 1 Fret a bank VHS tape ng Thi VOR deck. 2 tse the Number bin tons or the buttons {o select tha desired canned, or rosy ihe INPUT SEL.
VCR Operations 4 While in Hereford mode, press he REC button again ta. activate One-Touch Recording {TROT. Retrod length £:30 appears on the On-striven display and Hie OVERSEER will record for exactly 30 minutes, [pr Add Recording Time Continue pressing REC union to add recording time in 30 minute increments up to 4 hours. The OVD-VUR stops. recording automatically whee the time: has elapsed. The IVD VCH will automatically be turned off when the OTR finished.
VCR Operations Using a Timer Recording insert a blank videotape into the VOR deck. Be sure io leave the Record Salty Tab intact, With ihe Timer Recording function, you can program up 10 7 events record up fo a month in advance. Yo Begin Setting the Amer Recording, « Power On your DVD-VCR. « Power 00 yous TV. 1 Press the MERE button on the Female control.
VCR OPERATIONS Selecting Auto Speed ihe length of the landscape is nat Lang enough for 8 dimer recording in the BP mode, sul he recanting pale speed io “ule. Recording wil starting his SP mods, J tha length is not ong enough, the: jape speed will automatically song fom SP note ko SLP mdse. DliyfWaekly Date Programming Wally [surrealism: Use this 1 record TV programs on the sear Chanel 31 the same tine every week.
REFERENCE Problem Action Page Forgot pennyworth r problems. noisy or distorted fou experience | + 80 1010 cants and find ih section of “The screen 3 * Press the #4 ¥ tabulators simultaneously ki: more than § seconds (oH » 0s simultaneously for mon haa 5 seconds ih no dis In he unit, All salting including the password wil raved bo the factory settings. Don use ids unless shapelessly nonstaining the explanations grading the tat rent problem, and Hollow the procedure once again.
Warranty LIMITED WARRANTY TO ORIGINAL PURCHASER THIS SAMSUNG BRAND PRODUCT, 48 SUPPLIED AND DISTRIBUTED BY SAMSUNG ELECTRONICS AMERICA, ING, (SAMSUNG) AND DELIVERED NEW, IN THE ORIGINAL CARTON TO THE ORIGINAL CONSUMER PURCHASER, 1S WARRANTED BY SAMSUNG AGAINST MANUFACTURING DEFECTS IV MATERIALS AND WORKMANSHI® FOR THE FOLLOWING LIMITED WARRANTY PRICED: One (1} Year Parts / Ninety (0) days Labor “This Invited warranty begins on the original date of purchase, snd Is vies only on deadbeats purchased and used i
a> ELECTRONICS HEADQUARTERS 106 Challenger Road Ridge field Park, NJ 07660-0511 TEL: 1-800-8AMSUNG SERVICE DIVISION 400 Valley Road, Suite 201 Mount Arlington, NJ 07858 1-800-SAMSUNG (1-800-726-7864) SAMSUNG COM AKE8-00583F-00