DLPTV DLPTV 1-800-SAMSUNG (1-800-726-7864) Samsung Electronics America Service Division 400 Valley Road, Suite 201 Mount Arlington, NJ 07856 www.samsungusa.com Samsung Electronics Canada Inc. Samsung Customer Care 7037 Financial Drive Mississauga, Ontario L5N 6R3 www.samsung.ca BP68-00283A-00 I N S T R U C T I O N M A N U A L HLP4663W/HLP5063W/HLP6163W This device is a Class B digital apparatus.
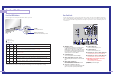
Table of Contents Your New Wide TV ............................................................................................6 Special Features ...............................................................................................46 Replacing the Lamp ................................................................................................6 List of Features .......................................................................................................8 Accessories ...............
SAMSUNG Your New Wide TV
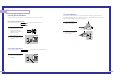
Your New Wide TV Replacing the Lamp • Why do I need to replace the lamp? The lamp used in a projection TV has a limited lifespan. For the best screen quality it needs to be replaced periodically. After replacing the lamp, the screen quality will be bright and clear as new. • For replacement, you will need a 5.91 Inches-long Phillips screwdriver and a pair of gloves. 1 Unplug TV, then use a screwdriver to remove the screw. 2 Remove the Lamp cover. 3 Remove the screws securing the Lamp by hand.
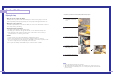
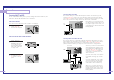
Your New Wide TV List of Features Side Panel Buttons Your TV was designed and engineered using the latest technology. It is a full-featured, high-performance unit that exceeds industry standards.
Your New Wide TV Front Panel LED Indicators Rear Panel Jacks The three lights on the front panel indicate the status of your TV. Use the rear panel jacks to connect components such as a VCR. You can connect different components such as VCRs, Set-Top Box and a DVD player etc., because there are two sets of video input jacks and three set of component video input jacks on the rear panel of your TV. For more information, please see “Connections”. POWER Press to turn the TV on and off.
Your New Wide TV Remote Control Installing Batteries in the Remote Control You can use the remote control up to about 23 feet from the TV. When using the remote control, always point it directly at the TV. You can also use your remote control to operate your Set-Top box, VCR, Cable box or DVD player. See pages 46~47 for details. With normal use, the batteries in the remote control should last about a year.
SAMSUNG Connections
Connections Connecting VHF and UHF Antennas Separate VHF and UHF Antennas If you do not have a cable system, you will need to connect an antenna to your TV. Antennas with 300-ohm Flat Twin Leads If your antenna looks like this: 1 2 it has 300-ohm flat twin leads. Place the wires from the twin leads under the screws on the 300-75 ohm adaptor (not supplied). Use a screwdriver to tighten the screws.
Connections Connecting Cable TV and VCR You can connect different cable systems to your TV, including cable without a cable box, and cable with a cable box that descrambles some or all channels. Connecting a Cable Converter Box This connection allows you to watch cable and premium channels. You should keep your TV selected to “ANT 1 IN” so that you can use the TV features.
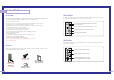
Connections Connecting a Camcorder Connecting a DVD Player The side panel jacks on your TV make it easy to connect a camcorder to your TV. You can use your camcorder to view tapes without using a VCR. The rear panel jacks on your TV make it easy to connect a DVD player to your TV. Connecting to Y,PB,PR 1 Locate the A/V output jacks on the camcorder. They are usually found on the side or back of the camcorder.
Connections Connecting a DTV Set-Top Box Connecting to Y,PB,PR 1 Connect a set of audio cables between the COMPONENT (1 or 2) AUDIO (L,R) IN jacks on the TV and the AUDIO OUT jacks on the Set-Top Box. 2 Connect a set of video cables between the COMPONENT (1 or 2) VIDEO (Y, PB, PR) IN jacks on the TV and VIDEO (Y, PB, PR (or Y, CB, CR) OUT jacks on the Set-Top Box. Note: For an explanation of Component video, see your Set Top Box owner's manual.
SAMSUNG Operation
Operation Turning the TV On and Off Selecting the Menu Language Press the POWER button on the remote control. You can also use the POWER button on the front panel. Choose a language for the on-screen menus: English, Spanish or French. 1 Viewing the Menus and On-Screen Displays The on-screen menu system allows you to control the settings of your TV. Access the on-screen menu system by pressing the MENU button on the remote control.
Operation Memorizing the Channels Storing Channels in Memory (Automatic Method) Your TV can memorize and store all of the available channels for both “off-air” (antenna) and cable channels. After the available channels are memorized, use the CH and CH buttons to scan through the channels. This eliminates the need to change channels by entering the channel digits.
Operation Changing Channels Selecting Your Favorite Channels You can change channels on your TV by using the CH and CH buttons, or by direct selection using the number buttons. You can use the number buttons to tune to any channel (even one that has been erased or has not been memorized). You can store your favorite channels for each available input source (such as TV and CATV). This allows you to quickly and easily find frequently watched channels by pressing the FAV.CH button on the remote control.
Operation Scanning the Channels Labeling the Channels The TV automatically scan all of the channels it has memorized. Use this feature to assign an easy-to-remember label to any channel (i.e., “CBS”, “ESPN”, “PBS2”, CNN1”, etc.) A label consists of five fields, where each field is a letter, a number or a blank. When the INFO button is pressed, the channel label will appear next to the channel number. 1 Press the MENU button. Press the … or † button to select “Channel”, then press the ENTER button.
Operation Picture Control Using Automatic Picture Settings Your TV has automatic picture settings (“Dynamic”, “Standard” and “Movie”) that are preset at the factory. You can activate either “Dynamic”, “Standard” or “Movie” by pressing the P.MODE button (or by making a selection from the menu). Or, you can select “Custom” which automatically recalls your personalized picture settings.
Operation Sound Control 3 You can control and customize the sound levels and settings of the TV with the remote control. Press the œ or √ button to select a particular item to be changed. Press the … or † button to increase or decrease the value of a particular item. Press the EXIT button to exit.
Operation Setting the Clock Setting the Timers Setting the clock is necessary in order to use the various timer features of the TV. Also, you can check the time while watching the TV. (Just press the INFO button.) This TV can be set to turn on or off automatically at specific times that you choose. Before using the timers, you must set the TV’s clock, as described previously. 1 Press the MENU button. Press the … or † button to select “Setup”, then press the ENTER button.
Operation Viewing an External Signal Source Setting the Sleep Timer The sleep timer automatically shuts off the TV after a preset time (from 30 to 180 minutes). Use the remote control to switch between viewing signals from connected equipment, such as VCR, DVD, Set-Top box and the TV source (broadcast or cable). 1 Press the MENU button. Press the … or † button to select “Setup”, then press the ENTER button.
Operation Assigning Names to External Input Mode Freezing the Current Picture This feature enables you to name the input source you have connected. You can freeze the picture when watching a television programme simply by pressing the STILL button. To return to normal viewing, press it again. 1 Press the MENU button. Press the ENTER button to select “Input”. Input Input √ √ Source List : TV Edit Name Picture • In the PIP mode, the main and sub pictures are stilled at the same time.