User Manual High Definition Digital Camcorder www.samsung.
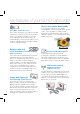
key features of your full HD camcorder Sharp & Vivid 1920 x 1080 Full HD! 3.5” Wide Touch Screen This camcorder adopts 3.5” wide touch LCD supporting 1.15 million pixels which enables you to record videos and photos in sharp color and image. And it also provides an enhanced LCD correction that enables you to make recordings while monitoring the image clearly in a bright sunlight.
Self-Decision on Situation! Smart Auto This camcorder automatically recognizes a recording condition and optimizes itself to the scene, which enables a novice to make a quick recording. Catch the sound! Internal Zooming Microphone Equipped with the internal zooming microphone, it can capture the sound from the scene clearly. Adjusting the video zooming focus to a nearby or distant scene, you will not miss any source of sound wherever it occurs.
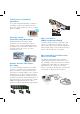
before reading this user manual SAFETY WARNINGS What the icons and signs in this user manual mean; Means that there is a potential risk of death or serious injury. WARNING CAUTION CAUTION Means that there is a potential risk of personal injury or damage to the product. To reduce the risk of fire, explosion, electric shock, or personal injury when using your camcorder, follow these basic safety precautions. Means hints or referential pages that may be helpful when operating the camcorder.
IMPORTANT INFORMATION ON USE About this user manual Thank you for purchasing this Samsung Camcorder. Please read this user manual carefully before you use the camcorder and keep it handy for future reference. Should your camcorder fail to operate correctly, refer to Troubleshooting. This User Manual covers HMX-S10, HMX-S15, and HMX-S16 models. • The HMX-S15 and HMX-S16 have a 32GB, and 64GB built-in storage media (SSD) respectively but also use memory cards.
before reading this user manual - • • • • • • vi Recorded contents may be lost due to a mistake when handling this camcorder or memory card, etc. Samsung shall not be responsible for compensation for damages due to the loss of recorded contents. Make a backup of important recorded data. Protect your important recorded data by copying the files to a PC. We also recommend you to copy it from your PC to other recording media for storage. Refer to the software installation and USB connection guide.
important safety instructions CAUTION RISK OF ELECTRIC SHOCK DO NOT OPEN CAUTION: TO REDUCE THE RISK OF ELECTRIC SHOCK, DO NOT REMOVE COVER (OR BACK). NO USER-SERVICEABLE PARTS INSIDE REFER SERVICING TO QUALIFIED SERVICE PERSONNEL. This symbol indicates that dangerous voltage consisting a risk of electric shock is present within this unit. This symbol indicates that there are important operating and maintenance instructions in the literature accompanying this unit.
important safety instructions 15. Apparatus shall not be exposed to dripping or splashing and no objects filled with liquids, such as vases, shall be placed on the apparatus. 16. VENTILATION: Slots and openings in the cabinet are provided for ventilation to ensure reliable operation of the CAMCORDER and to protect it from overheating. These openings must not be blocked or covered. Never place your CAMCORDER on a bed, sofa, rug, or other similar surface: on or near a radiator or heat register.
23. OVERLOADING: Do not overload wall outlets and extension cords as this can result in a risk of fire or electric shock. 24. OBJECTS AND LIQUIDS: Never push objects of any kind into this CAMCORDER through openings as they may touch dangerous voltage points or short out a part that could result in a fire or electric shock. Never spill liquids of any kind onto the CAMCORDER. Should spillage occur, unplug unit and have it checked by a technician before use. 25.
important safety instructions USER INSTALLER CAUTION: Your authority to operate this FCC certified equipment could be voided if you make changes or modifications not expressly approved by this party responsible for compliance to part 15 FCC rules. NOTE: Hg LAMP(S) INSIDE THIS PRODUCT CONTAIN MERCURY AND MUST BE RECYCLED OR DISPOSED OF ACCORDING TO LOCAL, STATE OR FEDERAL LAWS. For details see lamprecycle.org, eiae.
safety information The safety precautions illustrated below are to prevent personal injury or material damages. Heed all instructions carefully. WARNING Prohibited action. Do not touch the product. Do not disassemble the product. This precaution must be kept. Means that there is a potential risk of serious personal injury. CAUTION Means that there is a potential risk of personal injury or damage to the product Unplug from the power supply.
safety information d flui ng ani cle Do not dispose of battery in a fire as it may explode. Never use cleaning fluid or similar chemicals. Do not spray cleaners directly on the camcorder. Keep the used lithium battery or memory card out of the reach of children. If the lithium battery or memory card is swallowed by children, consult physician immediately. Do not plug or unplug the power cord with wet hands. There is a risk of electric shock.
W 4 CAUTION W 4 Do not drop or expose the camcorder, battery, AC adaptor or other accessories to severe vibrations or impact. This may cause a malfunction or injury. Do not use the camcorder on a tripod (not supplied) in a place where it is subject to severe vibrations or impact. Do not leave the camcorder in a closed vehicle for a long time, where the temperature is very high. Do not expose the camcorder to soot or steam. Thick soot or steam could damage the camcorder case or cause a malfunction.
W 4 W 4 safety information W 4 W 4 Do not use the camcorder near TV or radio: This could cause noise on the TV screen or to radio broadcasts. Do not use the camcorder near strong radio waves or magnetism such as speakers and a large motor. Noise could enter video or audio that are being recorded. W 4 w T Do not hold the camcorder by the LCD monitor when lifting it. The LCD screen could detach and the camcorder may fall. w T W W 4 Use Samsung-approved accessories only.
contents QUICK START GUIDE 07 GETTING TO KNOW THE CAMCORDER 11 GETTING STARTED 20 BASIC OPERATION OF THE CAMCORDER 25 FIRST TIME SETTINGS 29 GETTING READY TO START RECORDING 31 BASIC RECORDING 38 11 12 14 16 What’s included with your camcorder Location of controls Using the remote control Identifying the screen displays 20 21 22 Attaching/detaching the battery Charging the battery Checking the battery state 25 26 27 27 28 Turning your camcorder on/off Switching to the power saving mode Setting
contents BASIC PLAYBACK 49 USING THE MENU ITEMS 55 ADVANCED RECORDING 60 4 46 47 48 Using back light compensation mode Using the flash Using the manual dial 49 50 53 Changing the playback mode Playing back videos Viewing photos 55 56 59 Handling menus and quick menus Menu items Quick menu items 60 61 62 63 64 65 66 67 68 69 70 71 72 72 73 74 75 75 76 76 77 77 78 78 79 81 81 82 83 83 84 84 iSCENE Resolution Slow motion White balance ISO Aperture Shutter EV Super C.
SYSTEM SETTING 85 EDITING VIDEO CLIPS 102 FILE MANAGEMENT 105 WIRELESS NETWORK CONNECTION AND CONFIGURATION 108 85 85 86 86 87 87 88 88 89 89 90 90 91 92 92 93 93 94 95 95 95 96 96 97 98 99 99 100 100 101 LCD Brightness LCD Enhancer Guideline Date/Time Display TV Type TV Display HDMI TV Out Auto LCD Off Remote PC Software USB Connect TV Connect guide Anynet+ (HDMI-CEC) Storage Type (HMX-S15/S16 oniy) Storage Info Format File No.
contents CONNECTING TO A TV 117 DUBBING VIDEOS 117 119 120 Connecting to a high definition TV Connecting to a regular TV Viewing on a TV screen 121 Dubbing to a vcr or dvd/hdd recorder 122 Direct printing with a pictbridge printer 124 125 126 130 Checking your computer type What you can do with a Windows computer Using the Intelli-studio program Using as a removable storage device 132 136 Warning indicators and messages Symptoms and solutions 143 144 Maintenance Using your camcorder abroad 145
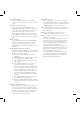
quick start guide This quick start guide introduces the basic operation and features of your camcorder. See the reference pages for more information. You can record videos in H.264 format! You can record videos in H.264 format that is convenient to email and share with your friends and family. You can also take photos with your camcorder. STEP1: Get ready 1. Insert a memory card. page ?? • You can use commercially available SDHC (SD High Capacity) or SD memory cards with this camcorder.
quick start guide Recording videos with HD (high definition) image quality Your camcorder uses advanced H.264 compression technology to realize the clearest video quality. 1. Open the LCD screen. • Your camcorder turns on when you open the LCD screen. Recording photos 1. Open the LCD screen. 2. Press the PHOTO button lightly to adjust the focus, then press it fully (a shutter click sounds). 2. Press the Recording start/stop button. • To stop recording, press the Recording start/stop button.
STEP3: Play back videos or photos Viewing the LCD screen of your camcorder You can find your desired recordings quickly by using the thumbnail index view. 1. Touch the Play ( ) tab on the LCD screen in STBY mode. 2. Touch the desired thumbnail ( 45#: < . JO > / SD / ) tab, then touch the desired image. . */ Viewing on a high definition TV • You can enjoy HD (high definition) videos. page ?? You can also play back videos on a SD (standard definition) image quality TV.
quick start guide Importing and viewing videos/photos from the camcorder to your PC 1. Launch the Intelli-studio program by connecting the camcorder to your PC via USB cable. • A new file saving screen appears with the Intelli-studio main window. Click “Yes”, the uploading procedure will start. Contents Manager Saved files into your PC 2. The new files are saved to your PC and registered to “Contents Manager” on the Intelli-studio program.
getting to know the camcorder WHAT'S INCLUDED WITH YOUR CAMCORDER Your new camcorder comes with the following accessories. If any of these items is missing from your box, call Samsung’s Customer Care Center.
getting to know the camcorder LOCATION OF CONTROLS Front/Left Remote control sensor Recording indicator Built-in flash Lens Manual button/dial Internal zoom microphone Flash ( ) button Anti-shake (OIS) ( ) button Display ( ) button SMART AUTO / VIEW button 12 Backlight ( ) button AV jack (Composite) HDMI jack USB jack Jack cover ( ) Power ( ) button TFT LCD screen (Touch screen) Recording start/stop button Zoom (W/T) button During a recording, be careful not to block the internal microphone and lens.
Rear/Right/Top/Bottom Memory card cover Memory card slot MODE button / Mode indicator : Video mode : Photo mode Zoom (W/T) lever PHOTO button Built-in speaker Internal zoom microphone Recording start/stop button Charging (CHG) indicator ) Jack cover ( DC IN jack External microphone (MIC) jack Battery release switch Tripod receptacle Grip belt hook 13
getting to know the camcorder USING THE REMOTE CONTROL You can operate the camcorder at a distance with a remote control. REC (Recording start/stop) button Display ( ) button Skip ( / ) button Stop ( ) button MENU button Control ( / / / PHOTO button / ) buttons Zoom (W/T) button Search ( / ) button Slow playback ( ) button Play/Pause ( ) button Remove the insulation sheet before using the remote control! Remove the insulation sheet before using the remote control as shown in the illustration.
Installing the button type battery (CR2025) in the remote control 1. Turn the battery holder counter clockwise (as indicated with ( ) mark) using your fingernail or a coin to open it. • The battery holder opens. 2. Insert the battery into the battery holder with the positive (+) terminal facing down and press it firmly until you hear a locking sound. 3.
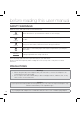
getting to know the camcorder IDENTIFYING THE SCREEN DISPLAYS The available functions vary depending on the selected operation mode, and different indicators appear depending on the setting values. PRECHECK! • This On Screen Display (OSD) is shown in the Video record mode only. • Select the Video record ( ) mode by pressing the MODE button. page ?? Video record mode Center of the LCD screen . */ 45#: < .
PRECHECK! • This On Screen Display (OSD) is shown in the Photo record mode only. • Select the Photo record ( ) mode by pressing the MODE button. page ?? Photo record mode Center of the LCD screen . */ ' Indicator Meaning 5M / / 2 Operating status (focus / recording)/ Self Timer Face Detection frame & &7 NOR NO OR Magic Touch point IISO SO SO 50 Optical zoom ".
getting to know the camcorder PRECHECK! • This On Screen Display (OSD) is shown in the Video play mode only. • Select the Play ( ) tab on the LCD screen to select the Video play ( / SD ) mode. page ?? Video play mode Top of the LCD screen @ . */ Indicator / SD Meaning Video play mode Operating status (play, pause, etc.) @ ".