FULL MANUAL HW-M360 Imagine the possibilities Thank you for purchasing this Samsung product. To receive more complete service, please register your product at www.samsung.
SAFETY INFORMATION WARNING •• The following also applies to the Wireless Subwoofer (PS-WM20). •• To reduce the risk of fire or electric shock, do not expose this appliance to rain or moisture. •• To prevent injury, this apparatus must be SAFETY WARNINGS securely attached to the floor/wall in TO REDUCE THE RISK OF ELECTRIC SHOCK, DO accordance with the installation instructions. NOT REMOVE THE COVER (OR BACK). •• This product contains chemicals known to the NO USER-SERVICEABLE PARTS ARE INSIDE.
Important Safety Instructions •• Reorienting or relocating the receiving antenna. Read these operating instructions carefully •• Increasing the separation between the before using the unit. Follow all the safety equipment and receiver. •• Connecting the equipment to an outlet that is on a different circuit than the radio or TV. instructions listed below. Keep these operating instructions handy for future reference. 1. Read these instructions. •• Consulting the dealer or an experienced 2.
12. Use only with the cart, stand, 3. Do not expose the unit to direct sunlight or tripod, bracket, or table other heat sources. This could lead to specified by the manufacturer, overheating and cause the unit to or sold with the apparatus. malfunction. When a cart is used, use caution when 4. Protect the product from moisture (i.e. moving the cart/apparatus combination to vases), and excess heat (e.g. a fireplace) or avoid injury from tip-over. equipment creating strong magnetic or 13.
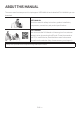
ABOUT THIS MANUAL The user manual has two parts: this simple paper USER MANUAL and a detailed FULL MANUAL you can download. USER MANUAL See this manual for safety instructions, product installation, components, connections, and product specifications. FULL MANUAL You can access the Full Manual on Samsung’s on-line customer support center by scanning the QR code. To see the manual on your PC or mobile device, download the manual in document format from the website. (http://www.samsung.
CONTENTS 01 Checking the Components Inserting Batteries before using the Remote Control (AA batteries X 2) 02 03 04 05 2 -------------------------- Product Overview 2 3 Front Panel / Right Side Panel of the Soundbar -------------------------- 3 Bottom Panel of the Soundbar -------------------------- 4 Connecting the Soundbar 5 Connecting Electrical Power -------------------------- 5 Connecting the Soundbar to the Subwoofer –– Automatic connection between the subwoofer and the Soundbar –
08 09 10 Using the Remote Control 19 How to Use the Remote Control -------------------------- 19 Adjusting the Soundbar volume with a TV remote control -------------------------- 22 Using the Hidden Buttons -------------------------- 23 Output specifications for the different sound effect modes -------------------------- 23 Installing the Wall Mount 24 Installation Precautions -------------------------- 24 Wallmount Components -------------------------- 24 Detaching the Soundbar from the
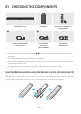
01 CHECKING THE COMPONENTS Bluetooth POWER Surround SOUND MODE VOL WOOFER SOUNDBAR Soundbar Main Unit Subwoofer Remote Control / Batteries (AH59-02758A) AC/DC Adapter (Main Unit) (BN44-00886A) Optical Cable (AH39-00779A) 2 1 Power Cord (Subwoofer) (3903-001117) •• The power connection steps are labelled (1, 2). For more information about power connections, see page 5. •• For Soundbar wall mounting components, see page 24. •• Micro USB to USB adapter Cable is sold separately.
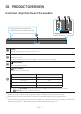
02 PRODUCT OVERVIEW Front Panel / Right Side Panel of the Soundbar Position the product so that the SAMSUNG logo is located on the top. Right Side of the Soundbar Display Displays the product’s status and current mode. +/- (Volume) Button Adjusts the volume. •• When adjusted, the volume level appears on the Soundbar’s front display. (Power) Button Turns the power on and off. (Source) Button Selects the source input mode. Input mode Display Optical Digital input D.
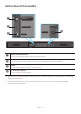
Bottom Panel of the Soundbar DIGITAL AUDIO IN (OPTICAL) USB (5V 0.5A) AUX IN DC 19V DC 19V DIGITAL AUDIO IN (OPTICAL) USB (5V 0.5A) AUX IN DIGITAL AUDIO IN (OPTICAL) Connect to the digital (optical) output of an external device. USB (5V 0.5A) Connect a USB device here to play music files on the USB device through the Soundbar. AUX IN Connect to the Analog output of an external device. DC 19V (Power Supply In) Connect the AC/DC power adapter.
03 CONNECTING THE SOUNDBAR Connecting Electrical Power Use the power components (1, 2) to connect the units to electrical outlets in the following order: 1.) Subwoofer 2.) Soundbar Main Unit. See the illustrations below. •• For more information about the required electrical power and power consumption, refer to the label attached to the product.
Connecting the Soundbar to the Subwoofer When the subwoofer is connected, you can enjoy rich bass sound. Automatic connection between the subwoofer and the Soundbar When you turn the power on after connecting the power cables to the Soundbar and subwoofer, the subwoofer is automatically connected to the Soundbar. •• When auto pairing is complete, the blue indicators at the top of the subwoofer turn on.
Manually connecting the subwoofer if automatic connection fails Check before performing the manual connection •• Check whether the power cables for the Soundbar and subwoofer are connected properly. •• Make sure that the Soundbar is turned on. 1. Press and hold ID SET on the rear of the subwoofer for at least 5 seconds. The red indicator on the top of the subwoofer turns off and the blue indicator blinks. ID SET 5 Sec ID SET POWER Rear of the Subwoofer Top of the Subwoofer 2. Turn off the Soundbar.
•• If the main unit is powered off, the wireless subwoofer will go into stand-by mode and the STANDBY LED on the rear will be Red after blinking Blue several times. •• If you use a device that uses the same frequency (5.8GHz) as the Soundbar near the Soundbar, interference may cause some sound interruption. •• The maximum transmission distance of the wireless signal of the main unit is about 32.8 ft, but may vary depending on your operating environment.
04 CONNECTING TO YOUR TV Hear TV sound from your Soundbar through wired or wireless connections. •• When the Soundbar is connected to a Samsung smart TV released in 2017 or later, the Soundbar can be controlled using the TV’s remote control. –– This function also allows you to use the TV menu to adjust the sound field and various settings as well as the volume and mute. Method 1.
Auto Power Link Auto Power Link automatically turns on the Soundbar when the TV is turned on. 1. Connect the Soundbar and a TV with a digital optical cable. 2. Press the (Source) button on the right side panel or on the remote control, and then select “D.IN”. 3. Press the Left button on the remote control for 5 seconds to turn Auto Power Link on or off. •• Auto Power Link is set to ON by default. (To turn off this function, turn off Auto Power using the Soundbar.
If the device fails to connect •• If the previously connected Soundbar listing (e.g. “[AV] Samsung Soundbar Mxxx M-Series”) appears in the list, delete it. •• In “BT” mode, press and hold the (Source) button for more than 5 seconds on the top panel of the Soundbar or on the remote control to switch to “BT PAIRING” mode. Then, select “[AV] Samsung Soundbar Mxxx M-Series” from the TV’s search list.
05 CONNECTING AN EXTERNAL DEVICE Connect to an external device via a wired or wireless network to play the external device’s sound through the Soundbar. Connecting using an Optical or Analog Audio (AUX) Cable BD / DVD player / Set-top box / Right Side of the Soundbar Game console DIGITAL AUDIO IN (OPTICAL) OPTICAL OUT Optical Cable USB (5V 0.
06 CONNECTING A USB You can play music files located on USB storage devices through the Soundbar. USB port DIGITAL AUDIO IN (OPTICAL) Display DC 19V USB (5V 0.5A) AUX IN USB USB (5V 0.5A) Micro USB to USB adapter Cable (not supplied) 1. Connect a Micro USB to USB adapter cable with a male USB 2.0 Micro USB plug (Type B) on one end and a standard female 2.0 USB jack (Type A) on the other end to the micro USB jack on your Soundbar. •• Micro USB to USB adapter Cable is sold separately.
File Format Type Compatibility list Extension Codec Sampling Rate Bitrate *.mp3 MPEG 1 Layer2 16KHz ~ 48KHz 80kbps~320kbps MPEG 1 Layer3 16KHz ~ 48KHz 80kbps~320kbps MPEG 2 Layer3 16KHz ~ 48KHz 80kbps~320kbps MPEG 2.5 Layer3 16KHz ~ 48KHz 80kbps~320kbps Wave_Format_MSAudio1 16KHz ~ 48KHz 56kbps~128kbps Wave_Format_ MSAudio2 16KHz ~ 48KHz 56kbps~128kbps AAC 16KHz ~ 96KHz 48kbps~320kbps AAC-LC 16KHz ~ 96KHz 128kbps~192kbps 5.1ch 320kbps HE-AAC 24KHz ~ 96KHz 48kbps~64kbps 5.
07 CONNECTING A MOBILE DEVICE Connecting via Bluetooth When a mobile device is connected using Bluetooth, you can hear stereo sound without the hassle of cabling. •• You cannot connect more than one Bluetooth device at a time. Bluetooth device The initial connection 1. Press the (Source) button on the right side panel or on the remote control, and then select “BT”. 2. Change “BT” to “BT PAIRING”.
What are the BT READY and BT PAIRING statuses? •• BT READY : In this mode, you can search for previously connected TVs or connect to the Soundbar from a previously connected mobile device. •• BT PAIRING : In this mode, you can connect to a new device. (While in “BT” mode, press and hold the (Source) button for more than 5 seconds on the right side of the Soundbar or on the remote control.) NOTES •• If asked for a PIN code when connecting a Bluetooth device, enter <0000>.
Disconnecting the Bluetooth device from a Soundbar You can disconnect a Bluetooth device from the Soundbar. For instructions, see the Bluetooth device’s user manual. •• The Soundbar will be disconnected. •• When the Soundbar is disconnected from the Bluetooth device, the Soundbar will display “BT DISCONNECTED” on the front display. Disconnecting the Soundbar from the Bluetooth device Press the (Source) button on the right side panel or on the remote control, and then change to any mode except “BT”.
Using the Samsung Audio Remote App Installing the Samsung Audio Remote App To control the Soundbar with your smart device and the Samsung Audio Remote app, download the Samsung Audio Remote app from the Google Play store. Market search : Samsung Audio Remote Launching the Samsung Audio Remote App To launch and use the Samsung Audio Remote app, touch the Audio Remote icon on your smart device, and then follow the directions on the screen.
08 USING THE REMOTE CONTROL How to Use the Remote Control Turns the Soundbar on and off. Power Bluetooth POWER Surround SOUND MODE VOL WOOFER SOUNDBAR Surround Surround You can select from TREBLE, BASS, or AUDIO SYNC. •• To control the volume of the treble or bass Sound Control sound, select TREBLE or BASS in Sound Settings, and then adjust the volume between -6~+6 by using the Up/Down buttons.
Bluetooth POWER Surround SOUND MODE SOUND MODE •• DRC (Dynamic Range Control) Lets you apply dynamic range control to Dolby Digital tracks. If you press and hold the SOUND MODE button while in standby mode, DRC (Dynamic Range Control) turns on or off. With the DRC turned on, loud sound is reduced. (The sound may be distorted.) WOOFERPress to select a source connected to the Soundbar.
Press the indicated areas to select Up/Down/Left/Right. Up/Down/ Bluetooth POWER Surround Left/Right SOUND MODE Press Up/Down/Left/Right on the button to select or set functions. •• Repeat To use the Repeat function in “USB” mode, press the Up button. VOL WOOFER •• Music Skip Press the Right button to select the next music file. Press the Left button to select the previous music file. •• Auto Power Link You can turn Auto Power Link on or off.
FE R Su rro un d D U N VO L D N SO SO SO U VO L BA R BA R W OO W OO W OO D N U U N VO L D BA R BA R SOUND MODE O SO M UN OD D E Bl u PO eto W oth ER Bl u PO eto W oth ER FE R Su rro un d WOOFER SO M UN OD D E Bl u PO eto W oth ER WOOFER FE R Su rro un d Bluetooth POWER Surround OO W OO BA R D N U SO VO L BA R D N SO U VO L Push the button up or down to adjust the volume. •• Mute Press the VOL button to mute the sound. Press it again to unmute the sound.
Using the Hidden Buttons Hidden Button Reference page Remote Control Button Function Surround TV remote control On/Off page 15 Auto Power Down On/Off (AUX mode) page 20 Initialize (Standby) page 28 (Source) p (Play / Pause) page 22 BT Paring VOL ID SET (Standby) page 7 Left Auto Power Link ON/OFF page 10 7 Band EQ page 23 DRC ON/OFF (Standby) page 23 (Sound Control) SOUND MODE Output specifications for the different sound effect modes Effect Input Bluetooth POWER Surround Except
09 INSTALLING THE WALL MOUNT Installation Precautions •• Install on a vertical wall only. •• Do not install in a place with high temperature or humidity. •• Verify whether the wall is strong enough to support the product’s weight. If not, reinforce the wall or choose another installation point. •• Purchase and use the fixing screws or anchors appropriate for the kind of wall you have (plaster board, iron board, wood, etc.). If possible, fix the support screws into wall studs.
1. Place the Wall Mount Guide against the wall 3. Push a pen tip or sharpened pencil tip surface. through the center of the B-TYPE images on •• The Wall Mount Guide must be level. each end of the Guide to mark the holes for •• If your TV is mounted on the wall, install the supporting screws, and then remove the the Soundbar at least 2 inches (5 cm) Wall Mount Guide. below the TV. A B CENTER LINE A-TYPE : 616mm B-TYPE : 360mm B A B CENTER LINE 2 inches or more 4.
6. Use the two Screws (M4 x L12) to attach both •• The left and right mounts are different shapes. Make sure to position them Bracket-Wall Mount L and R to the correctly. Soundbar’s bottom. For a proper fit, make sure to align the bumps on the Soundbar to the holes on the brackets. Wall Mount R Wall Mount L 7. Install the Soundbar with the attached Bracket-Wall Mounts by hanging the Bracket-Wall Mounts on the Holder-Screws on the wall.
10 SOFTWARE UPDATE Detaching the Soundbar from the Wall 1. To separate the Soundbar from the wall mount, push it in the direction of arrow, tilt it up slightly, and then pull it away from the Samsung may offer updates for the Soundbar’s wall as shown. system firmware in the future. USB port DIGITAL AUDIO IN (OPTICAL) DC 19V USB (5V 0.5A) AUX IN USB (5V 0.5A) Micro USB to USB adapter Cable (not supplied) •• Do not hang onto the installed unit and avoid striking or dropping the unit.
Updating Procedure If UPDATE is not displayed 1. Connect a Micro USB to USB adapter cable 1. Turn off the Soundbar, disconnect and then with a male USB 2.0 Micro USB plug (Type B) reconnect the USB storage device that on one end and a standard female 2.0 USB contains the update files to the Soundbar’s jack (Type A) on the other end to the micro USB port. USB jack on your Soundbar. 2.
11 TROUBLESHOOTING Refer to the table below if this product does not function properly. If the problem you are experiencing is not listed below or if the instructions below do not help, turn off the product, disconnect the power cord, and contact Samsung Electronics at 1-800-SAMSUNG (1-800-726-7864). The unit will not turn on. Is the power cord plugged into the outlet? ;; Connect the power plug to the outlet. A function does not work when the button is pressed.
12 LICENSE 13 OPEN SOURCE LICENSE NOTICE To send inquiries and requests regarding open Manufactured under license from Dolby Laboratories. Dolby, Dolby Audio and the double-D symbol are trademarks of Dolby Laboratories. For DTS patents, see http://patents.dts.com. sources, contact Samsung via Email (oss.request@samsung.com). 14 IMPORTANT NOTES ABOUT SERVICE Manufactured under license from DTS Licensing Limited.
15 SPECIFICATIONS AND GUIDE Specifications USB Weight GENERAL AMPLIFIER Dimensions (W x H x D) 5V/0.5A Soundbar Main Unit 3.3 lbs (1.5kg) Subwoofer (PS-WM20) 10.1 lbs (4.6kg) Soundbar Main Unit Subwoofer (PS-WM20) 35.7 x 2.1 x 2.8 inches (907.5 x 53.5 x 70.5 mm) 7.0 x 13.9 x 11.8 inches (179.0 x 353.0 x 299.
LIMITED WARRANTY TO ORIGINAL PURCHASER This SAMSUNG brand product, as supplied and distributed by SAMSUNG and delivered new, in the original carton to the original consumer purchaser, is warranted by SAMSUNG against manufacturing defects in materials and workmanship for a limited warranty period of: One (1) Year Parts and Labor* (*90 Days Parts and Labor for Commercial Use) This limited warranty begins on the original date of purchase, and is valid only on products purchased and used in the United States.
Certification model only The party responsible for product compliance: Samsung Electronics Co., LTD. America QA lab of Samsung 19 Chapin Rd. Building D, Pine Brook, New Jersey 07058 QUESTIONS OR COMMENTS? COUNTRY IN THE US CALL 1-800-SAMSUNG (726-7864) OR VISIT US ONLINE AT WRITE www.samsung.com/us/support Samsung Electronics America, Inc. 85 Challenger Road Ridgefield Park, NJ 07660 © 2017 Samsung Electronics Co., Ltd. All rights reserved.