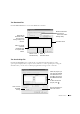
The Phonebook Tab Click the Phonebook tab to create and edit Phonebook entries. Reads the Phonebook entries from the machine to the Printer Settings Utility. Downloads the Phonebook entries from the Printer Settings Utility to the machine. Phonebook entries Allows you to edit a selected Phonebook entry in a separate Edit window. Deletes a selected Phonebook entry. Deletes all Phonebook entries.
The Fax Cover Sheet Tab Click the Fax Cover Sheet tab to create a fax cover page. When you send a fax, you can send a cover page together. For details, see page 139. The fax cover page contains the date, the sender’s fax number and machine ID, the recipient’s fax number and machine ID and the total number of pages you sent. Enter the machine ID you set. Enter your fax number. Click to send this cover page to the machine.
Installing Options Precautions When Installing Machine Options Installing Printer Memory Installing an Optional Tray2
Precautions When Installing Machine Options DISCONNECTING THE POWER CORD: Never remove the control board while the printer is plugged in. To avoid the possibility of an electrical shock, always disconnect the power cord when installing or removing ANY internal or external printer option. DISCHARGE OF STATIC ELECTRICITY: The control board and internal printer memory are sensitive to static electricity.
3 Open the lever on each side of the DIMM slots completely. 4 Remove the memory DIMM from the antistatic package. Locate the alignment notches on the bottom edge of the DIMM. Notches Connection points NOTE: Avoid touching the connection points along the edge of the memory. 5 Hold the memory DIMM. Align the notches on the DIMM with the notches at the top of the DIMM slot.
18 8 6 Insert the ends of the memory DIMM into the slot on the levers. 7 Push the memory DIMM firmly in to make sure you fully insert it into the slot. 8 Replace the control board cover, as shown. 9 Reconnect the power cord and printer cable, and turn the printer on.
Removing the Memory 1 Follow steps 1 and 2 on page 186 to access the control board. 2 Push the levers at both ends of the DIMM slot away from the DIMM. 3 Place the DIMM in its original packaging or wrap it with paper and store it in a box. 4 Follow from step 8 on page 188. Installing an Optional Tray2 You can increase the paper handling capacity of your machine by installing an optional Tray2. This tray holds 250 sheets of paper. 1 Turn the machine off and unplug all cables from the machine.
19 0 3 Find the location of the connector and the optional tray positioners. 4 Place the machine over the tray, aligning the feet on the machine with the positioners in the optional Tray2.
5 Plug the cable into the connector on the back of the machine. 6 Load paper in the optional Tray 2. For information about loading paper in this tray, see page 17. 7 Reconnect the power cord and cables and then turn the machine on. When you print a document on paper loaded in the optional Tray 2, you must configure the properties of the printer driver. To access the properties of the printer driver: 1 Click the Windows Start button. 2 For Windows 98/Me/NT 4.
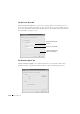
19 2 5 Click the Printer tab, and select Tray 2 from the Optional Tray drop-down list. 6 Click OK and print the document.
Specifications General Specifications Scanner and Copier Specifications Printer Specifications Facsimile Specifications Paper Specifications
General Specifications Item Description Automatic document feeder Up to 50 sheets (20 lb, 75g/m2) ADF Document size Width: 5.6-8.5in. (142-216 mm) Length: 5.8-14in.
Item Weight Description Net: 15.6Kg (including toner cartridge), 14.8Kg (except toner cartridge) Gross: 20.4Kg(including consumables, accessories and package) Package Weight Paper: 2.7Kg Plastic: 0.7Kg Scanner and Copier Specifications Item Description Compatibility TWAIN standard Scanning method Color CCD (Charge Coupled Device) module Resolution Optical: 600 x 1200 dpi Enhanced: 4,800 x 4800 dpi Effective scanning length Platen: 11.5 in. (293 mm) ADF: 14in.
Printer Specifications Item Description Printing method Laser Beam Printing Printing speed Letter: 22 ppm (pages per minute) A4: 20 pages per minute Paper size Paper tray: Letter, A4, Legal, Folio, A5, A6 Bypass tray: Letter, Legal, A4, Folio, Executive, A5, A6, A6 card, Post Card 4x6, HagaKi, Envelope 7-3/4, Envelope 9, Envelope 10, Envelope COM-10, Envelope DL, Envelope C5, Envelope C6, Envelope B5, JIS B5, ISO B5 * Min.: 3 x 5in. (76 x 127 mm) Max.: 8.5 x 14 in.
Facsimile Specifications Item Description Compatibility ITU-T Group 3 Applicable line Public Switched Telephone Network (PSTN) or behind PABX Data coding MH/MR/MMR (ECM Mode) and JPEG for color fax transmission Modem speed 33.6 Kbps Transmission speed Approx. 3 seconds/page * Transmission time applies to memory transmission of text data with ECM compression using only ITU-T No.1 Chart. Scanning speed Platen: approx. 6 seconds/A4 (at standard fax resolution mode) ADF: approx.
Paper Specifications Overview Your machine accepts a variety of print materials, such as cut-sheet paper (including up to 100 percent recycled fiber content paper), envelopes, labels, transparencies and custom-size paper. Properties, such as weight, composition, grain and moisture content, are important factors affecting the machine’s performance and the output quality.
Paper Dimensions a Minimum size 3 x 5in. (custom) (76 x 127 mm) Weight 60-120g/m2 bond (16-32 lb) Capacity b 1 sheet of paper for the Bypass tray Maximum size 8.5 x 14 in. (Legal) (216 x 356 mm) Transparency Labels Same minimum and 138-146 g/m2 maximum paper sizes as listed above. 120-150 g/m2 Cards 90-163 g/m2 Envelopes 75-90 g/m2 a. The machine supports a wide range of media sizes. b. Capacity may vary depending on print materials’ weight and thickness, and environmental conditions.
Symptom Problem with paper Solution Excessive curl problems with feeding Too moist, wrong grain direction or short-grain construction • Use the rear output slot. • Use long-grain paper. Jamming, damage to machine Cutouts or perforations Do not use paper with cutouts or perforations. Problems with feeding Ragged edges Use good quality paper. NOTE: Do not use letterhead paper printed with low-temperature inks, such as those used in some types of thermography.
Printer and Paper Storage Environment Paper storage environmental conditions directly affect the feed operation. Ideally, the machine and paper storage environment should be at or near room temperature, and not too dry or humid. Remember that paper is hygroscopic; it absorbs and loses moisture rapidly. Heat works with humidity to damage paper. Heat causes the moisture in paper to evaporate, while cold causes it to condense on the sheets.
21 0 Sp e ci fi ca t io n s
Regulatory Notices COMMENT: This is an all-inclusive boilerplate. Check with your EMC regulatory and safety contacts to verify that all of these statements apply to your product. Remove any statements that do not apply, as directed by your EMC regulatory and safety contacts.
Information Technology Equipment (ITE), including devices, expansion cards, printers, input/output (I/O) devices, monitors, and so on, that are integrated into or connected to the computer should match the electromagnetic environment classification of the computer. A Notice About Shielded Signal Cables: Use only shielded cables for connecting devices to any Dell device to reduce the possibility of interference with radio communications services.
FCC Identification Information COMMENT: Add the regulatory model number as appropriate for your computer in the following bulleted list. The following information is provided on the device or devices covered in this document in compliance with FCC regulations: • Model number: • Company name: Dell Inc. One Dell Way Round Rock, Texas 78682 USA 512-338-4400 COMMENT: The following modem information is only applicable for products with onboard modems, not add-in modem PCMCIA cards.
Fax Branding The Telephone Consumer Protection Act of 1991 makes it unlawful for any person to use a computer or other electronic device, including fax machines, to send any message unless such message clearly contains in a margin at the top or bottom of each transmitted page or on the first page of the transmission, the date and time it is sent, identification of the business, other entity, or individual sending the message, and the telephone number of the sending machine or such business, other entity, or
COMMENT: WRITERS: Verify the "0.6 B" measurement in the following clause with your Regulatory modem contacts. The REN for the internal modem as stated on the IC regulatory label located on the bottom of the computer is 0.6 B. The following information is provided in compliance with IC regulations: Dell Inc.
CE Mark Notice This equipment complies with the essential requirements of the European Union Directive 1999/5/EC. COMMENT: Use the New Zealand Telecom Warnings only in documents for computers that have modems and are shipping to New Zealand. New Zealand Telecom Warnings General "The grant of a Telepermit for any item of terminal equipment indicates only that Telecom has accepted that the item complies with minimum conditions for connection to its network.
Important Notice "Under power failure conditions, this telephone may not operate. Please ensure that a separate telephone, not dependent on local power, is available for emergency use." "Some parameters required for compliance with Telecom’s Telepermit requirements are dependent on the equipment (PC) associated with this device.
VCCI Notice (Japan Only) Most Dell computers are classified by the Voluntary Control Council for Interference (VCCI) as Class B information technology equipment (ITE). However, the inclusion of certain options can change the rating of some configurations to Class A. ITE, including devices, expansion cards, printers, input/output (I/O) devices, monitors, and so on, integrated into or connected to the computer should match the electromagnetic environment classification (Class A or B) of the computer.
MIC notice (Republic of Korea Only) To determine which classification (Class A or B) applies to your computer (or other Dell digital device), examine the Republic of Korean Ministry of Information and Communications (MIC) registration labels located on your computer (or other Dell digital device). The MIC label may be located separately from the other regulatory marking applied to your product.
MIC Class B Regulatory Label If the regulatory label includes the following marking, your computer is a Class B product: Polish Center For Testing And Certification Notice The equipment should draw power from a socket with an attached protection circuit (a 3-prong socket). All equipment that works together (computer, monitor, printer, and so on) should have the same power supply source.
BSMI Notice (Taiwan Only) If you find a following section is applicable: or mark on the regulatory label on the bottom, side, or back panel of your computer, the 221
NOM Information (Mexico Only) COMMENT: The model number, supply voltage, frequency, and current consumption figures may vary from computer to computer. Check with Product Safety Engineering to determine the information for your computer. Also ask whether you should use dashes or slashes for the "Supply voltage" and "Frequency" numbers.
Exporter: Dell Inc. One Dell Way Round Rock, TX 78682 Importer: Dell Computer de México, S.A. de C.V. Paseo de la Reforma 2620 - 11° Piso Col. Lomas Altas 11950 México, D.F. Ship to: Dell Computer de México, S.A. de C.V. al Cuidado de Kuehne & Nagel de México S. de R.L. Avenida Soles No. 55 Col. Peñon de los Baños 15520 México, D.F.
22 4