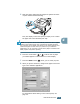
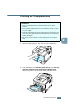
5 Slide the paper width guide and adjust it against the stack of print material without bending. Now, the display on the front panel prompts you to confirm the paper size in the Multi-Purpose Tray. NOTE: Your printer cannot automatically detect the size of paper loaded in the Multi-Purpose Tray. Configuring the Multi-Purpose Tray with the correct paper size allows you to select paper by size rather than paper source when you print from your software application.
9 After printing, push the extender back to its place and close the Multi-Purpose Tray. Using the Manual Feed Mode If you select Manual Feed in the Source option when changing print settings, you can manually load a sheet of print material in the Multi-Purpose Tray. Manually loading paper can be helpful when you want to check the print quality after each page is printed.
When you print a document, you must select Manual Feed for Source from the software application, and then select the correct paper size and type. 4 4 Print a document. The display shows a message prompting you to load paper and press the On-Line/Continue button ( ). 5 Press the On-Line/Continue button ( ). The printer picks up the paper and prints. After one page is printed, the message appears again. 6 Insert the next sheet into the Multi-Purpose Tray and press the On-Line/Continue button ( ).
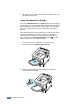
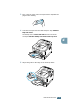
Printing on Envelopes Guidelines • Only use envelopes recommended for laser printers. Before loading envelopes in the Multi-Purpose Tray, make sure that they are undamaged and are not stuck together. • Do not feed stamped envelopes. • Never use envelopes with clasps, snaps, windows, coated lining, or self-stick adhesives. These envelopes may severely damage the printer. 1 Open the Multi-Purpose Tray and slide the extender to its full-length position. 2 Open the rear output tray and pull the extender. 4.
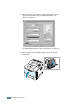
3 Flex or fan the edge of the envelope stack to separate the pages before loading. 4 Load the envelopes onto the Multi-Purpose Tray with the flap side down. The stamp area is on the left side and the end of the envelope with the stamp area enters the tray first. 4 5 Adjust the guide to the edge of the envelope stack. USING PRINT MATERIALS 4.
When you print on envelopes, configure the paper source, type and size properly in the software application. For details, see page 5.7. For details about setting on the control panel, see page 3.5. 7 After printing, close the Multi-Purpose Tray and the rear output tray. 4.
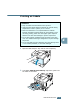
Printing on Labels Guidelines • Only use labels recommended for laser printers. • Verify that the labels’ adhesive material can tolerate fusing temperature of 200°C (392°F) for 0.1 second. • Make sure that there is no exposed adhesive material between the labels. Exposed areas can cause labels to peel off during printing, which can cause paper jams. Exposed adhesive can also cause damage to printer components. • Do not feed a sheet of label through the printer more than once.
3 When you print on labels, configure the paper source, type and size properly in the software application. For details, see page 5.7. For details about setting on the control panel, see page 3.5. 4 After printing, close the Multi-Purpose Tray and the rear output tray. NOTE: To prevent labels from sticking, do not let the printed label sheets stack up as they are printed out. 4.
Printing on Transparencies Guidelines • Only use transparencies recommended for use in laser printers. • Ensure that transparencies are not wrinkled, curled, or have any torn edges. • Hold the transparencies by the edges and avoid touching the print side. Oils deposited on the transparency can cause print quality problems. • Be careful not to scratch or leave fingerprints on the print side. 1 Open the Multi-Purpose Tray and the rear output tray.
3 When you print on transparencies, configure the paper source, type and size properly in the software application. For details, see page 5.7. For details about setting on the control panel, see page 3.5. 4 After printing, close the Multi-Purpose Tray and the rear output tray. NOTES: • If you print on thin transparencies to the rear output tray, they can be curled. In this case, use the top output tray. If the problem persists, check if your transparencies meets the printer’s specifications.
Printing on Preprinted Paper Preprinted paper is paper that has some type of printing placed on it before it is sent through the printer (paper that has a preprinted logo at the top of the page, for example). Guidelines • Letterheads must be printed with heat-resistant ink that will not melt, vaporize, or release hazardous emissions when subjected to the printer’s fusing temperature of 400 °F (205 °C) for 0.1 second.
2 When you print, configure the paper source, type and size properly in the software application. For details, see page 5.7. For details about setting on the control panel, see page 3.5. Printing on Card Stock or Custom-sized Materials Postcards, 3.5 by 5.83 in. (index) cards and other custom-sized materials can be printed with your printer. The minimum size is 76 by 127 mm (3 by 5 in.) and the maximum size is 216 by 356 mm (8.5 by 14 in.).
1 Open the Multi-Purpose Tray and the rear output tray. 2 Load print material with print side up and short edge first. Adjust the guide to fit the width of the material stack. 3 When you print, configure the paper source, type and size properly in the software application. For details, see page 5.7. NOTE: If the size of your print material is not listed in the Size box in the Paper tab of the printer driver properties, click the Add Custom button and set the size manually. See page 5.7.
MEMO 4.
5 PRINTING TASKS This chapter explains the printing options and common printing tasks.
Printing a Document The following procedure describes the general steps required for printing from various Windows applications. The exact steps for printing a document may vary depending on the application programme you are using. Refer to the User’s Guide of your software application for the exact printing procedure. NOTES: • For detailed information about printing from a Macintosh computer, see Appendix A, "Using Your Printer with a Macintosh.
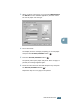
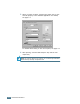
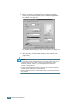
3 To take advantage of the printer features provided by your printer, click Properties in the application’s print window and go to Step 4. If you see Setup, Printer or Options, click that button instead. Then click Properties in the next screen. 4 Now you see the Samsung ML-2550 Series Properties window, which allows you to access all the information you will need when using your printer. The Layout tab is first displayed. The preview image shows the sample page with the settings you currently specified.
5 From the Paper tab, select the paper source, size and type. For further details, see page 5.7. 6 Click other tabs on the top of the Samsung ML-2550 series Properties window to access other features, if needed. 7 When you complete setting the properties, click OK until the Print window is displayed. 8 Click OK to start printing. Notes: • Most Windows applications will override settings you specify in the printer driver.
Cancelling a Print Job There are two ways to cancel a print job. To stop a print job from the control panel: Press the Cancel button ( ). The printer will finish printing the page that is moving through the printer and delete the rest of the print job. Pressing the button cancels only the current job in the printer. If more than one print job is in the printer memory, the button must be pressed once for each job.
Using a Favorite Setting The Favorites option, which is visible on each properties tab, allows you to save the current properties settings for future use. To save a Favorites item: 1 Change the settings as needed on each tab. 2 Enter a name for the item in the Favorites input box. 3 Click Save. To use a saved setting, just select the item from the Favorites drop down list. To delete a Favorites item, select it from the list and click Delete.
Setting Paper Properties Use the following options to set the basic paper handling needs when you access the printer properties. See page 5.2 for more information about accessing printer properties. Click the Paper tab to access various paper properties. 1 2 3 4 5 5 Property Description 1 Copies Copies allows you to choose the number of copies to be printed. You can enter up to 999. Size The Size option allows you to choose the size of paper loaded in the tray.
Property 3 Source Description Make sure that Source is set to the corresponding paper tray. The Manual Feed source is used when printing to special materials. You have to load one sheet at a time into the Multi-Purpose Tray. See page 4.12. If the paper source is set to Auto Select, the printer automatically picks up print materials according to the following order: Multi-Purpose Tray, Tray1, Optional Tray2. 4 Type Make sure that Type is set to Printer Default.
Using the Toner Save Mode Toner Save mode allows the printer to use less toner on each page. Using this mode will extend the life of your toner cartridge and reduce your cost per page, but will reduce the print quality. This setting is not available with the 1200 dpi setting. There are three ways to enable Toner Save mode: Using the control panel button Press the Toner Save button ( ) on the control panel.
From the software application 1 When you change the print settings from your software application, access the printer properties. See page 5.2. 2 Click the Graphics tab, and select the Toner Save option. You can select from: • Printer Setting: If you select this option, the Toner Save feature is determined by the setting you’ve made on the control panel of the printer. • On: Select this option to allow the printer to use less toner on each page.
Printing on Both Sides of Paper You can print on both sides of paper. Before printing, decide on which edge you will be binding your finished document. The binding options are: • Long Edge, which is the conventional layout used in book binding. • Short Edge, which is the type often used with calendars. 2 2 3 2 3 2 5 5 3 5 3 5 Long Edge Short Edge NOTE: • Do not print on both sides of labels, transparencies, envelopes, or thick paper. Damage to the printer and paper jamming might result.
From the software application 1 When you change the print settings from your software application, access the printer properties. See page 5.2. 2 From the Layout tab, select the paper orientation. 3 From the Duplex(Double-sided Printing) section, select the desired binding option. 4 Click the Paper tab and select the paper source, size and type. 5 Click OK and print the document. The printer prints on both sides of paper. NOTE: The setting in the software application overrides that on the control panel.
Printing Multiple Pages on One Sheet of Paper (N-Up Printing) 1 2 3 4 You can select the number of pages to print on a single sheet of paper. To print more than one page per sheet, the pages will appear decreased in size and arranged on the sheet. You can print up to 16 pages on one sheet. 1 To change the print settings from your software application, access the printer properties. See page 5.2. 2 From the Layout tab, choose Multiple Pages per Side in the Type drop-down list.
5 Click the Paper tab and select the paper source, size and type. 6 Click OK and print the document. Printing the Reduced or Enlarged Document You can scale your print job on a page. 1 When you change the print settings from your software application, access the printer properties. See page 5.2. 2 From the Layout tab, select Reduce/Enlarge in the Type drop-down list. 3 Enter the desired scaling rate in the Percentage input box. You can also click the or ❷ button.
Fitting Your Document to a Selected Paper Size A This printer feature allows you to scale your print job to any selected paper size regardless of the digital document size. This can be useful when you want to check fine details on a small document. 1 When you change the print settings from your software application, access the printer properties. See page 5.2. 2 From the Layout tab, select Fit to Page in the Type drop-down list. 3 Select the correct size from the Target Paper drop-down list.
Printing Posters This feature allows you to print a single-page document onto 4, 9 or 16 sheets of paper, for the purpose of pasting the sheets together to form one poster-size document. 1 When you change the print settings from your software application, access the printer properties. See page page 5.2. 2 From the Layout tab, select Poster in the Type drop-down list. 3 Configure the poster option: You can select the page layout from 2x2, 3x3 or 4x4.
Specify an overlap in millimeters or inches to make it easier to reconstruct the resulting poster. 0.1 inches 0.1 inches 4 Click the Paper tab and select the paper source, size and type. 5 Click OK and print the document. You can complete the poster by reconstructing the results. Printing Booklets Booklet printing feature allows you to print your document a double-sided job and arrange the pages so that the paper can be folded in half after printing to produce a booklet.
3 Click the Paper tab, and select the paper source, size and type. 4 Click OK and print the document. 5 After printing, fold and staple the pages. 8 9 Using Watermarks The Watermark option allows you to print text over an existing document. For example, you may want to have large gray letters reading “DRAFT” or “CONFIDENTIAL” printed diagonally across the first page or all pages of a document.
Creating a Watermark 1 When you change the print settings from your software application, access the printer properties. See page 5.2. 2 Click the Extras tab, and click the Edit button in the Watermark section. The Edit Watermarks window appears. 5 3 Enter the desired text message in the Watermark Message box. This will be displayed in the preview window. The preview image is provided so that you can see how the watermark will appear on the printed page.
Editing a Watermark 1 When you change the print settings from your software application, access the printer properties. See page 5.2. 2 Click the Extras tab, and click the Edit button in the Watermark section. The Edit Watermarks window appears. 3 Select the watermark you want to edit in the Current Watermarks list, and change the watermark message and the options. Refer to “Creating a Watermark” on page 5.19. 4 Click Update to save the changes. 5 Click Ok.
Using Overlays What is an Overlay? Dear ABC Regards WORLD BEST An overlay is text and/or images stored in the computer hard disk drive (HDD) as a special file format that can be printed on any document. Overlays are often used to take the place of preprinted forms and letterhead paper. Rather than using preprinted letterhead, you can create an overlay containing the exact same information that is currently on your letterhead.
4 In the Edit Overlays window, click Create Overlay. 5 In the Create Overlay window, type a name of up to eight characters in the File name box. Select the destination path, if necessary. (The default is C:\Formover). 6 Click Save. You will see the name in Overlay List. 7 Click OK or Yes until you complete creating. The file is not printed out. Instead it will be stored on your computer HDD disk. Note: The overlay document size must be the same as documents you will print with the overlay.
Using a Page Overlay After an overlay has been created, it is ready to be printed with your document. To print an overlay with a document: 1 Create or open the document you want to print. 2 When you change the print settings from your software application, access the printer properties. See page 5.2. 3 Click the Extras tab. 4 Select the desired overlay from the Overlay drop-down list box.
6 If necessary, click Confirm Page Overlay When Printing. If this box is checked, a message window will appear each time you submit a document for printing, asking you to confirm your wish to print an overlay on your document. Answering Yes to the window means that the selected overlay will be printed with your document. Answering No to the window cancels overlay printing. If this box is empty and an overlay has been selected, the overlay will be automatically printed with your document.
Setting Graphic Properties Use the following graphic options to adjust the print quality for your specific printing needs. See page 5.2 for more information about accessing printer properties. Click the Graphics tab to display the properties shown below. 1 2 3 5 4 Property Description 1 Resolution You can select the printing resolution by choosing from 1200 dpi (Best), 600 dpi (Normal) or 300 dpi (Draft). The higher the setting, the sharper the clarity of printed characters and graphics.
Property Description Some printed characters or images appear to have jagged or uneven edges. Set this Image Mode option to improve the print quality of your text and image, and make the characters and images appear smoother. 3 Image Mode The Image Mode option is only available when you select 600 dpi (Normal) in the Resolution option. • Normal: This setting prints images in the normal mode.
Property Description True-Type Options This option determines what the driver tells the printer about how to image the text in your document. Select the appropriate setting according to the status of your document. 4 Advanced Options • Download as Bit Image: When this option is selected, the driver will download the font data as bitmap images. Documents with complicated fonts, such as Korean or Chinese, or various types of fonts will print faster in this setting.
Using Output Options You can use the options for output of your document. See page 5.2 for more information about accessing printer properties. Click the Extras tab to access the Output Options feature. Option Description You can set in what sequence the pages will be printed. Select the required print order from the drop-down list. Print Order Reprint When Jammed 5.28 PRINTING TASKS • Normal:Your printer prints in normal order. • Reverse All Pages:Your printer prints all pages in reversed order.
6 MAINTAINING YOUR PRINTER This chapter provides suggestions for high-quality and economical printing and information for maintaining the toner cartridge and the printer.
Printing a Configuration Page From the printer’s control panel, you can print a Configuration page. Use the configuration page to view current printer settings, to help troubleshoot printer problems, or to verify installation of optional accessories, such as memory, optional tray and printer languages. To print a configuration page: 1 Press the Menu button ( ) on the control panel until you see “Information” on the bottom line of the display. 2 Press the Enter button ( ) to access the menu.
Maintaining the Toner Cartridge Toner cartridge storage To get the maximum results from the toner cartridge, keep the following guidelines in mind: • Do not remove the toner cartridge from its package until ready for use. • Do not refill the toner cartridge. The printer warranty does not cover damage caused by using a refilled cartridge. • Store toner cartridges in the same environment as the printer. • To prevent damage to the toner cartridge, do not expose it to light for more than a few minute.
Checking the Toner Remains You can check the level of toner currently left in the cartridge. 1 Press the Menu button ( ) on the control panel until you see “Setup” on the bottom line of the display. 2 Press the Enter button ( 3 Press the scroll button ( ) to access the menu. 4 Press the scroll button ( or or ) until “Maintenance” displays on the bottom line and press the Enter button ( ). ) to select the required option, “Remain Toner”. 5 Press the Enter button ( ).
CAUTIONS: • Avoid reaching too far into the printer. The fusing area may be hot. • To prevent damage, do not expose the toner cartridge to light for more than a few minutes. 3 Gently shake the toner cartridge from side to side 5 for 6 times to redistribute the toner evenly. NOTE: If toner gets on your clothing, wipe it off with a dry cloth and wash clothing in cold water. Hot water sets toner into fabric. 4 Reinstall the cartridge and close the cover.
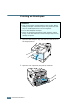
Replacing the Toner Cartridge 1 Open the top cover. 2 Remove the old cartridge. 3 Install a new toner cartridge. See page 2.4. 6.
Cleaning the Printer To maintain the print quality, follow the cleaning procedures below each time the toner cartridge is replaced or if print quality problems occur. NOTES: • Do not use ammonia-based cleaners or volatile solvents, such as thinner, on or around the printer. These can damage the printer. • While cleaning the inside of the printer, be careful not to touch the transfer roller (located underneath the toner cartridge). Oil from your fingers can cause print quality problems.
3 With a dry and lint-free cloth, wipe away any dust and spilled toner from the toner cartridge area and the toner cartridge cavity. CAUTION: To prevent damage to the toner cartridge, do not expose it to light for more than a few minute. Cover it with a piece of paper, if necessary. Also, do not touch the black transfer roller inside the printer. 4 Locate the long strip of glass (LSU) inside the top of the cartridge compartment, and gently swab the glass to see if dirt turns the white cotton black.
Printing a cleaning sheet If you are experiencing blurred, faded or smeared printouts, you can clear the problem by printing a cleaning sheet, provided by your printer. You can print: • OPC Cleaning sheet: cleans the OPC drum of the toner cartridge. • Fuser Cleaning sheet: cleans the fuser unit inside the printer. This process will produce a page with toner debris, which should be discarded. 1 Ensure that the printer is turned on and in ready mode with paper loaded in the tray.
Consumables and Replacement Parts From time to time, you will need to replace the toner cartridge, roller, and fuser unit to maintain top performance and avoid print quality problems and paper feed problems resulting from worn parts. The following items should be replaced after you have printed a specified number of pages. See the table below. Items Yield (Average) Regi.
7 SOLVING PROBLEMS This chapter provides helpful information for what to do if you encounter an error while using your printer.
Troubleshooting Checklist If the printer is not working properly, consult the following checklist. If the printer does not pass a step, follow the corresponding troubleshooting suggestions. Check Make sure that the On-Line/Continue button on the control panel is on in green and “Ready” is shown on the display. Solution • If the button backlight are off, check the power cord connection. Check the power switch. Check the power source by plugging into another outlet.
Solving General Printing Problems For problems with the operation of your printer, refer to the table for suggested solutions. Problem The printer does not print. Possible Cause Solution The printer is not receiving power. Check the power cord connections. Check the power switch and the power source. The printer is not selected as the default printer. Select Samsung ML-2550 Series or Samsung ML-2550 Series PS as your default printer.
Problem The printer does not print. (continued) Possible Cause Solution The printer driver may be incorrectly installed. Reinstall the printer driver; see page 2.19. Try printing a demo page. The printer is malfunctioning. Check the display message on the control panel to determine if the printer is indicating a system error. Printer selects print materials from the wrong paper source. The paper source selection in the printer properties may be incorrect.
Problem Half the page is blank. The paper keeps jamming. The printer prints, but the text is wrong, garbled, or incomplete. Possible Cause Solution The page layout is too complex. Simplify the page layout and remove any unnecessary graphics from the document. Install more memory in your printer. See “Installing Memory and PostScript DIMMs” on page F.3. The page orientation setting may be incorrect. Change the page orientation in your application. See page 5.3.
Problem Pages print, but are blank. The illustrations print incorrectly in Adobe Illustrator. Possible Cause Solution The toner cartridge is defective or out of toner. Redistribute the toner. if necessary. See page 6.4. The file may have blank pages. Check the file to ensure that it does not contain blank pages. Some parts, such as the controller or the board, may be defective. Contact a service representative. The setting in the software application is wrong.
Clearing Paper Jams When a paper jam occurs, the display on the control panel shows the message indicating the corresponding location of the paper jam. Refer to the table below to locate the paper jam and to clear it. Message Location of Jam Go to... Jam0 In the paper feed area below Jam1 Around the toner cartridge page 7.10 Jam2 In the paper exit area page 7.12 Jam Duplex1/2 In the duplex area page 7.13 In the Paper Feed Area 1 Slide out the Tray1 to expose the jammed paper.
NOTE: If the jammed paper is not invisible or if there is resistance when you pull the paper, remove the tray from the printer and carefully pull the jammed paper free from the printer. 3 Slide the tray back into the printer. 4 Open and close the top cover to resume printing. In the Optional Tray2 1 Pull the optional Tray2 out of the printer. 2 If you see the jammed paper, remove the paper from the tray. 7.
3 If you cannot find the jammed paper in the Tray2, pull the Tray1 half way out of the printer, and remove the paper. 4 Slide the trays back into the printer. Open and close the top cover. Printing can be resumed. In the Multi-Purpose Tray 1 Open the Multi-Purpose Tray. 2 Carefully remove the jammed paper from the tray. 7 3 Open and close the top cover. Printing can be resumed. SOLVING PROBLEMS 7.
Around the Toner Cartridge 1 Open and close the top cover, and the jammed paper is automatically exits the printer. If not, continue to Step 2. 2 Open the top cover and remove the toner cartridge. CAUTION: To prevent damage to the toner cartridge, do not expose it to light for more than a few minutes. Place a piece of paper over the top of the toner cartridge to shield it while it is out of the printer. 3 Carefully lift up the guide feed. 7.
4 Gently pull the jammed paper towards you to remove it from the printer. If the jammed paper is not visible or there is resistance when you pull the paper, go to “In the Paper Exit Area” on page 7.12. 5 Flip down the guide feed and reinstall the toner cartridge. 7 NOTE: If the toner cartridge is difficult to reinstall, make sure that the guide feed has been flipped back down into position. 6 Close the top cover. Printing can be resumed. SOLVING PROBLEMS 7.
In the Paper Exit Area 1 If a long portion of the paper is visible, pull it straight out. If not, continue to Step 2. 2 Open the rear output tray. 3 Loosen the paper if it is caught in the feed rollers. Then gently pull the paper out. 4 Close the rear output tray. 5 Open and close the top cover. Printing can be resumed. 7.
In the Duplex Area Jam Duplex1 1 Open the rear output tray. 2 Remove the jammed paper. 3 Close the rear output cover. 4 Open and close the top cover. Printing can be resumed. Jam Duplex2 1 Pull the paper tray out of the printer. 2 Pull down the metal plate inside of the printer. CAUTION: Pulling the plate may do you an injury. Use the lever on the left. SOLVING PROBLEMS 7.
3 Remove the jammed paper. 4 Slide the tray back into the printer. 5 Open and close the top cover. Printing can be resumed. Tips for Avoiding Paper Jams By selecting the correct paper types, most paper jams can be avoided. If a paper jam occurs, follow the steps outlined in “Clearing Paper Jams” on page 7.7. • Follow the procedures in “Loading Paper” on page 2.6. Ensure that the adjustable guides are positioned correctly. • Do not overload the paper tray.
Solving Print Quality Problems The dirty inside of the printer or improper paper loading may reduce the print quality. See the table below to troubleshoot the problem. Problem Solution Light or faded print If a vertical white streak or faded area appears on the page: • The toner supply is low. You may be able to temporarily extend the toner cartridge life. See “Redistributing Toner” on page 6.4. If this does not improve the print quality, install a new toner cartridge.
Problem Solution Dropouts If faded areas, generally rounded, occur randomly on the page: • A single sheet of paper may be defective. Try reprinting the job. • The moisture content of the paper is uneven or the paper has moist spots on its surface. Try a different brand of paper. See “Paper Specifications” on page G.3. • The paper lot is bad. The manufacturing processes can cause some areas to reject toner. Try a different kind or brand of paper. • The toner cartridge may be defective.
Problem Solution Vertical repetitive defects If marks repeatedly appear on the printed side of the page at even intervals: • The toner cartridge may be damaged. If a repetitive mark occurs on the page, print a cleaning sheet several times to clean the cartridge; see page 6.9. After the printout, if you still have the same problems, install a new toner cartridge. See “Installing the Toner Cartridge” on page 2.4. • Parts of the printer may have toner on them.
Problem Solution Curl or wave • Check the paper type and quality. Both high temperature and humidity can cause paper curl. See “Paper Specifications” on page G.3. • Turn over the stack of paper in the tray. Also try rotating the paper 180° in the tray. • Try printing to the face up output slot. Wrinkles or creases Ensure that the paper is loaded properly. • Check the paper type and quality. See “Paper Specifications” on page G.3. • Open the rear cover and try printing to the rear output tray (face-up).
Problem Solution Loose toner Clean the inside of the printer. • Check the paper type and quality. See “Paper Specifications” on page G.3. • Install a new toner cartridge. See “Installing the Toner Cartridge” on page 2.4. • If the problem persists, the printer may require repair. Contact a service representative. Character Voids Character voids are white areas within the parts of characters that should be solid black: • If you are using transparencies, try another type of transparency.
Understanding Display Messages The display on the front panel shows the messages to indicate the printer’s status or errors. Refer to the tables below to understand the message’s meaning and clear the problem if necessary. Messages and their meanings are listed in alphabetical order. NOTE: When you call for service, it is very convenient to tell the specified message. Message Status Do this...
Message Page Too Complex Status Too complicated data was sent to the printer. Do this... Simplify the page layout and remove unnecessary graphics from your document. If the message persists, expand the memory in your printer. See “Installing Memory and PostScript DIMMs” on page F.3. Paper Empty [Size]In[Tray] The displayed tray is empty. Load the corresponding size of paper into the tray. Ready Low Toner The toner cartridge in your printer is nearly empty.
Common Windows Problems Problem Possible Cause and Solution “File in Use” message appears during installation. Exit all software applications. Remove all software from the StartUp Group, then restart Windows. Reinstall the printer driver. “Error Writing to LPTx” message appears. • Ensure that the cables are connected correctly, the printer is on. • If bi-directional communication is not turned on in the driver, it will also cause this message.
Common Macintosh Problems Problems in the Chooser Problem Possible Cause and Solution The printer driver icon does not appear in Chooser. Software is not installed correctly. • The LaserWriter driver should be present as a part of the Macintosh OS. Make sure that the LaserWriter driver is in the Extensions folder within the Systems folder. If not, install the LaserWriter driver component from the Macintosh OS CD. • Make sure that you are using a high-quality cable.