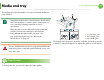
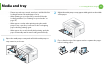
Media and tray 2. Learning the basic usage This chapter provides information on how to load print media into your machine. 27 2 3 1 • Using print media that does not meet these specifications may cause problems or require repairs. Such repairs are not covered by Samsung’s warranty or service agreements. • Make sure not to use the inkjet photo paper with this machine. It could cause damage to the machine. • Using inflammable print media can cause a fire.
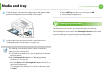
Media and tray If you do not adjust the guide, it may cause paper registration, image skew, or jamming of the paper. 2. Learning the basic usage 28 Paper quantity indicator shows the amount of paper in the tray.
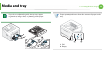
Media and tray 2 Loading paper in the tray/ optional tray 1 2 Pull out the paper tray. 3 Place paper with the side you want to print on facing down. 2. Learning the basic usage 29 4 Slide the paper length guide until it lightly touches the end of the paper stack. 5 Squeeze the paper width guide and slide it to the edge of the paper stack without causing it to bend. Flex or fan the edge of the paper stack to separate the pages before loading papers.
Media and tray 2. Learning the basic usage • Do not push the paper width guide too far causing the media to warp. 30 The settings set from the machine driver override the settings on the control panel. a To print from an application, open an application and start the print menu. b Open Printing Preferences (see "Opening printing preferences" on page 41). c Press the Paper tab in Printing Preferences, and select an appropriate paper type.
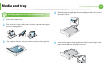
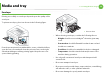
Media and tray • Flatten any curl on postcards, envelopes, and labels before loading them into the multi-purpose tray. 2. Learning the basic usage 31 2 Adjust the multi-purpose tray paper width guides to the width of the paper. 3 Flex or fan the edge of the paper stack to separate the pages before loading paper. • When printing on special media, you must follow the loading guidelines (see "Printing on special media" on page 32).
Media and tray 4 2. Learning the basic usage Load the paper. Squeeze the multi-purpose tray paper width guides and adjust them to the width of the paper. 32 d Select MP Tray in paper source, then press OK. e Start printing in application. 4 Printing on special media The table below shows the special media usable in each tray. The media types are shown in the Printing Preferences. Select the proper media type to get the highest printing quality.
Media and tray 2. Learning the basic usage • When using special media, we recommend you feed one sheet at a time (see "Print media specifications" on page 79). • Printing the special media (Face up) If special media are printed out with curl, wrinkles, crease, or black bold lines, open the rear cover and pull down the pressure lever as shown below and try printing again. Keep the rear cover opened during printing.
Media and tray 2. Learning the basic usage 34 Envelope Printing successfully on envelopes depends upon the quality of the envelopes. To print an envelope, place it as shown in the following figure. 1 • If envelopes are printed out with wrinkles, crease, or black bold lines, open the rear cover and pull down the pressure lever on the right side about 90 degrees and try printing again. Keep the rear cover opened during printing.
Media and tray • 2. Learning the basic usage Be sure the seam at both ends of the envelope extends all the way to the corner of the envelope. 2 1 35 Transparency To avoid damaging the machine, use only transparencies designed for use in laser printers. 1 Acceptable 2 Unacceptable • Envelopes with a peel-off adhesive strip or with more than one flap that folds over to seal must use adhesives compatible with the machine’s fusing temperature for 0.1 second (about 170°C (338 °F)).
Media and tray 2. Learning the basic usage 36 • Do not use transparencies that separate from the backing sheet. - • To prevent transparencies from sticking to each other, do not let the printed sheets stack up as they are being printed out. Curl: Must lie flat with no more than 13 mm of curl in any direction. - Condition: Do not use labels with wrinkles, bubbles, or other indications of separation. Labels • Make sure that there is no exposed adhesive material between labels.
Media and tray Card stock/ Custom-sized paper 2. Learning the basic usage 37 Preprinted paper When loading preprinted paper, the printed side should be facing up with an uncurled edge at the front. If you experience problems with paper feeding, turn the paper around. Note that print quality is not guaranteed. • In the software application, set margins at least 6.4 mm (0.25 inches) away from the edges of the material.
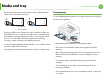
5 2. Learning the basic usage Setting the paper size and type After loading paper in the paper tray, set the paper size and type using the control panel buttons. • The settings set from the machine’s driver override the settings on the control panel. • For models that do not have the display screen on the control panel, this feature is not applicable. 1 2 3 4 5 Press (Menu) button on the control panel. Press Paper > OK > Select the tray you want > OK.
Basic printing Basic printing 2. Learning the basic usage 39 3 Select your machine from the Select Printer list. 4 The basic print settings including the number of copies and print range are selected within the Print window. 6 Printing If you are a Macintosh, Linux, or Unix OS user, refer to the Advanced Guide. The following Printing Preferences window is for Notepad in Windows 7. 1 2 Open the document you want to print.
Basic printing 2. Learning the basic usage 7 Canceling a print job If the print job is waiting in the print queue or print spooler, cancel the job as follows: • You can access this window by simply double-clicking the machine icon ( • ) in the Windows task bar. You can also cancel the current job by pressing the control panel.
Basic printing 8 Opening printing preferences 2. Learning the basic usage 4 41 Click Properties or Preferences. • The Printing Preferences window that appears in this user’s guide may differ depending on the machine in use. • When you select an option in Printing Preferences, you may see a warning mark or . An mark means you can select that certain option but it is not recommended, and an mark means you cannot select that option due to the machine’s setting or environment.
Basic printing 1 2 Change the settings as needed on each tab. 2. Learning the basic usage 42 9 Using help Enter a name for the item in the Presets input box. Click the option you want to know on the Printing Preferences window and press F1 on your keyboard. 10 3 Click (Add). When you save Presets, all current driver settings are saved. Select more options and click (Update), settings will be added to the Presets you made. To use a saved setting, select it from the Presets drop-down list.
Basic printing 3 2. Learning the basic usage 43 Press OK select the mode you want. Ź Eco options • Default Mode: Select this to turn on or off the eco mode. (Duplex (long edge)/Toner save/2-up/Skip blank pages) • Printer Default: Follows the settings from the machine's control panel. - Off: Set the eco mode off. • None: Disables eco mode. - On: Set the eco mode on. • Eco Printing: Enables eco mode. Activate the various eco items you want to use.
Basic printing • The actual saved or reduced amount may differ depending on the operating system used, computing performance, application software, connection method, media type, media size, job complexity, etc. 2.
3. Maintenance This chapter provides information about purchasing supplies, accessories and maintenance parts available for your machine.
Ordering supplies and accessories 3. Maintenance 46 Available accessories may differ from country to country. Contact your sales representatives to obtain the list of available supplies, and maintenance parts. To order Samsung-authorized supplies, accessories, and maintenance parts, contact your local Samsung dealer or the retailer where you purchased your machine. You can also visit www.samsung.com/supplies, and then select your country/region to obtain the contact information for service.
Available supplies 3. Maintenance When supplies reach the end of their life spans, you can order the following types of supplies for your machine: Type High yield toner cartridge Average yielda Approx. 15,000 pages Part name MLT-D305L a. Declared yield value in accordance with ISO/IEC 19752. Depending on the options and job mode used, the toner cartridge’s lifespan may differ.
Available accessories 3. Maintenance You can purchase and install accessories to enhance your machine’s performance and capacity. Some features and optional goods may not be available depending on models or countries (see "Features by models" on page 5). Accessory Function Extends your machine’s memory capacity.
Available maintenance parts 3. Maintenance 49 To purchase maintenance parts, contact the source where you bought the machine. Replacing maintenance parts can be performed only by an authorized service provider, dealer, or the retailer where you bought the machine. The warranty does not cover the replacement of any maintenance parts once it has reached its “Average yield”.
Redistributing toner When the toner cartridge is near the end of its life: • White streaks or light printing occurs and/or density variation side to side. • The Status LED blinks red. 3. Maintenance 2 50 Thoroughly roll the cartridge five or six times to distribute the toner evenly inside the cartridge. If this happens, you can temporarily improve print quality by redistributing the remaining toner in the cartridge.
Redistributing toner 4 Close the front cover. Ensure that the cover is securely closed. 3.
Replacing the toner cartridge Click this link to open an animation about replacing a toner cartridge. 3. Maintenance 52 3 Remove the label from the toner cartridge as shown below. 4 Thoroughly shake side to side the cartridge five or six times to distribute the toner evenly inside the cartridge. When a toner cartridge has reached the end of life, the machine will stop printing. 1 Open the front cover and pull the toner cartridge out.
Replacing the toner cartridge 5 Hold the toner cartridge by the handle and slowly insert the cartridge into the opening in the machine. 6 Close the front cover. Make sure that the cover is securely closed. 3.
Upgrading a memory module Use this memory module slot to install additional memory. Order information is provided for additional memory module. (See "Available accessories" on page 48.) 3. Maintenance 4 5 1 Installing a memory module 1 2 54 Remove the new memory module from its bag. Holding the memory module by the edges, align the memory module on the slot at about a 30-degree tilt. Make sure that the notches of the module and the grooves on the slot fit each other.
Upgrading a memory module Do not press the memory module strongly or the module may be damaged. If the module does not seem to fit into the slot properly, carefully try the previous procedure again. 7 8 Replace the control board cover. Reconnect the power cord and machine cable and turn the machine on. 3.
Monitoring the supplies life To view the supply life indicators, follow the steps below: 1 2 3 4 Press (Menu) on the control panel. Press System Setup > OK > Maintenance > OK. Press Supplies Info > OK. Press OK to select the option you want. 3.
Setting the toner low alert 3. Maintenance 57 If the amount of toner in the cartridge is low, a message or LED informing the user to change the toner cartridge appears. You can set the option for whether or not this message or LED appears. 1 2 3 4 Press (Menu) on the control panel. Press System Setup > OK > Maintenance > OK. Press Toner Low Alert > OK. Select the option you want, then press OK.
Cleaning the machine If printing quality problems occur or if you use your machine in a dusty enviroment, you need to clean your machine regularly to keep it in the best printing condition and use your machine longer. • Cleaning the cabinet of the machine with cleaning materials containing large amounts of alcohol, solvents, or other strong substances can discolor or distort the cabinet.
Cleaning the machine 3. Maintenance • To prevent damage to the toner cartridge, do not expose it to light for more than a few minutes. Cover it with a piece of paper, if necessary. While cleaning the inside of the machine, be careful not to damage the transfer roller or any other inside parts. Do not use solvents such as benzene or thinner. Printing quality problems can occur and cause damage to the machine. • Do not touch the green surface underside of the toner cartridge.
Cleaning the machine 4 Cleaning the pickup roller 1 Turn the machine off and unplug the power cord. Wait for the machine to cool down. 2 Pull out tray 1. 3. Maintenance 3 Clean the pickup roller with a soft, lint-free cloth. 4 Insert the tray back into the machine.