Over The Range Microwave Oven Use & Care Guide Model MMV5165BA Important Safety Instructions . . . . . . . . . . . . . . . . . . 2 Precautions to Avoid Possible Exposure to Excessive Microwave Energy . . . . . . . . . . . . . . . . . . . . . . . . . . . . 4 Features . . . . . . . . . . . . . . . . . . . . . . . . . . . . . . . . . . . . 6 Operating Instructions . . . . . . . . . . . . . . . . . . . . . . . . 8 Care and Cleaning . . . . . . . . . . . . . . . . . . . . . . . . . . . 19 Cooking Utensils . .
Important Safety Instructions Installer: Please leave this guide with this appliance. Consumer: Please read and keep this Use & Care Guide for future reference. Keep sales receipt and/or cancelled check as proof of purchase.
Important Safety Instructions WARNING To avoid risk of electrical shock or death, this oven must be grounded and plug must not be altered. Grounding Instructions Oven MUST be grounded. Grounding reduces risk of electric shock by providing an escape wire for the electric current if an electrical short occurs. This oven is equipped with a cord having a grounding wire with a grounding plug. The plug must be plugged into an outlet that is properly installed and grounded. See Installation Instructions.
Important Safety Instructions Precautions to Avoid Possible Exposure to Excessive Microwave Energy A. DO NOT attempt to operate this oven with the door open since open door operation can result in harmful exposure to microwave energy. It is important not to defeat or tamper with the safety interlocks. B. DO NOT place any object between the oven front face and the door or allow soil or cleaner residue to accumulate on sealing surfaces. C. DO NOT operate the oven if it is damaged.
Important Safety Instructions WARNING 10. DO NOT heat baby bottles in oven. When using electrical appliances, basic safety precautions should be followed to reduce the risk of burns, electric shock, fire, or injury to persons or exposure to excessive microwave energy. 11. DO NOT operate this oven if it has a damaged cord or plug, if it is not working properly, or if it has been damaged or dropped. 1. READ all instructions before using oven. 2.
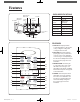
Features OVEN SPECIFICATIONS Model and Serial Number Plate Window with Metal Shield Door Handle Vent Grille Glass Turntable Cooking Guide Wire Rack Oven Control Panel Door Safety Lock System Power Supply 120 VAC, 60 Hz Input Power 1,650W Cooking Power 1,000 W (IEC 60705 Standard) Frequency 2,450 MHz Rated Current 14.5 A Outer Dimensions 29 7/8"(W) x 16 1/2"(H) x 15 1/4"(D) Cavity Volume 1.6 Cu. Ft. Net Weight 45.9 lbs. Grease Filter Cooktop Light FEATURES 1.
Features FEATURES (Cont.) 5. COOK: Touch this pad to cook beverage, frozen dinner, frozen breakfast, chicken breast. The oven’s sensor will tell the oven how long to cook depending on the amount of humidity coming from the food. See page 13 for more information. 6. VEGETABLES: Touch this pad to cook fresh or frozen vegetables. The oven’s sensor will tell the oven how long to cook depending on the amount of humidity it detects from the vegetables. See page 13 for more information. 7.
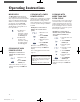
Operating Instructions LEARN ABOUT YOUR MICROWAVE OVEN This section introduces you to the basics you need to know to operate your microwave oven. Please read this information before use. KITCHEN TIMER VENT FAN You can use your microwave oven as a timer. Use the Kitchen Timer for timing up to 99 minutes, 99 seconds. The VENT moves steam and other vapors from the cooking surface. The vent will operate at the LEVEL 2 whenever the oven is on. Example: To set for 3 minutes. 1. Touch KITCHEN TIMER pad.
Operating Instructions CHILD LOCK LIGHT TIMER CUSTOM PROGRAM You may lock the control panel to prevent the microwave from being accidentally started or used by children. You can set the LIGHT to turn on and off automatically at any time. The light comes on at the same time every day until reset. CUSTOM PROGRAM lets you recall one cooking instruction previously placed in memory and begin cooking quickly. The Child Lock feature is also useful when cleaning the control panel.
Operating Instructions MORE/LESS The More(9)/Less(1) pads allow you to adjust pre-set cooking times. They only work in the Sensor Reheat, Sensor Cooking(except Beverage), Add 30 sec, Custom Cook or Time Cook modes. Use the More(9)/ Less(1) pads only after you have already begun cooking with one of these procedures. 1. To ADD more time to an automatic cooking procedure: Touch the More(9) pad. 2. To REDUCE the time of an automatic cooking procedure: Touch the Less(1) pad.
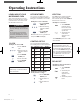
Operating Instructions COOKING GUIDE FOR POWER LEVELS The 9 power levels in addition to HIGH allow you to choose the best power level for the food you are cooking. Below are listed all the power levels, examples of foods best cooked at each level, and the amount of microwave power you are using. POWER LEVEL 10 High MICROWAVE OUTPUT 100% USE Boil water. Cook ground beef. ● Make candy. ● Cook fresh fruits and vegetables. ● Cook fish and poultry. ● Preheat browning dish. ● Reheat beverages. ● Bacon slices.
Operating Instructions SENSOR OPERATING INSTRUCTIONS Sensor Cook allows you to cook most of your favorite foods without selecting cooking times and power levels. The display will indicate the sensing period by scrolling the name of the food. The oven automatically determines required cooking time for each food item. When the internal sensor detects a certain amount of humidity coming from the food, it will tell the oven how much longer to cook. The display will show the remaining heating time.
Operating Instructions BAKED POTATO COOK REHEAT The BAKED POTATO pad lets you bake one to six potatoes without selecting cooking times and power levels. Using COOK pad lets you heat common microwave-prepared foods without needing to program cooking times and power levels. COOK has 4 preset food categories: Beverage, Frozen Dinner, Frozen Breakfast and Chicken Breast. REHEAT pad lets you heat foods without needing to program cooking times and power levels.
Operating Instructions SENSOR COOK TABLE CATEGORY Popcorn Potato DIRECTIONS Use only one microwave-only bag of popcorn at a time. Use caution when removing and opening the hot bag from oven. Let oven cool for at least 5 minutes before using again. Prick each potato several times with fork. Place on turntable in spoke-like fashion. Let stand 3-5 minutes. Let oven cool for at least 5 minutes before using again. Use More(9) pad when cooking larger potatoes. AMOUNT 3.0 to 3.
Operating Instructions AUTO DEFROST DEFROSTING GUIDE Defrost choices are preset in the oven. The defrost feature provides you with the best defrosting method for frozen foods, because the oven automatically sets the defrosting times according to the weight you enter. For added convenience, the AUTO DEFROST beeps to remind you to check or turn over the food during the defrost cycle. ● Follow the instructions below when defrosting different types of food. Standard Amount Procedure 2.5-6.0 lbs.
Operating Instructions WIRE RACK CAUTION To avoid risk of property damage: ● ● ● ● Do not use rack to pop popcorn. Rack must be on the four plastic supports when used. Use the rack only when cooking food on rack position. Do not cook with rack on floor of the oven. The wire rack gives you extra space when cooking in more than one container at the same time. To use rack: 1. Place rack securely in the four plastic supports. ● Rack MUST NOT touch metal walls or back of microwave oven. 2.
Operating Instructions COOKING GUIDE Guide for Cooking Meat in Your Microwave ● Place meat on a microwave-safe roasting rack in a microwave-safe dish. ● Start meat fat-side down. Use narrow strips of aluminum foil to shield any bone tips or thin meat areas. ● Check the temperature in several places before letting the meat stand the recommended time. ● The following temperatures are removal temperatures. The temperature of the food will rise during the standing time.
Operating Instructions Guide for Cooking Seafood in Your Microwave ● Cook fish until it flakes easily with a fork. ● Place fish on a microwave-safe roasting rack in a microwave-safe dish. ● Use a tight cover to steam fish. A lighter cover of wax paper or paper towel provides less steaming. ● Do not overcook fish; check it at minimum cooking time. Food Steaks Up to 1.5 lbs. Fillets Up to 1.5 lbs. Shrimp Up to 1.5 lbs.
Care and Cleaning CARE AND CLEANING For best performance and safety, keep the oven clean inside and outside. Take special care to keep the inner door panel and the oven front frame free of food or grease build-up. Never use rough powder or pads. Wipe the microwave oven inside and out, including the hood bottom cover, with a soft cloth and a warm (not hot) mild detergent solution. Then rinse and wipe dry. Use a chrome cleaner and polish on chrome, metal and aluminum surfaces.
Care and Cleaning COOKTOP/NIGHT LIGHT REPLACEMENT CAUTION To avoid personal injury or property damage, wear gloves when replacing light bulb. 1. Unplug the oven or turn off power at the main power supply. 2. Remove the bulb cover mounting screws. 3. Replace bulb with 40 watt appliance bulb. OVEN LIGHT REPLACEMENT 1. Unplug oven or turn off power at the main power supply. 2. Remove the vent cover mounting screws. (2 middle screws) 3. Tip the cover forward, then lift out to remove.
Cooking Utensils MICROWAVE UTENSIL GUIDE USE OVENPROOF GLASS (treated for high intensity heat): Utility dishes, loaf dishes, pie plates, cake plates, liquid measuring cups, casseroles and bowls without metallic trim. CHINA: Bowls, cups, serving plates and platters without metallic trim. DO NOT USE METAL UTENSILS: Metal shields the food from microwave energy and produces uneven cooking. Also avoid metal skewers, thermometers or foil trays.
Troubleshooting TROUBLESHOOTING GUIDE CARE AND CLEANING Before you call a repair person for your oven, check this list of possible problems and solutions. Follow these instructions to clean and care for your oven. Keep the inside of the oven clean. Food particles and spilled liquids can stick to the oven walls, causing the oven to work less efficiently. ● Wipe up spills immediately. Use a damp cloth and mild soap. Do not use harsh detergents or abrasives.
Note 23 MMV5165BA_03143E.
Warranty Full One Year Maytag will repair or replace, including related labor, any part which proves defective as to workmanship or materials. Limited Warranty After one year from the date of original retail purchase, Maytag will provide a free part, as listed below, to replace any part that fails due to a defect in materials or workmanship. The owner will be responsible for paying all other costs including labor, mileage, transportation, trip and diagnostic charges, if required.