* Same contents in this manual may differ from your phone depending uon th aftercare of the phone or your service provider. SCHNAPPS User's Manuel Draft version(for FCC) (2002.10. 09) ELECTRONICS Printed in Korea Pleads read this manual before operating your phone, and keep it World Wide Web, Indigo No. GHB oat for future reference. to: samsangmaile.com English, 10/2002 Bev 1.
FCC RF EXPOSURE INFORMATION WARNING! Read this information before using your phone In August 1998 the Federal Communications Commission {FCC) of the United States with its action in Report and Order FCC 96-326 adopted an updated safety standard for human exposure to radio frequency electromagnetic energy emitted by FCC regulated transmitters. Those guidelines are consistent with the safely standard previously set by both U.S. and international standards bodies.
Table of Contents IMPORTANT SAFETY PRECAUTIONS UNPACKING YOUR FORE Phone Layout Display Back light Service Lig FRE s GETTING STARTED Using a Battery Switching the Phe Your Phone's Mode (ALL FUNCTIONS Making o Call 2% Redialing the Lust Making a Cal from the Pan Pretend Dialing Geed Dialing Four-dig Dialing Pause Dialing Voice Doling Adjusting the Volume Answering a Call Options During o (ol Using Caller ID .. Viewing Missed Calls Quickly Switching to Silent Coll Forwarding olf Waring ..
ENTERING TEXT Changing the Text Input Mode 4 19 {English} those: 41 Alphabet Bode 4 Symbol Moro Huber Mode USING THE MENUS Accessing a Ens Function by Scrolling Recessing a Menu Function by Using its Short eat Lis of Keno Functions (Als Outgoing (MENU 1-1 52 fa coming (MENU 1-2} 53 Missed (MENU 1-9 4 Erase History (MENU Kirk Time (MENU 1-5), PHONE BOOK Find (MENU 2.1} .. Add New Entry (MENU 2.
GAMES. SETUP Rte Answer (MEN 0-1, Call Answer (MENU 0-2) Ruts Retry (MENU 0-3) Sef HAM (MENU 0-4) Set System (MENU 0-6) Data/Fax (MENU 0-6) Version (MENU 0.7} Security (MENU 0-8) HEALTH AND SAFETY INFORMATION Exposure fo Radio Frequency Energy Information Precautions When Using Buffers Rood Safety . Potentially Explosive Atmosphere Emergency Cal. Other important Safely information Care and Maintenance. GLOSSARY. INDEX... QUICK REFERENCE CARD...
Radio Frequency Exposure The design of this phone complies with Australian Communications Authority {ACA} requirements relating to radio frequency (RF) exposure. To maintain compliance with these requirements, use only Samsung-supplied or approved accessories. Use of non-approved accessories may violate the requirements. Sensible Use Use only in the normal position (held to the ear). Avoid unnecessary contact with the antenna when the phone is switched on.
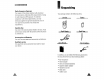
: Your Phone Phone Layout Closed View Antenna The following illustrations shows the main elements of Ear-microphone your phone. jack Service light Open View External display Centerpiece Key Functions Folder Enters menu mode. Main . display B In menu mode, selects a menu function or = stores information that you have entered {such as a name} in the phone memory. In Standby mods, enters the Messages menu and saves the number in the phone book tare entering a number.
Hi Key Functions {continued .} Display Go; Makes or answers a call. Layout In Standby mode, recalls the East outgoing numbers you dialed, and dials the last outgoing number when pressed twice. The display comprises two areas; an upper ling of various icons and the Sower text and graphic area. ED Ends a call. Also switches the phone on VERMEER leans and off when held down. In menu mode, cancels your input and | returns to Standby mods. Text and graphic area [7 Deletes characters from the display.
Alarm: Appears when you set an alarm to ring at a specified time. Roaming: Appears when you are out of your home area and have registered onto a different network when traveling in other countries, for example). Bela: Appears when you set the ringer volume for calls to one from Level 1 to Level 8 or to 1-Beep. Ringer Off: Appears when the ringer value is muted off. Vibration: Appears when you set the singer volume for calls to Vibrate or when the phone is in Silent mode.
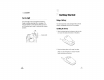
Service Light The service light is at the top right of the phone. It flashes to indicate incoming calls or messages. The light also flashes for a few seconds when you turn on or off the phone and is used for indicating the charging progress. Service light Getting Started Using o Buttery Your Samsung phone comes packaged with a partially charged, rechargeable Lithium lon {Li-ion} battery. Installing the buttery 1.
Removing the battery 1. if necessary, switch off the phone by holding down && until the power-off image is displayed. 2. Pull the catch above the battery towards the top of the phone and lift the battery away. @ @ ems 2 Charging the Buttery The travel adapter is provided with your phone fo allows you to charge your pane's battery from a standard AC wall outlet. Use only approved batteries and chargers. Nate: You need to fully charge the battery before using your phone for the first time.
4. When charging is finished {the light turns to green), unplug the adapter farm the power outlet and from the phone. Low Buttery Indicator You can easily tell if your battery needs to be recharged by checking the Battery Status icon (8881) in the upper-right comer of your phone's display. The presence of all three bars indicates a full charge, twa bars indicates a smaller charge, and one bar indicates an even smaller charge. No bars [the battery icon is. empty) means your battery must be charged.
Your Phone’s Mode Standby Mode Standby is the most basic state of your phone. The phone goes into Standby mode after you tum it on or whenever you briefly press = . When your phone is in Standby mode, you will typically see the greeting message and current date and time. If you enter a phone number, you can press <5 to dial it or press f) to save it in the internal phone book. Press && at any time to return to Standby mode.
Call Functions Making a Call In Standby mode, key in the area code and pane number and press &. Note: if the Auto Retry option (MENU 0-3) have been enabled {see page 106}, the phone automatically retries to make the call when the line is busy or the remote person does not answer you, While entering a number, press @ fo use the following menu options: Talk: places a call to the number. Save. allows you to save the number in the phone book. Find: sideshows you to find a number from the phone book.
2. Press <2 . The list of the outgoing calls is displayed. 3. Press or .£ to scroll through the list until you select the required name or number. 4. Press <7 to dial the number displayed. Making a Call from the Phone book Yau can store the phone numbers called regularly in memory, which is called the phone book. You then simply recall the number to dial. For further information about the phone book feature, refer to page 56.
Three-Touch Dial Memory locations 100 through 250 are special three touch locations. Press the first and the second digit briefly, then hold down the third digit of the memory cell. For example: Location no, 123 Press 32) and (2) briefly, then hold down Eh The number (and name stored is displayed, then dialed. Four-digit Dialing You can enter any four consecutive digits of a phone numbs in the phone book and your phone can dial the entire number for you.
IRE 3. Select the required pause type. « Press U3) for Hard Pause. The letter “p” displays, meaning that a hard pause will scour at that point in the dialing sequence. Press (E2J for sec Pause. The letter 1” displays, meaning that a “Timed” pause will occur at that point In the dialing sequence. 4, Enter the digits that dean to follow the pause, such as your account number &. Repeat steps 2 and 3 to add more pauses and numbers, if necessary. 6.
Voice Dialing Before using the Voice dialing feature, you must record the name and number in your phone using the Venice Dial menu. For further details, see page 88. 1. To place a call, press and hold down Sy or open the folder, depending on the Set Active menu option {MENU See page the voice prompt, say a name into the microphone. « If the phone recognizes the name, the phone attempts a connection. = If the phone does not recognize the name, the screen prompts for the name again.
Answering a Call When somebody calls you, the phone rings and the prune icon is displayed in the middies of the display. If the caller can be identified, the caller's phone number {or name if available in your phone book) is displayed. To answer a call, press <7. If the Call Answer menu (MENU 0-2) is sat to Any Key. you can answer a call only by pressing any key except for 2. To end the call, press G7 or simply close the folder.
Using Caller ID This feature tells you who is calling you by displaying the caller's number when the phone rings. If a caller's name and number are stored in your phone book, the corresponding name is also displayed. If you call someone wha has this feature, your phone number will be displayed on the their phone. Note: Contact your service provider to setup the Caller Line identification service.
Call Waiting Call Waiting lets vou receive a second call during conversation. Your phone ratifies you of a call waiting by beeping an displaying “Call Waiting.” Your phone provides the option of wining the Call Waiting feature on and off {if you have subscribed to the service). Call Waiting is on by default in the phone. if you choose to have a undisturbed conversation, simply turn off the feature for the current call, Note: Contact your service provider to activate the Call Waiting service.
iL’ Entering Text At many times when using your phone, you will need 0 enter text; for example, when storing a name in the phone book, creating your personal greeting or scheduling events in your calendar, You ean enter alphanumeric characters info your phone by using your phone's keypad, You are provided with the following text input modes: » Englishmen: This mode allows you to enter wards with only one key press per letter Each key on a keypad has more than one letter a single press on E53 could The T9 mo
T9 (English) Mode To type a word, press keys corresponding to the letters you need. Remember the following as you are typing: 1. Press keys on the handset just once per desired letter. For example, to enter “Hello,” press 35, m2), (5, 55) and 65. The word you are typing appears on the display. It may change with each key pass, 3. Type to the end of the ward before editing or deleting any keystrokes. 4. Put a space between each word by pressing g.
Alphabet Mode Her typing in the Alpha mode, you need to press the keys labeled with the required Deter: Once for the first letter -Twice for the second letter -And so on. For this reason, this method is called multi-tap typing. Far example, you press three times to display the letter "C" and (523 two times to display the letter "K". The cursor moves to the right when you press a different key.
Symbol Mode Symbol mode enables you enter symbols, 456759 > GA" pre You can display more symbols by pressing {= or -) Press the key corresponding to the desired symbol. The phone automatically switches back to the text entry mode used just prior to selecting the Symbol mode. Number Mode The Number mode enables you to enter numbers. Press the keys corresponding to the desired digits, and manually switch back to text entry mode of choice.
Accessing a Menu Function by Using its Shortcut The menu items {menu, sub menus and setting options) are numbered and can be accessed quickly by using their shootout numbers. Note: The numbers assigned fo sate menu function are indicated on the list on page 49. 1. In Standby mods, press @ 10 access mend mode, 2. Within three seconds, key in the first digit of the shortest number. Repeat this for each digit of the shootout number. Example: Accessing the Version menu option Press (22) and Ez).
Main menu Main mend 1 Main menu 2 Main menu 4. Wireless Web = 1, Get In Web 8. Display 557 Prompt 5 Planter Meme Pad 5 Alma 9. Games 8, Calculator 7. World Tami 2 3. Count Down 0. Setup $. Sut Ting 8. Voice Tools 1. Vice Dial 1. Record 2am 2. Redo 3-3. Erase All won 4, Set Active 2. Voice Perm psi 1. Horded wn 2. Review i 3. Erase Al Lose 3 oie pr soar ono inbox , Setting 7. Sots 1. Ringer Volume 1, Calls 2. Messages 3 Mass 2 Ringer Type =r 1, Yogic Calls Fe 7. Messages ree 3. Falstaff fn 4. Schedule 2 3.
3m w= Calls — You can use the Calls menu to: « View and dial the last outgoing, coming or missed numbers » Erase the numbers in the call log memory. » View the length of calls. Outgoing MENU 1-1 Nate: You can also access this menu by pressing in Standby mode. The phone stores the last 10 calls you dialed. When you access this menu, the list of the outgoing calls is displayed. 1. Press find the desired number for name if it is saved in the phone book. 2. Press ) to select the highlighted number.
[= + Missed MENU 1-3 If the Caller Line Identification service is available {contact your service provider), your phone keeps a list of 10 incoming calls that you failed to answer. For further information about serializing through the list and accessing a call log, see "Outgoing” on page 52. Erase History MENU 1-4 You can erase the entries stored in each of the three call logs or all three logs at once When you see a confirming message, select YES to erase the selected log or all logs.
5 Phone Book The Phone book allows you to store frequently used phone numbers and the associated names in your personal directory to make it easy for you to make a call without having to remember 07 enter the phone number. You can store up to 250 entries, including E+ mail address and URL address. Find MENU 2.1 This option allows you to find an entry in the phone book. Note: You can actress this menu by pressing in Standby mode, 1. Press scroll to the desired method.
Add New Entry MENU 2-2 This menu allows you to store a number with 3 name in your phone book. You can save a person's various numbers, such as workplace number, mobile number and fax number, into one entry. A phone book entry can contain up to six number, one in each category. Creating a New Entry 1. Enter a phone number and press © © 2. Press 5) ta confirm to add a new entry. if you are creating an entry for the first time, skip to Step 3. 3.
Storing Phone Numbers ut Call's End To store a phone number at the end of your call 1. Press &2 ta end the call. The call time and the phone number display. 2. To store the phone number, press complete storing the number, follow from Step 2 in "Creating a New Entry” on page 58. Adding a Number info an Existing Entry 1. Enter a number and press 2. Se roll to the entry in which you want to add a number by pressing “For and press 8. 3.
Messages Your phone can receive voicemail notification, text messages, and pages. Also, your phone can send text messages and pages if you system supplier provides his service. When the phone receives a message, an alert sounds, a text notification displays along with the name and phone number of the caller if available. The New Message icon { EE) remains on the screen until you read the new text, numeric page or web message, of you listen to the new voicemail messages.
entente Send Later: select how Lang the delivery of the message will be delayed at the SMS center, if you do not want to send it immediately. Delivery ACK: turn the delivery acknowledgment feature on or off. When this (s activated, the network informs you whether or net your message has been read by the recipient. Message Save: set if the phone will save the message in the Outbox after transmission.
Inbox MENU 3-3 Your phone can store up to 83 messages all together in the inbox, outbox and filed message. If the memory is full, a warning message Is displayed and the phone rejects additional messages unt! you erase the telesales ones. When you access the fab ex menu caption, the message list appears, To view details, press 5 ore. to scroll to one of the messages in the list and press §) . If necessary, press (os or =) sealant through the contents.
rr] wo Filed Messages MENU 3-5 Your phone can store draft messages that are yet to be sent in the filed message folder. If you save the message contents using the File MS& many option before sending it {see page 64), vou can access them using this menu. To review a stored message. press "Ror _z. fo scroll to the desired message and press §) . While reviewing a message, press @ 10 use the following options: Resend: allows you to edit the message and send it to another destination.
EE Message Setting MENU 38 Via this menu, you can preset several options for using the message feature. Scroll Timer if an incoming message is too long for the display, the phone displays it by automatically scrolling the screen. You can set how often the phone scrolls the message 10 the next screen. if you select Off, manually using u need to scroll to the next screen MSG Reminder When a message is received, the phone alerts you by sounding the selected ringer.
Wireless Web About the Web Browser Your phone comes equipped with a web browser which makes it possible for you to access the wireless wah. The web browser allows you to access up-to-the minute information through your phone. Browsing the wireless web through your phone is unlike using your computer; site providers have selected only the critical aspects of their sites to present to wireless phone users and they have removed most of the graphics.
Using the Web Browser Soft Keys At the bottom of the web browser display is a solid bar which contains browser commands. and =) are used fo execute the commands. These two quays are called soft keys because their functions change depending on where you are in the web browser software. Navigating the Web Browser When you use the web browser, some keys on your phone operate differently than an a normal phone call. These keys are explained below.
Using the Web Browser Menu On the web browser, you can access the following options by pressing a . Reload: rereads the currant web page. Home: takes you back at any time to the homepage of the wireless web service provider Bookmarks: allows yau ta load a bookmarked web page directly, Mark Site: allows you 10 set a bookmark for most page; they can be accessed directly farm any web page. Bookmarks save you time by reducing the number of steps required to access a given page.
Prompt MENU ¢-2 Your phone can be set to display a prompt each time you start or end a browser session or not to display the prompt. The flowing options are available: None: you will never see this prompt. To Start: this is default setting. You will see the prompt when enter the browser, but not when you exit it. To End: you will see the prompt only when you exit the browser. Bath: you will be prompted when yau enter or exit the browser.
4. Select when an alarm will inform you of the event by pressing f= or =. Selecting No alarm does not ring the alarm. 5. Press i) to save your event. Viewing Your Schedule The list of the events stored in the current day is displayed when you select the Today menu option [MENU 5-1). While viewing the schedule list: » Press @ 10 use the following options: Add New: allows you to add a new event. Erase : allows you to erase a selected event.
ke Task List MENU §-3 This feature allows you to enter up a fist of tasks fo be done and assign both a priority and a deadline to each task. Creating a New Task 1. Enter the first task and press B to confirm. You can enter up to 32 characters. For further details on how to enter characters, see page 40. 2. Enter the time and date by which the task needs to be done, by using the numeric keys. 3. Select high or fav priority using ¢= or = and then press §) to save the task.
Alarm Clock MENU 55 This option allows you to set or release up to three alarms to ring at a specific time. To set an alarm: 1. Select an alarm, Alarm #1 through Alarm 43, and press 4). 2. Select On by pressing Press x and enter the required time and date for alarm to ring. You need to enter the time in 12-hour format, To select AM or PM, press B= for A& {AN} or NF for B (PM). 4. Press = and select an lama melody by pressing {or 5.
World Time MEN 5.7 This menu allows you to check the current time for 24 major cities around the world. Select the city corresponding to your time zone by pressing the navigation keys one or mare times. The ioctl date and time are displayed. You can view the daylight saving time by pressing (8. Count Down MENU 5-8 This menu helps you know bow much time it takes for you to do something, or how many months, days, hows and minutes until a specific day arrives. You can create up 10 4 counter using this menu.
i! Voice Tools Is this menu, you can use the phone's voice features, allowing you to: * dial a number Dy saying 8 associated name. « record 2 voice memo. set the phone to answer a call and record the caller's message. Voice Dial MENU 6-1 When your phone is in digital mode, you can Cali up to 20 stored entries by speaking the name into the microphone, Using the Voice dialing option requires that you first program the phone to recognize the name of the person you are calling.
EE Review When a list of your stored voice dial numbers displays, scroll to the desired entry and press §) . The recorded name plays audibly. Erase All This option erases all of the entries in the Voice Dial list. Set Active Voice Dialing is always active once you have programmed the phone ta accept voice dialing entries and the associated phone numbers. To place a call using voice dialing, simply press and hold Ey in Standby mode and then say the name into the phone after you hear a prompt.
Review When a list of your voice memos is displaced, scroll to the desired memo and press (4 . The following options are available: Play: plays back the selected memo. Erase: erases the selected memo, Info: shows the detailed information on the memo, such as the title, the elapsed time, the memory size used for the memo and the time when the meme was recorded.
Setting You can change the settings for answer mode. The following options are available: Greeting : Your phone provides you with & predefined resting message to be played when a call comes in Also, you can record your own greeting message To record a resting message: 1. Select Reed and press 8 2. Wait until a prompt beep sounds and record a greeting message by speaking into the microphone You can pause recording by pressing = and then resume by pressing 3.
1 = i Sounds You can use the Sounds menu to customize various sound settings, such as the: = Ringer volume, type, and tone * Key beep and voice volume. * Alert sounds and a ringer for the roaming calls. « The ringer which sounds when the phone is switched on or off. Ringer Volume MENU 7-1 This menu option allows you to adjust the ringer volume: Calls: allows you to adjust the ringer volume for the in corning calls. Messages: allows you to adjust the ringer volume for the massages.
Alerts MENU 7-3 Your phone gives audible alerts (beeps) at a specified time to inform you that certain things have happened. The alerts only occur in your earpiece so the other party does nat hear them.
Power On/Of MENU 7-7 ‘You can tm on or off the tone that the phone sounds when it Is switched on or off, Choose On to use a power on/off sound or Off not to use it. Display The Display feature enables you to: « Change the display style of the menus » Create your own greeting, and select an animation to be displayed in Standby mode or when powered on or off, » Set the length of time for back light = View the version of your phone. Menu Style MENU 8.1 This options allows you to select the many display style.
Banner MENU 83 This option flows you to set a banner message io be displayed at the bottom of the display in Standby mode. 1. Hf necessary, press [57 repeatedly to delete each letter of the old greeting. Press are half £53 to clear the display. 2. Enter your banner message characters . For further information about how to enter letters, refer to page 40. 3. When you finish entering the message, press Btw save the new banner.
. Games This menu allows you fo play two games; Ash Push and Puzzle World 1. Press B select the game you wan 1b enjoy. 2. Press 0 . The display shows the Illustration of the key operation for the game. 3. To start Push Push, press 8 . To start Puzzle World, press Uy or (22. 4. Press &2 to end the game and rectum to Standby mode. Note: The key operation may vary depending on the selected game. Please use the onscreen help.
Auto Retry MENU 0-3 When this menu option is activated, your phone will automatically retry the call up to 10 times wham a connection fails. To activate this feature, select how often the phone will automatically retry the call; 68 Second, 38 Second and 18 Second are available Select Off deactivates this feature. Set NAM MENU 0-4 NAM stands for numerical assignment module, essentially your phone number. Your phone can have twp Mamas.
Dotard MENU 0-6 Your phone is capable of sending and receiving digital data and fax call when connected to a computing device laptop, desktop, handheld, palmtop, etc.) running Windows 95, Windows 98, Windows NT or later versions. The phone functions just like a typical modem on your PC, enabling you to use wireless data involving a wide variety of Windows software applications. To use digital data or fax services with your phone, you will need to obtain a digital data/fax Kit from your service provider.
Version MENU 0-7 This caption allows you to view the software and hardware versions of your phone. This feature is helpful if you have to the call customer care. Security MENU 6-8 Your phone provides many security options, including a user-programmable Jock code and call restriction features. The lock code Is preset to at the factory. Lock Phone When the phone is locked, you cannot operate the phone until you enter the lock code. The following options are available; Unlocked: the pane remains unlocked.
Send PIN Nate: Your service provider must enable this feature and assign you a PIN (Personal Identification Number} in larder for this feature to work. This feature prevents your phone from being used by unauthorized people. The feature is only available if your service provider supports this vicar and you have a PIN assigned by the system supplier. Contact your service provider for more detailed information of this feature. The following options are available: Never: the caption is not activated.
Health and Safety . Information Exposure to Radio-Frequency Energy (SAR information} This phone meets Australian Communications Authority (ACA) requirements [AS/NZS 2772) CONCERNING Expo Sure ta radio waves. Your mobile phone is a radio transmitter and receiver. It is desired and manufactured, sa as not to exceed the limits for exposure ta radio-frequency (RF) energy, as recommended by ACA.
» Do not leave the battery in hot or cold places, such as in a tar in summer or winter conditions, as you will reduce the capacity and lifetime of the battery. Always try to keep the battery at room temperature. A phone with a hot or cold battery may temporarily not work, even when the battery is fully charged. Li ion batteries are particularly affected by temperatures below not short-circuit the battery.
7 Do not engage in stressful or emotional conversations that may be distracting. Make the people with whom you are talking aware that you are driving and suspend conversations that have the potential to divert your attention from the road. 8. Use your wireless phone to call for help. Dial the emergency number in the case of fire, traffic accident or medical emergencies. Remember, iris a free call on your wireless phone! 9. Use your wireless phone to help anthers in emergencies.
Persons with pacemakers: » Should always keep the phone more than 15cm {8 inches} from their pacemaker when the euphoria is switched on « Should not carry the phone in a breast pocket « Should use the ear apposite the pacemaker fo minimize potential interference 1f yuu have any reason ta suspect that interference is taking place, switch off your phone immediately, Sore digital wireless panes may interfere with some hearing aids.
Emergency Calls This phone, like any wireless phone, operates using radio signals, wireless and landline networks as well as user-programmed functions, which cannot guarantee connection in all conditions. Therefore, you should never rely solely on any wireless phone for essential communications (medical emergencies, far example.
Care and Maintenance Your phone is a product of superior design and craftsmanship and should be treated with care. The suggestions below will help you fulfill any warranty obligations and allow you to enjoy this product for many years. » Neap the phone and all its parts and accessories out of the reach of small children’s. « Keep the phone dry. Precipitation, humidity and liquids contain minerals that will corrode electronic circuits. » Dg not touch the phone with a wet hand while iris charging.
i. Glossary Airtime Actual time spent talking on the wireless phone. Most carriers bill customers based on how many minsters of airtime they use each month. Antenna A device for transmitting or receiving signals. The size and shape of antennas is determined, in part, by the frequency of the signal they receive. Wireless phones and the base station must have antennas. Base Station The fixed radio neurotransmitter that maintains communications with mobile radio telephones within a given area.
EEE LED {Light Emitting Diode} Commonly used to refer to & small light on the wireless phone or on the Desktop Charger. The LED lights on the phone to indicate an incoming call. The lights on the charger indicate that battery charging is taking place Pretend The addition of a prefix, such as an area code, to a phone number.
lean description = 13 Inbox (33) » 86 In-call options + 35 Incoming cal (1-2) » 53 Installing better + 17 K Key Beep (7-5) » 99 Keys description » 11 location + 10 L Last number redialing + 25 Letters, entering « 40 Listening voicemail +65 Lock code + 111 Low battery indicator « 20 Maintenance « 124 smo pad (5-4) » 83 Memory [2-5] » 61 Memory, clearing 113 Menus list » 49 sealing » 47 shortcuts » 48 Messages erasing « 59 fled + 68 renting + 56 setup 3-8)» 70 voice 65 Minute beep + 98 Missed calls « 35 Modes
Make call Receive a cal Adjust key beep vole Adjust spotter volume Redial the fast eal Switch 16 silent mode.
2. Phonon Book, Messages 3 &: Wireless Wab Flamer Licensed by QUALCOMM Incorporate under one or mare of the following Patents. I US Patent No. 4.901.307 5,056,109 5099.