5 PRINTING This chapter explains how to print your documents in Windows and how to use the print settings.
Printing a Document The following procedure describes the general steps required for printing from various Windows applications. The exact steps for printing a document may vary depending on the application program you are using. Refer to your software application’s User’s Guide for the exact printing procedure. NOTE: For detailed information about printing from a Macintosh computer, see Appendix A. 1 Open the document you want to print. 2 Select Print from the File menu. The Print window is displayed.
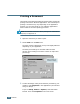
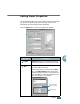
4 Now you see the Samsung SCX-4x16 Series Properties window, which allows you to access all of information you will need when using your machine. The Layout tab is first displayed. The preview image shows the sample page with the settings you currently specified. If necessary, select the Orientation option. The Orientation option allows you to select the direction in which information is printed on a page. • Portrait prints across the width of the page, letter style.
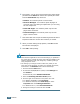
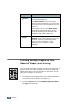
6 If necessary, you can set in what sequence the pages will be printed from the Extra tab. Select the required print order from the Print Order drop-down list. • Normal: Your machine prints in normal order. • Reverse All Pages: Your machine prints all pages in reversed order. This setting is helpful when you are using the rear output slot. • Print Odd Pages: Your machine prints only the odd pages of the document. • Print Even Pages: Your machine prints only the even pages of the document.
Canceling a Print Job There are two ways to cancel a print job: To stop a print job from the control panel: Press the Stop/Clear button. Your machine will finish printing the page that is moving through the machine and delete the rest of the print job. Pressing the button cancels only the current job. If more than one print job is in the machine’s memory, you need to press the button once for each job. To stop a print job from the Printers folder: 1 From the Windows Start menu, select Settings.
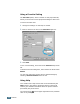
Using a Favorite Setting The Favorites option, which is visible on each properties tab, allows you to save the current properties settings for future use. To save a Favorites item: 1 Change the settings on each tab, as needed. 2 Enter a name for the item in the Favorites input box. 3 Click Save. To use a saved setting, select it from the Favorites drop-down list. To delete a favorite setting item, select it from the list and click Delete.
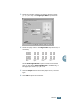
Setting Paper Properties Use the following options to set the paper handling needs when you access the printer properties. See page 5.2 for more information about accessing printer properties. Click the Paper tab to access many paper properties. 1 2 3 4 Property 5 Description 1 Copies Copies allows you to choose the number of copies to be printed. You can enter up to 999. Size The Size option allows you to choose the size of paper loaded in the tray.
Property 3 Source Description Make sure that Source is set to the corresponding paper tray. The Manual Feed source is used when printing to special materials. You need to load one sheet at a time into the Bypass Tray. See page 3.8. If the paper source is set to Auto Select, the machine automatically picks up print materials according to the following order: the Bypass tray and the paper tray. 4 Type Make sure that Type is set to Printer Default.
3 Select the number of pages you want to print per sheet (1, 2, 4, 9 or 16) in the Pages per Side drop-down list. 4 Select the page order in the Page Order drop-down list, if necessary. 1 2 1 3 2 1 3 1 3 4 2 4 4 3 4 2 Right, Then Down Down, Then Right Left, Then Down 5 Down, Then Left Check Print Page Border to print a border around each page on the sheet. Print Page Border is enabled only, if the pages per sheet is 2, 4, 9 or 16.
Printing a Reduced or Enlarged Document You can scale your print job on a page. 1 When you change the print settings from your software application, access the printer properties. See page 5.2. 2 From the Layout tab, select Reduce/Enlarge in the Type drop-down list. 3 Enter the desired scaling rate in the Persentage input box. You can also click the or button. 4 Click the Paper tab and select the paper source, size and type. 5 Click OK and print the document. 5.
Fitting Your Document to a Selected Paper Size A You can scale your print job to any selected paper size regardless of the digital document size. This can be useful when you want to check fine details on a small document. 1 When you change the print settings from your software application, access the printer properties. See page 5.2. 2 From the Layout tab, select Fit to Page in the Type drop-down list. 3 Select the correct size from the Target Paper drop-down list.
Printing Posters You can print a single-page document onto 4, 9 or 16 sheets of paper, for the purpose of pasting the sheets together to form one poster-size document. 1 When you change the print settings from your software application, access the printer properties. See page page 5.2. 2 From the Layout tab, select Poster in the Type drop-down list. 3 Configure the poster option: You can select the page layout from 2x2, 3x3 or 4x4.
Specify an overlap in millimeters or inches to make it easier to reconstruct the resulting poster. 0.1 inches 0.1 inches 4 Click the Paper tab and select the paper source, size and type. 5 Click OK and print the document. You can complete the poster by reconstructing the results. Using Watermarks The Watermark option allows you to print text over an existing document.
3 Click Ok and start printing. Creating a Watermark 1 When you change the print settings from your software application, access the printer properties. See page 5.2. 2 Click the Extras tab and click the Edit button in the Watermark section. The Edit Watermarks window appears. 3 Enter the text message you want to print in the Watermark Message box. The message will be displayed in the preview window. The preview image is provided so that you can see how the watermark will appear on the printed page.
Editing a Watermark 1 When you change the print settings from your software application, access the printer properties. See page 5.2. 2 Click the Extras tab and click the Edit button in the Watermark section. The Edit Watermarks window appears. 3 Select the watermark you want to edit in the Current Watermarks list, and change the watermark message and the options. Refer to “Creating a Watermark” on page 5.14. 4 Click Update to save the changes. 5 Click Ok.
Using Overlays What is an Overlay? Dear ABC Regards WORLD BEST An overlay is text and/or images stored in the computer hard disk drive (HDD) as a special file format that can be printed on any document. Overlays are often used to take the place of preprinted forms and letterhead paper. Rather than using preprinted letterhead, you can create an overlay containing the exact same information that is currently on your letterhead.
4 In the Edit Overlays window, click Create Overlay. 5 In the Create Overlay window, type a name of up to eight characters in the File name box. Select the destination path, if necessary. (The default is C:\Formover). 5 6 Click Save. You can see the name in Overlay List. 7 Click OK or Yes until you complete creating. The file is not printed out. Instead it will be stored on your computer HDD disk. NOTE: The overlay document size must be the same as documents you will print with the overlay.
Using a Page Overlay After an overlay has been created, it is ready to be printed with your document. To print an overlay with a document: 1 Create or open the document you want to print. 2 When you change the print settings from your software application, access the printer properties. See page 5.2. 3 Click the Extras tab. 4 Select the overlay you want to print from the Overlay drop-down list box.
6 If necessary, click Confirm Page Overlay When Printing. If this box is checked, a message window will appear each time you submit a document for printing, asking you to confirm your wish to print an overlay on your document. Answering Yes to the window means that the selected overlay will be printed with your document. Answering No to the window cancels overlay printing. If this box is empty and an overlay has been selected, the overlay will be automatically printed with your document.
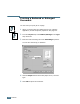
Setting Graphic Properties Use the following graphic options to adjust the print quality for your specific printing needs. See page 5.2 for more information about accessing printer properties. Click the Graphics tab to display the properties shown below. 1 2 3 5.20 PRINTING Property Description 1 Resolution You can select the printing resolution by choosing from 600 dpi (Normal) or 300 dpi (Draft). The higher the setting, the sharper the clarity of printed characters and graphics.
Property 3 Advanced Options Description You can set advanced settings by clicking the Advanced Options button. Darkness Use this option to lighten or darken the image appearance in your print. • Normal: This setting is for normal documents. • Light: This setting is for bolder line widths or darker gray-scale images. • Dark: This setting is for finer line width, higher definition in graphics and lighter gray-scale images.
Property 3 Advanced Options (continued) Description True Type Options This option determines what the driver tells the machine about how to image the text in your document. Select the appropriate setting according to the status of your document. • Download as Bit Image: When this option is selected, the driver will download the font data as bitmap images. Documents with complicated fonts, such as Korean or Chinese, or various types of fonts will print faster in this setting.
4 Click Start and select Printers from Settings. Double-click your printer name. 5 Select Properties in the Printer menu. 6 Click the Sharing tab and check the Shared As box. Fill in the Shared Name field and then click OK. Setting Up the Client Computer 1 Right-click Start and select Explorer. 2 Open your network folder in the left column. 3 Right-click the shared name and select Capture Printer Port. 4 Select the port you want, check the Reconnect at log on box and then click OK.
5 For Windows NT 4.0, check the Shared box. For Windows 2000, check the Shared As box. For Windows XP, check the Share this printer box. 6 For Windows NT 4.0, fill in the Share Name field and click OK. For Windows 2000/XP, fill in the Shared Name field and click OK. Setting Up the Client Computer 1 Right-click Start and select Explorer. 2 Open your network folder in the left column. 3 Click the shared name. 4 For Windows NT 4.0/2000, from the Start menu, select Settings and Printers.
6 SCANNING Scanning with your machine lets you turn pictures and text into digital files on your computer. Then you can fax or e-mail the files, display them on your web site or use them to create projects that you can print using Samsung SmarThru software.
Scanning Basics Your machine offers two ways to begin scanning: • From the Samsung SmarThru software: Launch Samsung SmarThru and open the Scan Wizard to begin scanning. See below. • From TWAIN-compliant software: You can use other software including Adobe PhotoDeluxe and Adobe Photoshop. See page 6.5. NOTES: • To scan with your machine, you must install the MFP driver. • Scanning is done through the same LPT or USB port currently assigned for your printer port.
3 Once you have installed Samsung software, you see the SmarThru icon on the desktop window. Double-click the SmarThru 3 icon. Double-click this icon. The SmarThru 3 window opens. 4 To open the Scan Wizard, click the Scan Wizard icon in the plugin bar on the left of the SmarThru 3 window. 6 Scan Wizard icon. SCANNING 6.
The Scan Wizard lets you use the following services: • Scan Lets you scan the original documents and save them in the Image Manager of the Samsung SmarThru system. The Image Manager is an image database manager and image editor program. • Copy Lets you use your machine to produce professional quality copies. You can adjust the image size and select advanced settings.
6 The Samsung Scan Manager opens for the selected service. Adjust the scan settings. You can use the Help button to receive on-line help. 7 To start scanning, click Scan. For more information, please refer to the SmarThru User’s Guide which came with your machine. NOTE: If you want to cancel the scan job, press the Stop/Clear button on the control panel.
MEMO 6.
7 MAINTENANCE This chapter provides information for maintaining the toner cartridge and your machine.
Clearing the Memory You can selectively clear information stored in your machine’s memory. 1 Press Menu on the control panel until “Maintenance” appears on the top line of the display. 2 Press the scroll button (¦ or ) until you see “Clear Memory” on the bottom line and press Enter. The first available menu item, “Paper Setting,” displays on the bottom line. 3 Press the scroll button (¦ or ) until you see the item you want to clear.
Cleaning Your Machine To maintain the print quality, follow the cleaning procedures below each time the toner cartridge is replaced or if print quality problems occur. CAUTIONS: • Do not pour or spray water directly onto any part of your machine. • Do not use ammonia-based cleaners or volatile solvents, such as thinner, on or around the machine. These can damage the machine.
3 With a dry and lint-free cloth, wipe away any dust and spilled toner from the toner cartridge area and the toner cartridge cavity. CAUTION: To prevent damage to the toner cartridge, do not expose it to light for more than a few minute. Cover it with a piece of paper, if necessary. Do not touch the black transfer roller inside the machine. 4 Reinsert the toner cartridge and close the cover. 5 Plug in the power cord and turn the machine on.
3 Wipe the surface of the document glass and ADF glass (for SCX-4116/4216F) until it is clean and dry. White sheet Document cover ADF glass Document glass 4 Wipe the underside of the white document cover and white sheet (for SCX-4116/4216F) until it is clean and dry. 5 Close the document cover.
Saving toner To save toner, press the Toner Save button on the printer control panel; see page 1.19. The button backlight will be lit. Using this feature will extend the life of the toner cartridge and reduce your cost per page, but it will reduce the print quality. Expected Cartridge Life The life of the toner cartridge depends on the amount of toner that print jobs require. When printing text at IDC 5% coverage, a new toner cartridge lasts an average of 3,000 pages.
NOTE: If the toner gets on your clothing, wipe it off with a dry cloth and wash clothing in cold water. Hot water sets the toner into fabric. 3 Reinstall the cartridge and close the front cover. Replacing the Toner Cartridge If the toner eventually runs out, only blank pages will print when a print job is sent or when a fax is received. At this stage, the toner cartridge needs to be replaced. The display shows the warning message, “Toner Empty” and the indicator on the control panel turns on.
NOTE: Help the environment by recycling your used toner cartridge. Refer to the recycling brochure packed with the toner cartridge for details. 3 Unpack the new toner cartridge and gently shake it horizontally four or five times to distribute the toner evenly inside the cartridge. Save the box and the cover for shipping. 4 Slide the new toner cartridge in until it locks into place. 5 Close the front cover. 7.
Setting the Notify Toner Option (For SCX-4216F) If you have set the Notify Toner menu option to “On”, your machine automatically sends a fax to your service company or the dealer to notify them that your machine requires a new toner cartridge when the toner cartridge needs to be replaced. The fax number is preset by your dealer when you bought your machine. 1 Press Menu on the control panel until “Maintenance” appears on the top line of the display.
Consumables and Replacement Parts From time to time, you will need to replace the toner cartridge, roller, and fuser unit to maintain top performance and to avoid print quality problems and paper feed problems resulting from worn parts. The following items should be replaced after you have printed a specified number of pages. See the table below.
8 ‘ TROUBLESHOOTING This chapter gives helpful information for what to do if you encounter an error.
Clearing Document Jams (For SCX-4116/4216F) If a document jams while it is feeding through the ADF (Automatic Document Feeder), “Document Jam” appears on the display. Input Misfeed 1 Remove the remaining documents from the ADF. 2 Open the ADF top cover. 3 Push the bushing on one end of the ADF roller inward ( a ) and rotate it to the left ( b ). Then remove the roller from the slot and pull the document gently to the right and out of the ADF. 4 Close the ADF top cover.
Exit Misfeed 1 Remove the remaining documents from the ADF. 2 Open the document cover and turn the release knob to remove the misfed documents from the document output tray. 3 Close the document cover. Then load the documents back into the ADF. Roller Misfeed 1 Remove the remaining documents from the ADF. 2 Open the document cover.
Clearing Paper Jams If paper jams occur, “Paper Jam” appears on the display. Refer to the table below to locate and clear the paper jam. Message Location of Jam Go to Paper Jam 0 In the paper feed area below Paper Jam 1 In the paper exit area page 8.5 Paper Jam 2 In the fuser area or around the toner cartridge page 8.7 Bypass Jam In the Bypass tray page 8.8 To avoid tearing the paper, pull the jammed paper out gently and slowly. Follow the steps below to clear a jam.
3 Remove the jammed paper by gently pulling it straight out. If there is any resistance and the paper does not move when you pull or if you cannot see the paper in this area, skip to the fuser area around the toner cartridge; see page 8.7. 4 Insert the paper tray into the machine until it snaps into place. 5 Open and close the front cover to resume printing. In the Paper Exit Area 8 1 Open and close the front cover. The jammed paper automatically exits the machine.
2 Gently pull the paper out of the front output tray. Skip to Step 6. 3 If there is any resistance and the paper does not move when you pull or if you cannot see the paper in the front output tray, open the rear cover. 4 Remove the jammed paper by gently pulling it straight out. 8.
5 Close the rear cover. 6 Open and close the front cover to resume printing. In the Fuser Area or Around the Toner Cartridge NOTE: The fuser area is hot. Take care when removing paper from the machine. 1 Open the front cover and pull the toner cartridge out, lightly pushing it down. 2 Remove the jammed paper by gently pulling it straight out. 8 TROUBLESHOOTING 8.
3 Replace the toner cartridge and close the front cover. Printing automatically resumes. In the Bypass Tray “Bypass Jam” appears on the display when you try to print using the Bypass tray and when the machine does not detect paper due to no paper or improper paper loading. “Bypass Jam” also may occur when the paper is not properly fed into the machine through the Bypass tray. In that case, pull the paper out of the machine. 8.
Tips for Avoiding Paper Jams By selecting the correct paper types, most paper jams can be avoided. If a paper jam occurs, follow the steps outlined in “Clearing Paper Jams” on page 8.4. • Follow the procedures in “Loading Paper” on page 1.12. Ensure that the adjustable guides are positioned correctly. • Do not overload the paper tray. Ensure that the paper is below the paper capacity mark on the inside wall of the paper tray. • Do not remove the paper from the tray while your machine is printing.
Clearing LCD Error Messages Display Bypass Jam Cancel ? 1:Yes 2:No Comm. Error (only for SCX-4216F) Document Jam (only for SCX-4116/ 4216F) Door Open Meaning Suggested solutions Your machine detects non feeding from the Bypass tray. Load paper in the Bypass tray. Or remove the jammed paper from the Bypass tray. Your machine’s memory is full during the machine stores the document into the memory. To cancel the fax job, press the 1 button to accept “Yes.
Display Meaning The remote machine did not have the requested feature, such as a delayed transmission. Incompatible (only for SCX-4216F) Suggested solutions Reconfirm the remote machine’s features. It also occurs if the remote machine does not have enough memory space to complete the operation you are attempting. You have used unauthorized cartridge. You must use a Samsung approved cartridge. The remote party did not answer or the line is already engaged. Try again after a few minutes.
Display No Paper Operation Not Assigned (only for SCX-4216F) Meaning Suggested solutions The paper in the paper tray has run out. Load paper in the paper tray. See page 1.12. You are doing in the Add/ Cancel operation, but there is no jobs waiting. Check the display to see if there is any scheduled job. The display should indicate them in the standby mode, for example, Delay Fax. Paper has jammed in the feeding area of the paper tray. Clear the jam. See page 8.4.
Solving Problems The following chart lists some conditions that may occur and the recommended solutions. Follow the suggested solutions until the problem is corrected. If the problem persists, please call for service. Paper Feeding Problems Condition Suggested solutions Paper is jammed during printing. Clear the paper jam. See page 8.4. Paper sticks together. • Ensure that there is not too much paper in the paper tray.
Condition Suggested solutions Envelopes skew or fail to feed correctly. Ensure that the paper guide is against both sides of the envelopes. Printing Problems Condition The machine does not print. Possible cause Suggested solutions The machine is not receiving power. Check the power cord connections. Check the power switch and the power source. The machine is not selected as the default printer. Select Samsung SCX-4x16 Series as your default printer in your Windows.
Condition Possible cause Suggested solutions The machine selects print materials from the wrong paper source. The paper source selection in the printer properties may be incorrect. For many software applications, the paper source selection is found under the Paper tab within the printer properties. Select the correct paper source. See page 5.8. Print job is extremely slow. The job may be very complex. Reduce the complexity of the page or try adjusting the print quality settings.
Condition Pages print, but are blank. Possible cause Suggested solutions The toner cartridge is defective or out of toner. Redistribute the toner. if necessary. See page 7.6. The file may have blank pages. Check the file to ensure that it does not contain blank pages. Some parts, such as the controller or the board, may be defective. Contact a service representative. The illustrations print incorrectly in Adobe Illustrator. The setting in the software application is wrong.
Printing Quality Problems The dirty inside of the machine or improper paper loading may reduce the print quality. See the table below to troubleshoot the problem. Condition Suggested solutions Light or faded print If a vertical white streak or faded area appears on the page: • The toner supply is low. You may be able to temporarily extend the toner cartridge life. See “Redistributing Toner” on page 7.6. If this does not improve the print quality, install a new toner cartridge.
Condition Vertical lines AaBbCc AaBbCc AaBbCc AaBbCc AaBbCc Gray background AaBbCc AaBbCc AaBbCc AaBbCc AaBbCc Suggested solutions If black vertical streaks appear on the page: • The drum inside the toner cartridge has probably been scratched. Install a new toner cartridge. See “Installing the Toner Cartridge” on page 1.10. If the amount of background shading becomes unacceptable: • Change to a lighter weight pages. See “Paper Specifications” on page B.6.
Condition Suggested solutions Background scatter Background scatter results from bits of toner distributed on the printed page. • The paper may be too damp. Try printing with a different batch of paper. Do not open packages of paper until necessary so that the paper does not absorb too much moisture. • If background scatter occurs on an envelope, change the printing layout to avoid printing over areas that have overlapping seams on the reverse side. Printing on seams can cause problems.
Condition Suggested solutions Wrinkles or creases • Ensure that the paper is loaded properly. • Check the paper type and quality. See “Paper Specifications” on page B.6. • Turn over the stack of paper in the paper tray. Also try rotating the paper 180° in the tray. Back of printouts are dirty Check for leaking toner. Clean the inside of the machine. See page 7.3. Black pages • The toner cartridge may not be installed properly. Remove the cartridge and reinsert.
Condition Suggested solutions Horizontal stripes If horizontally aligned black streaks or smears appear: • The toner cartridge may be installed improperly. Remove the cartridge and reinsert. • The toner cartridge may be defective. Install a new toner cartridge. See “Installing the Toner Cartridge” on page 1.10. • If the problem persists, the machine may require repair. Contact a service representative.
Condition The incoming fax has blank spaces or is received with a poor-quality. Suggested solutions • • • • The fax machine sending you the fax may be faulty. A noisy phone line can cause line errors. Check your machine by making a copy. The toner cartridge may be empty. Replace the toner cartridge, referring to page 7.7. Some of the words on a incoming fax are stretched. The fax machine sending you the fax had a temporary document jam. There are lines on the documents you send.
Copying Problems Condition Suggested solutions Copies are too light or too dark. • If the original is light, use the Contrast button to darken the background of the copies. • If the original is dark, use the Contrast button to lighten the background of the copies. Smears, lines, marks or spots appears on copies. • If defects are on the original, press the Contrast button to lighten the background of your copies.
Scanning Problems Condition Suggested solutions The scanner does not work. • Make sure that you place the document to be scanned face down on the document glass, or face up in the Automatic Document Feeder (for SCX-4116/4216F). • There may not be enough available memory to hold the document you want to scan. Try the Prescan function to see if that works. Try lowering the scan resolution rate. • Check that the USB or parallel cable is connected properly.
Common Macintosh Problems Problem Possible Cause and Solution The printer driver icon does not appear in Chooser. Software is not installed correctly. Reinstall the software; see page A.2. The printer name does not appear in the Connect to box in the Chooser. • Make sure that the cables are connected correctly and the printer is turned on. • Check if “Ready” appears on the display of the control panel. If not, clear the problem depending on the error message; see page 8.10.
MEMO 8.
A P‘RINTING FROM A MACINTOSH This chapter includes: • Installing Software for Macintosh • Printing a Document • Using Advanced Printing Features
Installing Software for Macintosh Your machine supports Macintosh systems with a built-in USB interface. When you print a file from a Macintosh computer, you can use the SPL driver to support your machine’s major printing features.
NOTE: If you are using a USB hub, connect the machine’s cable to the first tier of the hub, or the machine may malfunction. If the machine doesn’t work with the hub, connect it directly to the USB port. 2 Turn on your computer and machine. 3 Insert the CD-ROM which came with your machine into the CD-ROM drive. 4 Double-click SCX-4x16 on your Macintosh desktop. 5 Double-click the West folder. 6 Double-click the Samsung Laser Printer Installer icon next to each language to select the correct one.
Choosing Your Printer 1 From the Apple menu, select Chooser. 2 From the left pane of the Chooser window, click SAMSUNG SPL II. Then your printer name will appear in the right pane of the Chooser window. 3 Click SAMSUNG SPL II and close the Chooser window. 4 The message window indicating that you have changed your current printer appears. Click OK. 5 An SAMSUNG SPL II printer icon will be created on your desktop.
Choose Watermark to add a watermark to each page in your document to emphasize its purpose or indicate how it should be handled. For details on the watermark options, see page 5.13. 4 Open the File menu and click Print. You will see the SAMSUNG SPL II Printer window. 5 Choose the number of copies and indicate which pages you want to print. For advanced printing features, select the desired option. For details, see page A.6. Saves the current settings for later use. Restores the default settings.