8 MAINTENANCE This chapter provides information for maintaining your machine and the toner cartridge.
Clearing the Memory You can selectively clear information stored in your machine’s memory. 1 Press Menu on the control panel until “Maintenance” appears on the top line of the display. 2 Press the scroll button (➛ or ❿) until you see “Clear Memory” on the bottom line and press Enter The first available menu item, “Clear All Mem.” displays on the bottom line. 3 Press the scroll button (➛ or ❿) until you see the item you want to clear. • Clear All Mem.
5 To clear another item, press Enter and repeat steps 3 and 4 OR To return to Standby mode, press Stop/Clear. Adjusting Shading When the scan unit becomes dirty, it can alter the shading value. If your copy has black lines or is blurred, adjust the shading setting. 1 Load a sheet of white paper into the ADF. 2 Press Menu on the control panel until “Maintenance” appears on the top line of the display. 3 Press the scroll button (➛ or ❿) until “Adjust Shading ” appears on the bottom line and press Enter.
Cleaning the Outside Clean the cabinet of the machine with a soft lint-free cloth. You can dampen the cloth slightly with water, but be careful not to be let any water drip onto the machine or inside of it. Cleaning the Inside During the printing process, paper, toner and dust particles can accumulate inside the machine. This buildup can cause print quality problems, such as toner specks or smearing. Cleaning the inside of the machine clears or reduces these problems.
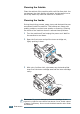
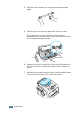
4 Reinsert the toner cartridge and close the cover. 5 Plug in the power cord and turn the machine on. Cleaning the Scan Unit Keeping the scan unit clean helps ensure the best possible copies. We suggest that you clean the scan unit at the start of each day and during the day, as needed. 1 Slightly dampen a soft lint-free cloth or paper towel with water. 2 Open the control panel by gripping its bottom and pulling it upward.
4 Wipe the roller surface with a soft cloth dampened with water. 5 Carefully wipe the scanning glass with a soft dry cloth. If the glass is very dirty, first wipe it with a slightly dampened cloth, and then with a dry cloth. Be very careful not to scratch the glass surface. 6 Replace the roller by inserting the left end first followed by the right end, then rotating the bushing until it locks into place.
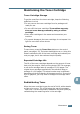
Maintaining the Toner Cartridge Toner Cartridge Storage To get the most from the toner cartridge, keep the following guidelines in mind: • Do not remove the toner cartridge from its package until ready for use. • Do not refill the toner cartridge. The machine warranty does not cover damage caused by using a refilled cartridge. • Store toner cartridges in the same environment as your machine. • To prevent damage to the toner cartridge, do not expose it to light for more than a few minute.
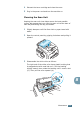
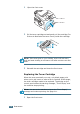
1 Open the front cover. 2 Pull the toner cartridge out and gently roll the cartridge 5 or 6 times to distribute the toner evenly inside the cartridge. NOTE: If the toner gets on your clothing, wipe it off with a dry cloth and wash clothing in cold water. Hot water sets the toner into fabric. 3 Reinstall the cartridge and close the front cover. Replacing the Toner Cartridge When the toner eventually runs out, only blank pages print when a print job is sent or when a fax is received.
2 Lightly pushing the used cartridge down, pull it out. 3 Unpack the new toner cartridge and gently roll it horizontally four or five times to distribute the toner evenly inside the cartridge. Save the box and the Plastic bag for shipping. 4 Slide the new toner cartridge in until it locks into place. 8 5 Close the front cover. MAINTENANCE 8.
Setting the Notify Toner Option If you have set the Notify Toner menu option to “On”, your machine automatically sends a fax to your service company or the dealer to notify them that your machine requires a new toner cartridge when the toner cartridge needs to be replaced. The fax number is preset by your dealer when you bought your machine. 1 Press Menu on the control panel until “Maintenance” appears on the top line of the display. The first available menu item, “Clean Drum,” displays on the bottom line.
Cleaning the Drum If there are streaks or spots on your print, the OPC drum of the cartridge may require cleaning. 1 Before setting the cleaning procedure, make sure that paper is loaded in the machine. 2 Press Menu on the control panel until “Maintenance” appears on the top line of the display. The first available menu item, “Clean Drum,” displays on the bottom line. 3 Press Enter. 4 When the display asks you to confirm your selection, press Enter. The machine prints a cleaning page.
Consumables and Replacement Parts From time to time, you needs to replace the toner cartridge, roller, and fuser unit to maintain top performance and to avoid print quality problems and paper feed problems resulting from worn parts.
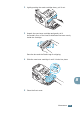
Replacing the ADF Rubber Pad You can purchase a ADF rubber assembly from a Samsung dealer or the retailer where you bought your machine. 1 Open the control panel by gripping its bottom and pulling it upward. 2 Disconnect the support on the left side of the machine from the control panel and lift the control panel up to the complete open position. 3 Remove the control panel from the machine by disconnecting the hinge on the right.
4 Using a screw driver, press the slots on the ADF rubber plate to unlatch the plate and the ADF rubber. 5 Align the holes on the new ADF rubber and the plate, and insert the tabs on the plate into the slot on the machine. Press them until they are lached. 6 Replace the control panel by connecting the hinge on the right first, then inserting the left arm while pushing the control panel to the right.
9 TROUBLESHOOTING This chapter gives helpful information for what to do if you encounter an error.
Clearing Document Jams When a document jams while it passes through the ADF (Automatic Document Feeder), “Document Jam” appears on the display. Input Misfeed 1 Remove the remaining documents from the ADF. 2 Pull the jammed document gently out of the ADF. 3 Load the documents back into the ADF. NOTE: To prevent document jams, do not use thick, thin or mixed documents. Exit Misfeed 1 Remove the remaining documents from the ADF. 2 Open the control panel by gripping its bottom and pulling it upward. 9.
3 Pull the document gently out of the ADF. 4 Close the control panel. Then load the documents back into the ADF. Clearing Paper Jams When a paper jam occurs, “Paper Jam” appears on the display. Refer to the table below to locate and clear the paper jam. Message Location of Jam Go to [Paper Jam 0] Open/Close Door In the paper tray. page 9.4 [Paper Jam 1] Open/Close Door In the fuser area or around the toner cartridge. page 9.5 [Paper Jam 2] Check Inside In the paper exit area page 9.
In the Paper Tray 1 Open and close the front cover. The jammed paper automatically exits the machine. If the paper does not exit, continue to step 2. 2 Pull the paper tray open. 3 Remove the jammed paper by gently pulling it straight out. If there is any resistance and the paper does not move when you pull or if you cannot see the paper in this area, skip to the fuser area around the toner cartridge. See page 9.5. 4 Insert the paper tray into the machine until it snaps into place.
2 Gently pull the paper out of the front output tray. Skip to step 6. If there is any resistance and the paper does not move when you pull or if you cannot see the paper in the front output tray, continue to step 3. 3 Open the rear cover. 4 Remove the jammed paper by gently pulling it straight out. 5 Close the rear cover. 6 Open and close the front cover to resume printing. In the Fuser Area or Around the Toner Cartridge NOTE: The fuser area is hot. Take care when removing paper from the machine.
2 Remove the jammed paper by gently pulling it straight out. 3 Replace the toner cartridge and close the front cover. Printing automatically resumes. In the Manual Feeder “Bypass Jam” appears on the display when you try to print using the manual feeder and the machine does not detect paper, due to no paper or improper paper loading. The error message may also occur when the paper is not properly fed into the machine through the manual feeder. In that case, pull the paper out of the machine. 9.
Tips for Avoiding Paper Jams By selecting the correct paper types, most paper jams can be avoided. When a paper jam occurs, follow the steps outlined in page 9.3. • Follow the procedures on page 1.12 when you load paper. Ensure that the adjustable guides are positioned correctly. • Do not overload the paper tray. Ensure that the paper is below the paper capacity mark on the inside wall of the paper tray. • Do not remove the paper from the tray while your machine is printing.
Clearing LCD Error Messages Messages appears on the display to indicate the control panel to indicate the machine’s status or errors. Refer to the following table to understand the message’s meaning and correct the problem, if necessary. Messages and their meanings are listed in alphabetical order. Display Meaning Suggested solutions A paper jam has occurred in the manual feeder or the machine detects non-feeding from the manual feeder. Clear the paper jam. See page 9.6.
Display Meaning The remote machine does not have the requested feature, such as a delayed transmission. Suggested solutions Reconfirm the remote machine’s features. [Incompatible] It also occurs if the remote machine does not have enough memory space to complete the operation you are attempting. [Jam 1] [No Cartridge] The toner cartridge is not installed. Install the toner cartridge. See page 1.10. The remote person did not answer or the line is already engaged. Try again after a few minutes.
Display Meaning Suggested solutions The remote fax machine has not answered after several redial attempts. Try again. Make sure that the remote machine is operational. The one-touch or speed dial location you tried to use has no number assigned to it. Dial the number manually using the number keypad or assign the number. For storing a number, see “Automatic Dialing” on page 6.14. [No Paper] Add Paper The paper tray has run out of paper. Load paper in the paper tray. See page 1.12.
Solving Problems The following chart lists some conditions that may occur and the recommended solutions. Follow the suggested solutions until the problem is corrected. If the problem persists, please call for service. Paper Feeding Problems Condition Suggested solutions Paper is jammed during printing. Clear the paper jam. See page 9.3. Paper sticks together. • Ensure that there is not too much paper in the paper tray.
Printing Problems Condition The machine does not print. Possible cause Suggested solutions The machine is not receiving power. Check the power cord connections. Check the power switch and the power source. The machine is not selected as the default printer. Select Samsung MFP 560 Series as your default printer in your Windows. Check the machine for the following: • The front or rear cover is not closed. • Paper is jammed. • No paper is loaded. • The toner cartridge is not installed.
Condition Possible cause Suggested solutions The machine selects print materials from the wrong paper source. The paper source selection in the printer properties may be incorrect. For many software applications, the paper source selection is found under the Paper tab within the printer properties. Select the correct paper source. See page 3.8. A print job is extremely slow. The job may be very complex. Reduce the complexity of the page or try adjusting the print quality settings.
Condition Pages print, but are blank. Possible cause Suggested solutions The toner cartridge is defective or out of toner. Redistribute the toner. if necessary. See page 8.7. The file may have blank pages. Check the file to ensure that it does not contain blank pages. Some parts, such as the controller or the board, may be defective. Contact a service representative. The illustrations print incorrectly in Adobe Illustrator. The setting in the software application is wrong.
Printing Quality Problems The dirty inside of the machine or improper paper loading may reduce the print quality. See the table below to clear the problem. Condition Suggested solutions Light or faded print If a vertical white streak or faded area appears on the page: • The toner supply is low. You may be able to temporarily extend the toner cartridge life. See “Redistributing Toner” on page 8.7. If this does not improve the print quality, install a new toner cartridge.
Condition Suggested solutions Vertical lines If black vertical streaks appear on the page: • The drum inside the toner cartridge has probably been scratched. Remove the toner cartridge and install a new one. See “Replacing the Toner Cartridge” on page 8.8. AaBbCc AaBbCc AaBbCc AaBbCc AaBbCc Gray background AaBbCc AaBbCc AaBbCc AaBbCc AaBbCc If the amount of background shading becomes unacceptable: • Change to a lighter weight pages. See “Paper Specifications” on page A.6.
Condition Suggested solutions Background scatter Background scatter results from bits of toner distributed on the printed page. • The paper may be too damp. Try printing with a different batch of paper. Do not open packages of paper until necessary so that the paper does not absorb too much moisture. • If background scatter occurs on an envelope, change the printing layout to avoid printing over areas that have overlapping seams on the reverse side. Printing on seams can cause problems.
Condition Suggested solutions Wrinkles or creases • Ensure that the paper is loaded properly. • Check the paper type and quality. See “Paper Specifications” on page A.6. • Turn the stack of paper over in the paper tray. Also try rotating the paper 180° in the tray. • Try printing to the rear output slot. Back of printouts are dirty Check for leaking toner. Clean the inside of the machine. See page 8.4. Black pages • The toner cartridge may not be installed properly. Remove the cartridge and reinsert.
Condition Character Voids A Horizontal stripes AaBbCc AaBbCc AaBbCc AaBbCc AaBbCc Curl Suggested solutions Character voids are white areas within the parts of characters that should be solid black: • If you are using transparencies, try another type of transparency. Due to the composition of the transparency, some character voids are normal. • You may be printing on the wrong surface on the paper. Remove the paper and turn it around. • The paper may not meet paper specifications.
Condition Suggested solutions Image rubs off the copy easily. • Replace the paper in the paper tray with paper from a new package. • In high humidity areas, do not leave paper in the machine for the extended periods of time. Frequent copy paper jams occurs. • Fan the stack of paper, then turn it over in the paper tray. Replace the paper in the tray with a fresh supply. Check/adjust the paper guides, if necessary. • Ensure that the paper is the proper paper weight.
Condition Suggested solutions The unit scans very slowly. • Check if the machine is printing received data. Scan the document after the current job is completed. • Graphics are scanned more slowly than text. • Communication speed becomes slow in scan mode because of the large amount of memory required to analyze and reproduce the scanned image. Set your computer to the ECP printer mode through BIOS setting. It will help to increase the speed.
Condition Suggested solutions The document does not feed into the machine. • Make sure that the document is not wrinkled and you are putting it in correctly. Check that the document is the right size, not too thick or thin. • Make sure that the control panel is firmly closed. Faxes are not received automatically. • Fax mode should be selected. • Make sure that there is paper in the tray. • Check to see if the display shows “Memory Full.” The machine does not send.
Common Macintosh Problems Problems in the Chooser Problem Possible Cause and Solution The printer driver icon does not appear in Chooser. • Software is not installed correctly. Reinstall the software; see page 7.2. • Make sure that you are using a high-quality cable. The printer name does not appear in the Connect to box in Chooser. • Make sure that the cables are connected correctly and the printer is turned on. • Check if “Ready” appears on the display of the control panel.
Common Linux Problems Problem The machine doesn't print Possible Cause and Solution • Check if the printer driver is installed in your system. Open MFP Configurator and switch to the Printers tab in Printers Configuration window to look at the list of available printers. Make sure that your machine is displayed on the list. If not, please, invoke Add new printer wizard to set up your device. • Check if the printer is started. Open Printers configuration and select your device on the printers list.
Problem The machine does not appear on the scanners list (continued) Possible Cause and Solution • Check if the MFP port is not busy. Since functional components of MFP (printer and scanner) share the same I/O interface (MFP port), the situation of simultaneous access of different "consumer" application to the same MFP port is possible. To avoid possible conflicts, only one of them at a time is allowed to gain control over the device. The other "consumer" will encounter "device busy" response.
MEMO 9.
A SPECIFICATIONS This chapter includes: • General Specifications • Scanner and Copier Specifications • Printer Specifications • Facsimile Specifications • Paper Specifications
General Specifications Item Automatic document feeder (ADF) ADF Document size Paper input capacity Paper output capacity Description Up to 20 sheets (weight:47~90g/m2, 12.5~24lb) Width: 142 to 216 mm (5.6 to 8.5 inches) Length: 148 to 356 mm (5.
Item Description Net: 9 Kg (including consumables) Weight Gross: 9.7 Kg (including consumables, accessories and package) Package Weight Paper: 2.7 Kg Plastic: 0.7 Kg Scanner and Copier Specifications Item Description Compatibility TWAIN standard Scan method CIS, Mono Scan resolution 200 X 200 dpi (optical) Scan length Maximum: 15.7 inches (400 mm) Scan width Maximum: 8.5 inches (216 mm) Effective: 8.
Printer Specifications Item Description Print method Laser Beam Printing Print speed Letter: 17 pages per minute A4: 16 pages per minute Paper size Paper tray: Letter, A4, Legal, Folio, A5, A6 Manual feeder: Letter, Legal, A4, Folio, Executive, A5, A6, A6 card, Post Card 4x6, Hagaki, Envelope 7-3/4, Envelope 9, Envelope 10, Envelope DL, Envelope C5, Envelope C6, Envelope B5 * Min.: 76 x 127 mm (3 x 5 in.) Max.: 216 x 356 (8.5 x 14 in.
Facsimile Specifications Item Description Compatibility ITU-T Group 3 Applicable line Public Switched Telephone Network (PSTN) or behind PABX Data coding MH/MR/MMR (ECM Mode) Modem speed 33600/31200/28800/26400/24000/21600/19200/ 16800/14400/12000/9600/7200/4800/2400 bps with fall back Transmission speed Approx. 3 seconds/page * Transmission time applies to memory transmission of text data with ECM compression using only ITU-T No.1 Chart. Scan speed Approx.
Paper Specifications Overview Your machine accepts a variety of print materials, such as cut-sheet paper, including up to 100% recycled fiber content paper, envelopes, labels, transparencies and custom-size paper. Properties, such as weight, composition, grain and moisture content, are important factors affecting the machine’s performance and the output quality.
Size (mm/in.) Weight Labels Letter (215.9 x 279/8.5 x 11) A4 (210 x 297/8.27 x 11.69) 120 to 150 g/m2 Transparency films Letter (215.9 x 279/8.5 x 11) A4 (210 x 297/8.27 x 11.69) 138 to 146 g/m2 Card stocks A6 card (105 x 148/4.13 x 5.88) Post Card (101.6 x 152.4/4 x 6) Hagaki (100 x 148/3.94 x 5.
Symptom Problem with Paper Solution Jamming, damage to machine Cutouts or perforations Do not use paper with cutouts or perforations. Problems with feeding Ragged edges Use good quality paper. NOTES: • Do not use letterhead paper printed with low-temperature inks, such as those used in some types of thermography. • Do not use raised or embossed letterhead. • The machine uses heat and pressure to fuse toner to the paper.
Paper Storage Environment Paper storage environmental conditions directly affect the feed operation. Ideally, the machine and paper storage environment should be at or near room temperature, and not too dry or humid. Remember that paper is hygroscopic; it absorbs and loses moisture rapidly. Heat works with humidity to damage paper. Heat causes the moisture in paper to evaporate, while cold causes it to condense on the sheets. Heating systems and air conditioners remove most of the humidity from a room.
• Temperature: You should use envelopes that are compatible with the heat and pressure of the machine. • Size: You should only use envelopes within the following size ranges NOTES: • Use only the manual feeder to print envelopes. • You may experience some paper jams when using any media with a length less than 140 mm (5.5 in.). This may be caused by paper that has been affected by environmental conditions. For optimum performance, make sure you are storing and handling the paper correctly.
NOTES: • For the best print quality, position margins no closer than 15 mm (0.6 in.) from the edges of the envelope. • Avoid printing over the area where the envelope’s seams meet. Envelope Storage Proper storage of envelopes helps contribute to print quality. Envelopes should be stored flat. If air is trapped in an envelope, creating an air bubble, then the envelope may wrinkle during printing. Labels CAUTIONS: • To avoid damaging the machine, use only labels recommended for laser printers.
INDEX A D adding documents 6.26 ADF (Automatic Document Feeder), load 4.3 ADF rubber pad, replace 8.13 automatic dialing group 6.17 one-touch 6.14 speed 6.15 automatic redialing 6.9 date and time, set 1.36 delay receive polling 6.25 delayed fax 6.22 display language, change 1.32 document jam, clear 9.2 loading 1.12 preparing 4.2 drum, clean 8.11 B E broadcasting faxes 6.21 error messages 9.8 extension phone, connect 1.16 C canceling fax 6.8 print 3.5 scan 5.5 scheduled faxes 6.
toner cartridge 1.10 Windows software 1.21 J jam, clear document 9.2 paper 9.3 L Linux common problems 9.24 driver, install 7.15 printing 7.23 scanning 7.25 M machine ID, set 1.33 Macintosh common problems 9.23 driver, install 7.2 printing 7.7 memory, clear 8.2 MFP driver, install Linux 7.15 Macintosh 7.2 Windows 1.21 N network printer, set 3.22 notifying toner low 8.10 O one-touch dial dialing 6.15 storing 6.14 orientation, print 3.3, 7.7, 7.24 output location, select 2.4 overlay, use 3.
3.12 reports 6.30 using overlays 3.18 watermarks 3.15 priority fax 6.24 problems, solve copying 9.19 error messages 9.8 faxing 9.21 Linux 9.24 Macintosh 9.23 paper feeding 9.11 printing 9.12 printing quality 9.15 scanning 9.20 R rear output slot, use 2.5 receiving a fax in Ans/Fax mode 6.12 in Fax mode 6.11 in Secure Receiving mode 6.28 in Tel mode 6.11 in the memory 6.13 redialing automaically 6.8 manually 6.9 reduced/enlarged copy 4.6 print 3.12, 7.7 Remote Control Panel 6.35 reports, print 6.
Home Visit us at: www.samsungprinter.com Rev.1.