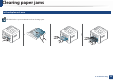
Clearing paper jams 6 In the duplex unit area Click this link to open an animation about clearing a jam. 4.
If you do not see the paper in this area, stop and go to next step: 4.
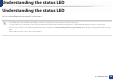
Understanding the status LED Understanding the status LED The color of the LED indicates the machine's current status. • Some LEDs may not be available depending on model or country (see "Control panel overview" on page 23). • To resolve the error, look at the error message and its instructions from the troubleshooting part (see "Understanding display messages" on page 101).
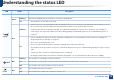
Understanding the status LED LED Status Off Description The machine is off-line. Blinking When the backlight blinks, the machine is receiving or printing data. On • The machine is on-line and can be used. Green • A minor error has occurred and the machine is waiting for the error to be cleared. For models that supports display screen on the control panel, check the display message. When the problem is cleared, the machine resumes. Blinking • Small amount of toner is left in the cartridge.
LED Status On Eco Description Eco mode is on (see "Eco printing" on page 51). Green a. Estimated cartridge life means the expected or estimated toner cartridge life, which indicates the average capacity of print-outs and is designed pursuant to ISO/IEC 19798. The number of pages may be affected by operating environment, percentage of image area, printing interval, graphics, media and media size. Some amount of toner may remain in the cartridge even when red LED is on and the printer stops printing. b.
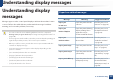
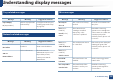
Understanding display messages Understanding display messages Messages appear on the control panel display to indicate the machine’s status or errors. Refer to the tables below to understand the messages’ and their meaning, and correct the problem, if necessary. 7 Paper Jam-related messages Message Paper jam • If a message is not in the table, reboot the power and try the printing job again. If the problem persists, call a service representative.
Understanding display messages 8 Toner-related messages Message Replace new cartridge Message Install toner Not Compatible Toner cartridge Prepare new cartridge Meaning Suggested solutions A toner cartridge is not Reinstall the toner cartridge. installed. A toner cartridge is not Reinstall the toner cartridge two or being detected three times to confirm it is seated properly. If the problem persists, contact the service representatives.
Understanding display messages Samsung does not recommend using a non-genuine Samsung toner cartridge such as refilled or remanufactured. Samsung cannot guarantee a non-genuine Samsung toner cartridge's quality. Service or repair required as a result of using non-genuine Samsung toner cartridges will not be covered under the machine warranty. 4.
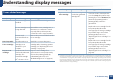
Understanding display messages 9 Imaging unit-related messages Message Replace new Image unit Message Not Installed Imaging unit Not compatible Imaging unit Prepare new Image unit Meaning Suggested solutions An imaging unit is not Reinstall the imaging unit. installed. An imaging unit is not Reinstall the imaging unit two or three being detected times to confirm it is seated properly. If the problem persists, contact the service representatives.
Understanding display messages 10 12 Tray-related messages Message Paper Empty in [tray number] Misc. messages Meaning Suggested solutions There is no paper in the indicated tray. Load paper in the tray (see "Loading paper in the tray" on page 37). Message Door Open Close the cover until it locks into place. Install [color] toner The indicated toner cartridge is installed improperly, or the connector is polluted.
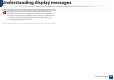
Understanding display messages Message Not installed Meaning Suggested solutions The is waste toner container not installed. Install a Samsung-genuine waste toner container. temp. Move set The machine is in a room with improper room temperature. Move the machine to a room with proper roomG temperature. Output bin Full The output tray is full. Remove papers from the output tray, the machine resumes printing. If the problem persists, call for service.
5. Appendix This chapter provides product specifications and information concerning applicable regulations.
Specifications 1 General specifications The specification values listed below are subject to change without notice. See www.samsung.com for possible changes in information. Items Description Dimension Width x Length x Height 366 x 365.6 x 262.5 mm (14.4 x 14.39 x 10.33 inches) Weight Machine with consumables • M332xND/M382xD series: 9.92 kg (21.9 lbs) • M382xND/M382xDW/M402xND series: 10.21 kg (22.
Specifications Items Power consumption Wirelesse a. b. c. d. e. Description Average operating mode Less than 600 W Ready mode Less than 60 W Power save mode c Less than 0.3 W (Wi-Fi Direct on: Less than 0.9 W) Power off mode d Less than 0.1 W Module SPW-B4319U Sound Pressure Level, ISO 7779. Configuration tested: basic machine installation, A4 paper, simplex printing. See the rating label on the machine for the correct voltage (V), frequency (hertz) and of current (A) for your machine.
Specifications 2 Print media specifications Type Size Dimensions Plain paper Letter Legal US Folio A4 Oficio JIS B5 ISO B5 Executive A5 A6 216 x 279 mm (8.5 x 11 inches) 216 x 356 mm (8.5 x 14 inches) 216 x 330 mm (8.5 x 13 inches) 210 x 297 mm (8.26 x 11.69 inches) 216 x 343 mm (8.5 x 13.5 inches) 182 x 257 mm (7.16 x 10.11 inches) 176 x 250 mm (6.93 x 9.84 inches) 184 x 267 mm (7.25 x 10.5 inches) 148 x 210 mm (5.82 x 8.26 inches) 105 x 148 mm (4.13 x 5.82 inches) Envelope Monarch Envelope No.
Specifications Type Size Transparency Letter, A4 Labelsd Card stock Bond paper Refer to the Plain paper section Letter, Legal, US Folio, Refer to the Plain paper section A4, JIS B5, ISO B5, Executive, A5 Letter, Legal, US Folio, Refer to the Plain paper section A4, JIS B5, ISO B5, Executive, A5 Refer to the Plain Refer to the Plain paper section paper section Minimum size (custom)e, f Maximum size (custom) a. b. c. d. e. f.
Specifications 3 System requirements Microsoft® Windows® Requirement (recommended) Operating system CPU RAM free HDD space Windows® XP Intel® Pentium® III 933 MHz (Pentium IV 1 GHz) 128 MB (256 MB) 1.5 GB Windows Server® 2003 Intel® Pentium® III 933 MHz (Pentium IV 1 GHz) 128 MB (512 MB) 1.
Specifications Mac Requirements (Recommended) Operating system CPU Mac OS X 10.5 • Intel® processors RAM Free HDD space 512 MB (1 GB) 1 GB • 867 MHz or faster Power PC G4/G5 Mac OS X 10.6 • Intel® processors 1 GB (2 GB) 1 GB Mac OS X 10.7 - 10.8 • Intel® processors 2 GB 4 GB Linux Items Operating system Requirements Redhat® Enterprise Linux WS 4, 5, 6 (32/64 bit) Fedora 5 ~ 15 (32/64 bit) OpenSuSE® 10.2, 10.3, 11.0, 11.1, 11.2, 11.3, 11.4 (32/64 bit) Mandriva 2007, 2008, 2009, 2009.
Specifications Items Free HDD space Requirements 1 GB (2 GB) Unix Items Requirements Sun Solaris 9, 10, 11 (x86, SPARC) Operating system HP-UX 11.0, 11i v1, 11i v2, 11i v3 (PA-RISC, Itanium) IBM AIX 5.1, 5.2, 5.3, 5.4, 6.1, 7.1 (Power PC) Free HDD space Up to 100 MB 5.
Specifications 4 Network environment Network and wireless models only (see "Features by models" on page 8). You need to set up the network protocols on the machine to use it as your network machine. The following table shows the network environments supported by the machine. Items Network interface Specifications • Ethernet 10/100/1000 Base-TX Wired Lan Network operating system • 802.
Regulatory information This machine is designed for a normal work environment and certified with several regulatory statements. When using this product, these basic safety precautions should always be followed to reduce risk of fire, electric shock, and injury to persons: 5 Laser safety statement The printer is certified in the U.S.
Regulatory information 6 8 Ozone safety This product’s ozone emission rate is under 0.1 ppm. Because ozone is heavier than air, keep the product in a place with good ventilation. Recycling Recycle or dispose of the packaging material for this product in an environmentally responsible manner. 7 Power saver This printer contains advanced energy conservation technology that reduces power consumption when it is not in active use.
Regulatory information 9 10 Correct disposal of this product (Waste electrical & electronic equipment) China only (Applicable in countries with separate collection systems) This marking on the product, accessories or literature indicates that the product and its electronic accessories (e.g. charger, headset, USB cable) should not be disposed of with other household waste at the end of their working life.
Regulatory information (The United States of America only) Dispose unwanted electronics through an approved recycler. To find the nearest recycling location, go to our website: www.samsung.com/recyclingdirect Or call, (877) 278 - 0799 11 State of California Proposition 65 Warning (US Only) 12 This equipment has been tested and found to comply with the limits for a Class B digital device, pursuant to Part 15 of the FCC Rules.
Regulatory information Canadian radio interference regulations This digital apparatus does not exceed the Class B limits for radio noise emissions from digital apparatus as set out in the interference-causing equipment standard entitled “Digital Apparatus”, ICES-003 of the Industry and Science Canada.
Regulatory information FCC Statement for Wireless LAN use: 16 Turkey only While installing and operating this transmitter and antenna combination the radio frequency exposure limit of 1m W/cm2 may be exceeded at distances close to the antenna installed. Therefore, the user must maintain a minimum distance of 20cm from the antenna at all times. This device cannot be colocated with another transmitter and transmitting antenna.
Regulatory information The 13 amp plug is the most widely used in the UK and should be suitable. However, some buildings (mainly old ones) do not have normal 13 amp plug sockets. You need to buy a suitable plug adaptor. Do not remove the moulded plug. You must connect the brown wire to the pin which is marked with the letter “L” or colored red. You must have a 13 amp fuse in the plug, adaptor, or at the distribution board. 19 If you cut off the moulded plug, get rid of it straight away.
Regulatory information March 9, 1999: Council Directive 1999/5/EC on radio equipment and telecommunications terminal equipment and the mutual recognition of their conformity. A full declaration, defining the relevant Directives and referenced standards can be obtained from your Samsung Electronics Co., Ltd. representative.
Regulatory information 20 Israel only 21 Regulatory compliance statements Wireless guidance Low power, Radio LAN devices (radio frequency (RF) wireless communication devices), operating in the 2.4 GHz/5 GHz Band, may be present (embedded) in your printer system. The following section is a general overview of considerations while operating a wireless device. Additional limitations, cautions, and concerns for specific countries are listed in the specific country sections (or country group sections).
Regulatory information In environments where the risk of interference to other devices or services is harmful or perceived as harmful, the option to use a wireless device may be restricted or eliminated. Airports, Hospitals, and Oxygen or flammable gas laden atmospheres are limited examples where use of wireless devices may be restricted or eliminated.
Regulatory information 22 China only 5.
Copyright © 2013 Samsung Electronics Co., Ltd. All rights reserved. This user’s guide is provided for information purposes only. All information included herein is subject to change without notice. Samsung Electronics is not responsible for any direct or indirect damages, arising from or related to use of this user’s guide. • Samsung and the Samsung logo are trademarks of Samsung Electronics Co., Ltd.
User’s Guide ADVANCED ADVANCED This guide provides information about installation, advanced configuration, operation and troubleshooting on various OS environments. Some features may not be available depending on models or countries. BASIC This guide provides information concerning installation, basic operation and troubleshooting on windows.
ADVANCED 1. Software Installation Installation for Mac 132 Reinstallation for Mac 133 Installation for Linux 134 Reinstallation for Linux 135 2. Using a Network-Connected Machine 194 Layout 195 Paper 197 Graphic 198 System Setup 199 Emulation 202 Network 203 Job Management 205 4.
ADVANCED Using Samsung Easy Printer Manager 237 Using Samsung Printer Status 240 Using Samsung Printer Experience 242 Using the Linux Unified Driver Configurator 248 6.
1. Software Installation This chapter provides instructions for installing essential and helpful software for use in an environment where the machine is connected via a cable. A locally connected machine is a machine directly attached to your computer using the cable. If your machine is attached to a network, skip the following steps below and go on to installing a network connected machine’s driver (see "Installing driver over the network" on page 142).
Installation for Mac 1 Make sure that the machine is connected to your computer and powered on. 10 Select Direct Connection using USB cable on the Printer Connection Type and click Continue. 2 Insert the supplied software CD into your CD-ROM drive. 11 Click Add Printer button to select your printer and add it to your printer list. If your machine supports fax, click Add Fax button to select your fax and add it to your fax list 12 3 Double-click the CD-ROM icon that appears on your Mac desktop.
Reinstallation for Mac If the printer driver does not work properly, uninstall the driver and reinstall it. 1 Open the Applications folder > Samsung > Printer Software Uninstaller. 2 3 4 5 To uninstall printer software, click Continue. Check the program you want to delete and click Uninstall. Enter the password and click OK. After the uninstallation is finished, click Close. If a machine has already been added, delete it from the Print Setup Utility or Print & Fax. 1.
Installation for Linux You need to download Linux software packages from the Samsung website to install the printer software (http://www.samsung.com > find your product > Support or Downloads). 1 The installation program added the Unified Driver Configurator desktop icon and the Unified Driver group to the system menu for your convenience.
Reinstallation for Linux If the printer driver does not work properly, uninstall the driver and reinstall it. 1 Make sure that the machine is connected to your computer and powered on. 2 When the Administrator Login window appears, type “root” in the Login field and enter the system password. You must log in as a super user (root) to uninstall the printer driver. If you are not a super user, ask your system administrator. 3 Open the Terminal program.
2. Using a NetworkConnected Machine This chapter gives you step-by-step instructions for setting up a network connected machine and software. • Useful network programs 137 • Wired network setup 138 • Installing driver over the network 142 • IPv6 configuration 151 • Wireless network setup 154 • Samsung MobilePrint 186 • AirPrint 187 • Google Cloud Print™ 189 Supported optional devices and features may differ according to your model (see "Features by models" on page 8).
Useful network programs There are several programs available to setup the network settings easily in a network environment. For the network administrator especially, managing several machines on the network is possible. • Before using the programs below, set the IP address first. • Some features and optional goods may not be available depending on model or country (see "Features by models" on page 8). 2 SyncThru™ Web Admin Service Web-based machine management solution for network administrators.
Wired network setup 4 Printing a network configuration report Using this Network Configuration Report, you can find your machine’s MAC address and IP address. For example: You can print Network Configuration Report from the machine’s control panel that will show the current machine’s network settings. This will help you to set up a network. • MAC Address: 00:15:99:41:A2:78 • IP Address: 169.254.192.
Wired network setup 1 Download the software from the Samsung website then unpack and install it: (http://www.samsung.com > find your product > Support or Downloads). 2 3 4 5 Follow the instructions in the installation window. Find the machine’s MAC address from the Network Configuration Report (see "Printing a network configuration report" on page 138) and enter it without the colons. For example, 00:15:99:29:51:A8 becomes 0015992951A8. Connect your machine to the network with a network cable.
Wired network setup 3 Double-click the CD-ROM icon that appears on your Mac desktop. • 4 5 6 7 8 Double-click the MAC_Installer folder > Installer OS X icon. Click Continue. Read the license agreement and click Continue. 13 Click Agree to agree to the license agreement. Click Apply, and then click OK. The machine will automatically print the Network Configuration Report. Confirm that all the settings are correct. Click Install. All components necessary for machine operations will be installed.
Wired network setup Find the machine’s MAC address from the Network Configuration Report (see "Printing a network configuration report" on page 138) and enter it without the colons. For example, 00:15:99:29:51:A8 becomes 0015992951A8. 5 The machine will automatically print the Network Configuration Report. 2.
Installing driver over the network • Some features and optional goods may not be available depending on model or country (see "Features by models" on page 8). • The machine that does not support the network interface, it will not be able to use this feature (see "Rear view" on page 21). • You can install the printer driver and software when you insert the software CD into your CD-ROM drive. For Windows, select the printer driver and software in the Select Software to Install window. 2.
Installing driver over the network Using Enhanced Features and Participating in Printer Usage Information Collection Program (optional). Then, click Next. 6 Windows 1 Make sure that the machine is connected to the network and powered on. Also, your machine’s IP address should have been set (see "Setting IP address" on page 138). 2 Insert the supplied software CD into your CD-ROM drive. If the installation window does not appear, click Start > All programs > Accessories > Run. X:\Setup.
Installing driver over the network From the Windows 8 Start Screen 3 Click Add a device. Discovered machines will be shown on the screen. • Samsung Printer Experience app can only be used in the Start screen when V4 driver is installed. The V4 driver is automatically downloaded from the Windows Update if your computer is connected to the Internet. If not, you can manually download the V4 driver from Samsung website, www.samsung.com > find your product > Support or downloads.
Installing driver over the network Command- line /s or Definition Starts silent installation. /S /p”” or Specifies printer port. /P”” Network Port will be created by use of Standard TCP/IP Port monitor. For local port, this port must exist on system before being specified by command. /a”” or /A”” Specifies destination path for installation. The destination path should be a fully qualified path.
Installing driver over the network 7 Command- line /up”” or /UP”” /d or /D Definition Description Removes only specified printer instance and not the driver files. This command provides a way to remove only specified printer instance from your system without effecting other printer drivers. It will not remove printer driver files from your system. Uninstalls all device drivers and applications from your system.
Installing driver over the network 9 10 Enter the password and click OK. 11 Click Add Printer button to select your printer and add it to your printer list. 12 13 14 Click IP and select HP Jetdirect - Socket in Protocol. 15 16 17 Select Network connection on the Printer Connection Type and click Continue. Enter the machine’s IP address in the Address input field. Enter the queue name in the Queue input field.
Installing driver over the network Add a network printer 1 2 3 4 5 6 7 8 Double-click the Unified Driver Configurator. To use the UNIX printer driver, you have to install the UNIX printer driver package first, then setup the printer. You can download the UNIX printer driver package from the Samsung website (http://www.samsung.com > find your product > Support or Downloads). Click Add Printer. The Add printer wizard window opens. Click Next.
Installing driver over the network 6 Run the install script. Uninstalling the printer driver package “./install –i” install is the installer script file which is used to install or uninstall the UNIX Printer Driver package. The utility should be used to delete the printer installed in the system. a Run “uninstallprinter” command from the terminal. It will open the Uninstall Printer Wizard. The installed printers are listed in the drop-down list. b Select the printer to be deleted.
Installing driver over the network 4 5 6 Specify any printer description in the Description field. This is optional. 7 Queue type shows the connection as lpd or jetdirect in the corresponding list box. Additionally, usb type is available on Sun Solaris OS. 8 9 10 11 12 Specify the printer location in the Location field. Type the IP address or DNS name of the printer in the Device textbox for network-connected printers.
IPv6 configuration 10 IPv6 is supported properly only in Windows Vista or higher. • Some features and optional goods may not be available depending on model or country (see "Features by models" on page 8 or "Menu overview" on page 31). From the control panel Activating IPv6 • Accessing menus may differ from model to model (see "Accessing the menu" on page 31). • If the IPv6 network seems to not be working, set all the network setting to the factory defaults and try again using Clear Setting.
IPv6 configuration 11 • Accessing menus may differ from model to model (see "Accessing the menu" on page 31). • It may be necessary to press OK to navigate to lower-level menus for some models. 1 Select (Menu) > Network > TCP/IP (IPv6) > DHCPv6 Config on the control panel. 2 Press OK to select the required value you want. • Router: Use DHCPv6 only when requested by a router. • Always Use: Always use DHCPv6 regardless of router request. • Never Use: Never use DHCPv6 regardless of router request.
IPv6 configuration • You can also set the DHCPv6. Address must be enclosed in '[ ]' brackets. • To manually set the IPv6 address: Check the Manual Address check box. Then, the Address/Prefix text box is activated. Enter the rest of the address (e.g.,:3FFE:10:88:194::AAAA. “A” is the hexadecimal 0 through 9, A through F). IPv6 address configuration 1 Start a web browser, such as Internet Explorer, that supports IPv6 addressing as a URL.
Wireless network setup Wireless network name and network password • Make sure your machine supports wireless networking. Wireless networking may not be available depending on the model (see "Features by models" on page 8). • If the IPv6 network seems to not be working, set all the network settings to the factory defaults and try again using Clear Setting.
Wireless network setup 13 Introducing wireless set up methods Some wireless network installation types may not be available depending on the model or country. You can set wireless settings either from the machine or the computer. Choose the setting method from the below table. Set up method Connecting method From the computer Description & Reference A Windows user, see "Access point via USB cable" on page 161. B Windows user, see "Access point without a USB cable (recommended)" on page 164.
Wireless network setup Set up method Connecting method From the computer Without Access Point Description & Reference G Windows user, see "Ad hoc via USB cable" on page 167. H Mac user, see "Ad hoc via USB cable" on page 174. Wi-Fi Direct setup See "Setting the Wi-Fi Direct for mobile printing" on page 179. I • If problems occur during wireless set up or driver installation, refer to the troubleshooting chapter (see "Troubleshooting for wireless network" on page 181).
Wireless network setup Choosing your type 14 Using the WPS button There are two methods available to connect your machine to a wireless network If your machine and an access point (or wireless router) support Wi-Fi Protected Setup™ (WPS), you can easily configure the wireless network settings by pressing the (WPS) button on the control panel without a computer. • If you want to use the wireless network using the infrastructure mode, make sure that the network cable is disconnected from the machine.
Wireless network setup Machines with a display screen 1 Connecting in PBC mode 1 Connecting in PIN mode Or press and hold the than 2 seconds. Select (Menu) > Network > WiTFi > WPS > ConnectViaPBC on the control panel. Or press and hold the than 2 seconds. (WPS) button on the control panel for more 2 The eight-digit PIN appears on the display. The messages are displayed on the display screen in the order below: Press the WPS (PBC) button on the access point (or wireless router).
Wireless network setup Machines without a display screen Connecting in PBC mode 1 Connecting in PIN mode 1 Press and hold the (WPS) button on the control panel for about 2 - 4 seconds until the status LED blinks quickly. The machine starts connecting to the wireless network. The LED blinks slowly for up to two minutes until you press the PBC button on the access point (or wireless router).
Wireless network setup Re-connecting to a network Disconnecting from a network When the wireless function is off, the machine automatically tries to re-connect to the access point (or wireless router) with the previously used wireless connection settings and address. To disconnect the wireless network connection, press the the control panel for more than two seconds.
Wireless network setup Access point via USB cable After completing the wireless network connection, you need to install a machine driver to print from an application (see "Installing driver over the network" on page 142). 1 2 Items to prepare • Access point • Network-connected computer • Software CD that was provided with your machine Press the OK to select the setup method you want. • A machine installed with a wireless network interface • • USB cable Select panel.
Wireless network setup 3 Insert the supplied software CD into your CD-ROM drive. 5 Select Wireless network connection on the Printer Connection Type screen. Then, click Next. 6 If Select the Wireless Setup Method screen appears, select Using a USB cable and click Next. If the installation window does not appear, click Start > All programs > Accessories > Run. X:\Setup.exe replacing “X” with the letter, which represents your CDROM drive and click OK.
Wireless network setup If your comupter is wirless network enabled PC running Windows 7 or higher, wireless network installation proceeds automatically. Go to step 10. • Authentication: Select an authentication type. Open System: Authentication is not used, and encryption may or may not be used, depending on the need for data security. Shared Key: Authentication is used. A device that has a proper WEP key can access the network.
Wireless network setup 8 If your printer supports Wi-Fi Direct and this function is disabled, its corresponding screen will appear. Click OK and Next. 10 11 Select the components to be installed. 12 Click Finish. After selecting the components, you can also change the machine name, set the machine to be shared on the network, set the machine as the default machine, and change the port name of each machine. Click Next.
Wireless network setup Creating the infrastructure network 1 2 4 Select Wireless network connection on the Printer Connection Type screen. Then, click Next. Turn on your computer, access point, and machine. Insert the supplied software CD into your CD-ROM drive. If the installation window does not appear, click Start > All programs > Accessories > Run. X:\Setup.exe replacing “X” with the letter, which represents your CDROM drive and click OK.
Wireless network setup 5 Select Using a direct wireless connection on the Select the Wireless Setup Method screen. Then, click Next. If below screen apperas, press the withing 2 minutes. Even if your computer is running Windows 7 or higher, you cannot use this feature if your PC does not support wirless network. Set the wireless network using a USB cable (see "Access point via USB cable" on page 161). (WPS) button from the control panel 6 7 8 When the wireless network set up is completed, click Next.
Wireless network setup Ad hoc via USB cable If you do not have an access point (AP), you may still connect the machine wirelessly to your computer by setting up an ad-hoc wireless network by following the simple steps below. Items to prepare • Network-connected computer • Software CD that was provided with your machine • A machine installed with a wireless network interface • USB cable 2.
Wireless network setup Creating the ad hoc network in Windows 1 2 Turn on your computer and the wireless network machine. Insert the supplied software CD into your CD-ROM drive. If the installation window does not appear, click Start > All programs > Accessories > Run. X:\Setup.exe replacing “X” with the letter, which represents your CDROM drive and click OK. • For Windows 8, If the installation window does not appear, from Charms, select Search > Apps and search for Run. Type in X:\Setup.
Wireless network setup • Encryption: Select the encryption (None, WEP64, WEP128). • Network Password: Enter the encryption network password value. • Confirm Network Password: Confirm the encryption network password value. • WEP Key Index: If you are using WEP Encryption, select the appropriate WEP Key Index. The wireless network security window appears when the ad hoc network has security enabled. Select Open System or Shared Key for the authentication and click Next.
Wireless network setup The Wireless Network Setting Complete window appears. Click Next. 7 8 When the wireless network settings are completed, disconnect the USB cable between the computer and machine. Click Next. 9 10 Select the components to be installed. 11 Click Finish. 1 Make sure that the machine is connected to your computer and powered on. 2 Insert the supplied software CD into your CD-ROM drive. 3 Double-click the CD-ROM icon that appears on your Mac desktop.
Wireless network setup 10 Select Wireless network connection on the Printer Connection Type and click Continue. 11 Select Using a USB cable on the Configure wireless settings to the printer screen and click Next. If the screen does not appear, go to step 15. 12 After searching, the window shows the wireless network devices. Select the name (SSID) of the access point you want to use and click Next. 2.
Wireless network setup • Wi-Fi Direct option appears on the screen only if your printer supports this feature. When you set the wireless configuration manually, click Advanced Setting. • Enter the wireless Network Name: Enter the SSID of the access point (SSID is case-sensitive). • Can start to build Wi-Fi Direct by using Samsung Easy Printer Manager (see "Setting up Wi-Fi Direct" on page 180). • Operation Mode: Select Infrastructure.
Wireless network setup 1 Make sure that the machine is connected to your computer and powered on. 2 3 Select Wireless network connection on the Printer Connection Type and click Continue. Insert the supplied software CD into your CD-ROM drive. Double-click the CD-ROM icon that appears on your Mac desktop. • 4 5 6 7 8 10 For Mac OS X 10.8, double-click the CD-ROM that appears on Finder. Double-click the MAC_Installer folder > Installer OS X icon. Click Continue.
Wireless network setup 11 Select Using a direct wireless connection on the Configure wireless settings to the printer screen and click Next. If below screen apperas, press the withing 2 minutes. If the screen does not appear, go to step 13. 12 13 (WPS) button from the control panel When the wireless network set up is completed, click Next. After the installation is finished, click Close.
Wireless network setup Items to prepare 11 After searching the wireless networks, a list of wireless networks your machine has searched appears. Click Advanced Setting. • Network-connected computer • Software CD that was provided with your machine • A machine installed with a wireless network interface • Enter the wireless Network Name: Enter the SSID name (SSID is casesensitive). • USB cable • Operation Mode: Select ad hoc. • Channel: Select the channel (Auto Setting or 2412 MHz to 2467 MHz).
Wireless network setup 12 The window showing the wireless network settings appears. Check the settings and click Next. - Subnet Mask: 255.255.0.0 (Use the computer’s subnet mask.) - Gateway: 169.254.133.1 Before entering the IP address for the machine, you must know the computer’s network configuration information. If the computer’s network configuration is set to DHCP, the wireless network setting should also be DHCP.
Wireless network setup Your machine is a network compatible machine. To enable your machine to work with your network, you will need to perform some configuration procedures. • After completing the wireless network connection, you need to install a machine driver to print from an application (see "Installing driver over the network" on page 142).
Wireless network setup 1 2 Check whether or not the network cable is connected to the machine. If not, connect the machine with a standard network cable. 7 • SSID: SSID (Service Set Identifier) is a name that identifies a wireless network, access points, and wireless devices attempting to connect to a specific wireless network must use the same SSID. The SSID is case sensitive.
Wireless network setup 4 Disconnect the network cable (standard or network). Your machine should then start communicating wirelessly with the network. In case of Ad-hoc mode, you can use a wireless LAN and wired LAN simultaneously. 10 Insert the supplied software CD into your CD-ROM drive, and follow the instructions in the window to set up the wireless network. 19 Turning the Wi-Fi network on/off Type in the ID and Password, then click Login.
Wireless network setup Device Name: Enter the printer’s name for searching for your printer on a wireless network. By default, the device name is the model name. IP Address: Enter the IP address of the printer. This IP address is used only for the local network and not for the infrastructure wired or wireless network. We recommend using the default local IP address (the default local IP address of the printer for Wi-Fi Direct is 192.168.3.
Wireless network setup From the network-connected computer • When you have found the printer you want to connect to from your mobile device, select the printer and the printer's LED will blink. Press the WPS button on the printer and it will be connected to your mobile device. If your printer is using a network cable or a wireless access point, you can enable and configure Wi-Fi Direct from SyncThru™ Web Service. • Access SyncThru™ Web Service, select Settings > Network Settings > Wireless > Wi-Fi Direct.
Wireless network setup Connecting Failure - SSID Not Found • The machine is unable to find the network name (SSID) you have selected or entered. Check the network name (SSID) on your access point and try connecting again. • Your access point is not turned on. Turn on your access point. 2.
Wireless network setup Connecting Failure - Invalid Security the product's IP address and the printer port's IP address. • How to compare: Security is not configured correctly. Check the configured security on your access point and machine. Connecting Failure - General Connection Error • Your computer is not receiving a signal from your machine. Check the USB cable and your machine’s power. Connecting Failure - Connected Wired Network • Your machine is connected with a wired network cable.
- For a Static network environment The machine uses the static address when the computer is configured to static address. • Cycle the power for the access point (or wireless router), machine, and computer. Sometimes cycling the power can recover network communication. • Check whether firewall software (V3 or Norton) is blocking the communication. For example, If the computer’s network information is as shown below: IP address: 169.254.133.42 Subnet Mask: 255.255.0.
• This machine only supports IEEE 802.11 b/g/n and Wi-Fi. Other wireless communication types (e.g., Bluetooth) are not supported. • When using the ad hoc mode, in operating systems such as Windows Vista, you might need to set the wireless connection setting every time you use the wireless machine. • You cannot use infrastructure mode and ad hoc mode at the same time for Samsung wireless network machines. • The machine is within the range of the wireless network.
Samsung MobilePrint Samsung MobilePrint 22 What is Samsung MobilePrint? Samsung MobilePrint is a free application that enables users to print photos, documents, and web pages directly from your smartphone or tablet. Samsung MobilePrint is not only compatible with your Android and iOS smart phones but also with your iPod Touch and tablet PC. It connects your mobile device to a network connected Samsung printer or to a wireless printer through a Wi-Fi access point.
AirPrint 4 Network model only (see "Features by models" on page 8). AirPrint allows you to wirelessly print directly from an iPhone, iPad, and iPod touch running the latest version of iOS. 26 Type in the ID and Password, then click Login. If it’s your first time logging into SyncThru™ Web Service, type in the below default ID and password. We recommend you to change the default password for security reasons.
AirPrint Cancelling print job: To cancel the printing job or view the print summary, click the print center icon ( ) in multitasking area. You can click cancel in the print center. 2.
Google Cloud Print™ Google Cloud Print™ 4 Enter your printer’s IP address in the address field and press the Enter key or click Go. Google Cloud Print™ is a service that allows you to print to a printer using your 5 smart phone, tabletS or any other web-connected devices. Just register your Google account with the printer, and you are ready to use the Google Cloud Print™ service.
Google Cloud Print™ If you set the browser to block pop-ups, the confirmation window will not appear. Allow the site to show pop-ups. 1 Install the Cloud Print application on your mobile device. If you do not have the application, download it from the application storeG such as Android Market or App Store. 10 11 Click Finish printer registration. Click Manage your printers. Now your printer is registered with Google Cloud Print™ service. Google Cloud Print™-ready devices will appear in the list.
Google Cloud Print™ 5 6 Select Print with Google Cloud Print. Click the Print button. 2.
3. Useful Setting Menus This chapter explains how to browse the current status of your machine, and the method of setting for advanced machine setup.
Before you begin reading a chapter This chapter explains all the features available for this series' models to help users easily understand the features. You can check the features available for each model in the Basic Guide (see "Menu overview" on page 31). The following are tips for using this chapter • The control panel provides access to various menus to set up the machine or use the machine’s functions.
Information Some menus may not appear in the display depending on options or models. If so, it is not applicable to your machine (see "Menu overview" on page 31). To change the menu options: Item Description KSC5843 Fonta Prints the KSC5843 font list. KSC5895 Font Prints the KSC5895 font list. KSSM Font Prints the KSSM font list. a. This option may not be available depending on your country. • Press (Menu) > Information on the control panel.
Layout Item Some menus may not appear in the display depending on options or models. If so, it is not applicable to your machine (see "Menu overview" on page 31). • Simplex: Sets the margin for one-sided printing. • Duplex: Sets the margin for double-sided printing. Common Margin To change the menu options: • Press (Menu) > Layout on the control panel.
Layout Item Description To print on both sides of the paper, choose the binding edge. • Off: Disables this option. • Long Edge Duplex • Short Edge 3.
Paper Some menus may not appear in the display depending on options or models. If so, it is not applicable to your machine (see "Menu overview" on page 31). To change the menu options: • Press (Menu) > Paper on the control panel. Item Copies Description Selects the number of copies. • Paper Size: Selects the default paper size. MP Tray/ [Tray ] • Paper Type: Selects the paper type currently loaded in the tray. Sets the default paper tray to use.
Graphic Some menus may not appear in the display depending on options or models. If so, it is not applicable to your machine (see "Menu overview" on page 31). To change the menu options: • Press (Menu) > Graphic on the control panel. Item Description Resolution Specifies the number of dots printed per inch (dpi). The higher the setting, the sharper printed characters and graphics. Clear Text Prints text darker than on a normal document.
System Setup Some menus may not appear in the display depending on options or models. If so, it is not applicable to your machine (see "Menu overview" on page 31). Item When this option is On, you can wake up the machine from the power saving mode with the following actions: Wakeup Event To change the menu options: • Press Date & Time a • Loading paper in a tray. • Opening or closing the front cover. (Menu) > System Setup on the control panel.
System Setup Item Auto Tray Swi. Description Item Description • CLR Empty Msg.: This option appears only when toner cartridge is empty. Determine whether or not the machine continues printing when it detects the paper does not match. For example, if both tray 1 and tray 2 are filled with the same size paper, the machine automatically prints from tray 2 after the tray 1 runs out of paper. • Supplies Life: Allows you to check how many pages are printed and how much toner is left in the cartridge.
System Setup Item Description Allows you to save print resources and enables ecofriendly printing (see "Eco printing" on page 51). • Default Mode: Select whether to turn the Eco mode on or off. Item Auto Power Off Description Turns power off automatically when the machine has been in power save mode for the length of time set in Auto Power Off > On > Timeout. • To turn the machine on again, press the Eco Settings OnGForce: Sets the Eco mode on.
Emulation Some menus may not appear in the display depending on options or models. If so, it is not applicable to your machine (see "Menu overview" on page 31). To change the menu options: • Press (Menu) > Emulation on the control panel. Item Description Emulation Type The machine language defines how the computer communicates with the machine. Setup Sets the detailed settings for the selected emulation type. 3.
Network Option Some menus may not appear in the display depending on options or models. If so, it is not applicable to your machine (see "Menu overview" on page 31). Description Configure the ethernet port and network transmission speed. Ethernet Turn the power off and on after you change this option. To change the menu options: • Press (Menu) > Network on the control panel. You can also use this feature from the SyncThru™ Web Service.
Network Option Description Option You can activate or deactivate the following protocols. • HTTP: You can sets whether to use SyncThru™ Web Service or not. • WINS: You can configure the WINS server. WINS(Windows Internet Name Service) is used in the Windows operating system. Description Reverts the network settings to the default values. Clear Setting Turn the power off and onU • SNMP V1/V2: You have to enable this option to use SNMP V1/V2 protocol.
Job Management • This feature is not supported for M382xD. • Some menus may not appear in the display depending on options or models. If so, it is not applicable to your machine (see "Menu overview" on page 31). To change the menu options: • Press (Menu) > Job Managent on the control panel. Item Description Active Job Shows the print job lists that are waiting to be printed. Secured Job Shows the print job lists that are secured on the disk.
3.
4. Special Features This chapter explains special printing features. • Altitude adjustment 208 • Entering various characters 209 • Printing features 210 • Using optional device features 226 • The procedures in this chapter are mainly based on Windows 7. • It may be necessary to press OK to navigate to lower-level menus for some models.
Altitude adjustment Print quality is affected by atmospheric pressure, which is determined by the height of the machine above sea level. The following information will guide you on how to set your machine for the best print quality. You can set the altitude value from Device Settings in 6DPVXQJ (DV\ 3ULQWHU 0DQDJHU program. • Before you set the altitude value, determine the altitude where you are.
Entering various characters M382xND/M382xDW/M402xND only. As you perform various tasks, you may need to enter names and numbers. Key Assigned numbers, letters, or characters 1 @/.’1 2 ABCabc2 3 DEFdef3 4 GHIghi4 5 JKLjkl5 6 MNOmno6 7 PQRSpqrs7 8 TUVtuv8 9 WXYZwxyz9 0 &+-,0 * *%^_~!#$()[] 1 Entering alphanumeric characters Press the button until the correct letter appears on the display. For example, to enter the letter O, press 6, labeled with MNO.
Printing features • For basic printing features, refer to the Basic Guide (see "Basic printing" on page 48). If you want to change the settings for each print job, change it in Printing Preferences. • This feature may not be available depending on model or optional goods (see "Features by models" on page 8). 4 Setting your machine as a default machine 3 Changing the default print settings 1 2 3 4 Click the Windows Start menu. Select Control Panel > Devices and Printers. Right-click on your machine.
Printing features 5 Using advanced print features 1 Check the Print to file box in the Print window. 2 3 Click Print. • See "Features by models" on page 8. • XPS printer driver: used to print XPS file format. - The XPS printer driver can be installed only on Windows Vista OS or higher. - Install optional memory when an XPS job does not print because the printer is out of memory. - You can install the XPS printer driver when you insert the software CD into your CD-ROM drive.
Printing features Understanding special printer features You can use advanced printing features when using your machine. To take advantage of the printer features provided by your printer driver, click Properties or Preferences in the application’s Print window to change the print settings. The machine name, that appears in the printer properties window may differ depending on the machine in use. • Some menus may not appear on the display depending on options or models.
Printing features Item Description Prints your document on both sides of a sheet of paper and arranges the pages so that the paper can be folded in half after printing to produce a booklet. Booklet Printinga • If you want to make a booklet, you need to print on Letter, Legal, A4, US Folio, or Oficio sized print media. 8 9 • The Booklet Printing option is not available for all paper sizes. Select the available paper Size option under the Paper tab to see what paper sizes are available.
Printing features Item Description • Printer Default: If you select this option, this feature is determined by the settings you have selected on the control panel of the machine. • None: Disables this feature. • Long Edge: This option is the conventional layout used in bookbinding. Double-sided Printing • Short Edge: This option is the conventional layout used in calendars. • Reverse Double-Sided Printing: Check this option to reverse the print order when duplex printing.
Printing features Item Watermark (Creating a watermark) Watermark (Editing a watermark) Watermark (Deleting a watermark) Description a To change the print settings from your software application, access Printing Preferences. b Click the Advanced tab, select Edit from the Watermark drop-down list. The Edit Watermarks window appears. c Enter a text message in the Watermark Message box. You can enter up to 256 characters. The message displays in the preview window.
Printing features Item Overlaya (Creating a new page overlay) Description a b c d To save the document as an overlay, access Printing Preferences. Click the Advanced tab, and select Edit from the Text drop-down list. Edit Overlay window appears. In the Edit Overlay window, click Create. In the Save As window, type a name up to eight characters in the File name box. Select the destination path, if necessary (The default is C:\Formover). e Click Save. The name appears on the Overlay List.
Printing features Item Description • This feature is available only if you have installed the optional memory or mass storage device (HDD) (see "Variety feature" on page 10). • Some menus may not appear on the display depending on options or models. If so, it is not applicable to your machine. • To enable this feature, check Storage Options (see "Setting Device Options" on page 71).
Printing features Item Description This option allows you to print with the given permission. • User permission: If you check this option, only users with user permission can start a print job. • Group permission: If you check this option, only groups with group permission can start a print job. Job Accountingb • Select the Help menu or press F1 on your keyboard and click on any option you want to know about (see "Using help" on page 50).
Printing features • Whether or not a PDF file can be printed using the Direct Printing Utility program depends on how the PDF file was created. 6 Using Direct Printing Utility • The Direct Printing Utility program supports PDF version 1.7 and below. For higher versions, you must open the file to print it. • This feature is not supported for M382xD. • Direct Printing Utility may not be available depending on model or optional goods (see "Software" on page 8).
Printing features Using the right-click menu 7 Mac printing 1 Right-click on the PDF file to print and select Direct Printing. The Direct Printing Utility window appears with the PDF file is added. 2 3 4 Some features may not be available depending on models or options. It means that the features are not supported. Select the machine to use. Customize the machine settings. Click Print. The selected PDF file is sent to the machine.
Printing features Changing printer settings Printing on both sides of the paper You can use advanced printing features when using your machine. Some features may not be available depending on models or options. It means that the features are not supported (see "Variety feature" on page 10). Open an application and select Print from the File menu. The machine name, which appears in the printer properties window, may differ depending on the machine in use.
Printing features Using help Printing from applications Click the question mark on the bottom-left corner of the window and click on the topic you want to know about. A pop-up window appears with information about that option's feature, which is provided from the driver. There are a lot of Linux applications that allow you to print using Common UNIX Printing System (CUPS). You can print on your machine from any such application. 1 2 Open the document to print.
Printing features Printing files 3 The Printer Properties window appears. The following five tabs display at the top of the window: You can print text, image, pdf files on your machine using the standard • General: Allows you to change the printer location and name. The name entered in this tab displays on the printer list in Printers configuration. • Connection: Allows you to view or select another port.
Printing features 9 Unix printing To take advantage of the printer features provided by your printer driver, press Properties. Some features may not be available depending on models or options. It means that the features are not supported (see "Features by models" on page 8). 5 Press OK to start the print job. Changing the machine settings Proceeding the print job The UNIX printer driver Print Job Manager in which the user can select various print options in printer Properties.
Printing features Printer-Specific Settings tab Automatic duplex printing may not be available depending on models. You can alternatively use the lpr printing system or other applications for oddeven printing. • Multiple pages: Print several pages on one side of the paper. • Page Border: Choose any of the border styles (e.g., Single-line hairline, Double-line hairline) Select various options in the JCL and General frames to customize various settings.
Using optional device features • This feature is not supported for M382xD. 3 Select your printer driver from the Select Printer list. 4 5 6 Click Properties or Preferences . • Some features may not be available depending depending on model or optional goods (see "Variety feature" on page 10). 10 From the printer driver If you install the optional device, you can use advanced printing features, such as proofing a job and printing a private job in the Print window.
Using optional device features Some menus may not appear on the display depending on options or models. If so, it is not applicable to your machine. • Active Job All of the print jobs waiting to be printed are listed in the active job queue in the order you sent them to the printer. You can delete a job from the queue before printing, or promote a job to print sooner. • Secured Job: You can print or delete a secured job. Shows the list of secured jobs the user has set in the printer driver.
5. Useful Management Tools This chapter introduces management tools provided to help you make full use of your machine.
Accessing management tools Samsung provides a variety of management tools for Samsung printers. 1 2 Make sure that the machine is connected to your computer and powered on. From the Start menu, select Programs or All Programs. • 3 4 5 For Windows 8, from the Charms, select Search > Apps. Find Samsung Printers. Under Samsung Printers, you can see installed management tools. Click the management tool you want to use.
Easy Capture Manager • This feature may not be available depending on model or optional goods (see "Software" on page 8). • Available for Windows OS users only (see "Software" on page 8). Capture your screen and launch Easy Capture Manager by simply pressing the Print Screen key. Now you can easily print your captured screen as captured or edited. 5.
Samsung AnyWeb Print • This feature may not be available depending on model or optional goods (see "Software" on page 8). • Available for Windows and Mac OS users only (see "Software" on page 8). This tool helps you screen-capture, preview, scrap, and print Windows Internet Explorer pages more easily, than when you use an ordinary program. Download the software from the Samsung website then unpack and install it: (http://www.samsung.com > find your product > Support or Downloads). 5.
Easy Eco Driver • This feature may not be available depending on model or optional goods (see "Software" on page 8). • Available for Windows OS users only (see "Software" on page 8). With the Easy Eco Driver, you can apply Eco features to save paper and toner before printing. To use this application, Start Easy Eco Driver before printing job checkbox in the printer properties should be checked. Easy Eco Driver also allows you to do simple editing such as removing images and texts, changing fonts, and more.
Using SyncThru™ Web Service 1 2 • Internet Explorer 6.0 or higher is the minimum requirement for SyncThru™ Web Service. • SyncThru™ Web Service explanation in this user’s guide may differ from your machine depending on its options or models. • Network model only (see "Software" on page 8). Click Login on the upper right of the SyncThru™ Web Service website. Type in the ID and Password then click Login. Type in the below default ID and password.
Using SyncThru™ Web Service Information tab Security tab This tab gives you general information about your machine. You can check things, such as remaining amount of toner. You can also print reports, such as an error report. This tab allows you to set system and network security information. You need to log-in as an administrator to view this tab. • • Active Alerts: Shows the alerts that have occurred in the machine and their severity.
Using SyncThru™ Web Service • Cloning: You can import or export (transfer) various settings (machine setting, network information, address book, etc.) between devices that have the Cloning feature in SyncThru™ Web Service. If you have not configured outgoing server environment, go to Settings > Network Settings > Outgoing Mail Server(SMTP) to configure network environment before setting e-mail notification.
Using SyncThru™ Web Service 1 Start a web browser, such as Internet Explorer, from Windows. Enter the machine IP address (http://xxx.xxx.xxx.xxx) in the address field and press the Enter key or click Go. 2 3 4 Your machine’s embedded website opens. 5 Click Apply. From the Security tab, select System Security > System Administrator Enter the name of the administrator, phone number, location, and email address. 5.
Using Samsung Easy Printer Manager • This feature may not be available depending on model or optional goods (see "Software" on page 8). The Samsung Easy Printer Manager interface is comprised of various basic sections as described in the table that follows: • Available for Windows and Mac OS users only (see "Software" on page 8). The screenshot may differ depending on the operating system you are using. • For Windows, Internet Explorer 6.
Using Samsung Easy Printer Manager Printer information This area gives you general information about your machine. You can check information, such as the machine’s model name, IP address (or Port name), and machine status. Quick links Displays Quick links to machine specific functions. This section also includes links to applications in the advanced settings. 4 You can view the online User’s Guide. 2 If you connect your machine to a network, the SyncThru™ Web Service icon is enabled.
Using Samsung Easy Printer Manager Some menus may not appear in the display depending on options or models. If so, it is not applicable to your machine. Device Settings You can configure various machine settings such as machine setup, paper, layout, emulation, network, and print information. Alert Settings (Windows only) This menu includes settings related to error alerting. • Printer Alert: Provides settings related to when alerts will be received.
Using Samsung Printer Status The Samsung Printer Status is a program that monitors and informs you of the machine status. Icon • The Samsung Printer Status window and its contents shown in this user’s guide may differ depending on the machine or operating system in use. Mean Normal The machine is in ready mode and experiencing no errors or warnings. Warning The machine is in a state where an error might occur in the future.
Using Samsung Printer Status 2 3 Option You can set printing job alert related settings. Order Supplies You can order replacement toner cartridge(s) from online. User’s Guide You can view the online User’s Guide. This button opens the Troubleshooting Guide when an error occurs. You can directly open the troubleshooting section in the user’s guide. 4 5 Close Close the window. 5.
Using Samsung Printer Experience Samsung Printer Experience is a Samsung application that combines Samsung machine settings and machine management into one location. You can set device settings, order supplies, open troubleshooting guides, visit Samsung’s web site, and check connected machine information. This application will be automatically downloaded from the Windows Store if the machine is connected to a computer with an Internet connection.
Using Samsung Printer Experience 9 2 User Guide You can view the online User’s Guide. You need to be connected to the Internet to use this feature. Printing from Windows 8 This section explains common printing tasks from the Start screen. This button opens the Troubleshooting Guide when an error occurs. You can directly open the troubleshooting section in the user’s guide. 3 4 Order Supplies Visit Samsung Links to Samsung printer website.
Using Samsung Printer Experience 5 Click the Print button to start the print job. Cancelling a print job If the printing job is waiting in the print queue or print spooler, cancel the job as follows: • You can access this window by simply double-clicking the machine icon ( • ) in the Windows task bar. You can also cancel the current job by pressing the control panel. (Stop/Clear) button on Opening more settings The screen may appear somewhat different depending on the model or options.
Using Samsung Printer Experience Basic tab Basic This option allows you to choose the basic printing settings such as copies, orientation, and document type. Eco settings Advanced tab Paper settings This option allows you to set the basic paper handling specifications. Layout settings This option allows you to set the various ways to layout your documents. This option allows you to choose multiple pages per side to save media. 5.
Using Samsung Printer Experience Security tab 10 Scanning from Windows 8 Some features may not be available depending on the model or options. If this tab is not shown or disabled, it means that this features are not supported. This section is for the users with multi-functional printers. Scanning with your machine lets you turn pictures and text into digital files that can be stored on your computer.
Using Samsung Printer Experience 7 Click Scan ( )and save the image. • When you place the originals in the ADF (or DADF), Prescan ( ) is not available. • You can skip step 5, if the Prescan option is selected. 5.
Using the Linux Unified Driver Configurator The Unified Driver Configurator is a tool primarily intended for configuring machine devices. You need to install Unified Linux Driver to use Unified Driver Configurator (see "Installation for Linux" on page 134). After the driver is installed on your Linux system, the Unified Driver Configurator icon will automatically be created on your desktop. 11 Opening Unified Driver Configurator 1 Double-click the Unified Driver Configurator on the desktop.
Using the Linux Unified Driver Configurator Printers tab To use the on screen help, the Help or 3 button from the window. After changing the configurations, click Exit to close the Unified Driver Configurator. View the current system’s printer configuration by clicking on the machine icon button on the left side of the Unified Driver Configurator window. 12 Printers configuration Printers configuration has the two tabs: Printers and Classes. 1 Switches to Printers configuration.
Using the Linux Unified Driver Configurator The printer control buttons are, as follows: • Refresh: Renews the available machines list. • Add Printer: Allows you to add a new machines. • Remove Printer: Removes the selected machine. • Set as Default: Sets the current selected machine as a default machine. • Stop/Start: Stops/starts the machine. • Test: Allows you to print a test page to ensure the machine is working properly. • Properties: Allows you to view and change the printer’s properties.
Using the Linux Unified Driver Configurator 13 Ports configuration In this window, you can view the list of available ports, check the status of each port and release a port that is stalled in a busy state when its owner has terminated the job for any reason. 1 Switches to Ports configuration. 2 Shows all of the available ports. 3 Shows the port type, device connected to the port, and status. • Refresh: Renews the available ports list. • Release port: Releases the selected port. 5.
6. Troubleshooting This chapter gives helpful information for what to do if you encounter an error. • Paper feeding problems 253 • Power and cable connecting problems 254 • Printing problems 255 • Printing quality problems 259 • Operating system problems 267 For errors that occur during the wireless software installation and settings, refer to the troubleshotting section in the wireless setting chapter (see "Troubleshooting for wireless network" on page 181).
Paper feeding problems Condition Suggested solutions Paper jams during printing. Clear the paper jam. Paper sticks together. • Check the maximum paper capacity of the tray. • Make sure that you are using the correct type of paper. • Remove paper from the tray and flex or fan the paper. • Humid conditions may cause some paper to stick together. Multiple sheets of paper do not feed. Different types of paper may be stacked in the tray. Load paper of only one type, size, and weight.
Power and cable connecting problems Click this link to open an animation about solving power problems. Condition The machine is not receiving power, or the connection cable between the computer and the machine is not connected properly. Suggested solutions • Connect the machine to the electricity supply first. If the machine has a (Power) button on the control, press it. • Disconnect the machine’s cable and reconnect it. 6.
Printing problems Condition The machine does not print. Possible cause The machine is not receiving power. Suggested solutions Connect the machine to the electricity supply first. If the machine has a (Power) button on the control, press it. The machine is not selected as the default machine. Select your machine as your default machine in Windows. Check the machine for the following: • The cover is not closed. Close the cover. • Paper is jammed.
Printing problems Condition The machine does not print. Possible cause Suggested solutions The machine may be configured incorrectly. Check the Printing Preferences to ensure that all of the print settings are correct. The printer driver may be incorrectly installed. Uninstall and reinstall the machine’s driver. The machine is malfunctioning. Check the display message on the control panel to see if the machine is indicating a system error. Contact a service representative.
Printing problems Condition Pages print, but they are blank. Possible cause Suggested solutions The wrong printer driver was selected. Check the application’s printer selection menu to ensure that your machine is selected. The software application is malfunctioning. Try printing a job from another application. The operating system is malfunctioning. Exit Windows and reboot the computer. Turn the machine off and back on again. The toner cartridge is defective or out of toner.
Printing problems Condition Possible cause Suggested solutions The machine does not print custom-sized paper, such as billing paper. Paper size and paper size setting do not match. Set the correct paper size in the Custom in Paper tab in Printing Preferences (see "Opening printing preferences" on page 49). The printed billing paper is curled. The paper type setting does not match. Change the printer option and try again.
Printing quality problems If the inside of the machine is dirty or paper has been loaded improperly, there might be a reduction in print quality. See the table below to clear the problem. Condition Light or faded print Suggested solutions • If a vertical white streak or faded area appears on the page, the toner supply is low. Install a new toner cartridge (see "Replacing the toner cartridge" on page 64). • The paper may not meet paper specifications; for example, the paper may be too moist or rough.
Printing quality problems Condition Toner specks Suggested solutions • The paper may not meet specifications; for example, the paper may be too moist or rough. • The transfer roller may be dirty. Clean the inside of your machine (see "Cleaning the machine" on page 77). A aB bC c A aB bC c A aB bC c A aB bC c A aB bC c Dropouts • The paper path may need cleaning. Contact a service representative (see "Cleaning the machine" on page 77).
Printing quality problems Condition Vertical lines Suggested solutions If black vertical streaks appear on the page: • The surface (drum part) of the toner cartridge inside the machine has probably been scratched. Remove the toner cartridge and install a new one (see "Replacing the toner cartridge" on page 64). If white vertical streaks appear on the page: • The surface of the LSU part inside the machine may be dirty. Clean the inside of your machine (see "Cleaning the machine" on page 77).
Printing quality problems Condition Vertical repetitive defects Suggested solutions If marks repeatedly appear on the printed side of the page at even intervals: • The toner cartridge may be damaged. If you still have the same problem, remove the toner cartridge and, install a new one (see "Replacing the toner cartridge" on page 64). • Parts of the machine may have toner on them. If the defects occur on the back of the page, the problem will likely correct itself after a few more pages.
Printing quality problems Condition Suggested solutions Misformed characters • If characters are improperly formed and producing hollow images, the paper stock may be too slick. Try different paper. Page skew • Ensure that the paper is loaded properly. A aBb A aBb C A aBb C A aBb C A aBb C Cc Curl or wave • Check the paper type and quality. • Ensure that the guides are not too tight or too loose against the paper stack. • Ensure that the paper is loaded properly. • Check the paper type and quality.
Printing quality problems Condition Wrinkles or creases Suggested solutions • Ensure that the paper is loaded properly. • Check the paper type and quality. • Turn the stack of paper over in the tray. Also try rotating the paper 180° in the tray. Back of printouts are dirty • Check for leaking toner. Clean the inside of the machine (see "Cleaning the machine" on page 77). Solid color or black pages • The toner cartridge may not be installed properly. Remove the cartridge and reinsert it.
Printing quality problems Condition Loose toner Suggested solutions • Clean the inside of the machine (see "Cleaning the machine" on page 77). • Check the paper type, thickness, and quality. • Remove the toner cartridge and then, install a new one (see "Replacing the toner cartridge" on page 64). If the problem persists, the machine may require repair. Contact a service representative.
Printing quality problems Condition Curl Suggested solutions If the printed paper is curled or paper does not feed into the machine: • Turn the stack of paper over in the tray. Also try rotating the paper 180° in the tray. • Change the printer’s paper option and try again. Go to Printing Preferences, click the Paper tab, and set type to Thin (see "Opening printing preferences" on page 49). • An unknown image Your machine is probably being used at an altitude of 1,000 m (3,281 ft) or above.
Operating system problems 1 Common Windows problems Condition Suggested solutions “File in Use” message appears during installation. Exit all software applications. Remove all software from the startup group, then restart Windows. Reinstall the printer driver. “General Protection Fault”, “Exception OE”, “Spool 32”, or “Illegal Operation” messages appear. Close all other applications, reboot Windows and try printing again. “Fail To Print”, “A printer timeout error occurred” message appear.
Operating system problems 2 Common Mac problems Condition The machine does not print PDF files correctly. Some parts of graphics, text, or illustrations are missing. Suggested solutions Printing the PDF file as an image may enable the file to print. Turn on Print As Image from the Acrobat printing options. It will take longer to print when you print a PDF file as an image. Some letters are not displayed normally during cover page printing. Mac OS cannot create the font while printing the cover page.
Operating system problems 3 Common Linux problems condition The machine does not print. Suggested solutions • Check if the printer driver is installed in your system. Open Unified Driver Configurator and switch to the Printers tab in Printers configuration window to look at the list of available machines. Make sure that your machine is displayed on the list. If not, open Add new printer wizard to set up your device. • Check if the machine is started.
Operating system problems condition Suggested solutions I encounter error “Cannot open port device file” when printing a document. Avoid changing print job parameters (via LPR GUI, for example) while a print job is in progress. Known versions of CUPS (Common UNIX Printing System) server break the print job whenever print options are changed and then try to restart the job from the beginning.
Operating system problems 4 Common PostScript problems The following situations are PS language specific and may occur when several printer languages are used. Problem The PostScript file cannot be printed Possible cause The PostScript driver may not be installed correctly. Solution • Install the PostScript driver (see "Software Installation" on page 131). • Print a configuration page and verify that the PS version is available for printing. • If the problem persists, contact a service representative.
Contact SAMSUNG worldwide If you have any comments or questions regarding Samsung products, contact the Samsung customer care center. Country/Region ALBANIA Customer Care Center 42 27 5755 Web Site Country/Region Customer Care Center Web Site BOSNIA 05 133 1999 www.samsung.com BOTSWANA 0800-726-000 www.samsung.com 0800-124-421 www.samsung.com www.samsung.com BRAZIL 4004-0000 ANGOLA 91-726-7864 www.samsung.com ARGENTINA 0800-333-3733 www.samsung.
Contact SAMSUNG worldwide Country/Region CYPRUS Customer Care Center Web Site 8009 4000 only from landline www.samsung.com 800-SAMSUNG (800-726786) www.samsung.com CZECH REPUBLIC Samsung Electronics Czech and Slovak, s.r.o., Oasis Florenc, Sokolovská 394/17, 180 00, Praha 8 DENMARK 70 70 19 70 1-800-751-2676 Country/Region FYROM 023 207 777 www.samsung.com 0180 5 SAMSUNG bzw. www.samsung.com GERMANY 0180 5 7267864* (*0,14 €/Min. aus dem dt. Festnetz, aus dem Mobilfunk max. 0,42 €/Min.
Contact SAMSUNG worldwide Country/Region Customer Care Center (852) 3698-4698 Web Site www.samsung.com/hk (Chinese) Country/Region KOSOVO HONG KONG www.samsung.com/ hk_en/ (English) HUNGARY 06-80-SAMSUNG (726-7864) www.samsung.com 1800 1100 11 www.samsung.com 3030 8282 INDIA 1800 3000 8282 Customer Care Center Web Site +381 0113216899 www.samsung.com 183-2255 www.samsung.com/ae (English) KUWAIT www.samsung.com/ ae_ar (Arabic) KYRGYZSTAN 00-800-500-55-500 www.samsung.
Contact SAMSUNG worldwide Country/Region Customer Care Center 00-1800-5077267 Web Site Country/Region POLAND www.samsung.com/ latin (Spanish) PORTUGAL 808 20-SAMSUNG (808 20 7267) www.samsung.com PUERTO RICO 1-800-682-3180 www.samsung.com www.samsung.com ROMANIA 08008 SAMSUNG (08008 726 7864) NIGERIA 0800-726-7864 www.samsung.com NORWAY 815 56480 www.samsung.com 800-SAMSUNG (726-7864) www.samsung.com/ae (English) OMAN www.samsung.
Contact SAMSUNG worldwide Country/Region Customer Care Center 0848-SAMSUNG (7267864, CHF 0.08/min) Web Site www.samsung.com/ch (German) Customer Care Center Web Site UZBEKISTAN 8-10-800-500-55-500 www.samsung.com VENEZUELA 0-800-100-5303 www.samsung.com www.samsung.com/ ch_fr(French) VIETNAM 1 800 588 889 www.samsung.com www.samsung.com ZAMBIA 211350370 www.samsung.com SWITZERLAND 0800-329-999 Country/Region TAIWAN 0266-026-066 TAJIKISTAN 8-10-800-500-55-500 www.samsung.
Glossary ADF The following glossary helps you get familiar with the product by understanding the terminologies commonly used with printing as well as mentioned in this user’s guide. 802.11 802.11 is a set of standards for wireless local area network (WLAN) communication, developed by the IEEE LAN/MAN Standards Committee (IEEE 802). 802.11b/g/n 802.11b/g/n can share same hardware and use the 2.4 GHz band. 802.11b supports bandwidth up to 11 Mbps, 802.11n supports bandwidth up to 150 Mbps. 802.
Glossary BOOTP Coverage Bootstrap Protocol. A network protocol used by a network client to obtain its IP address automatically. This is usually done in the bootstrap process of computers or operating systems running on them. The BOOTP servers assign the IP address from a pool of addresses to each client. BOOTP enables 'diskless workstation' computers to obtain an IP address prior to loading any advanced operating system. It is the printing term used for a toner usage measurement on printing.
Glossary DHCP DPI A Dynamic Host Configuration Protocol (DHCP) is a client-server networking protocol. A DHCP server provides configuration parameters specific to the DHCP client host requesting, generally, information required by the client host to participate on an IP network. DHCP also provides a mechanism for allocation of IP addresses to client hosts. Dots Per Inch (DPI) is a measurement of resolution that is used for scanning and printing.
Glossary ECM EtherTalk Error Correction Mode (ECM) is an optional transmission mode built into Class 1 fax machines or fax modems. It automatically detects and corrects errors in the fax transmission process that are sometimes caused by telephone line noise. A suite of protocols developed by Apple Computer for computer networking. It was included in the original Mac (1984) and is now deprecated by Apple in favor of TCP/IP networking.
Glossary Gateway IEEE A connection between computer networks, or between a computer network and a telephone line. It is very popular, as it is a computer or a network that allows access to another computer or network. The Institute of Electrical and Electronics Engineers (IEEE) is an international non-profit, professional organization for the advancement of technology related to electricity.
Glossary IPM ITU-T The Images Per Minute (IPM) is a way of measuring the speed of a printer. An IPM rate indicates the number of single-sided sheets a printer can complete within one minute. The International Telecommunication Union is an international organization established to standardize and regulate international radio and telecommunications.
Glossary LDAP MH The Lightweight Directory Access Protocol (LDAP) is a networking protocol for querying and modifying directory services running over TCP/IP. Modified Huffman (MH) is a compression method for decreasing the amount of data that needs to be transmitted between the fax machines to transfer the image recommended by ITU-T T.4. MH is a codebook-based run-length encoding scheme optimized to efficiently compress white space.
Glossary NetWare OSI A network operating system developed by Novell, Inc. It initially used cooperative multitasking to run various services on a PC, and the network protocols were based on the archetypal Xerox XNS stack. Today NetWare supports TCP/IP as well as IPX/SPX. Open Systems Interconnection (OSI) is a model developed by the International Organization for Standardization (ISO) for communications.
Glossary PostScript Protocol PostScript (PS) is a page description language and programming language used primarily in the electronic and desktop publishing areas. - that is run in an interpreter to generate an image. A convention or standard that controls or enables the connection, communication, and data transfer between two computing endpoints. PS Printer Driver See PostScript. A program used to send commands and transfer data from the computer to the printer.
Glossary SMB TCP/IP Server Message Block (SMB) is a network protocol mainly applied to share files, printers, serial ports, and miscellaneous communications between nodes on a network. It also provides an authenticated Inter-process communication mechanism. The Transmission Control Protocol (TCP) and the Internet Protocol (IP); the set of communications protocols that implement the protocol stack on which the Internet and most commercial networks run.
Glossary TWAIN Watermark An industry standard for scanners and software. By using a TWAIN-compliant scanner with a TWAIN-compliant program, a scan can be initiated from within the program. It is an image capture API for Microsoft Windows and Apple Mac operating systems. A watermark is a recognizable image or pattern in paper that appears lighter when viewed by transmitted light.
Glossary WPA-PSK WPA-PSK (WPA Pre-Shared Key) is special mode of WPA for small business or home users. A shared key, or password, is configured in the wireless access point (WAP) and any wireless laptop or desktop devices. WPA-PSK generates a unique key for each session between a wireless client and the associated WAP for more advanced security. WPS The Wi-Fi Protected Setup (WPS) is a standard for establishing a wireless home network.
Index A tray settingG device optionsG accessories installingG 71 direct printing utilityG orderingG 58 driver installation AirPrintG 187 AnyWeb PrintG 231 UnixG 45 71 J jam 219 clearing paperG 85 tips for avoiding paper jamsG 84 148 L E layoutG 195 B eco printingG buttons entering characterG 209 common Linux problemsG 101 driver installation for network connectedG 147 ecoG 23SG24 error messageG print screenG 23SG24 F wpsG 24 favorites settings, for printingG C feat
Index special mediaG 41 menu mapG 194 menu overviewG M 31 O optional trayG 58 orderingG 58 multi-purpose (or manual feeder) tray Mac common Mac problemsG 268 driver installation for network connectedG 146 driver installation for USB cable connectedG 132 driver reinstallation for USB cable connectedG 133 printingG 220 system requirementsG 113 using SetIPG 139 machine overview front viewG 20 rear viewG 21 maintenance partsG 59 memory memory upgradingG memory/hard drive featureG 73
Index labelsG output supportG 44 110 UNIXG 224 secu printingG using direct printing utilityG 219 service contact numbersG 52 272 preprinted paperG 45 setting the paper sizeG 45 LinuxG 222 Special featuresG 207 setting the paper typeG 45 MacG 220 specificationsG 108 special mediaG 41 UNIXG 224 110 transparencyG 43 print mediaG printer preferences LinuxG printing featureG SetIP programG 210 problem 223 printer status general informationG printing a document operating syst
Index replacing the cartridgeG 64 storingG 60 tray adjusting the width and lengthG 36 changing the tray sizeG 36 loading paper in multi-purpose (or manual feeder) trayG 39 W wireless network network cableG watermark createG 215 deleteG 215 editG 215 Windows ordering an optional trayG 58 common Windows problemsG ordering an parallelG 58 setting the paper size and typeG 45 driver installation for network connectedG 143 U 98 UNIX 224 Unix system requirementsG 114 USB cable driver