This document is watermarked because certain important information in the document has not yet been verified. This document has been sent to you as a draft and for informational purposes only. The document should only be used for internal purposes and may not be distributed outside of the company. Distributing the document outside of the company could result in legal exposure to the company if the preliminary, unverified information in the draft turns out to be inaccurate.
Legal Notices Open Source Software WARNING! This product contains chemicals known to the State of California to cause cancer, birth defects, or other reproductive harm. For more information, please call 1-800-SAMSUNG (726-7864). Some software components of this product incorporate source code covered under GNU General Public License (GPL), GNU Lesser General Public License (LGPL), OpenSSL License, BSD License and other open source licenses.
Modification of Software Your device is designed to make it easy for you to access a wide variety of content. For your protection, AT&T wants you to be aware that some applications that you enable may involve the location of your device being shared. For applications available through AT&T, AT&T offers privacy controls that let you decide how an application may use the location of your device and other devices on your account.
Samsung Electronics America (SEA), Inc. Legal Information Important legal information can be accessed in writing on the mobile device or at samsung.com Address: 85 Challenger Road Ridgefield Park, New Jersey 07660 READ THIS INFORMATION BEFORE USING YOUR MOBILE DEVICE. Samsung Limited Warranty - This product is covered under the applicable Samsung Limited Warranty INCLUDING ITS DISPUTE RESOLUTION PROCEDURE and your right to opt out of arbitration within 30 calendar days of the first consumer purchase.
Table of Contents Getting Started.................................................1 Email.................................................................. 55 Front View............................................................2 Back View............................................................3 Assemble Your Device......................................4 Set Up Your Device...........................................7 Set Up Accounts on Your Device....................9 Galaxy Apps.....................
Accessibility...................................................104 Accounts.........................................................106 Backup and Reset........................................107 Language and Input.....................................109 Battery.............................................................111 Storage............................................................112 Date and Time...............................................114 Help.............................................
Getting Started Learn about your mobile device hardware, assembly procedures, and how to get started using your new device.
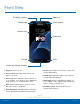
Front View Earpiece Proximity sensors Front camera Status light Volume keys Power key Recent Back Home key/Finger scanner • Earpiece: Listen to a call. • Front camera: Take self-portraits and record • Recent: Tap to display recent apps, or touch and hold for Multi window. • Volume keys: Adjust the volume of your device’s videos of yourself. sounds and audio playback.
Back View SIM card/Memory card tray Microphone Flash Rear camera Heart rate sensor Speaker Headset jack USB charger/ Accessory port Microphone • SIM card/Memory card tray: Install the SIM • USB charger/Accessory port: Connect the card and an optional memory card (not included) for storage of files. For more information, see Install the SIM Card and a Memory Card. • USB charger (included) and other optional accessories (not included).
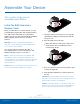
Assemble Your Device This section helps you to assemble your device. Install the SIM Card and a Memory Card When you subscribe to a cellular network, you are provided with a plug-in SIM card. During activation, your SIM card is loaded with your subscription details, such as your Personal Identification Number (PIN), available optional services, and other features. 1. Insert the removal tool into the hole on the SIM card/Memory card tray, and then push until the tray pops out. 2.
Maintaining Water and Dust Resistance Charge the Battery Your device is powered by a rechargeable, standard Li-Ion battery. A USB charger (charging head and USB cable) is included with the device for charging the battery from any standard outlet. Note: Water-resistant and dustproof based on IP68 rating, which tests submersion up to 5 feet for up to 30 minutes. The battery comes partially charged. A fully discharged battery requires up to four hours of charge time. You can use the device while charging.
When to Charge the Battery When the battery is low and only a few minutes of operation remain, the device sounds a warning tone at regular intervals. In this condition, your device conserves its remaining battery power by dimming the screen. When the battery level becomes too low, the device automatically turns off. For a quick check of your battery level: ►► View the battery charge indicator located in the top right corner of your device’s display. A solid color ( ) indicates a full charge.
Set Up Your Device Turn Your Device On or Off Smart Switch The instructions below explain how to turn your device on or off. Use Smart Switch™ to transfer contacts, photos, and other content from your old device. You can copy content quickly and easily without installing the app on your old device. Just connect both devices using the included USB cable and On-the-Go (OTG) connector. Turn the Device On ►► Press and hold the Power key until the device turns on.
Secure Your Device Use your device’s screen lock features to secure your device. Lock the Device By default, the device locks automatically when the screen times out. To lock the device: ►► Press the Power key. Unlock the Device The default Screen lock on your device is Swipe. Note: To choose a more secure screen lock, see Set a Screen Lock. To unlock the device: ►► Press the Power key or Home key, and then drag your finger across the screen.
Set Up Accounts on Your Device Samsung Account Factory Reset Protection Create a Samsung account for access to Samsung content and apps on your device. When you turn on your device for the first time, set up your existing Samsung account or create a new Samsung account. When you sign in to a Google Account on your device, Factory Reset Protection is turned on. Factory Reset Protection (FRP) prevents other people from using your device if it is reset to factory settings without your permission.
Know Your Device Learn some of the key features of your mobile device, including the screens and icons, as well as how to navigate the device and enter text using the keyboard. Warning: Please note that a touch screen responds best to a light touch from the pad of your finger or a capacitive stylus. Using excessive force or a metallic object when pressing on the touch screen may damage the tempered glass surface and void the warranty.
Home Screen The Home screen is the starting point for using your device. Notification icons Status icons Status bar Widget App shortcuts App folder Home screen indicator Apps list Primary app shortcuts • Status icons: Displays information about the • Home screen indicator: Indicates which device, such as the network signal strength, battery level, and the time. • Home screen is currently visible.
Customize your Home screens by adding application shortcuts, widgets, folders, and custom wallpapers. Wallpapers To access Home screen manager: 2. Tap Wallpapers to customize. ►► From a Home screen, pinch the screen. For more information, see Wallpaper. Change the look of the Home and Lock screens with wallpaper. You can display a favorite picture or choose from preloaded wallpapers. 1. From a Home screen, pinch the screen.
Themes Remove a Shortcut Set visual themes for all system screens and icons on your device. You can remove a shortcut that you added to a Home screen. 1. From a Home screen, pinch the screen. 1. Touch and hold an app shortcut to release it. 2. Tap Themes to customize. 2. Drag the app shortcut to release it. For more information, see Themes. Note: Removing a shortcut does not delete the app, it just removes the shortcut from the Home screen.
Status Bar The Status bar at the top of the Home screen provides device information (such as network status, battery charge, and time) on the right side and notification alerts on the left. Notification Icons Missed call: A call has been missed. Call in progress: A call is in progress. Call on hold: A call is on hold. New email: New email has arrived. Status Icons Battery full: Battery is fully charged. New Gmail: New Gmail has arrived. Battery low: Battery is low.
Navigation Learn the basics for how to navigate through your device. Drag Touchscreen Navigation • Drag an app shortcut to add it to a Home screen. • Drag a widget to place it in a new location on a Touch and hold an item, and then move it to a new location. Use the following motions and gestures on your touchscreen to navigate the device. Home screen. Pinch and Spread Tap Pinch the screen using your thumb and forefinger or spread by moving your fingers apart.
Common Options The device uses basic command options to perform common actions. • More: Tap to view more menu options for a screen. This often allows you to select items to delete or share. • Delete: Tap to select items to delete. • Share: Tap to select items to share, and a sharing method. • Edit: Tap to customize the screen. • On/Off button: Tap to turn the option on ( off ( ) or ). • Checkbox: Tap to enable or select. When enabled, a checkmark is displayed.
Notification Panel Notification icons on the Status bar display calendar events, device status, and more. For details, open the Notification panel. Settings View all Quick settings Screen brightness Quick connect Notification card Notification settings Clear notifications • Settings: Display the Settings screen. • View all: See all available Quick settings. • Clear notifications: Clear all notifications.
View the Notification Panel Quick Connect You can access the Notification panel from any Home screen. Search for nearby devices automatically to connect to them quickly and easily. 1. Drag the Status bar down to display the Notification panel. 1. Drag the Status bar down to display the Notification panel. 2. Swipe down the list to see notification details. 2. Tap Quick connect. Your device automatically scans for compatible devices. • • To open an item, tap it.
Multi Window Multitask by using multiple applications at the same time. Window controls Activate Multi Window Apps that support Multi window display together on a split screen. You can switch between the apps, adjust the size of their display on the screen, and copy information from one app to the other. 1. From any screen, touch and hold Recent. 2. Tap two apps that support Multi window to open them in split screen view. ‑ or ‑ Note: Multi window is not available for all apps.
You can also launch recently used apps directly into Multi window view: 1. Tap • Recent. Recently used apps that support Multi window have a Multi window icon in their title bar. 2. Tap Multi window in the title bar to launch an application in split screen view. • Other recently used apps that support Multi window display below the launched app. 3. Tap an app icon to add it to the split screen view. Note: Only applications that support Multi window have the Multi window icon.
Enter Text Text can be entered using a keyboard or by speaking. Special Keys Symbol: Tap to insert symbols. Touch and hold Options for the following: Use the Samsung Keyboard Voice input: Enter text using Google voice™ typing. Enter text using a QWERTY keyboard. Predictive text Clipboard: Access the clipboard. Emoticon: Insert an emoticon at the cursor position. Keyboard settings: Access keyboard settings. Note: Available options depend on the app in use. Not all options are available for all apps.
Use Google Voice Typing Instead of typing, enter text by speaking. Settings Delete text To enable Google voice typing: 1. Tap • Voice input on the Samsung keyboard. You may need to touch and hold Options (left of the Space bar) to find it. 2. Speak your text. Note: Tap Settings > Languages to download additional languages for use with Google voice typing. Configure Google Voice Typing To customize Google voice typing: 1. From a Home screen, tap Settings > System. Apps > 2.
Emergency Mode Use Emergency Mode Emergency mode conserves your device’s remaining power when you are in an emergency situation. While in Emergency mode, your device conserves power. The following apps and features are available on the Home screen: • Flashlight: Use the device’s flash as a steady source of light. Emergency mode saves battery power by: • Changing the color of the screen to grayscale. • Restricting application usage to only essential • Emergency alarm: Sound an audible siren.
Calling Make telephone calls using a variety of calling features and services.
Phone Screen Use the Phone screen to access the dialer keypad, recent calls, favorites, and contacts. More options Tabs Keypad Hide the keypad Voicemail Video call Call • More options: Access Speed dial and Call • Keypad: Dial the number that you want to call. • Tabs: Display a log of all dialed, received, settings. • Hide the keypad: Hide the keypad and display and missed calls. Display contacts marked as favorites. Display your contacts and select a contact to call. recent calls.
Access Phone There are a couple of ways to access Phone. ►► From a Home screen, tap Phone. – or – From a Home screen, tap Apps > Phone. Display Your Phone Number Your phone number can be found in Settings. ►► From a Home screen, tap Apps > Settings > System > About device > Status > SIM card status. • Your phone number is displayed in the My phone number field. Call Settings There are also a couple of ways to access the Call settings menu. ►► From a Home screen, tap Settings.
Make and Answer Calls Learn how to make or answer a call. Explore features and functionality associated with making or answering a call. Dial a Recent Number All incoming, outgoing, and missed calls are recorded in the Call log. If the number or caller is listed in your contacts list, the associated name is also displayed. 1. From a Home screen, tap Phone. Make a Call 2. Tap Log. A list of recent calls is displayed. You can make a call from a Home screen. 3. Tap a contact, and then tap 1.
Answer a Call Multitask While on a Call When a call is received, the phone rings and the caller’s phone number or name is displayed, if it is stored in the Contacts list. If you exit the call screen and return to a Home screen, your active call is indicated by Call on the Status bar. ►► At the incoming call screen: This lets you continue with your current call and do something else, such as access the contacts list, view a recent email, or locate a picture. Answer to the right to answer the call.
Place a New Call While on a Call Video Call Options If your service plan supports this feature, you can make another call while a call is in progress. To change the call type during a video call: 1. From the active call, tap second call. 2. Dial the new number and tap the call is answered: • • Tap calls. ►► Tap Call type. The following options are available: Add call to dial the • Dial. When Show me or camera on or off.
Delete a Call from the Call Log To delete Call log entries: 1. From a Home screen, tap Phone > Log. 2. Touch and hold the call you want to delete from the Call log. 3. Tap Delete. Block a Number By adding a caller to your Block list, future calls from this number are sent directly to your voicemail, and messages are not received. 1. From a Home screen, tap Phone > Log. 2. Tap the caller you want to add to the Block list. 3.
Speed Dial Remove a Speed Dial Number Assignment You can assign a shortcut number to a contact for speed dialing their default number. You can remove an assigned Speed dial number. 1. From a Home screen, tap Phone. Create a Speed Dial 2. Tap More > Speed dial. Your can assign 100 speed dial numbers. 3. Find the contact to remove from Speed dial. 1. From a Home screen, tap • Tap 4. Tap Phone. Remove. Keypad if the keypad is not displayed. 2. Tap More > Speed dial.
Emergency Calls You can dial the emergency telephone number in your region regardless of the phone’s cellular service status. Swipe Lock Screen If the Lock screen is set to Swipe, you can access the call screen in a couple of ways. 1. Drag Phone upward to open the call screen. - or Swipe across the screen to unlock it, and then tap Phone. Make an Emergency Call You can dial the emergency telephone number from your phone whether or not cellular service has been activated.
Set Up and Access Voicemail Visual Voicemail Set up and configure your voicemail. Use Visual voicemail to: • Review and manage your voicemail messages directly from your phone without dialing into voicemail. Set Up Your Voicemail You can access your voicemail from a Home screen. 1. From the Home screen, tap Voicemail. • See a list of your messages on your phone and select, in any order you choose, which ones you want to play, call back, forward, delete, or save. Phone > 2.
Applications Learn how to change the way apps display, organize apps into folders, and uninstall or disable apps.
Apps List Uninstall or Disable Apps The Apps list displays all preloaded apps and apps that you downloaded. You can uninstall, disable, or hide apps from view. You can uninstall or disable apps you download and install. • Preloaded apps cannot be uninstalled. • Apps that are disabled are turned off and hidden from view. Shortcuts to apps can be placed on any of the Home screens. For more information, see Add a Shortcut to a Home Screen. 1. From a Home screen, tap Access Apps 2. Tap Edit.
Organize Your Apps To launch apps in a folder: ►► Tap a folder, and then tap an app shortcut to launch it. App shortcuts can be listed alphabetically or in your own custom order. To delete a folder: To change the order apps are listed: 1. From a Home screen, tap 1. From a Home screen, tap Apps > Edit. 2. Tap the folder to delete and tap Delete folder. Confirm when prompted. 2. Touch and hold an app shortcut or folder, and then drag it to a new location. 3. Tap Done when finished. 3.
Google Apps Google Enjoy these apps from Google. Search not only the Internet, but also the apps and contents of your device. Note: Certain apps require a Google Account. Visit google.com to learn more. Google Now Android Pay Works in the background to collect information you regularly look up and organize it into convenient cards that appear when you need them. Pay with your Android phone at over one million store locations across the US and within mobile apps. Visit google.
Play Movies & TV Watch movies and TV shows purchased from Google Play. You can stream them instantly, or download them for viewing when you are not connected to the Internet. You can also view videos saved on your device. Visit play.google.com/store/movies to learn more. Play Music Play music and audio files on your device. Visit play.google.com/music to learn more. Play Store Find new apps, movies and TV shows, music, books, magazines, and games in Google Play store. Visit play.google.
AT&T Apps Device Help Enjoy these apps from AT&T . Access online information to help with your device questions. Note: Certain apps require a data plan or paid subscription. Visit att.com to learn more or contact your service provider for additional information. DIRECTV DIRECTV® brings you all the entertainment you love on just about any device you have in your possession. Stream live TV. Watch the latest blockbusters and hottest shows On Demand. Even watch your DVR recordings. Any time, anywhere.
Uber Hire a private driver in more than 130 cities and 30 countries. Uber is an entirely new and modern way to travel. Usage Manager Open the Data usage settings page to manage your mobile data usage. For more information, see Data Usage. Visual Voicemail Review and manage your voicemail messages directly from your device without dialing into voicemail. You can also see a list of your messages on your device and select which ones you want to play, call back, share, delete, or save.
Additional Apps There are additional apps, including several Samsung apps, preloaded on your device. Facebook Keep up with friends and family with the Facebook app. Share updates, photos, and videos, as well as text, chat, and play games. Plenti PlentiSM is a rewards program that lets you earn points at one place and use them at another, all with a single card. For more information see plenti.com. Samsung Gear Connect your device to your Samsung Gear using this application.
Calculator Scientific Calculator The Calculator provides basic and advanced arithmetic functions. The Calculator app also provides advanced arithmetic functions, such as sin, cos, and tan. To use the Scientific calculator: ►► If Auto rotate is enabled, turn the device to landscape. Basic Operation You can use your calculator to perform basic operations. 1. From a Home screen, tap Calculator. – or – If Portait is enabled, tap Rotate.
Calendar Share an Event Manage your events and tasks. You can share events you create from your Calendar. Calendar View 1. From a Home screen, tap Calendar. To choose a calendar view: 1. From a Home screen, tap Calendar. 2. Tap 2. Tap an event to view it. Apps > 3. Tap Share, choose a sharing method, and follow the prompts. Menu and tap one of the following: • Year: Display all twelve months of this year. Swipe across the screen to display another year.
Create a Task Calendar Settings You can use your Calendar to create tasks. Tasks are items you add to the calendar to be accomplished on a certain day. A task appears as a checklist item and is removed once you mark the task as complete. These settings allow you to modify settings associated with using the Calendar. 1. From a Home screen, tap Calendar. 1. From a Home screen, tap Calendar. Apps > 2. Tap More > Settings. Apps > 3. Tap an option and follow the prompts. 2.
Camera and Video Take pictures and record videos with the Camera app. Show or hide settings Gallery Record video Quick settings Take a picture Switch cameras More settings Shooting mode • Gallery: Open the Gallery to view photos and • Shooting mode: Change the shooting mode. • More settings: Configure other camera settings. • Quick settings: Select camera settings or videos. • Record video: Record a video. • Take a picture: Take a picture. • Switch cameras: Switch between the rear and options.
Take Pictures • Take pictures with your device’s front or rear camera. Download: Download additional shooting modes from the Galaxy Apps store. • Note: Prior to using the camera, remove the plastic protective covering from the camera lens. Info: Read information about each available camera mode. • More: See more options for the camera modes. 1. From a Home screen, tap Apps > Camera. Rear camera 2. Using the display screen as a viewfinder, compose your shot by aiming the camera at the subject.
Camera Settings • You can adjust your camera’s settings using the icons on the main camera screen and the full camera settings menu. Volume keys function: Use the Volume key as the camera key, the record key, or as a zoom key. • Shutter sound: Enable or disable a shutter sound when pictures are taken. • • Reset settings: Reset the camera settings. 1. From a Home screen, tap Apps > Camera. 2. Quick settings are listed across one side of the camera view finder.
Live Broadcast Share a Broadcast Use YouTube to share what is happening around you. You can share your Live broadcast with contacts before recording or share the link after you have finished recording and it has been posted to YouTube. To access the Live Broadcast: ►► From a Home screen, tap > Mode > Live broadcast. Apps > Camera To invite contacts before broadcasting: 1. From a Home screen, tap > Mode > Live broadcast.
Clock The Clock app offers features for keeping track of time and setting alarms. 1. From a Home screen, tap Apps > • -- Alarm type: Choose whether the alarm uses sound, vibration, or vibration and sound to alert you. Clock. -- Volume: Drag the slider to set the volume of 2. Tap a tab to use a feature: • • • • Options: Tap to view and set the following options: the alarm. -- Alarm tone: Choose a sound to play for the Alarm: Set an alarm to ring at a specific time. alarm.
World Clock Timer The World clock lets you keep track of the current time in multiple cities around the globe. The Timer provides a countdown timer for up to 99 hours, 59 minutes, and 59 seconds. To list a city on the main World clock screen: 1. From a Home screen, tap 1. From a Home screen, tap Apps > 3. Use the keypad and tap Hours, Minutes, and Seconds to set the length of the Timer. The following options are available: 3. Tap a city to view it on the globe. Add city in the pop-up for the city.
Contacts Store and manage your contacts with the Contacts app, which can be synchronized with a variety of your existing personal accounts, including Google, Email, Facebook, and your Samsung account. Add a Contact Use the following procedure to add a new contact. 1. From a Home screen, tap Contacts. 2. Tap Create contact, and then tap contact fields to enter information. For more information on connecting with and managing your accounts through your device, see Accounts.
Share a Contact Delete Contacts When you share a contact, the contact’s information is sent as a vCard file (.vcf). You can share a vCard using Bluetooth or Wi-Fi Direct, attach it to a message, or save it to a storage location. You can delete a single contact or choose multiple contacts to delete. 1. From a Home screen, tap Contacts. 1. From a Home screen, tap Contacts. Apps > 2. Touch and hold a contact to select it.
Groups Add Contacts to a Group You can use groups to organize your contacts. Your device comes with preloaded groups, and you can create your own. You might create a group for your family, for coworkers, or a team. Groups make it easy to find contacts, and you can send messages to the members of a group. You can add contacts to a group. 1. From a Home screen, tap Contacts. Apps > 2. Tap Groups, and then tap a group. Create a Group 3. Tap Edit > Add member, and then tap the contacts you want to add.
Delete a Group Preset groups cannot be deleted. 1. From a Home screen, tap Contacts. Apps > 2. Tap Groups, and then tap the group to delete. 3. Tap More > Delete. 4. Tap Group only to only delete the group or tap Group and members to delete the group and the contacts in the groups. Contacts Settings These settings allow you to modify settings associated with using the Contacts app. 1. From a Home screen, tap Contacts. Apps > 2. Tap More > Settings. 3. Tap an option and follow the prompts.
Email Use the Email app to view and manage all your email accounts in one app. View Multiple Email Accounts To access Email: 1. From a Home screen, tap Apps > Email. Samsung folder > You can view email you receive for multiple accounts on the Combined inbox screen or you can view email accounts individually. ►► From a Home screen, tap Apps > Email. Samsung folder > 2. Tap Menu at the top left of the screen to view the current account mailbox. 3.
Create and Send an Email Email Settings This section describes how to create and send an email using the Email app. These settings allow you to modify settings associated with using the Email app. 1. From a Home screen, tap Apps > Email > Compose. Samsung folder > 1. From a Home screen, tap Apps > Email. Samsung folder > 2. Tap the To field to manually add an email address or tap Add Recipient to select a recipient from Contacts or Groups. 2. Tap More > Settings.
Galaxy Apps Samsung Galaxy Apps provides a quick and easy way to find and download free premium apps that are compatible with your Galaxy device. To access the Samsung Galaxy Apps website: ►► From a Home screen, tap Apps > Samsung folder > Galaxy Apps. Galaxy Essentials Galaxy Essentials is a collection of specially chosen apps available through Samsung Apps. From Galaxy Essentials, you can access and download a collection of premium content, free of charge. To access Galaxy Essentials: 1.
Gallery View, edit, and manage pictures and videos. Play Videos Note: Some functions described in this section are only available if there are images or videos in the Gallery. 1. From a Home screen, tap View Images and Videos 4. Tap You can play videos stored on your device. Apps > 3. Tap a video to view it. You can trim segments of a video. 1. Select a video, and then tap the screen once to see the video options. Gallery. 2. Tap Edit, and then tap Trim. 3.
Edit Images Delete Images and Videos You can edit images stored on your device. You can delete images stored on your device. ►► While viewing an image, tap the screen once to see the following options: 1. From a Home screen, tap Apps > Gallery. 2. Tap a folder to open it. • Auto adjust: Apply adjustments determined by built-in correction software. 3. Tap More > Edit. • Share: Send the image to your contacts by email, messaging, social media, cloud accounts, or other methods. 4.
Internet Access the Internet with a fully‑featured web browser. Browser Tabs Access the Internet To open a new tab: Use tabs to view multiple web pages at the same time. ►► Tap ►► From a Home screen, tap Apps > Internet. Samsung folder > To close a tab: 1. Tap Command Keys 2. Tap The following command keys are available: • • • • Back or Forward: Go forward to a recent page. Bookmarks: Manage bookmarked pages, saved pages, and history. • Refresh: Refresh or reload the current Web page.
Saved Pages To turn off Secret mode: Saving a web page stores the web page content on your device so that you can access it offline. 1. From a Home screen, tap Apps > Internet. Samsung folder > 2. Tap To save the current web page: 3. Tap Turn off secret. ►► Tap More > Save web page. Internet Settings To view saved web pages: 1. Tap Bookmarks > Saved pages. These settings allow you to modify settings associated with using the Internet app. 2. Tap a saved page to open it in the browser. 1.
Memo Browse Memos Use Memo to write and save notes on your device. You can browse Memos you create. ►► From a Home screen, tap Compose a Memo • • You can create Memos using the Memo app. 1. From a Home screen, tap Apps > Memo. • Memo. Browse memo entries by swiping up or down. To search for a memo, tap Search. Memo Options 2. Tap Create memo and type a memo. Available options include: • • • • Apps > You can edit, share, or manage Memos. Category: Add or change the category. 1.
Messages Create and Send Messages Learn how to send and receive different messages using the Samsung Messages app on your device. This section describes how to create and send a message using the Messages app. 1. From a Home screen, tap Messages. 2. Tap Types of Messages Apps > Compose. 3. Tap the Enter recipients field to manually enter Add Recipient to select a a recipient or tap recipient from your Contacts. You can also select the recipient based on Groups, Favorites, or Logs.
View New Messages Messages Settings When you receive a new message, New message appears on the Status bar. Configure the settings for text messages, multimedia messages, push messages, and more. To view the message: ►► From a Home screen, tap Apps > Messages > More > Settings. ►► Open the Notification panel and tap the message. For more information, see Notification Panel.
My Files My Files Options Access files stored on your device, including images, videos, music, and sound clips. Use My File options to search, edit, clear file history, and more. ►► From a Home screen, tap Apps > My Files. The following Samsung folder > options are available: To view files in My Files: 1. From a Home screen, tap Apps > My Files. Samsung folder > • • 2. Tap a category to view the relevant files or folders. Search: Search for a file or folder.
S Health Use S Health to plan, track, and manage your health goals and activities, including exercise, sleep, and meals. • A heart murmur or a rapid or pronounced heartbeat; • Muscle pain when walking upstairs or up a hill that goes away when you rest.
S Voice Speak commands to perform operations on your device, and to speak criteria for searches and other operations. Access S Voice You can access S Voice from the Apps list. 1. From a Home screen, tap Apps > Samsung folder > S Voice. 2. Speak a command. 3. Tap Microphone if the device does not hear you, or to give it another command. Tip: Tap Help for example commands. S Voice Settings These settings allow you to modify settings associated with using the S Voice app. 1.
Samsung Pay Samsung Pay is the new way to pay with your Samsung Galaxy device. It is simple, secure and works in more stores than any other mobile payment service. Simple Pay Samsung Pay is accepted almost anywhere you can swipe or tap your credit card. 2. Tap More > Settings > Use Simple Pay. Access Samsung Pay from the Screen off, Lock Screen or Home screen using Simple Pay. To customize Simple Pay: 1. From a Home screen, tap Apps > Samsung Pay. Samsung folder > 3.
Use Gift Cards with Samsung Pay Purchase, send, and redeem gift cards from an expanding selection of your favorite retailers. To view the list of supported retailers: 1. Visit samsung.com/us/samsung-pay. 2. Scroll down to “Gift cards now available on Samsung Pay” and click the link. Secure Your Information Samsung Pay is designed with the latest security technology and works on most recent Samsung Galaxy devices.
Settings Configure your device’s connections and settings, add accounts, and customize Home screens, apps, and features.
How to Use Settings Access Settings Customize Quick Settings There are a couple of ways to access your device settings. Quick settings are the settings that you are most likely to frequently use. When you first access the Settings menu, the Quick settings are set to a default list of settings. ►► From a Home screen, tap Settings. Apps > – or – To edit the Quick settings list: Drag down from the Status bar to display the Notification panel, and then tap Settings. 1. From a Home screen, tap Settings.
Wi‑Fi Wi‑Fi Networks Wi-Fi is a term used for certain types of Wireless Local Area Networks (WLAN). Wi-Fi communication requires access to a wireless Access Point (AP). To scan for a Wi-Fi network and connect to it: 1. From a Home screen, tap > Connections. Turn Wi‑Fi On or Off Turning Wi‑Fi on makes your device able to discover and connect to compatible in-range wireless APs. Apps > Settings 2. Tap Wi-Fi, and then tap On/Off to turn Wi-Fi on. • 1. From a Home screen, tap > Connections.
Wi-Fi Options Wi-Fi Direct The Wi-Fi settings menu allows you to set up many of your device’s advanced Wi-Fi services. Wi-Fi Direct allows direct device‑to-device connections using Wi-Fi, without having to connect to a Wi-Fi network. 1. From a Home screen, tap > Connections. Apps > Settings 1. From a Home screen, tap > Connections. 2. Tap Wi-Fi, and then tap On/Off to turn Wi-Fi on. • • • Settings 2. Tap Wi-Fi, and then tap On/Off to turn Wi-Fi on. 3.
Bluetooth Scan for Bluetooth Devices Bluetooth is a short-range communications technology that connects your device wirelessly to a number of Bluetooth devices, such as headsets and hands-free car Bluetooth systems, and Bluetooth-enabled computers, printers, and wireless devices. When you want to pair with another Bluetooth device, you can scan for nearby devices that are visible. 1. From a Home screen, tap > Connections. Apps > Settings 2. Tap Bluetooth, and then tap On/Off to turn on Bluetooth.
Note: Due to different specifications and features of other Bluetooth-compatible devices, display and operations may be different, and functions such as transfer or exchange may not be possible with all Bluetooth compatible devices. Rename a Paired Device Once you have paired your device to another device, you can rename the paired device to make it easier to recognize. 1. From a Home screen, tap > Connections. Apps > Settings 2. Tap Bluetooth, and then tap On/Off to turn on Bluetooth. 3.
Airplane Mode Airplane mode disconnects your device from all networks and turns off connectivity features, such as phone calls and Wi-Fi. While in Airplane mode, you can use other features such as playing music, watching videos, and other offline applications. Enable Airplane Mode To enable or disable Airplane mode: 1. From a Home screen, tap > Connections. Apps > Settings 2. Tap Airplane mode, and then tap On/Off to enable or disable the option.
Mobile Hotspot and Tethering Use Mobile hotspot and Tethering to share your device’s Internet connection with other devices. Allowed Devices List Enable Mobile Hotspot Note: Using your device as a Mobile hotspot consumes battery power and uses data service. While Mobile hotspot is active, your device’s applications use the Mobile hotspot data service. Roaming while using your device as a Mobile hotspot incurs extra data charges.
Configure Mobile Hotspot Settings Timeout Settings Automatically turn off Mobile hotspot if there are no connected devices. Manage your Mobile hotspot security and connecting settings. 1. From a Home screen, tap > Connections. Apps > 1. From a Home screen, tap > Connections. Settings 3. Tap More > Timeout settings, and then select an interval. 3. Tap More > Configure mobile hotspot for the following settings: • Wi‑Fi Sharing Network name: View and change the name of your Mobile hotspot.
Data Usage Monitor how your data is being used, and set limits and restrictions to conserve it. Note: Your service provider may account for data usage differently. 1. From a Home screen, tap > Connections. Apps > Settings 2. Tap Data usage for options: • Data usage cycle: Tap the drop-down menu, and then choose a time period for data usage. Data usage for the period is displayed on the graph, along with usage by application at the bottom of the screen. • • Mobile data: Enable mobile data.
Mobile Networks Control your device’s access to networks and mobile data service. 1. From a Home screen, tap > Connections. Apps > Settings 2. Tap Mobile networks for options: • Mobile data: Allow your device to connect to a mobile data network. • International data roaming: Allow your device to connect to data services while roaming. Significantly higher charges may result. • • Access Point Names: Choose or add APNs. Network operators: Choose available and preferred networks.
NFC and Payment Tap and Pay NFC (Near Field Communication) allows data exchange when you touch your device with another compatible device. This is used for features like Android Beam. Tap and pay allows you to select the default payment application you want to use for making purchases on your device. 1. From a Home screen, tap > Connections. Apps > Settings 2. Tap NFC and payment. Enable NFC 3. Tap On/Off to turn NFC on. Activate NFC to allow your device to exchange data with other NFC devices. 4.
More Connection Settings MirrorLink The More connection settings allow you to configure a variety of connectivity settings for your device. Mirror your device’s display on your car’s entertainment and information screen using a USB connection. Note: To use this feature, your car system must support MirrorLink. Nearby Device Scanning To turn on MirrorLink: Scan for nearby devices to connect to and set them up easily. You receive a notification when there are available devices to connect to. 1.
Connect to a VPN Reset Network Settings To connect to a VPN: You can reset Wi-Fi, Mobile data, and Bluetooth settings with Reset network settings. 1. From a Home screen, tap > Connections. Apps > Settings 1. From a Home screen, tap > Connections. 2. Tap More connection settings > VPN. Apps > Settings 2. Tap More connection settings > Reset network settings. 3. Tap the VPN, enter your log in information, and tap Connect. 3. Tap Reset settings, and confirm when prompted.
Sounds and Vibration Adjust the Volume Configure the sounds and vibrations used to indicate notifications, screen touches, and other interactions. Set the system volume level and default volume for call ringtones, notifications, and other audio. Tip: You can also set the Ringtone volume from a Home screen by pressing the Volume key. Apps > Settings Change the Sound Mode 1. From a Home screen, tap > Device.
Select a Default Vibration Pattern Do Not Disturb Choose from preset vibration patterns or create your own pattern. This setting allows you to block all notifications and alerts. The options below determine what notifications can make sounds, and during what time periods you want to enter this mode. 1. From a Home screen, tap > Device. Apps > Settings 2. Tap Sounds and vibration > Vibration pattern. To activate Do not disturb mode: 3. Tap a pattern to preview and select it. 1.
System Sounds Sound Quality and Effects Set various other system sound options. You can enable sound effects when connected to a headset. 1. From a Home screen, tap > Device. Apps > Settings Note: Sound effects are only available when headphones or a compatible Bluetooth headset (not included) is connected. 2. Tap Sounds and vibration, and tap to enable each option: Choose from advanced sound options to customize your audio experience.
Notifications Select which apps you want to receive alerts from. Alerts include notifications, sounds, and vibrations. 1. From a Home screen, tap > Device. Apps > Settings 2. Tap Notifications. 3. Tap On/Off next to an app to enable or disable notifications. • Tap Advanced to configure more notification options for individual apps.
Display Enable Icon Backgrounds Configure your display’s brightness, screen timeout delay, and other display settings. You can show icons with a shaded background to make them stand out on the Home screen and Apps list screen. 1. From a Home screen, tap > Device. Adjust the Screen Brightness Apps > Settings 3. Customize options under Brightness: Icons with backgrounds: Show icons with shaded backgrounds. • Icons only: Show icons only.
Always On Display Screen Mode Choose an image or information to display instead of turning off the screen. Choose a screen mode to match your type of viewing. Note: To turn this feature on or off without going to Settings, double tap the screen while it is turned off or while the selected image or information is displayed. 1. From a Home screen, tap > Device. 1. From a Home screen, tap > Device. Apps > • 2. Tap Display > Always on display. 3.
Keep Screen Turned Off Prevent the screen from turning on accidentally while the device is in a dark place, such as a pocket or bag. 1. From a Home screen, tap > Device. Apps > Settings 2. Tap Display. 3. Tap On/Off next to Keep screen turned off to enable this feature. Screensaver The Screensaver setting controls what is displayed on the screen when the device is docked (dock not included) or while charging. You can choose to display colors or display photos. 1. From a Home screen, tap > Device.
Advanced Features Other Features Configure features on your device that make it easier to use. Configure other useful features. For example, you can control certain device actions by picking up the device and by touching the screen with the palm of your hand or turning over the device. Manage Game Features 1. From a Home screen, tap > Device. Manage useful features while you play games. 1. From a Home screen, tap > Device. Apps > Settings Apps > Settings 2. Tap Advanced features. 3.
Applications Settings Manage settings for applications on your device. Manage Apps You can view and update information about an application, including memory usage, default settings, and permissions. Application Manager 1. From a Home screen, tap > Device. You can download and install new applications on your device. Use Application manager settings to manage your downloaded and preloaded applications. 3. Tap an application to view and update information about the application.
Default Applications Application Settings If you have multiple applications of the same type, such as email apps, you can select one app to be the default. Shortcuts to the settings for various apps are available in one convenient location. 1. From a Home screen, tap > Device. You can also use a simpler Home screen that provides an easier user experience for first-time smartphone users. 1. From a Home screen, tap > Device. Apps > 3.
Wallpaper Change the look of the Home and Lock screens with wallpaper. You can display a favorite picture or choose from preloaded wallpapers. To change wallpaper: 1. From a Home screen, tap > Personal. Apps > Settings 2. Tap Wallpaper. 3. Tap Home screen, Lock screen, or Home and lock screen. 4. Tap an image to preview it, and then tap Set as wallpaper. • Tap Wallpaper motion effect to allow the wallpaper to shift slightly as you move the device. • Tap From Gallery for additional wallpapers.
Themes Set the theme to be applied to your Home and Lock screens, wallpapers, and app icons. You can apply a theme to your Home or Lock screen. 1. From a Home screen, tap > Personal. Apps > Settings 2. Tap Themes. • Tap a theme to view a preview of various screens. • Tap More themes to download additional themes from the Theme Store with your Samsung account. 3. Tap Apply to apply the selected theme.
Home Screen Settings Customize your Home screen by adding application shortcuts, widgets, folders, and using wallpapers. To customize Home screen: ►► From a Home screen, tap Apps > > Personal > Home screen. Settings - or From a Home screen, either tap and hold an empty space on a screen or pinch the screen. For more information, see Home Screen.
Lock Screen and Security Secure your device and protect your data with Lock Screen and Security settings. 5. Choose a screen lock option: Set a Screen Lock It is recommended that you secure your device using a Screen lock. 1. From a Home screen, tap > Personal. Apps > Settings • Info and app shortcuts: Display a dual clock, or information such as the weather, on the Lock screen. • Notifications on lock screen: Show notifications on the Lock screen.
Register a Fingerprint Find My Mobile You can register up to three fingerprints. A password is also set up as an alternative to your fingerprint. Protect your device from loss or theft allowing your device to be locked, tracked, and for your data to be deleted remotely. 1. From a Home screen, tap > Personal. Apps > Settings ►► To access your device remotely, visit findmymobile.samsung.com. 2. Tap Lock screen and security > Fingerprints.
Protect Encrypted Data SIM Card Lock Require a numeric PIN or password to decrypt your device each time you power it on. Require both your SIM card PIN and your ordinary screen lock type when unlocking the device. 1. From a Home screen, tap > Personal. Apps > 1. From a Home screen, tap > Personal. Settings Apps > Settings 2. Tap Lock screen and security > Other security settings > Set up SIM card lock and follow the prompts. 2.
Device Administration Advanced Security Settings Manage your device administrators and application installation privileges. Use these options to configure advanced security settings. 1. From a Home screen, tap > Personal. Apps > Settings 1. From a Home screen, tap > Personal. 2. Tap Lock screen and security > Other security Settings > Device administrators. • Apps > Settings 2.
Privacy and Safety Choose from various modes designed to hide personal content from being accessed by anyone else using your device, or to aid you in an emergency. 5. Tap Improve accuracy to use other connections for determining your location: Location Some apps, such as Google Maps, may require one or more location services be turned on for full functionality. • Bluetooth scanning: Allow apps to scan for and connect to nearby devices automatically through Bluetooth, even when Bluetooth is turned off.
App Permissions Report Diagnostic Info Control which apps have permissions to use certain features of your device. This feature sends diagnostic information about your device when you are having technical problems. 1. From a Home screen, tap > Personal. Apps > Settings 1. From a Home screen, tap > Personal. 2. Tap Privacy and safety > App permissions. Settings 2. Tap Privacy and safety > Report diagnostic info. 3.
Easy Mode Switch between the default screen layout and a simpler layout. The Easy mode layout has larger text and icons, making for a more straightforward visual experience. To enable Easy mode: 1. From a Home screen, tap > Personal. Apps > Settings 2. Tap Easy mode. 3. Tap Easy mode to enable this feature. • When Easy mode is enabled, you can swipe down the page and select which apps you want to display on the Home screens. 4. Tap the apps you want to add or remove. 5. Tap Done to save your settings.
Accessibility Accessibility services are special features that make using the device easier for those with certain physical disabilities. • • Font size: Set the font size. • High contrast keyboard: Adjust the size of the Samsung keyboard and change its colors to increase the contrast between the keys and the background. • Show button shapes: Show buttons with shaded backgrounds to make them stand out. • Magnifier window: Magnify content shown on the screen.
• Left/right sound balance: Use the slider to set the left and right balance when using a stereo device. • Mono audio: Switch audio from stereo to mono for use with one earphone. Dexterity and interaction • Universal switch: Control your device with your customized switches. • Assistant menu: Improve the device accessibility for users with reduced dexterity. • Easy screen turn on: Wake up your device by waving your hand over the sensor.
Accounts Account Settings Set up and manage accounts, including your Google Account, Samsung account, email, and social networking accounts. Each account has its own set of settings. In addition, you can configure common settings for all accounts of the same type. Note: Account settings and available features vary between account types and service providers. Contact your service provider for more information on your account’s settings.
Backup and Reset Reset Back up your data to Google servers. You can also reset your device to its factory defaults. Restore your device to its default settings. Reset Settings You can reset your device to its factory default settings, which resets everything except the security, language, and account settings. Personal data is not affected. Smart Switch Transfer content from your old device to this device. 1. From a Home screen, tap > Personal. Apps > Settings 1. From a Home screen, tap > Personal.
Factory Data Reset You can reset your device to factory defaults, erasing all data from your device. This action permanently erases ALL data from the device, including Google or other account settings, system and application data and settings, downloaded applications, as well as your music, photos, videos, and other files. Any data stored on an external SD card is not affected. Note: When you sign in to a Google Account on your device, Factory Reset Protection is activated.
Language and Input Samsung Keyboard Configure your device’s language and input settings. Configure options for using the Samsung keyboard. 1. From a Home screen, tap > System. Language Apps > Settings 2. Tap Language and input > Language. • English(US): Set the keyboard type: Qwerty keyboard or 3x4 keyboard. • Add input languages: Choose which languages are available on the keyboard. To switch between languages, slide the Space bar sideways.
Google Voice Typing Text-to-Speech Options Speak rather than type your text entries using Google voice typing. Configure your Text-to-Speech (TTS) options. TTS is used for various accessibility features, such as Voice Assistant. For more information, see Accessibility. 1. From a Home screen, tap > System. Apps > Settings 1. From a Home screen, tap > System. 2. Tap Language and input > Google voice typing for options: • Languages: Select languages for Google voice typing.
Battery View how battery power is used for device activities. 1. From a Home screen, tap > System. Apps > Settings 2. Tap Battery for options: • Power saving mode: Save battery power by limiting your device’s performance, limiting vibration feedback, and restricting location services and most background data. • Ultra power saving mode: Save battery power by applying a simplified grayscale theme to your Home screen and limiting the number of usable apps.
Storage View the device memory and usage. Mount, unmount, or format an optional memory card (not included). To increase available memory: 1. From a Home screen, tap > System. Settings 2. Tap Storage. – or – Tap Storage > Internal storage (if an optional SD card is installed). Device Memory View and manage the memory used by the device. 1. From a Home screen, tap > System. Apps > Apps > 3. Tap Cached data to clear cached data for all apps. Settings 4. Tap Delete to confirm. 2. Tap Storage.
Remove a Memory Card Warning: To prevent damage to information stored on the memory card, unmount the card before removing it from the device. 1. From a Home screen, tap Settings > System. Apps > 2. Tap Storage > SD card. 3. Tap Unmount. 4. Insert the removal tool into the hole on the SIM card/Memory card tray, and push until the tray pops out. 5. Remove the memory card from the tray, and slide the tray back into the slot.
Date and Time By default, your device receives date and time information from the wireless network. When you are outside network coverage, you may want to set date and time information manually using the date and time settings. 1. From a Home screen, tap > System. Apps > Settings 2. Tap Date and time. The following options are available: • Automatic date and time: Receive date and time updates from the wireless network.
Help View tips and guidelines for using your device. 1. From a Home screen, tap > System. Apps > Settings 2.
About Device View information about your device, including current status, legal information, hardware and software versions, and more. 1. From a Home screen, tap > System. Apps > Settings 2. Tap About device, and then tap items for more details: • Software update: Check for and install available software updates. • Status: View the status of the battery, network, and other information about your device. • Legal information: View legal notices and other legal information.