BD-C6900 Blu-ray Disc Player user manual imagine the possibilities Thank you for purchasing this Samsung product. To receive more complete service, please register your product at www.samsung.com/register 01945B-BD-C6900-XAC-ENG.
Key features Blu-ray Disc Features Subtitles Blu-ray Discs support the highest quality HD video available in the industry - Large capacity means no compromise on video quality. Furthermore, a Blu-ray Disc has the same familiar size and look as a DVD. Depending on what is contained on the Blu-ray Disc, you may be able to select different font styles, sizes and colors for the subtitles. Subtitles may also be animated, scrolled or faded in and out.
Safety Information 02 Warning CAUTION RISK OF ELECTRIC SHOCK DO NOT OPEN The lighting flash and Arrowhead within the CAUTION: TO REDUCE THE RISK OF ELECTRIC The explanation point within the triangle triangle is a warning sign alerting you of SHOCK, DO NOT REMOVE COVER (OR BACK) is a warning sign alerting you of important dangerous voltage inside the product. NO USER SERVICEABLE PARTS INSIDE. REFER instructions accompanying the product. SERVICING TO QUALIFIED SERVICE PERSONNEL.
Safety Information Precautions Important Safety Instructions Read these operating instructions carefully before using the unit. Follow all the safety instructions listed below. Keep these operating instructions handy for future reference. 1. Read these instructions. 2. Keep these instructions. 3. Heed all warnings. 4. Follow all instructions. 5. Do not use this apparatus near water. 6. Clean only with dry cloth. 7. Do not block any ventilation openings.
Handling Cautions • Do not write on the printed side with a ball-point pen or pencil. • Do not use record cleaning or antistatic sprays. Also, do not use volatile chemicals, such as benzene or thinner. • Do not apply labels or stickers to discs. (Do not use discs fixed with exposed tape adhesive or leftover peeled-off stickers.) • Do not use scratch-proof protectors or covers. • Do not use discs printed with label printers available on the market. • Do not load warped or cracked discs.
Contents Key features 2 2 Blu-ray Disc Features Blu-ray Disc Player Features Safety Information 3 4 4 4 4 Warning Precautions Important Safety Instructions Disc Storage & Management Disc Handling Getting Started 10 10 10 11 11 12 13 13 14 14 15 16 17 18 18 19 19 Before Using the user manual Disc Types and Contents that can be played.
Contents 24 24 27 27 28 Connecting to an Audio System Case 1 : Connecting to an Audio System (HDMI Supported Amplifier) - Best Quality (Recommended) Case 2 : Connecting to an Audio System (7.
Contents Setup 38 38 42 42 42 42 42 43 43 43 43 43 43 44 44 44 Network Setup Network Settings Network Status BD-LIVE Internet Connection Language Security Parental Rating Change Password General Background Front Display Power On/Off Sound Light Effect Support Software Upgrade Contact Samsung Basic Functions 45 45 45 45 45 45 45 46 46 46 46 46 46 46 47 47 47 47 47 48 48 48 48 49 Playing a Disc Playback Disc Structure Using the Disc menu/Title menu/Popup menu Using the Disc Menu Using the Title Menu
Contents 49 49 50 50 50 51 51 51 52 Listening to Music Buttons on the Remote Control used for Music Playback Playing an Audio CD (CD-DA)/MP3 Repeat an Audio CD (CD-DA)/MP3 Playlist Playing back a Picture Playing a JPEG Disc Using the TOOLS button Playing back a USB Storage Device Network Services 53 53 55 56 57 57 57 Using Internet@TV Getting Started with Internet@TV Settings Samsung Apps BD-LIVE™ Software Upgrade Notification Using the AllShare Function Appendix 59 62 63 64 64 65 66 Troubleshooting
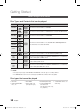
Getting Started Before Using the user manual Disc Types and Contents that can be played. Term Logo Icon h � Z BD-ROM BD-RE/-R DVD-VIDEO Definition This involves a function available on a BD-ROM. This involves a function available on a BD-RE/-R disc recorded in the BD-RE format. This involves a function available on a DVD-VIDEO. DVD-RW(V) DVD-R � DVD+RW This involves a function available on recorded DVD+RW or DVD-RW(V)/DVD-R/+R discs that have been recorded and finalized.
▪ ▪ ▪ ▪ ▪ ▪ Do not allow the disc to become dirty or scratched. Fingerprints, dirt, dust, scratches or deposits of cigarette smoke on the recording surface may make it impossible to use the disc for playback. Discs with PAL programs recorded on them cannot be played using this player. This player is compatible with the NTSC color system only. When a BD-J title is played, loading may take longer than a normal title, or some functions may perform slowly.
Getting Started DVD+R CD-RW/-R • This player can play back a DVD+R disc recorded and finalized with a DVD Video recorder. Ability to play back may depend on recording conditions. • Use a 700MB (80 minute) CD-RW/-R disc. If possible, do not use a 800MB (90 minute) or above disc, as the disc may not play back. • If the CD-RW/-R disc was not recorded as a closed session, you may experience delays when playing back the beginning of the disc or all recorded files may not play.
Container Audio Codec Support Range *.mp3 MP3 MP3 - WMA Compliant with WMA version 10 * Sampling rates (in kHz) - 8, 11, 16, 22, 32, 44.1, 48 * Bit rates - All bitrates in the range 5kbps to 384kbps *.wma WMA AVCHD (Advanced Video Codec High Definition) • This player can playback AVCHD format discs. These discs are normally recorded and used in camcorders. • The AVCHD format is a high definition digital video camera format. • The MPEG-4 AVC/H.
Getting Started Logos of Discs that can be played Blu-ray Disc 3D Blu-ray Disc DTS-HD Master Audio DivX BD-LIVE Dolby TrueHD NTSC broadcast system in U.S.A, Canada, Korea, Japan Java Accessories Check for the supplied accessories below.
03 Front Panel b c d e f Getting Started a g h 1 DISC TRAY Opens to accept a disc. 2 DISPLAY Displays the playing status, time, etc. 3 REMOTE CONTROL SENSOR Detects signals from the remote control. 4 OPEN/CLOSE BUTTON Opens and closes the disc tray. 5 STOP BUTTON Stops disc playback. 6 PLAY/PAUSE BUTTON Plays a disc or pauses playback. 7 POWER BUTTON Turns the player on and off.
Getting Started Front Panel Display a b c d 1 IN DISC INDICATOR Lights when a disc is inserted or played back. 2 CURRENT TIME AND STATUS INDICATOR Displays the play time and the current status. 3 3D DISC INDICATOR Lights when 3D disc is inserted or played back. 4 WIFI INDICATOR Lights when the wireless network is connected. 16 English 01945B-BD-C6900-XAC-ENG.
d Getting Started abc 03 Rear Panel e g f 1 DIGITAL AUDIO OUT (OPTICAL) Connects to a Receiver. 2 LAN Can be used for network based services (See pages 53~58), BD-LIVE and software upgrades using a network connection. 3 HDMI OUT Using an HDMI cable, connect this HDMI output terminal to the HDMI input terminal on your TV for the best quality picture or to your Receiver for the best quality sound. 4 COMPONENT OUT Connects to equipment having component video input. 5 7.
Getting Started Remote Control Tour of the Remote Control Turn the player on and off. To open and close the disc tray. POWER TV POWER BONUSVIEW SOURCE Turn the TV on and off. (To operate your TV, please refer to page 19) After setup, allows you to set the input source on your TV. Press this to use Bonusview function. Press numeric buttons to operate options. Press this to switch the Blu-ray Disc/DVD’s subtitle language.
Button Function TV POWER Used to switch the television on and off. TV SOURCE Used to select an external source connected to the TV. TV VOL (+/–) Used to adjust the volume of the television. TV CH (,/.) Used to select the desired channel. TV MUTE ✎ Used to toggle the sound on and off. NOTE ▪ The functions listed above will not necessarily work on all televisions. If you encounter problems, operate the television directly or using the TV's remote.
Connections Connecting to a TV Case 1 : Connecting to a TV with an HDMI Cable - Best Quality (Recommended) 1. Using an HDMI cable, connect the HDMI OUT terminal on the rear of the player to the HDMI IN terminal of your TV. 2. Turn on the player and TV. 3. Press the input selector on your TV remote control until the HDMI signal from the player appears on your TV screen.
04 Case 2 : Connecting to a TV with a DVI Cable - Best Quality (Recommended) 2. Using the audio cables, connect the AUDIO OUT (red and white) terminals on the rear of the player to the AUDIO IN (red and white) terminals of your TV. Connections 1. Using an HDMI-DVI cable, connect the HDMI OUT terminal on the rear of the player to the DVI IN terminal of your TV. 3. Turn on the player and TV. 4.
Connections Case 3 : Connecting to a TV (Component) - Better Quality - Connecting to your TV using Component video cables. - You will enjoy high quality images with accurate color reproduction. Component video separates the picture element into black and white (Y), blue (PB) and red (PR) signals to present clear and clean images. (Audio signals are delivered through the audio output.) 1.
04 Case 4 : Connecting to a TV (Video) - Good Quality 2. Turn on the player and TV. Connections 1. Using video/audio cables, connect the VIDEO OUT (yellow) / AUDIO OUT (red and white) terminals on the rear of the player to the VIDEO IN (yellow) / AUDIO IN (red and white) terminals of your TV. 3. Press the input selector on your TV remote control until the “VIDEO” signal from the player appears on the TV screen.
Connections Connecting to an Audio System • Please turn the volume down when you turn on the Amplifier. A sudden loud sound may cause damage to the speakers and your ears. • Set the audio output format according to the capabilities of your amplifier. (See pages 34~36) • The position of HDMI terminals may vary depending on the Amplifier. Please refer to the user manual of your Amplifier. Case 1 : Connecting to an Audio System (HDMI Supported Amplifier) - Best Quality (Recommended) 1.
04 Case 2 : Connecting to an Audio System (7.1 Channel Amplifier) - Better Quality 2. Using the video signal cable(s), connect the HDMI, COMPONENT or VIDEO OUT terminals on the rear of the player to the HDMI, COMPONENT or VIDEO IN terminal of your TV. (See pages 20~23) Connections 1. Using the 7.1CH audio cables, connect the 7.1CH ANALOG AUDIO OUT terminals on the rear of the player to the 7.1CH ANALOG AUDIO IN terminals of your amplifier. 3. Turn on the Player, TV and amplifier. 4.
Connections Case 3 : Connecting to an Audio System (Dolby Digital, DTS Amplifier) - Better Quality Case 4 : Connecting to an Audio System (2 Channel Amplifier) - Good Quality 1. Using an optical cable, connect the DIGITAL AUDIO OUT (OPTICAL) terminal on the rear of the player to the DIGITAL AUDIO IN (OPTICAL) terminal of your amplifier. 1. Using audio cables, connect the AUDIO OUT (red and white) terminals on the rear of the player to the AUDIO IN (red and white) terminals of your amplifier. 2.
04 Connecting to the Network Cable Network Connections This player lets you view network based services (See pages 53~58) such as Internet@TV and BD-LIVE, as well as receive software upgrades through a network connection. We recommend using an AP (Access Point) or IP router for the connection. For more information on router connection, refer to the user manual of the router or contact the router manufacturer for technical assistance. 1.
Connections Wireless Network You can connect your player to your network with a Wireless IP sharer. A wireless AP/IP router is required to make a wireless network connection. To set the network options, see pages 38~42. Broadband service Wireless IP sharer Networking with PC for AllShare function (See pages 57~58) ✎ NOTE ▪ To use a wireless network, your player must be connected to a wireless IP sharer.
Setup Initial Settings I On-Screen Language Select a language for the on-screen displays. English Setup 1. Turn on your TV after connecting the player. (When the player is connected to TV for the first time, the player will turn on automatically and display the Initial Settings screen.) 5. Press the ◄► buttons to select the desired Network Settings : Wired, Wireless or PBC (WPS), and then press the ENTER button.
Setup ▪ ▪ Use the HDMI cable to connect the player to an Anynet+(HDMI-CEC)-compliant Samsung TV. If the TV uses a language supported by the player, TV that languagePOWER will be set to POWER a preferred language automatically. BONUSVIEW SOURCE For this to work, the Anynet+(HDMI-CEC) feature should be set to On in both the TV and the player. If the player is left in the stop mode more than 5 minutes without being used, a screen saver appears on your TV.
You can configure various display options such as the TV Aspect, Resolution, etc. ▪ 3D ▪ Select whether to play a Blu-ray Disc with 3D contents in 3D Mode. ▪ Settings ▪ Display 3D 3D Audio System 3D Mode : Auto Network TV Screen Size : 55 inch Language Security General > Move " Select ' Return Support Still Mode : Auto ▪ ▪ 3D Mode • Auto : You can choose whether to watch 3D Blu-ray disc in 3D or 2D mode before playing the 3D Blu-ray.
Setup TV Aspect BD Wise (Samsung Players only) Depending on the type of television you have, you may want to adjust the screen setting. BD Wise is Samsung's latest inter-connectivity feature. When you connect Samsung players with BD Wise to a Samsung TV via HDMI, the optimum resolution is set automatically. • On : The original resolution of the BD/DVD disc is output to the TV. • Off : The output resolution is fixed at the resolution previously set, regardless of the resolution of the disc.
05 Resolution according to the output mode HDMI connected Output Setup Setup • Blu-ray Disc playback HDMI not connected HDMI Mode Component/VIDEO Mode Component Mode VIDEO Mode Auto Optimal Resolution 480i - - 1080p, Movie Frame(24Fs) off 1080p@60F 480i - - 1080p/1080i, Movie Frame(24Fs) on 1080p@24F 480i - - 1080i, Movie Frame(24Fs) off 1080i 480i 1080i 480i 720p 720p 480i 720p 480i 480p 480p 480i 480p 480i 480i - - 480i 480i • DVD playback HDMI connected Outpu
Setup HDMI Format HDMI Deep Color You can optimize the color setting from the HDMI output by selecting a connected device Type. • TV : Select if connected to a TV via HDMI. • Monitor : Select if connected to a Monitor via HDMI. Set to output the picture from the HDMI OUT jack with Deep Color or without. Deep Color allows more accurate color reproduction with deeper color depth. • Auto : The picture is output with Deep Color to the connected TV if it supports HDMI Deep Color.
Connection Bitstream (Audiophile) HDMI Receiver Optical HDMI Receiver or Optical PCM Up to 7.1ch PCM 2ch DTS re-encoded PCM PCM 2ch Dolby Digital Up to 5.1ch PCM 2ch DTS re-encoded Dolby Digital Dolby Digital Up to 7.1ch PCM 2ch DTS re-encoded Dolby Digital Plus Dolby Digital Up to 7.1ch PCM 2ch DTS re-encoded Dolby TrueHD Dolby Digital Dolby Digital Audio Stream Plus on Blu-ray Dolby TrueHD Disc DTS HDMI Receiver Optical Up to 6.
Setup HDMI • If your TV is not compatible with compressed multi-channel formats (Dolby Digital, DTS), the player may output PCM 2ch downmixed audio even though you set Bitstream (either Reencode or Audiophile) on your setup menu. • If your TV is not compatible with PCM sampling rates over 48kHz, the player may output 48kHz downsampled PCM audio even though you set PCM Downsampling to Off. Dynamic Range Control You can listen at low volumes but still hear dialog clearly.
By adjusting the Initial Settings, you can set the language, TV aspect and Network Settings, etc. For more information on the settings, refer to the corresponding section in this user manual. (See pages 29~44) Internet@TV Screen Size Set the Internet@TV Screen to the optimal size. • Size 1: Display smaller application icons. You may see some black on the sides of the screen. • Size 2: Display normal application icons. The image may be too large for your TV screen.
Setup Clock DivX(R) Deactivation Set time-related functions. Select this to get a new registration code. Settings Display Audio System Network Language Security General Support Settings On-Screen ClockMenu : : Clock Mode Disc Menu : Auto : Clock Set Audio : Time Zone Subtitle : GMT + 0:00 DST \ : Off > Move " Enter ' Return • Clock Mode : You can set it to Auto or Manual. If you select Manual, the Clock Set menu is activated while and DST is will be deactivated.
2. Press the ► button, then select Auto or Manual, and then press the ENTER button. Setting Up a Wired Connection - Auto 1. If you selected Auto, the Network Function acquires and fills in the values for IP Address, Subnet Mask, etc., automatically. ✎ NOTE ▪ This process can take up to five minutes. : Auto \ IP Address : 0 0 0 0 Subnet Mask : 0 0 0 0 Gateway : 0 0 0 0 DNS : Auto DNS Server : 0 0 0 > Move 0 1. Right click the Network icon on the bottom right of the screen. 2.
Setup 9. Press the RETURN button on your remote. 10. Run a Network Test to ensure the player has connected to your network (See page 42). Wireless Network You can setup the wireless connection three ways: • Using PBC (WPS) • Using the Auto Network Search function. • Manually. Each method is described below. Setting Up the Wireless Network Connection - PBC (WPS) The easiest way to set up the wireless network connection is using the PBC (WPS) function.
7. Press the ▲▼ buttons to select PIN or Security. For most home networks, you would select Security (for Security Key). 8. On the Security screen, enter your network’s Pass Phrase. ✎ NOTE ▪ You should be able to find the Pass Phrase on one of the set up screens you used to set up your router or modem.
Setup 6. Enter the IP Address, Subnet Mask, and Gateway values. 7. Press the ▼ to go to DNS. ✎ NOTE ▪ What is a valid certificate? 8. Press the ▼ button to go to the first DNS entry field. Enter the numbers as above. 9. When done, press the ▲ button to return to Access Point Selection. Select the network, and then press the ENTER button.
Parental Rating Change Password Off 8 (Adults) 7 6 5 4 3 2 ▼ Change the brightness of the front panel. • Auto : Dim during playback. • Dim : Dim the display window. • Bright : Brighten the display window. Setup Display Audio System Network Language Security General Support 05 Front Display Settings Power On/Off Sound Change Password Play a melody when the player is turned on and off. • On : Turn Power Sound On. • Off : Turn Power Sound Off.
Setup Support Software Upgrade This menu allows you to upgrade software for performance improvements or additional services. You can check the current software version, upgrade using the Internet and set the Auto upgrade notification. If the player is properly connected to the network by cable or wirelessly, the player automatically connects to Samsung's website each time it is turned on and downloads update files if any valid upgrade exists.
Basic Functions Playback 1. Press the OPEN/CLOSE ( open the disc tray. ) button to 2. Place a disc gently into the tray with the disc’s label facing up. 3. Press the OPEN/CLOSE ( close the disc tray. 4. Press the PLAY ( ) button to ) button. STOP ( PAUSE ( ) Starts playback. ) Stops playback. • If you press the button once : The stop position is memorized. • If you press the button twice : The stop position is not memorized. ) Disc Structure The contents of disc are usually divided as below.
Basic Functions Using the Popup Menu Skipping Chapters h 1. During playback, press the POPUP MENU button on the remote control. 2. Press the ▲▼◄► buttons or ENTER button to select the desired menu. ✎ NOTE ▪ Depending on the disc, the menu items may differ or this menu may not be available. Using the Search and Skip Functions During play, you can search quickly through a chapter or track, and use the skip function to jump to the next selection.
hzZy Repeat the disc title or chapter. Depending on the disc, the Repeat function may not be available. 1. During playback, press the REPEAT button on the remote control. 2. Press the ▲▼ buttons to select Chapter or Title, then press the ENTER button. 5. To return to normal play, press the REPEAT button again. 6. Press the ENTER button. ✎ NOTE ▪ If you set point (B) before 5 seconds has elapsed, Basic Functions Repeat the Title or Chapter 4.
Basic Functions Selecting the Audio Language hzZx You can also operate this function by pressing the AUDIO button on the remote control. 1. During playback, press the TOOLS button. 2. Press the ▲▼ buttons to select Audio. 3. Press the ◄► buttons to select the desired audio language. ✎ NOTE ▪ The ◄► indicator will not be displayed on the ▪ ▪ ▪ ▪ ▪ screen if the BONUSVIEW section does not contain any BONUSVIEW audio settings.
• Movie : This is the best setting for watching movies. • User : You user can adjust the sharpness and noise reduction functions respectively. Setting BONUSVIEW ow Buttons on the Remote Control used for Music Playback POWER TV TV POWER POWER BONUSVIEW BONUSVIEW SOURCE SOURCE SUBTITLE SUBTITLE AUDIO AUDIO @ h The BONUSVIEW feature allows you to view additional content (such as commentaries) in a small screen window while the movie is playing.
Basic Functions SKIP button : During playback, moves to the previous page in the Music List or moves to the previous track in the Playlist. If you press this button after three seconds of playback in the Playlist, the current track is replayed from the beginning. But, if you press this button within three seconds after playback starts in the Playlist, the previous track is played. ! NUMBER buttons : During the Playlist playback, press the desired track number. The selected track is played.
G Playing a JPEG Disc 3 files selected 1/2 Page TRACK 003 TRACK 001 TRACK 002 TRACK 003 TRACK 004 TRACK 005 TRACK 006 TRACK 007 TRACK 008 TRACK 009 TRACK 010 1. Insert a JPEG disc into the disc tray. 2. Press the ◄► buttons to select Photos and then press the ENTER button. 00:04:27 00:05:57 00:03:41 00:04:07 3. Press the ▲▼◄► buttons to select the folder you want to play, and then press the ENTER button.
Basic Functions • Zoom : Select if you want to enlarge the current picture. (Enlarged up to 4 times) • Rotate : Select if you want to rotate the picture. (This rotates the picture either clockwise or counter clockwise.) • Information : Shows the picture information including the name and size, etc. ✎ NOTE ▪ To enable the Background Music function, both 5. Press the ▲▼ buttons to select USB, then press the ENTER button. 6.
Network Services 1. Connect the player to the network. (See pages 27~28) Internet@TV at a Glance 2. Configure the network settings. (See pages 38~42) 1 2 3 Network Services Check the following instructions before using any network service. 4. After you have signed off on the service agreement, the Internet@TV service starts updating. It takes several minutes. When the update is complete, you will see the Internet@ TV menu screen.
Network Services Using the Keypad Through your remote, you can use the On-Screen Keypad in several Internet@TV applications to enter text. Pressing the SUBTITLE button on the remote while you are using the Screen Keypad lets you change the text fields to lower case, upper case, numbers and icons. 12. Press buttons on the remote to input the rest of ‘Challenger Rd., Ridgefield Park NJ’. 13. Press the ENTER button. 14. The map and address appear on the screen.
System Setup 1. Press the ▲▼◄► buttons to select the desired application and press the RED (A) button. Login User Account : [0~9] Enter PIN ' Cancel 2. Enter the user account and password. Settings Create IDs and configure Internet@TV settings on this screen. Settings System setup Internet@TV ID Service Manager Properties ✎ NOTE ▪ If you forgot your password, press the STOP ( ) button on the front panel of the player for more than 5 seconds with no disc inserted.
Network Services Service Manager Delete and lock applications installed to Internet@ TV. Lock Lock the application. Accessing a locked application requires a password. Delete Using the color buttons with the Samsung Apps • RED (A) (Login) : To log in to the internet service. • GREEN (B) (Thumbnail View) : To change the view mode. • BLUE (D) (Sort By) : To sort the applications by Featured, Most Downloaded, Most Recent or Name.
Using the AllShare Function Once the player is connected to the network, you can enjoy various movie-related service contents using a BD-LIVE compliant disc. AllShare lets you play music, video and photo files in your PC using the player. To use AllShare, you must connect the player to your PC via the network (See pages 27~28) and install the SAMSUNG PC Share Manager on the PC. To install and use Share Manager, follow these steps. 2. Insert a Blu-ray disc that supports BD-LIVE. 3.
Network Services 8. To select a device, use the RED (A) or BLUE (D) button to select a file to play. (For playing back Video, Music or Photos files, see pages 45~52.) AllShare Program at a Glance 6 1 SAMSUNG PC Share Manager File Share Server You Tube internet radio service Please activate Internet@TV to enjoy a variety of Internet Services. a Change Device d View Devices Size ▪ ▪ ▪ ▪ ▪ ▪ 58 Kind File Folder 2 File Folder 3 File Folder Folder 1 Full Path C: Document and settin..
Appendix 08 Troubleshooting PROBLEM Appendix Before requesting service, please check the following. SOLUTION No operation can be performed with the remote control. • Check the batteries in the remote control. They may need replacing. • Operate the remote control at a distance of no more than 20 feet. • Remove batteries and hold down one or more buttons for several minutes to drain the microprocessor inside the remote control to reset it. Reinstall batteries and try to operate the remote control again.
Appendix PROBLEM SOLUTION Forgot password • Press the STOP ( ) button (on the front panel) for more than 5 seconds with no disc inside. All settings including the password will revert to the factory settings. Don't use this unless absolutely necessary. • When the factory default settings are restored, all the user data stored in the BD data will be deleted. If you experience other problems.
SOLUTION 08 PROBLEM I cannot connect to the BD-LIVE server. • Check whether the network connection is successful or not by using Network Test menu. (See page 42) • Check whether a USB memory device is connected to player or not. • The memory device must have at least 1GB of free space to accommodate the BD-LIVE service. You can check the available size in BD Data Management. (See page 37) • Please check whether the BD-LIVE Internet Connection menu is set to Allow (All).
Appendix Index J A Accessories Ad-hoc Anynet+ (HDMI-CEC) Audio Language AllShare 14 28 37 48 57~58 B 51 M Movie Frame (24F) MP3 34 50~51 32 37 57 49 51 Network Setup 38~42 32~33 C Component Cable Network Camera Angle 22 27 48 PCM Downsampling Popup Menu Picture Setting 52 W 28, 40 Z Zoom P 32 45 47~49 U Wireless Network O Optimal Resolution TV Aspect Title Menu Tools Menu USB Storage Device N BD Wise BD Data Management BD-LIVE BONUSVIEW Background Music 52 35 46 48~49 R D Digita
4 Ibs Dimensions 17 (W) × 8.1 (D) × 1.7 (H) inches Operating Temperature Range +41°F to +95°F Operating Humidity Range 10 % to 75 % BD (Blu-ray Disc) Reading Speed : 4.917m/sec DVD (Digital Versatile Disc) Disc CD : 5 inches (COMPACT DISC) CD : 3 1/2 inches (COMPACT DISC) Composite Video Video Output Component Video Video/Audio HDMI Appendix General Weight 08 Specifications Reading Speed : 3.49 ~ 4.06 m/sec. Approx. Play Time (Single Sided, Single Layer Disc) : 135 min. Reading Speed : 4.
Appendix Compliance and Compatibility Notice NOT ALL discs are compatible • Subject to the restrictions described below and those noted throughout this Manual, including the Disc Type and Characteristics section of this user manual, disc types that can be played are: pre-recorded commercial BD-ROM, DVD-VIDEO, and Audio CD (CD-DA) discs; BD-RE/-R, DVD-RW/-R discs; and CD-RW/-R discs. • Discs other than the above cannot and/or is not intended to be played by this player.
08 Appendix • Many Blu-ray Disc/DVD discs are encoded with copy protection. Because of this, you should only connect your Player directly to your TV, not to a VCR. Connecting to a VCR results in a distorted picture from copy-protected Blu-ray Disc/DVD discs. • This product incorporates copyright protection technology that is protected by U.S. patents and other intellectual property rights.
Appendix License • Manufactured under license from Dolby Laboratories. “Dolby” and the double-D symbol are trademarks of Dolby Laboratories. • Manufactured under license under U.S. Patent #’s: 5,451,942; 5,956,674; 5,974,380; 5,978,762; 6,226,616; 6,487,535; 7,212,872; 7,333,929; 7,392,195; 7,272,567 & other U.S. and worldwide patents issued & pending. DTS and the Symbol are registered trademarks, & DTS-HD, DTS-HD Master Audio, and the DTS logos are trademarks of DTS, Inc. Product includes software.
LIMITED WARRANTY TO ORIGINAL PURCHASER Samsung Electronics Canada Inc.(SECA), warrants that this product is free from defective material and workmanship. SECA further warrants that if this product falls to operate properly within the specified warranty period and the failure is due to improper workmanship or defective materials, SECA will repair or replace the product at its option. All warranty repairs must be performed by a SECA Authorized Service Center.
Contact SAMSUNG WORLD WIDE If you have any questions or comments relating to Samsung products, please contact the SAMSUNG customer care center. Area Contact Center Web Site ` North America Canada 1-800-SAMSUNG (726-7864) www.samsung.com Mexico 01-800-SAMSUNG (726-7864) www.samsung.com U.S.A 1-800-SAMSUNG (726-7864) www.samsung.com ` Latin America Area Contact Center Web Site Switzerland 0848 - SAMSUNG (7267864, www.samsung.com/ch www.samsung.com/ CHF 0.
HEADQUARTERS Samsung Electronics Canada Inc., 55 Standish Court Mississauga, Ontario L5R 4B2 Canada TEL: 1-800-SAMSUNG (1-800-7267864) www.samsung.com/ca AK68-01945B 01945B-BD-C6900-XAC-ENG.
BD-C6900 Lecteur de disque Blu-ray guide d'utilisation imaginez les possibilités Merci d'avoir acheté ce produit Samsung. Profitez de tous les avantages offerts par notre service intégral ! Enregistrez votre produit dès aujourd’hui sur le portail www.samsung.com/register et sélectionnez Enregistrement de produit 01945B-BD-C6900-XAC-FRC.
Caractéristiques Principales Caractéristiques des disques Blu-ray Les disques Blu-ray prennent en charge des vidéos HD dont la qualité est la meilleure de l'industrie. La capacité supérieure de ces supports leur assure une absence totale de compromis en termes de qualité. En outre, un disque Blu-ray est de format et d'apparence identiques à ceux d'un DVD. Les caractéristiques suivantes des disques Bluray dépendent du disque et peuvent varier.
Directives de Sécurité 02 Avertissement ATTENTION RISQUE D’ÉLECTROCUTION NE PAS OUVRIR L’éclair et la flèche inclus dans le triangle représentent un avertissement à l’égard de tensions dangereuses se trouvant à l’intérieur du produit. ATTENTION : AFIN DE RÉDUIRE LES RISQUES DE CHOCS ÉLECTRIQUES, NE PAS RETIRER LE COUVERCLE (OU LE PANNEAU ARRIÈRE). L'APPAREIL NE CONTIENT PAS DE PIÈCES EXIGEANT UN ENTRETIEN DE LA PART DE L’UTILISATEUR. CONFIER L’ENTRETIEN À UN PERSONNEL QUALIFIÉ.
Directives de Sécurité Consignes de précautions Consignes de sécurité importantes Lisez attentivement ces directives de fonctionnement avant d’utiliser l’appareil. Observez toutes les consignes de sécurité énumérées plus bas. Conservez ces directives d’opération en vue d’une consultation ultérieure. 1. 2. 3. 4. 5. 6. 7. 8. 9. 10. 11. 12. Lisez ces directives. Conservez ces directives. Tenez compte de tous les avertissements. Suivez toutes les directives.
Précautions de manipulation • N'écrivez pas sur la face imprimée avec un stylo à bille ou un crayon. • N'utilisez pas de liquides de nettoyage pour disques de vinyle en aérosol ou d'antistatiques. Évitez également d'utiliser des produits chimiques volatiles, tels que le benzène ou un solvant. • N'apposez pas d'étiquettes ou d'autocollants sur les disques. (N'utilisez pas des disques réparés avec du ruban adhésif ou contenant des restes d'autocollants.
Table des Matières Caractéristiques Principales 2 2 Caractéristiques des disques Blu-ray Caractéristiques du lecteur Directives de Sécurité 3 4 4 4 4 Avertissement Consignes de précautions Consignes de sécurité importantes Rangements et gestion des disques Manipulation des disques Premiers Pas 10 10 10 11 11 12 13 13 14 14 15 16 17 18 18 19 19 Avant de consulter le guide d’utilisation Types de disque et contenu pour la lecture.
24 24 27 27 28 Raccordement à un système audio Cas 1 : Raccordement à un système audio (Amplificateur prenant en charge l'interface HDMI) - Meilleur type de connexion (Recommandé) Cas 2 : Raccordement à un système audio (amplificateur à 7,1 canaux) - Meilleur type de connexion Cas 3 : Raccordement à un système audio (Dolby numérique, amplificateur DTS) - Meilleure qualité Cas 4 : Raccordement à un système audio (amplificateur à 2 canaux) - Bonne qualité Branchement sur le réseau Réseau filaire Réseau sans
Table des Matières Configuration 38 38 42 42 42 42 42 43 43 43 43 43 43 44 44 44 Config.
49 49 50 50 50 51 51 51 52 Écouter de la musique Touches de la télécommande utilisées pour la lecture de plages musicales Lecture d'un CD Audio (CD-DA)/MP3 Lecture en boucle de CD Audio (CD-DA)/MP3 Liste de lecture Lecture d'une image Lecture d’un disque contenant des fichiers JPEG Utilisation de la touche TOOLS Lecture d’un périphérique de stockage USB Services Réseau 53 53 55 56 57 57 57 Utilisation du service Internet@TV Premiers pas avec Internet@TV Paramètres Samsung Apps BD-LIVE™ Mise à niveau du
Premiers Pas Avant de consulter le guide d’utilisation Types de disque et contenu pour la lecture. Terme Logo BD-ROM BD-RE/-R DVD-VIDEO Icône Définition h � Z Cela présuppose une fonction disponible sur un BD-ROM. � Cela présuppose une fonction disponible sur des disques DVD+RW ou DVD-RW(V)/ DVD-R/+R enregistrés et finalisés. Cela présuppose une fonction disponible sur un disque CD-RW/-R audio (format CD-DA).
▪ ▪ ▪ ▪ ▪ ▪ Compatibilité des disques Blu-ray Le disque Blu-ray est un nouveau format toujours en évolution. En conséquence, des problèmes de compatibilité du disque sont possibles. Tous les disques ne sont pas compatibles et tous ne peuvent être lus. Pour plus de renseignements, reportez-vous aussi à la rubrique Avis de conformité et de compatibilité du présent guide. BD-ROM Ce disque Blu-ray ne peut être que lu. Ce lecteur peut lire des disques BD-ROM préenregistrés de type commercial.
Premiers Pas DVD+R CD-RW/-R • Ce lecteur peut lire des disques DVD+R enregistrés et finalisés à l’aide d’un graveur vidéo DVD. La compatibilité de lecture peut dépendre des conditions d’enregistrement. • Utilisez un disque CD-RW/-R de 700Mo(80 minutes). Dans la mesure du possible, éviter d’utiliser des disques de 800Mo(90 minutes) ou d'une capacité supérieure car le lecteur pourrait ne pas les lire.
*.mp3 *.wma Codec audio Plage de compatibilité MP3 - WMA Conforme au format WMA, version 10 * T aux d’échantillonnage (en kHz) - 8, 11, 16, 22, 32, 44.1, 48 * Débits binaires Tous les débits binaires de 5 Kbps à 384 Kbps MP3 WMA Le lecteur et les disques sont codés par région. Ces codes régionaux doivent correspondre pour permettre la lecture du disque. Si les codes ne correspondent pas, le disque ne pourra pas être lu.
Premiers Pas Logo des disques compatibles Disques Blu-ray Disques Blu-ray 3D DTS-HD Master Audio DivX BD-LIVE Dolby TrueHD NTSC système de diffusion aux États-Unis, au Canada, en Corée et au Japon Java Accessoires Vérifiez la présence de tous les accessoires indiqués plus bas.
03 Façade b c d e f Premiers Pas a g h 1 TIROIR DISQUE S’ouvre pour insérer un disque. 2 AFFICHAGE Affiche l’état de la lecture, l’heure, etc. 3 CAPTEUR DE LA TÉLÉCOMMANDE Il détecte tout signal venant de la télécommande. 4 OUVERTURE/FERMETURE Permet d'ouvrir et de fermer le tiroir disque. 5 TOUCHE ARRÊT Permet d'arrêter la lecture du disque. 6 TOUCHE LECTURE/PAUSE Permet de lire un disque ou d’interrompre la lecture. 7 TOUCHE LIMENTATION Turns the player on and off.
Premiers Pas Affichage en façade a b c d 1 TÉMOIN DE DISQUE CHARGÉ S’allume lorsqu’un disque est inséré ou en cours de lecture. 2 TÉMOIN D'HEURE ET D’ÉTAT Affiche l’heure et l'état actuel. 3 TÉMOIN DE DISQUE 3D S’allume lorsqu’un disque 3D est inséré ou pendant la lecture. 4 TÉMOIN WIFI S’allume si l’appareil est connecté à un réseau sans fil. 16 Français 01945B-BD-C6900-XAC-FRC.
d Premiers Pas abc 03 Panneau arrière e g f 1 DIGITAL AUDIO OUT (OPTICAL) Pour raccorder l’appareil à un syntoniseur. 2 LAN Peut servir aux services réseau (Reportez-vous aux pages 53 à 58), à BD-LIVE et aux mises à niveau en utilisant une connexion réseau. 3 HDMI OUT À l’aide d’un câble HDMI, raccordez la borne de sortie HDMI à la borne d’entrée HDMI de votre téléviseur.
Premiers Pas Télécommande Aperçu de la télécommande Pour allumer et éteindre le lecteur. Pour ouvrir et fermer le tiroir disque. POWER TV POWER BONUSVIEW SOURCE Permet d’allumer et d’éteindre le téléviseur. (Pour utiliser votre téléviseur, veuillez vous reporter à la page 19) Après la configuration, vous permet de définir la source d'entrée de votre téléviseur. Appuyez sur cette touche pour accéder à la fonction Bonusview. Appuyez sur les touches numériques pour activer les options.
Touche Fonction Permet d’allumer et d’éteindre le téléviseur. Permet de sélectionner une source TV SOURCE externe connectée au téléviseur. Permet de régler le volume sonore du TV VOL (+/–) téléviseur. Permet de sélectionner la chaîne TV CH (,/.) souhaitée. Permet de désactiver et de réactiver les TV MUTE haut-parleurs. TV POWER ✎ REMARQUE ▪ Les fonctions ci-dessus ne fonctionneront pas nécessairement avec tous les téléviseurs.
Raccordements Raccordement à un téléviseur Cas 1 : Raccordement à un téléviseur à l'aide d’un câble HDMI - Meilleur type de connexion (Recommandé) 1. À l’aide d’un câble HDMI, raccordez la borne HDMI OUT située à l’arrière du lecteur à la borne HDMI IN de votre téléviseur. 2. Allumez le lecteur et le téléviseur. 3. Appuyez sur la touche de sélection d’entrée de la télécommande de votre téléviseur jusqu’à ce que le signal HDMI du lecteur apparaisse à l’écran.
04 Cas 2 : Raccordement à un téléviseur à l’aide d’un câble DVI - Meilleur type de connexion (Recommandé) 2. À l’aide de câbles audio, raccordez les bornes AUDIO OUT (rouge et blanche) situées à l’arrière du lecteur aux bornes AUDIO IN (rouge et blanche) de votre téléviseur. Raccordements 1. À l’aide d’un câble HDMI-DVI, raccordez la borne de sortie HDMI OUT située à l’arrière du lecteur à la borne d’entrée DVI IN de votre téléviseur. 3. Allumez le lecteur et le téléviseur. 4.
Raccordements Cas 3 : Raccordement à un téléviseur (Component) - Meilleure qualité - Raccordement de votre téléviseur à l’aide de câbles vidéo composante. - Vous profiterez d’images de haute qualité aux couleurs précises. La vidéo composante sépare les éléments de l’image en signaux noir et blanc (Y), bleu (PB) et rouge (PR) pour reproduire des images lumineuses et plus claires. (Les signaux audio sont transmis par la sortie audio.) 1.
04 Cas 4 : Raccordement à un téléviseur (Vidéo) - Bonne qualité 2. Allumez le lecteur et le téléviseur. 3. Appuyez sur la touche de sélection d’entrée de la télécommande de votre téléviseur jusqu’à ce que le signal « VIDEO » du lecteur apparaisse à l’écran. • Si vous avez réglé la télécommande pour contrôler votre téléviseur (Reportez-vous à la page 19), appuyez sur la touche TV SOURCE de la télécommande et sélectionnez la source externe du téléviseur. Raccordements 1.
Raccordements Raccordement à un système audio • Veuillez baisser le volume avant d'allumer l'amplificateur. Un son fort et soudain peut endommager vos enceintes acoustiques et votre ouïe. • Veuillez régler les paramètres audio à l'aide de l'écran de menu en fonction de l'amplificateur. (Reportez-vous aux pages 34 à 36) • La position des bornes HDMI peut varier en fonction de l’amplificateur. Veuillez vous reporter au guide d'utilisation de votre amplificateur.
2. Utilisez le(s) câble(s) du signal vidéo et connectez les bornes HDMI, COMPONENT ou VIDEO OUT situées à l’arrière du produit respectivement aux bornes HDMI, COMPONENT ou VIDEO IN de votre téléviseur. (Reportez-vous aux pages 20 à 23) Raccordements 1. Utilisez des câbles audio 7,1 canaux pour relier les bornes 7.1CH ANALOG AUDIO OUT à l’arrière du produit aux bornes 7.1CH ANALOG AUDIO IN de votre amplificateur.
Raccordements Cas 3 : Raccordement à un système audio (Dolby numérique, amplificateur DTS) - Meilleure qualité Cas 4 : Raccordement à un système audio (amplificateur à 2 canaux) - Bonne qualité 1. Si vous utilisez un câble optique, raccordez la borne de sortie numérique DIGITAL AUDIO OUT (OPTICAL) située à l'arrière du lecteur à la borne d’entrée DIGITAL AUDIO IN (OPTICAL) de votre amplificateur. 1.
04 Branchement sur le réseau Raccordements Ce lecteur vous permet d'afficher les services réseau (Reportez-vous aux pages 53 à 58) comme Internet@TV et BD-LIVE, de même qu’aux mises à niveau de logiciels à partir d’une connexion réseau. Nous vous recommandons d’utiliser un point d’accès ou un routeur IP pour le réseau. Pour de plus amples renseignements sur la connexion au routeur, reportez-vous au Guide d’utilisation du routeur ou contactez le fabricant du routeur pour obtenir de l’assistance technique.
Raccordements Réseau sans fil Vous pouvez connecter votre lecteur au réseau à l’aide d’un répartiteur IP sans fil. Un point d’accès ou un routeur IP sans fil est requis pour établir une connexion réseau sans fil. Pour configurer les options réseau, reportez-vous aux pages 38 à 42.
Configuration Initial Settings I On-Screen Language Select a language for the on-screen displays. English Français Deutsch Español Italiano Nederlands Svenska > Move " Select Configuration 1. Allumez votre téléviseur après avoir connecté le lecteur. (Lorsque le lecteur est raccordé à un téléviseur pour la première fois, le lecteur s’allume automatiquement et l’écran de paramétrage initial s’affiche.) 5.
Configuration ▪ ▪ Utilisez le câble HDMI pour brancher le lecteur à un téléviseur Samsung conforme à la norme Anynet+ (HDMI-CEC). Si le téléviseur utilise une langue prise en charge par le lecteur, la langue sera automatiquement TV POWER POWER configurée comme langue préférée. Pour ce faire, la fonction Anynet+ (HDMI-CEC) doit SOURCE toutefois êtreBONUSVIEW réglée à Oui sur le téléviseur et sur le lecteur.
Il vous est possible de régler plusieurs options d’affichage comme le format d’image, la résolution, etc. ▪ 3D ▪ Sélectionnez le mode 3D si vous souhaitez la lecture du disque Blu-ray avec un contenu 3D.
Configuration Format écran BD Wise (lecteurs Samsung seulement) Vous pourriez souhaiter régler l’écran en fonction du type de téléviseur que vous possédez. BD Wise est la fonctionnalité d’interconnectivité de Samsung la plus récente. Lorsque vous branchez différents lecteurs Samsung dotés de la technologie BD Wise par l’intermédiaire de l'interface HDMI, la résolution optimale est automatiquement réglée. • Oui : La résolution d’origine du disque BD/DVD est restituée par le téléviseur.
05 Résolution en fonction du mode de sortie Configuration HDMI raccordé Sortie HDMI non raccordé Mode HDMI Mode Composant/VIDÉO Mode Composant Mode VIDÉO Auto Résolution optimale 480i - - 1080p, Cadre vidéo (24Fs) Non 1080p@60F 480i - - 1080p/1080i, Cadre vidéo (24Fs) Oui 1080p@24F 480i - - 1080i, Cadre vidéo (24Fs) Non 1080i 480i 1080i 480i 720p 720p 480i 720p 480i 480p 480p 480i 480p 480i 480i - - 480i 480i Configuration • Lecture du disque Blu-ray • Lecture
Configuration Format HDMI Couleur intense HDMI Il vous est possible d’optimiser les réglages de la couleur de la sortie HDMI en sélectionnant un type de périphérique connecté. • TV : À sélectionner pour un raccordement HDMI avec un téléviseur. • Ecran : À sélectionner pour un raccordement HDMI avec un moniteur. Permet de régler l’image de la prise HDMI OUT avec des couleurs intenses ou pas. Le mode Couleur intense vous permet d’apprécier des images d’une reproduction de couleur foncée.
Bitstream (Re-encode) PCM Récepteur HDMI Bitstream (Audiophile) Récepteur HDMI ou optique Récepteur HDMI Optique Jusqu’à 7,1 ca PCM 2ch Codé à nouveau par DTS PCM PCM 2ch Dolby Digital Jusqu’à 5,1 ca PCM 2ch Codé à nouveau par DTS Dolby Digital Dolby Digital Flux de données audio sur le disque Dolby TrueHD Jusqu’à 7,1 ca PCM 2ch Blu-ray DTS Jusqu’à 6,1 ca PCM 2ch Codé à nouveau par DTS Dolby Digital Plus Dolby Digital Codé à nouveau par DTS Dolby TrueHD Dolby Digital Codé à nouveau par
Configuration HDMI • Si votre téléviseur ne peut pas prendre en charge les formats multi-canaux compressés (Dolby numérique, DTS), le lecteur peut produire la source en signal audio PCM 2 canaux même si vous avez sélectionné Bitstream Re-encode ou Bitstream Audiophile dans le menu de configuration.
L'option Paramètre initial, vous permet de régler la langue, l’aspect du téléviseur, les paramètres réseau, etc. Pour plus de renseignements sur les paramètres, reportez-vous à la section correspondante du guide d’utilisation. (Reportez-vous aux pages 29 à 44) Taille écran Internet@TV Permet à l’écran Internet@TV au format optimal. • Taille 1 : Affiche les icônes en format plus petit. Vous pourriez voir du noir sur les côtés de l’écran. • Taille 2 : Affiche les icônes dans le format normal.
Configuration Horloge DivX(R) Désactivation Réglage des fonctions liées à l’horloge. À sélectionner pour obtenir un nouveau code d’enregistrement. Paramètres Affichage Horloge Audio Mode Horloge : Auto \ Système Paramétrage de l'horloge Réseau Fuseau horaire : GMT + 0:00 Langue DST : Non Sécurité Général > Déplacer " Entrée ' Retour Assistance • Mode Horloge : Vous pouvez régler l’horloge à Auto ou Manual. Si vous sélectionnez Manuel, le menu Paramétrage de l'horloge s’activera si le DST est désactivé.
2. Appuyez sur la touche ►, puis sélectionnez Auto ou Manuel, puis appuyez sur la touche ENTRÉE. Configuration d’une connexion câblée - Auto 1. Si vous avez sélectionné Auto, la Fonction réseau récupère et inscrit automatiquement les valeurs de l’adresse IP, du masque sousréseau, etc. ✎ REMARQUE ▪ Ce procédé peut prendre jusqu’à cinq minutes. Paramètre réseau Config. prot.
Configuration 9. Appuyez sur la touche RETURN de votre télécommande. Configuration de la connexion réseau sans fil - Recherche de réseau automatique 10. Effectuez un test réseau pour vous assurer que le lecteur est connecté à votre réseau (Reportez-vous à la page 42). La plupart des réseaux sans fil disposent d’un système de sécurité optionnel qui exige la transmission d’un code de sécurité crypté pour accéder au réseau. Ce code est appelé Accès ou Clé sécurité.
passe dans un des écrans de configuration que vous avez utilisé pour configurer votre router ou votre modem. Paramètre réseau Nom du réseau – A B C D E F G H I G K L M N O P Q R S T U V W X Y Z m Déplacer = Nombre a Minuscule b Supprimer c Espace " Entrer ' Retour 9. Pour saisir la Phrase de passe, suivez ces directives générales : • Utilisez les touches numériques de votre télécommande pour saisir les chiffres.
Configuration 6. Saisissez les valeurs sous Adresse IP, Masque sous-réseau et Passerelle. 7. Appuyez sur la touche ▼ pour accéder à DNS. 8. Appuyez sur la touche ▼ pour accéder au premier champ d'entrée DNS. Saisissez les chiffres comme indiqué ci-haut. 9. Lorsque vous avez terminé, appuyez sur la touche ▲ pour retourner à Point d'accès Sélection. Sélectionnez le réseau, puis appuyez sur la touche ENTRÉE. 10.
Classement parental Non Modifier mot de passe 8 (Adulte) 7 6 5 4 3 2 | Modifier mot de passe Modifie le mot de passe à 4 chiffres servant à accéder aux fonctions liées à la sécurité. Si vous avez oublié votre mot de passe 1. Retirez le disque. 2. Appuyez pendant au moins 5 secondes sur la touche ARRÊT ( ) située en façade de l’appareil. Tous les réglages retournent aux réglages du fabricant.
Configuration Assistance Mise à niveau du logiciel Ce menu permet de mettre à niveau le logiciel pour améliorer les performances ou les services supplémentaires. Vous pouvez vérifier la version actuelle du logiciel, mettre à niveau l’Internet et configurer la notification de mise à niveau automatique.
Fonctions de base Lecture 1. Appuyez de nouveau sur la touche OUVERTURE/ FERMETURE ( ) pour ouvrir le tiroir disque. 2. Placez délicatement un disque dans le tiroir disque, face étiquette vers le haut. 3. Appuyez de nouveau sur la touche OUVERTURE/ FERMETURE ( ) pour refermer le tiroir disque. 4. Appuyez sur la touche LECTURE ( ). ARRÊT ( PAUSE ( ) ) ) hZ 1. Appuyez sur la touche DISC MENU de votre télécommande pendant la lecture. 2.
Fonctions de base Menu Contextuel Saut de Chapitres h 1. Appuyez sur la touche MENU CONTEXTUEL de votre télécommande pendant la lecture. 2. Appuyez sur les touches ▲▼◄► ou ENTRÉE pour sélectionner le menu désiré. ✎ REMARQUE ▪ Selon le lecteur, il est possible que les éléments de hzZyx • Appuyez sur la touche IGNORER ( ) durant la lecture. Pour aller au chapitre suivant, appuyez sur la touche IGNORER ( ). Pour retourner au début du chapitre, appuyez sur la touche IGNORER ( ).
hzZy Permet d’effectuer la lecture en boucle du titre ou du chapitre du disque. Selon le disque, la fonction de répétition pourrait ne pas être disponible. 1. Appuyez sur la touche REPEAT de votre télécommande pendant la lecture. 2. Appuyez sur les touches ▲▼ pour sélectionner Chapitre ou Titre, puis appuyez sur la touche ENTRÉE. Répétition > Chapitre 5. Pour repasser en lecture à vitesse normale, appuyez de nouveau sur la touche REPEAT. 6. Appuyez sur la touche ENTRÉE.
Fonctions de base Sélection de la langue audio hzZx Cette fonction peut aussi être activée en appuyant sur la touche AUDIO de la télécommande. 1. Appuyez sur la touche TOOLS en cours de lecture. 2. Appuyez sur les touches ▲▼ pour sélectionner Audio. 3. Appuyez sur les touches ◄► pour sélectionner la langue audio souhaitée. ✎ REMARQUE ▪ L’indicateur ◄► ne s’affichera pas à l’écran si la ▪ ▪ ▪ ▪ ▪ section BONUSVIEW ne contient pas de paramètres audio BONUSVIEW.
• Film : Il s’agit du meilleur réglage pour regarder des films. • Utilisateur : L’utilisateur peut régler respectivement la fonction de netteté et de réduction de bruit. ow Touches de la télécommande utilisées pour la lecture de plages musicales h La fonction BONUSVIEW vous permet d’afficher certaines options supplémentaires (comme des commentaires) dans un écran incrusté pendant la lecture du film. Cette fonction n’est pas disponible si le disque n’en dispose pas.
Fonctions de base Touche IGNORER : Durant la lecture, revient à la page précédente sous Liste musicale ou à la piste précédente sous Liste lect. Si vous appuyez sur cette touche trois secondes après le démarrage de la lecture de Liste de lecture, la lecture de la piste redémarre du début. Mais, si vous appuyez sur cette touche dans les trois secondes suivant le démarrage de la lecture, la piste précédente est alors lue.
Lecture d’un disque contenant des fichiers JPEG Fichiers 3 sél 1/2 Page TRACK 003 TRACK 001 TRACK 002 TRACK 003 TRACK 004 TRACK 005 TRACK 006 TRACK 007 TRACK 008 TRACK 009 TRACK 010 1. Insérez un disque JPEG sur le tiroir disque. 2. Appuyez sur les touches ◄► pour sélectionner les Photos, puis appuyez sur ENTRÉE. 3. Appuyez sur les flèches ▲▼◄► pour sélectionner le dossier que vous désirez, puis appuyez sur ENTRÉE. 4.
Fonctions de base • Zoom : Sélectionnez cette option si vous souhaitez agrandir l’image actuelle. (Agrandie jusqu’à 4 fois) • Pivoter : Sélectionnez cette option pour tourner l’image. (Cette action fera pivoter l’image dans le sens des aiguilles d’une montre ou le sens contraire des aiguilles d’une montre.) • Information : Affiche l’information sur l’image, dont le nom et le taille. 5. Appuyez sur les touches ▲▼ pour sélectionner USB, puis appuyez sur la touche ENTRÉE. 6.
Services Réseau 1. Raccordez le lecteur au réseau. (Reportez-vous aux pages 27 à 28) Aperçu du service Internet@TV 2. Configurez les paramètres réseau. (Reportez-vous aux pages 38 à 42) 1 2 Cette fonction peut aussi être activée en appuyant sur la touche INTERNET@ de la télécommande. Premiers pas avec Internet@TV 1. Allez au menu d’accueil.
Services Réseau Utilisation du clavier numérique Grâce à votre télécommande, vous pouvez utiliser le Clavier à l’écran dans plusieurs applications Internet@TV afin d’entrer du texte. Appuyez sur le bouton SUBTITLE de la télécommande tout en utilisant le Clavier à l'écran afin de modifier le mode d’entrée dans les champs de texte en minuscules, majuscules, chiffres ou icônes. 1 2 abc 3 def 4 ghi 5 jkl 6 mno 7 pqrs 8 tuv 9 wxyz 0 Mode de a 12.
Config. système Réinit. Réinitialise le service Internet@TV aux paramètres d’usine par défaut. ✎ REMARQUE ▪ Si vous avez oublié votre mot de passe, appuyez sur la touche ARRET ( ) sur le panneau avant du produit pendant plus de 5 secondes, à condition qu’aucun disque ne soit introduit dans l’appareil à ce moment-là. 1. Appuyez sur les touches ▲▼◄► pour sélectionner l’application souhaitée, puis appuyez sur la touche ROUGE(A).
Services Réseau Gestionnaire service Utilisation des touches de couleur avec les applications Samsung Permet de supprimer et de verrouiller des applications installées sur Internet@TV. Verrouil. Permet de verrouiller l’application. L’accès à une application verrouillée exige le mot de passe. Supprimer • ROUGE(A) (Connexion) : Permet de se brancher au service Internet. • VERT(B) (Affichage Vignettes) : Permet de modifier le mode de visualisation.
Une fois le lecteur connecté au réseau, vous pouvez profiter de plusieurs contenus de services liés au cinéma en utilisant un disque compatible avec la technologie BD-LIVE. 1. Vérifiez qu’il reste suffisamment d’espace disponible sur le disque. La mémoire du périphérique doit disposer au minimum de 1 Go d’espace libre pour pouvoir prendre en charge les services BD-LIVE. 2. Insérez un disque Blu-ray compatible avec les services BD-LIVE. 3.
Services Réseau 8. Pour sélectionner un périphérique, utilisez les touches ROUGE(A) ou BLEU(D) pour sélectionner le fichier à lire. (Consultez les pages 45 à 52 pour en savoir plus sur la lecture de fichiers vidéo, musicaux ou de photos.
Annexe 08 Dépannage PROBLÈME Annexe Avant de contacter le centre de service technique, effectuez les vérifications élémentaires suivantes: SOLUTION La télécommande ne fonctionne pas. • Vérifiez les piles de la télécommande. Il pourrait s’avérer nécessaire de les remplacer. • Utilisez la télécommande à une distance inférieure à 6 mètres (20 pieds).
Annexe PROBLÈME SOLUTION Mot de passe oublié • Retirez le disque et appuyez sur la touche ARRÊT ( ) située en façade du lecteur pendant plus de 5 secondes. Tous les réglages retournent aux réglages du fabricant. À ne pas utiliser à moins que cela ne soit absolument nécessaire. • Si les réglages par défaut sont rétablis, toutes les données utilisateurs stockées sur le disque Blu-ray seront supprimées. Si vous rencontrez d’autres difficultés.
SOLUTION 08 PROBLÈME Je ne peux pas me brancher au serveur BD-LIVE. • Vérifiez que la connexion réseau fonctionne correctement au moyen du menu de test de réseaux. (Reportez-vous à la page 42) • Assurez-vous que le périphérique USB est branché au lecteur. • La mémoire du périphérique doit disposer au minimum de 1Go d’espace libre pour pouvoir prendre en charge les services BD-LIVE. Vous pouvez vérifier le format disponible dans le Gestion des données BD.
Annexe Specifications Général Disques Poids 4 Ibs Dimensions 17 (L) X 8,1 (P) X 1,7 (H) po Plage de températures de fonctionnement De + 41° F à + 95° F Plage d’humidité de fonctionnement De 10 % à 75 % BD (disques Blu-ray) Vitesse de lecture : 4,917 m/s DVD (disque Digital Versatile (numérique polyvalent)) Vitesse de lecture : 3,49 ~ 4,06 m/s CD : 5 po (DISQUES COMPACTS) CD : 3 1/2 po (DISQUES COMPACTS) Vidéo composite Durée de lecture approximative (Disque simple face, simple couche) : 13
08 Avis de conformité et de compatibilité Annexe Les disques ne sont pas TOUS compatibles. • Conformément aux limitations décrites ci-dessous et à celles mentionnées ailleurs dans ce guide, incluant dans la section traitant sur les types de disques et leurs caractéristiques, les disques suivants peuvent être lus : les disques présenregistrés de type commercial BD-ROM, DVD-Vidéo et Audio CD (CD-DA), BD-RE/-R, DVD-RM/-R; et CD-RW/CD-R.
Annexe • De nombreux disques Blu-ray/DVD sont protégés contre la copie. C’est pourquoi vous devez raccorder votre lecteur directement à votre téléviseur et non à un magnétoscope. Le branchement à un magnétoscope entraîne une déformation de l'image lorsque vous tentez de lire des disques Blu-ray/ DVD protégés contre la copie. • Ce produit intègre la technologie de protection des droits d’auteur, protégée par des brevets américains et d’autres droits intellectuels.
08 License Annexe • Fabriqué sous licence de Dolby Laboratories. « Dolby » et le symbole du double-D sont des marques de commerce de Dolby Laboratories. • Fabriqué sous licence des brevets américains nos : 5,451,942; 5,956,674; 5,974,380; 5,978,762; 6,226,616; 6,487,535; 7,212,872; 7,333,929; 7,392,195; 7,272,567 et autres brevets américains ou mondiaux, délivrés et en instance.
GARANTIE LIMITEE A L’ACHETEUR INITIAL Samsung Electronics Canada Inc. (SECA) garantit ce produit contre tout défaut de fabrication. SECA garantit aussi que si cet appareil ne fonctionne pas convenablement durant la période de garantie SECA se réservera le droit de réparer ou de remplacer l’appareil défectueux. Toutes les réparations sous garantie doivent être effectuées par un Centre de service autorisé SECA.
Contacter SAMSUNG À TRAVERS LE MONDE Si vous avez des questions ou commentaires concernant les produits Samsung, veuillez communiquer avec le service à la clientèle SAMSUNG. Area Contact Center Web Site ` North America Canada 1-800-SAMSUNG (726-7864) www.samsung.com Mexico 01-800-SAMSUNG (726-7864) www.samsung.com U.S.A 1-800-SAMSUNG (726-7864) www.samsung.com ` Latin America Area Contact Center Web Site Switzerland 0848 - SAMSUNG (7267864, www.samsung.com/ch www.samsung.com/ CHF 0.
SIÈGE SOCIAL SAMSUNG ELECTRONIQUE CANADA INC., 55 STANDISH COURT MISSISSAUGA, ONTARIO L5R 4B2 CANADA TEL: 1-800-SAMSUNG (1-800-7267864) www.samsung.com/ca AK68-01945B 01945B-BD-C6900-XAC-FRC.