SyncMaster 152MP/172MP http://www.samsung-monitor.
English Contents Safety Instructions 2 Unpacking Your Monitor 3 Setting up Your Monitor Connecting to a Computer 4 Connecting AV Devices 5 Connecting TV(Connect a TV tuner box(option) ) 6 Connecting to a Macintosh 7 Connecting Headphones 8 Adjusting Your Monitor Monitor Buttons 9 Remote Control Buttons 10 Direct-Access Features 12 PC Screen 13 TV Screen 14 Video Screen 15 OSD Control 17 PowerSaver 18 Troubleshooting 19 Specifications 24 Display Modes 28
Safety Instructions 1. Do not use a damaged or loose plug. 2. Do not pull the plug out by the wire nor touch the plug with wet hands. 3. Use only a properly grounded plug and receptacle. 4. Do not excessively bend the plug and wire nor place heavy objects upon them, which could cause damage. 5. Disconnect the plug from the outlet during storms or lightening or if it is not used for a long period of time. 6. Do not connect too many extension cords or plugs to an outlet. 7.
Unpacking Your Monitor Power Cord Monitor Signal Cable(15 pin D-Sub) DC-Adapter Audio Cable Natural Color and Driver Installation CD User’s Manual Sold separately Remote Control Batteries (AAA X 2) 3 TV Tuner Box
Setting up Your Monitor Connecting to a Computer DC POWER PC Video Audio(ST) 1. Connect the power cord to the DC adapter and connect the adapter jack to the DC POWER port on the back of your monitor. 2. Connect the signal cable to the video port on your computer. 3. Connect the audio cable for your monitor to the audio port on the back of your computer. 4. Turn on both your computer and the monitor. 5. You may enjoy clear and quality sound from the computer sound card using the monitor speakers.
Setting up Your Monitor Connecting AV Devices AV Audio(R) Audio(L) Video S-Video The monitor has AV connection terminals to connect AV input devices like DVDs, VCRs or Camcorders. You may enjoy AV signals as long as the monitor is turned on. 1. Input devices such as DVDs, VCRs or Camcorders are connected to the S-Video terminal of the monitor using the RCA or S-VHS cable. S-VHS or RCA cable is optional. 2.
Setting up Your Monitor Connecting TV (Connect a TV tuner box(option) ) With a TV tuner box(option), you can watch TV simply by hooking up the monitor to an antenna or to your cable box. There is no need to buy a TV card which connects to a PC, or additional hardware or software. 1. Connect the antenna or the cable box to the TV tuner box(option), using the "ANTENNA" terminal on the tuner box. 2. Remove the TV Tuner Box cover from the rear of the monitor. 3.
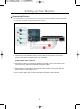
Setting up Your Monitor Connecting to a Macintosh DC POWER New Model PC Video Audio(ST) Older Model Adapter (Not included) 1. Connect the power cord to the DC adapter and then connect the adapter jack to the DC POWER port on the monitor. (Voltage is automatically adjusted by the power adaptor.) 2. Connect the signal cable to the D-SUB port on the Macintosh computer. 3.
Setting up Your Monitor Connecting Headphones You may connect your headphones to the monitor. 1. Connect your headphones to the Headphone-out port.
Adjusting Your Monitor Monitor Buttons | Source Buttons | 1. PC mode button Switches from Video mode to PC mode. 2. PIP mode button In PC Mode, turns on Video or TV screens in PIP mode. Using this function, you may view a Video or TV program while performing PC work. (PIP mode button works in PC mode only.) To switch Screen modes:[PC + TV] [PC + Video] [PC + S-Video] 3. Video mode button Switches from PC mode to Video mode. The image size automatically switches to Full when Video mode is on.
Adjusting Your Monitor Remote Control Buttons 1. Power button 2. PC button 3. PIP(Picture-in-Picture) button 4. Video button 5. Audio button 6. PIP Position button 7. PIP Size button 8. Up-Down button / Channel button 9. Left-Right button / Volume button 10. Menu button 11. Exit button 12. Mute button 13. Channel button 14. Display button 15. Previous channel button 16. Auto button 17. Channel search button 18. MTS/S-mode button 19. Caption button (US Only) 1.
Adjusting Your Monitor 8-11 Control Buttons See the Control Buttons above. 12. Mute button Pauses (mutes) the audio output temporarily. The audio resumes if Mute or - VOL + button is pressed in the Mute mode. 13. Channel button Selects TV channels in the TV mode. You may use this button in PIP mode as well. 14. Display button Shows a Video Source, Audio Source, current channel number, an audio type and Speaker Mute ON/OFF on the upper right corner of the screen. 15.
Adjusting Your Monitor Direct-Access Features 1. Auto Adjustment The monitor display becomes more stabilized if adjusted by Auto Adjustment functions when the monitor is installed for the first time. Try Auto Adjustment before attempting Manual Adjustment. Ensure the clock frequency of the monitor matches that of the computer video card before carrying out Auto Adjustment.
Adjusting Your Monitor On Screen Display PC Screen PC TV OSD Contrast Adjust Contrast. Brightness Adjust Brightness. Color Control The tone of color can be changed from redish white to bluish white. The individual color components are also user customizable. 1) Mode 1 : Plain white. 2) Mode 2 : Reddish white. 3) Mode 3 : Bluish white. 4) User Mode : User customizable. 5) Reset : Color parameters are replaced with the factory default values.
Adjusting Your Monitor Sound The monitor has a built-in high fidelity stereo audio amplifier. 1) Mode • Custom : Choose Custom to recall your personalized settings. - Bass : Emphasize low frequency audio. - Treble : Emphasize high frequency audio. • Standard : Choose Standard for the standard factory settings. • Music : Choose Music when watching music videos or concerts. • Movie : Choose Movie when watching movies. • Speech : Choose Speech when watching a show that is mostly dialogue (i.e., news).
Adjusting Your Monitor Sound The monitor has a built-in high fidelity stereo audio amplifier. 1) Mode • Custom : Choose Custom to recall your personalized settings. - Bass : Emphasize low frequency audio. - Treble : Emphasize high frequency audio. • Standard : Choose Standard for the standard factory settings. • Music : Choose Music when watching music videos or concerts. • Movie : Choose Movie when watching movies. • Speech : Choose Speech when watching a show that is mostly dialogue (i.e., news).
Adjusting Your Monitor Video Screen You can use this function only if your monitor is not connected to a TV tuner box. PC Video OSD z z z Picture Controls Contrast, Brightness, Sharpness, Color and Tint of the Video image. 1) Mode • Custom : Choose Custom to recall your personalized settings. - Contrast : Adjust the contrast of Video without affecting PC RGB's contrast. - Brightness : Adjust the brightness of Video without affecting PC RGB's brightness.
Adjusting Your Monitor OSD Control Press the Exit button to make the menu disappear. The adjustments made are saved automatically as the menu screen disappears. The OSD (On-Screen Display) feature may not function properly depending on input signals. PC TV OSD Language You can choose one of 8 languages. (English, German, Spanish, French, Italian, Swedish, Portuguese, Nederlands) Position Move the OSD Window to the vertical and horizontal direction.
PowerSaver This monitor has a built-in power management system called PowerSaver. This system saves energy by switching your monitor into a low-power mode when it has not been used for a certain amount of time. The monitor automatically returns to normal operation when you move the computer's mouse or press a key on the keyboard. For energy conservation, turn your monitor OFF when it is not needed, or when leaving it unattended for long periods.
Troubleshooting Self-Test Feature Check Your monitor provides a self test feature that allows you to check whether your monitor is functioning properly. 1. Turn off both your computer and the monitor. 2. Unplug the video cable from the back of the computer. 3. Turn on the monitor.
Troubleshooting Display Adapter Driver Display adapter refers to the computer video card driver. If the adapter is not properly set, you cannot adjust resolution, frequency or color and you cannot install the monitor driver. 1. Checking Adapter Driver (explained based on Windows 98) Click Start Settings Control Panel Display Settings Advanced Adapter. If "Default" or a wrong product model is indicated, it means that the adapter driver is not properly installed.
Troubleshooting Problems related to Installation Problems related to the monitor installation and their solutions are listed. Problems Solution It appears the PC does not function normally. Check if the Display Adapter Driver (VGA Driver) is properly installed. The monitor screen flickers. Check if the signal cable between the computer and the monitor is securely connected and tightened. TV screen is blurred or shows noise signals.
Troubleshooting Problems related to Screen Problems related to the monitor screenCheck and their solutions are listed. List Problems Solution Solution Screen is blank and power indicator is off Ensure that the power cord is firmly connected and the LCD monitor is on. "Check Signal Cable" message. Ensure that the signal cable is firmly connected to the PC or video sources. Ensure that the PC or video sources are turned on. "Video mode not supported" message.
Troubleshooting Frequently asked questions are summarized here for your reference. Question How can I change the frequency? Answer Frequency can be changed by reconfiguring the video card. Note that video card support can vary, depending on the version of the driver used. (Refer to the computer or the video card manual for details.) How can I adjust the resolution? Windows XP: Reset resolution by clicking Control Panel _> Appearance & Theme _> Display _> Settings.
Specifications SyncMaster 152MP General Model Name SyncMaster 152MP LCD Panel Size 15.0 inch (Diagonal) Display area 304.128 (H) x 228.056(V) Pixel Pitch 0.297 (H) x 0.297 (V) Type a-si TFT active matrix Viewing Angle 140 (H)/ 120 (V) Synchronization 30 ~ 60 kHz Horizontal 56 ~ 75 Hz Vertical Display Color 16,194,277 Colors Resolution Optimum resolution 1024 x 768@60Hz Maximum resolution 1024 x 768@75Hz Input Signal, Terminated RGB Analog, Composite H/V, 0.
Specifications VESA Mounting Interface 75mm x 75mm (for use with Specialty(Arm) Mounting hardware.) Environmental considerations Temperature : 50°F ~ 104°F(10°C ~ 40°C) Operating Humidity : 10% ~ 80%, non-condensing Temperature : -4°F ~113°F (-20°C ~ 45°C) Storage Humidity : 5% ~ 95%, non-condensing Plug and Play Capability This monitor can be installed on any Plug & Play compatible system. Interaction of the monitor and computer systems will provide the best operating conditions and monitor settings.
Specifications SyncMaster 172MP General Model Name SyncMaster 172MP LCD Panel Size 17.0 inch (Diagonal) Display area 337.92 (H) x 270.336 (V) Pixel Pitch 0.264 (H) x 0.264 (V) Type a-si TFT active matrix Viewing Angle 170°(H)/ 170°(V) Synchronization 31 ~ 81 kHz Horizontal 56 ~ 75 Hz Vertical Display Color 16,194,277 Colors Resolution Optimum resolution 1280 x 1024@60Hz Maximum resolution 1280 x 1024@75Hz Input Signal, Terminated RGB Analog, Composite H/V, 0.
Specifications VESA Mounting Interface 100mm x 100mm (for use with Specialty(Arm) Mounting hardware.) Environmental considerations Temperature : 50°F ~ 104°F(10°C ~ 40°C) Operating Humidity : 10% ~ 80%, non-condensing Temperature : -4°F ~113°F (-20°C ~ 45°C) Storage Humidity : 5% ~ 95%, non-condensing Plug and Play Capability This monitor can be installed on any Plug & Play compatible system. Interaction of the monitor and computer systems will provide the best operating conditions and monitor settings.
Display Modes If the signal transferred from the computer is the same as the following Display Modes, the screen will be adjusted automatically. However, if the signal differs, the screen may go blank while the power LED is on. Refer to the video card manual and adjust the screen as follows.