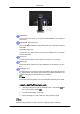
LCD MONITOR quick start guide 2243QW/2243QWX ii
Introduction Package Contents Note Please make sure the following items are included with your monitor. If any items are missing, contact your dealer. Contact a local dealer to buy optional items.
Introduction Note Cleaning Cloth is only provided for highly polished black products as a product feature. Your Monitor Initial Settings Select the language using the up or down key. The displayed content will disappear after 40 seconds. Turn the Power button off and on. It will be displayed again. It can be displayed up to three (3) times. Make sure to adjust the resolution of your PC before reaching the maximum count.
Introduction Opens the on-screen menu and exits from the menu. Also use to exit the OSD menu or return to the previous menu. Customized Key[ ] You can customize key assignment for the Custom button according to your preferences. Note You can configure the customized key for a required function via Setup > Customized Key. Brightness button [ ] When OSD is not on the screen, push the button to adjust brightness.
Introduction HAS Stand POWER port Connect the power cord for your monitor to the POWER port on the back of the product. DOWN(USB downstream port) Connect the USB cable. DOWN port of the USB monitor and a USB device with the UP(USB upstrem port) Connect the UP port of the monitor and the USB port of the computer with the USB cable. DVI IN port Connect the DVI Cable to the DVI IN port on the back of your monitor.
Introduction Cable holding ring • Fix the cables using the holding ring, as shown in the figure.
Connections Connecting Cables Connect the power cord for your monitor to the power port on the back of the monitor. Plug the power cord for the monitor into a nearby outlet. Use a connection appropriate for your computer. Using the D-sub (Analog) connector on the video card. • Connect the signal cable to the 15-pin, D-sub port on the back of your monitor. [RGB IN] Using the DVI (Digital) connector on the video card. • Connect the DVI Cable to the DVI IN Port on the back of your Monitor.
Connections Data Rate High speed Full speed Low speed 480 Mbps 12 Mbps 1.5 Mbps 2.5 W 2.5 W (Max., each port) (Max., each port) Power Consump- 2.5 W tion (Max., each port) 1. Connect the cable. UP port of the monitor and the USB port of the computer with the USB Note To use DOWN port, you have to connect the UP (Upstream Cable) to the PC. Make sure to use the USB cable supplied with this monitor to connect the monitor's UP port and your computer's USB port. 2. Connect the 3.
Connections Note When connecting a device to the DOWN port of the monitor, connect the device using a cable appropriate to the device. (For the purchase of the cable and external devices, ask the service center of the corresponding product.) The company is not liable for problems or damages to an external device caused by using an unauthorized cable for the connection. Some products do not follow the USB standard, and it may cause a malfunction of the device.
Connections Installation Installing Your USB Monitor Note Make sure to connect the USB cable and begin the installation after your PC has booted. If you turn off your monitor or remove the USB cable while the installation is in progress, it may cause a problem with your PC and Windows OS. The optimal resolution for this USB monitor is 1680 x 1050. 1. insert the provided USB Monitor Install CD into the CD-ROM drive of your PC. Doubleclick My Computer on the Windows Desktop and click on User Manual (I:).
Connections 4. Click "Install". 5. Click "Finish" to complete the installation. When setup is finished, a monitor icon is created in the system tray at the bottom of the monitor screen, and the information for the installed USB monitor is displayed. 6. When the installation is completed, configure the following settings to use multiple monitors. Right-click on the ‘Windows Desktop’and select ‘Properties’ from the displayed menu. The “Display Properties” window appears. 'Select the “Settings” tab.
Connections You can see the deactivated monitor No.2 (this may appear activated). Monitor No.2 is a virtual monitor which cannot actually be used. Therefore, first arrange the activated monitors in the order which they are actually used and move monitor No.2 to the last position. Note A virtual monitor may be not displayed in the 'Display Properties' window. Example) Three or four monitors may be displayed in the 'Display Properties' window when two or three monitors respectively are actually connected.
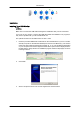
Connections 2. Click the monitor icon to display a list of connected USB monitors. Example) The following figure shows when two USB monitors are connected. Select the monitor for which you want to configure the display settings. You can configure the "Screen Resolution" , "Color Quality" and "Screen Rotation" settings for your monitor. Checking the configuration After the installation, you can check the configuration by following these steps. 1.
Connections 3. A list of the installed device will be displayed, as shown in the figure below.
Connections Service Pack 4 or later: Supported Windows Server 2003: Not Supported Windows Vista: Supported. (64bit Not Supported) • To check the information on the operating system of your PC, right-click’My Computer’ on the ‘Windows Desktop’ and select ‘Properties’ from the displayed menu. Check the information in the ‘General’ tab of the ‘Computer Properties’ window. 1.
Connections Using the Stand Monitor Assembly HAS Stand Monitor and Bottom HAS Stand A. Stand Stopper Attaching a Base This monitor accepts a 100 mm x 100 mm VESA-compliant mounting interface pad.
Connections HAS Stand A. Monitor B. Mounting interface pad (Sold separately) 1. Turn off your monitor and unplug its power cord. 2. Lay the LCD monitor face-down on a flat surface with a cushion beneath it to protect the screen. 3. Remove two screws and then remove the stand from the LCD monitor. 4. Align the mounting interface pad with the holes in the rear cover mounting pad and secure it with four screws that came with the arm-type base, wall mount hanger or other base.
Troubleshooting Self-Test Feature Check Note Your monitor provides a self test feature that allows you to check whether your monitor is functioning properly. Self-Test Feature Check 1. Turn off both your computer and the monitor. 2. Unplug the video cable from the back of the computer. 3. Turn on the monitor. If the monitor is functioning properly, you will see a box in the illustration below. This box appears during normal operation if the video cable becomes disconnected or damaged. 4.
Troubleshooting Useful Tips A monitor recreates visual signals received from the computer. Therefore, if there is a problem with the computer or the video card, this can cause the monitor to become blank, have poor coloring, become noisy, and video mode not supported, etc. In this case, first check the source of the problem, and then contact the Service Center or your dealer.
Troubleshooting A: You can see this message when the signal from the video card exceeds the maximum resolution and frequency that the monitor can handle properly. A: Adjust the maximum resolution and frequency that the monitor can handle properly. A: If the display exceeds SXGA or 75 Hz, a "Not Optimum Mode", "Recommended Mode 1680 x 1050 60 Hz" message is displayed.
Troubleshooting Q: Have you adjusted the resolution or frequency to the monitor? A: Adjust the resolution and frequency at the video card. (Refer to the Preset Timing Modes). Q: The screen can be unbalanced due to the cycle of the video card signals. Readjust Position by referring to the OSD. The screen is out of focus or OSD cannot be adjusted. Q: Have you adjusted the resolution or frequency on the monitor? A: Adjust the resolution and frequency of the video card.
Troubleshooting There is no image on the screen. I cannot turn on the monitor. Q: If you quickly and repeatedly turn your USB monitor off and on, it may not work normally. A: Your USB monitor is recognized as a general USB device on your PC. Therefore, please refer to the troubleshooting information for USB devices by visiting Microsoft’s customer support site. Check the signal cable connection. ( www.microsoft.com - Support ) 1. Right-click the ’My Computer’ and click on’Properties’. 2.
Troubleshooting Q: Check whether your computer is in hibernation mode (The monitor turns off). A: Move your mouse or press any key to display the screen again. Check the following items if there is trouble with the monitor. Check if the power cord and the video cables are properly connected to the computer. Check if the computer beeps more than 3 times when booting. (If it does, request an a service for the main board of the computer.
Troubleshooting Set the function in the BIOS-SETUP of the computer. (Refer to the Windows / Computer Manual). Q: How can I clean the outer case/LCD Panel? A: Disconnect the power cord and then clean the monitor with a soft cloth, using either a cleaning solution or plain water. Do not leave any detergent or scratches on the case. Do not let any water enter the monitor. Q: How can I remove the “USB Monitor Installation Program“ completely? A: 1.Click ‘Add/Remove Programs’ in the ‘Control Pane’.
Troubleshooting Note Before calling for assistance, check the information in this section to see if you can remedy any problems yourself. If you do need assistance, please call the phone number on the Information section or contact your dealer.