
user manual


122
Setup
7
7 Setup
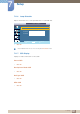
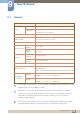
7.11.8 Software Upgrade
Performs a software upgrade.
1 Connect the product to a computer via a digital signal such as DVI or HDMI. Click the BMP image
file converted from an SW code. The image below will appear on the screen of the product.
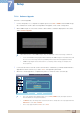
2 While a BMP image onto which the software code has been converted is displayed on the screen,
select Software Upgrade.
When there are two or more BMP images, they are displayed on the screen using a slideshow.
It is recommended that the playback interval between two BMP images in the slideshow should
be one second. The image extraction probability will decrease with other playback intervals.
A BMP image might not be extracted if it is covered by another image (for example, the
mouse pointer).
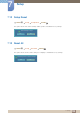
3 If a more recent version than the current software version is detected, you will be asked whether to
upgrade the current software. If you select <Yes>, the upgrade is performed.
4 When the software upgrade is completed, the product is turned off and on automatically.
This only operates with a digital signal, such as in DVI, HDMI mode. (The input resolution
must be identical to the panel resolution.)
In HDMI modes, the timing values used for both the PC and product are only supported if the
Edit Name is set to PC or DVI PC.
This is only supported if the Size is set to 16:9.
0RYH (QWHU 5HWXUQ
)DQ7HPSHUDWXUH
$XWR3RZHU 2II
؟ટ̖࢜ ଥࢿ
یࡈѰ࣏ۛۘࢽ
оֻ̛Җ۶ࢽ Ѱ۶ࢽ
Ѧ࣏ࢽ̛М
26''LVSOD\
6RIWZDUH8SJUDGH
$GYDQFHG6HWWLQJV
$GYDQFHG6HWWLQJV
8SJUDGHLVFRPSOHWHG
3RZHUZLOOEHRIIDQGWXPHGRQDXWRPDWLFDOO\
2.