SyncMaster 2333HD LCD Monitor User Manual
Safety Instructions Notational Note These safety instructions must be followed to ensure your safety and prevent property damage. Make sure to read the instructions carefully and use the product in the correct manner. Warning / Caution Otherwise, it may result in death or personal injury. Otherwise, it may result in personal injury or property damage.
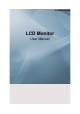
Safety Instructions Ensure that the power plug is plugged into the power outlet firmly and correctly. • Otherwise, this may result in fire. Do not forcefully bend or pull the power plug and do not place any heavy material on it. • Otherwise, this may result in fire. Do not connect multiple appliances to the same power outlet. • Otherwise, this may cause fire due to overheating. Do not disconnect the power cord while using the product.
Safety Instructions Do not place candles, mosquito repellant, cigarettes and any heating appliances near the product. • Otherwise, this may result in fire. Keep heating appliances as far away from the power cord or the product as possible. • Otherwise, this may result in electric shock or fire. Do not install it in a badly ventilated location such as a bookcase or closet. • Otherwise, this may result in fire due to an increase in the internal temperature. Put down the monitor carefully.
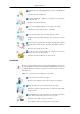
Safety Instructions Clean When cleaning the monitor case or the surface of the TFT-LCD screen, wipe with a slightly moistened, soft fabric. Do not spray cleaner directly onto the surface of the product. • Otherwise, this may result in the discoloration and distortion of the structure and the screen surface may peel off. Clean the product using a soft cloth with a monitor cleaner only. If you must use a cleaner other than the monitor cleaner, dilute it with water at a ratio of 1:10.
Safety Instructions If there is a strange smell or a strange sound or smoke is coming from the product, disconnect the power plug immediately and contact a Service Center. • Otherwise, this may result in electric shock or fire. Do not place this product in a location exposed to moisture, dust, smoke, water, or in a car. • Otherwise, this may result in electric shock or fire. When you drop the product or the case is broken, turn the power off and disconnect the power cord. Contact a Service Center.
Safety Instructions When using a fixed screen for a long time, an afterimage or stain may occur. • If you are not using your product for a long period of time, put it into sleep mode or use a moving screen saver. Set a resolution and frequency appropriate to the product. • Otherwise, your eyesight may be damaged. When using headphones or earphones, do not turn the volume too high. • Having the sound too loud may damage your hearing.
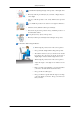
Safety Instructions Be careful that children do not place the battery in their mouths when removed from the remote control. Place the battery in a location that children or infants cannot reach. • If children have had the battery in their mouths, consult your doctor immediately. When replacing the battery, insert it with right polarity (+, -). • Otherwise, the battery may become damaged or it may cause fire, personal injury or damage due to leakage of the internal liquid.
Safety Instructions Be careful when adjusting the angle of the product or the height of the stand. • This may result in personal injury as your hand or fingers may become caught. • Also, if you tilt the product too far, it may fall and cause personal injury. Do not install the product in a location low enough for children to reach. • Otherwise, it may fall and result in personal injury. • Since the front part of the product is heavy, install the product on a level and stable surface.
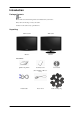
Introduction Package Contents Note Please make sure the following items are included with your monitor. If any items are missing, contact your dealer. Contact a local dealer to buy optional items.
Introduction List of Parts Remote Control Batteries (AAA X 2) Cleaning Cloth (Not available in all locations) Stand Body Stand Base Stereo Cable Note Cleaning Cloth is only provided for highly polished black products as a product feature.
Introduction Your Monitor Front Activates a highlighted menu item. Push the ' ', button to change the input signal source. Changing the source is only allowed for external devices connected to the product at the time. To switch Screen modes: [PC] →[DVI] → [TV] → [Ext.] → [Component] → [HDMI1] → [HDMI2] → [DTV] >> Click here to see an animation clip Use this button to open the on-screen menu and to exit from the on-screen menu or to close the screen adjustment menu.
Introduction Remote Control Sensor Aim the remote control towards this spot on the Monitor. Power indicator This light is lit when operating normally, and blinks once when your adjustments are saved. Note See PowerSaver described in the manual for further information regarding power saving functions. For energy conservation, turn your monitor OFF when it is not needed or when leaving it unattended for long periods. Speaker You can hear sound by connecting the soundcard of your PC to the monitor.
Introduction Connect the PC IN terminal at the back of your monitor to your computer. HDMI/PC/DVI-D AUDIO IN , DIGITAL AUDIO OUT (OPTICAL) , EX-LINK HDMI/PC/DVI-D AUDIO IN Connect the [ HDMI/PC/DVI-D AUDIO IN ] terminal at the back of your product to your computer’s sound card.
Introduction COMPONENT IN R - AUDIO - L Connect the port of the DVD, VCR (DVD / DTV Set-Top Box) to the [ R - AUDIO - L] port of the product. PR, PB,Y Connect the VIDEO OUT port of the DVD / DTV Set-Top Box to the [ PR, PB,Y ] input ports using a component video cable ( PR, PB,Y ). ANT IN Connect the CATV cable or TV antenna cable to the "ANT IN" port on the rear side of the product. Make sure to use a TV antenna cable (sold separately) as the antenna cable.
Introduction This contains information on CAM inserted in the CI slot and displays it. The Application Info inserting is about the CI CARD. You can install the CAM anytime whether the TV is ON or OFF. HDMI IN 2 / HDMI IN 2 Connect the [HDMI IN 2] terminal at the back of your product to the HDMI terminal of your digital output device using a HDMI cable. Connect your headphones to the Headphone connection terminal. Cable holding ring Fix the cables using the holding ring, as shown in the figure.
Introduction POWER Number Button TV/DTV CH LIST MUTE MENU Up-Down Left-Right buttons ENTER RETURN SOURCE PRE-CH GUIDE D.MENU P EXIT INFO TTX/MIX COLOR BUTTON P.MODE, M/B (MagicBright) S.MODE AUTO P.SIZE DUAL SUBTITLE SOURCE PIP 1. POWER 2. Number button Turns the product On/Off. Press to change the channel. (One/Two-Digit channel selection) 3. Use to select a channel numbered ten or over. Press this button, and the "--" symbol is displayed. Enter the two-digit channel number.
Introduction 4. TV/DTV Selects the TV and DTV mode directly. 5. CH LIST It displays "Channel List" on the screen. 6. Adjusts the audio volume. 7. MUTE Pauses (mutes) the audio output temporarily. This is displayed on the lower left corner of the screen. The audio resumes if MUTE or - VOL + is pressed in the Mute mode. 8. MENU Opens the on-screen menu and exits from the menu or closes the adjustment menu. 9.
Introduction The monitor has three automatic picture settings that are preset at the factory. Then press the button again to circle through available preconfigured modes. (Dynamic > Standard > Movie) - PC / DVI Mode : M/B ( MagicBright ) MagicBright is a feature providing the optimum viewing environment depending on the contents of the image you are watching. Then press the button again to circle through available preconfigured modes. (Entertain > Internet > Text > Dynamic Contrast > Custom) 22. S.
Connections Connecting Cables Connecting to a Computer Connect the power cord for your monitor to the POWER port on the back of the monitor. Plug the power cord for the monitor into a nearby outlet. Use a connection appropriate for your computer. Using the D-sub (Analog) connector on the video card. • Connect the signal cable to the [PC IN] port on the back of your monitor. [PC IN] Using the DVI-D IN (Digital) connector on the video card.
Connections Connecting to a Macintosh 1. Using the D-sub (Analog) connector on the video card. • Connect the signal cable to the D-SUB port on the back of your monitor. [PC IN] Note Turn on the monitor and Macintosh. Connecting to Other devices Note • This monitor allows the user to connect it to such input devices as a DVD player, a VCR or camcorder, or a DTV or TV without disconnecting the PC. • The configuration at the back of the monitor may vary from product to product.
Connections 2. When a Scart device is connected to your monitor, the Source automatically changes to Ext. Connecting TV Note You may view television programs on the monitor if it is connected to an antenna or CATV cable without installing any separate TV reception hardware or software on your computer. 1. Connect the CATV cable or TV antenna cable to the "ANT IN" port on the rear side of the monitor. Make sure to use a TV antenna cable (sold separately) as the antenna cable.
Connections Connect the port of the DVD, VCR (DVD / Set-Top Box) to the [R-AUDIO-L] port of the monitor. Connect the VIDEO OUT port of the DVD / Set-Top Box to the [PR, PB,Y] input ports using a component video cable (PR, PB,Y). Note Select "Component" using the 'SOURCE [ ]' If you connect the PR, PB, and Y component cables to the incorrect terminals, the screen will be displayed in red or blue. For single-family houses, install an UHF antenna to receive digital broadcasting.
Connections Select HDMI using the ‘SOURCE [ 2. ]‘ button. Connecting Using a DVI to HDMI Cable Connect the DVI output terminal of a digital output device to the [ HDMI IN2] terminal of the monitor using a DVI to HDMI cable. HDMI IN1] or [ Connect the red and white jacks of an RCA to stereo (for PC) cable to the same colored audio output terminals of the digital output device, and connect the opposite jack to the [HDMI/PC/ DVI-D AUDIO IN]terminal of the monitor. 3.
Connections 1. Connect the [DIGITAL AUDIO OUT (OPTICAL)] terminal of your monitor to the digital sound input terminal of your digital amplifier using an optical cable. 2. Set the Internal Mute On in the Sound menu using the MENU button. 3. Adjust the sound volume using the Volume button of your amplifier 4. If the connections are set up, power up your monitor and amplifier. Note • Because no sound is emitted from the monitor, you need to use an amplifier.
Connections 1. Connect your headphones to the Headphone connection terminal. Using the Stand Tilt angle You can adjust the tilt angle within a range of 0° forward to 18° backward for the most comfortable viewing angle. Attaching a Base This monitor accepts a 100 mm x 100 mm VESA-compliant mounting interface pad.
Connections 1. Turn off your monitor and unplug its power cord. 2. Lay the LCD monitor face-down on a flat surface with a cushion beneath it to protect the screen. 3. Remove four screws and then remove the stand from the LCD monitor. 4. Align the mounting interface pad with the holes in the rear cover mounting pad and secure it with four screws that came with the arm-type base, wall mount hanger or other base.
Using the Software Monitor Driver Note When prompted by the operating system for the monitor driver, insert the CD-ROM included with this monitor. Driver installation is slightly different from one operating system to another. Follow the directions appropriate for the operating system you have. Prepare a blank disk and download the driver program file at the Internet web site shown here. Internet web site : http://www.samsung.com/ (Worldwide) Installing the Monitor Driver (Automatic) 1.
Using the Software Note This monitor driver is under certifying MS logo, and this installation doesn't damage your system. The certified driver will be posted on Samsung Monitor homepage. http://www.samsung.com/ Installing the Monitor Driver (Manual) Microsoft® Windows Vista™‚ Operating System 1. Insert your Manual CD into your CD-ROM drive. 2. Click 3. Click "Personalization" and then "Display Settings". 4. Click "Advanced Settings...". 5. Click "Properties" in the "Monitor" tab.
Using the Software Note This monitor driver is under certifying MS logo, and this installation doesn't damage your system. The certified driver will be posted on Samsung Monitor homepage. 6. Click "Update Driver..." in the "Driver" tab. 7. Check the "Browse my computer for driver software" checkbox and click "Let me pick from a list of device drivers on my computer". 8. Click "Have Disk...” and select the folder (for example, D:\Drive) where the driver setup file is located, and click "OK".
Using the Software 9. Select the model that matches your monitor from the list of monitor models on the screen, and click "Next". 10. Click "Close" → "Close" → "OK" → "OK" on the following screens displayed in sequence.
Using the Software 1. Insert CD into the CD-ROM drive. 2. Click "Start" → "Control Panel" then click the "Appearance and Themes" icon. 3. Click "Display" icon and choose the "Settings" tab then click "Advanced...". 4. Click the "Properties" button on the "Monitor" tab and select "Driver" tab. 5. Click "Update Driver..." and select "Install from a list or..." then click "Next" button. 6. Select "Don't search, I will..." then click "Next" and then click "Have disk".
Using the Software 7. Click the "Browse" button then choose A:(D:\Driver) and choose your monitor model in the model list and click the "Next" button. 8. If you can see following message window, then click the "Continue Anyway" button. Then click "OK" button. Note This monitor driver is under certifying MS logo, and this installation doesn't damage your system. The certified driver will be posted on Samsung Monitor homepage. http://www.samsung.com/ 9.
Using the Software 10. Monitor driver installation is completed. Microsoft® Windows® 2000 Operating System When you can see "Digital Signature Not Found" on your monitor, follow these steps. 1. Choose "OK" button on the "Insert disk" window. 2. Click the "Browse" button on the "File Needed" window. 3. Choose A:(D:\Driver) then click the "Open" button and then click "OK" button. How to install 1. Click "Start", "Setting", "Control Panel". 2. Double click the "Display" icon. 3.
Using the Software 4. Select the "Monitor" tab. 5. Click the "Change" button in the "Monitor Type" area. 6. Choose "Specify the location of the driver". 7. Choose "Display a list of all the driver in a specific location..." then click "Next" button. 8. Click the "Have Disk" button. 9. Specify A:\(D:\driver) then click "OK" button. 10. Select "Show all devices" and choose the monitor that corresponds to the one you connected to your computer and click "OK". 11.
Using the Software Natural Color Natural Color Software Program One of the recent problems in using a computer is that the color of the images printed out by a printer or other images scanned by a scanner or a digital camera are not the same as those shown on the monitor. The Natural Color S/W is the very solution for this problem. It is a color administration system developed by Samsung Electronics in association with Korea Electronics & Telecommunications Research Institute (ETRI).
Using the Software Installation 1. Insert the installation CD into the CD-ROM drive. 2. Click the MultiScreen installation file. Note If the popup window to install the software for the main screen is not displayed, proceed with the installation using the MultiScreen executable file on the CD. 3. When the Installation Shield Wizard window appears, click "Next". 4. Select "I agree to the terms of the license agreement" to accept the terms of use. 5.
Using the Software Select "Setting/Control Panel" on the "Start" menu and then double-click "Add/Delete a program". Select Multiscreen from the list and then click the "Add/Delete" button.
Adjusting the Display Picture Available Modes PC / DVI TV DTV Component HDMI Ext. Note The default setting may different depending on the selected Input Mode (input signal source selected in External Input List) and the selected resolution. Picture : PC / DVI MagicBright MagicBright is a feature providing optimum viewing environment depending on the contents of the image you are watching. Currently five different modes are available: Entertain, Internet, Text, Dynamic Contrast and Custom.
Adjusting the Display • Contrast - Adjust the Contrast. • Brightness - Adjust the Brightness. • Sharpness - Adjust the Sharpness. MENU → → , → → , , , → → MENU,EXIT Auto Adjustment The values of Fine, Coarse, Position are adjusted automatically. By changing the resolution in the control panel, auto function is performed. The direct button on the remote control is the 'AUTO' button.
Adjusting the Display • R/G/B Adjusts the individual R, G, B color controls. MENU → • → , → → , → → , , , → MENU,EXIT → , → → , → MENU,EXIT Size You can switch the Size. • 16:9 / 4:3 MENU → → , → Reset Picture parameters are replaced with the factory default values. • OK / Cancel MENU → → , → → , → → MENU,EXIT Picture : TV / DTV / Ext.
Adjusting the Display • Cool2 / Cool1 / Normal / Warm1 / Warm2 Note “Warm1” or “Warm2” is only activated when the picture mode is “Movie”. Settings can be adjusted and stored for each external device you have connected to an input of the TV. MENU → → , → → , → → MENU,EXIT Backlight Adjust the screen brightness by adjusting the LCD backlight. MENU → → , → → , → → MENU,EXIT Size You can switch the Size. The direct button on the remote control is 'P.SIZE' button.
Adjusting the Display - Screen mode is supported in TV, Ext., DTV. - Screen Mode is available in Auto Wide mode. • 16:9 / Wide Zoom/ Zoom / 4:3 MENU → → , → → , → → MENU,EXIT Digital NR Digital Noise Reduction. If the broadcast signal received by your TV is weak, you can activate the Digital Noise Reduction feature to help reduce any static and ghosting that may appear on the screen. • Off - Turns the screen noise reduction function off. • Low - Reduces screen noise at a low level.
Adjusting the Display • Custom - Choose Custom if you want to adjust the settings according to personal preference. MENU → , → → → , → → MENU,EXIT Equalizer You can adjust the left and right sound balance and the low or high volume as you want. MENU → , → → , → → , , , → → MENU,EXIT Auto Volume Reduces the differences in volume level among broadcasters.
Adjusting the Display Manual Store You can scan the frequency ranges available on your television in your area and store all the channels found manually. • Programme - Inputting the appropriate program number on the screen. MENU → • , → → , → → → , → → MENU,EXIT Colour System - Adjusts repeatedly until the colour is of the best quality. (Auto <-> PAL <-> SECAM <-> NTSC4.
Adjusting the Display MENU → , → → , → → , → → , → → MENU,EXIT Sort It's used to exchange the numbers of two channels. MENU → , → → , → → , , , → MENU,EXIT Name Name the device connected to the input jacks to make your input source selection easier.
Adjusting the Display MENU → , → → , → → , → → MENU,EXIT Time • Clock Set You can set the current time. MENU → • , → → , → → → , , , → → MENU,EXIT Sleep Timer Use to set the Monitor to be turned off automatically in certain minutes. • Off, 30, 60, 90, 120, 150, 180 MENU → • , → → , → → , → → , → → MENU,EXIT Timer1 / Timer2 / Timer3 You can have the monitor turned on or off automatically at a specified time. • On time - Select hour, minute and “Yes”/”No”.
Adjusting the Display Light Effect You can turn on/off the LED on the front of monitor according to the situation. use it for saving power or when the LED dazzles your eyes. • Off - LED will not come on. • In Standby - Turns the LED on in standby mode. • In Watching TV - Turns the LED on while watching TV. • Always - LED is always on. MENU → , → → , → → , → → MENU,EXIT Light Level Use to adjust the light level i.e., the brightness of the light.
Adjusting the Display Note The default setting may different depending on the selected Input Mode (input signal source selected in External Input List) and the selected resolution. Source List Use to select PC, TV or other external input source connected to the product.Use to select the screen of your choice. The direct button on the remote control is "SOURCE" button. • PC / DVI / TV / Ext.
Troubleshooting Self-Test Feature Check Note • Check the following items yourself before calling for service. Contact the service center for problems that you cannot solve by yourself. • Your monitor provides a self test feature that allows you to check whether your monitor is functioning properly. Self-Test Feature Check 1. Turn off both your computer and the monitor. 2. Unplug the video cable from the back of the computer. 3. Turn on the monitor.
Troubleshooting • Do not use benzene, thinner or other flammable substances, or a wet cloth. • We recommend a Samsung cleansing agent is used to prevent damage to the screen. 2. Maintaining the Flat Panel Display Screen. Clean with a soft cloth (cotton flannel) smoothly. • Never use acetone, benzene or thinner. (They may cause flaws or deformation of the screen surface.) • The user will be required to pay costs and related expenses for repair of damages caused by him/her.
Troubleshooting PC Mode Q: It appears the PC does not function normally. A: Check if the Display Adapter Driver (VGA Driver) is properly installed. (Refer to Installing Driver) Q: The monitor screen flickers. A: Check if the signal cable between the computer and the monitor is securely connected and tightened.(Refer to Connecting the monitor) TV Mode Q: TV screen is blurred or shows noise signals. A: Check if the TV antenna connector is securely connected to the external antenna.
Troubleshooting A: Check if the resolution and frequency set for the computer video card falls in the range supported by the monitor. If not, reset them referring to the current Information under the monitor menu and Preset Timing Modes. Q: The image is too light or too dark A: Adjust the Brightness and Contrast.(Refer to the Brightness, Contrast) Q: Power Indicator blinks green. A: The monitor is currently saving the changes made in settings to the OSD memory.
Troubleshooting 5. You may see small particles if you look closely at the edge of the bezel surrounding the screen. This is part of the product’s design and is not a defect. Q&A Q: How can I change the frequency? A: The frequency can be changed by reconfiguring the video card. A: Note that video card support can vary, depending on the version of the driver used. (Refer to the computer or the video card manual for details.
Troubleshooting Digital TV broadcasting allows you to easily access various information services in your home creating a more information-oriented home. Q: What is the difference between HDTV and SDTV? A: There are various types of digital TVs. A: The most widely known types of digital TV are HDTV and SDTV. They are classified according to the screen quality and the video specifications. • HDTV (High Definition TV): High screen quality, very clear TV.
Specifications General General Model Name SyncMaster 2333HD LCD Panel Size 23 inchs (58 cm) Display area 509.76 mm (H) x 286.74 mm (V) Pixel Pitch 0.2655 mm (H) x 0.2655 mm (V) Synchronization Horizontal 30 ~ 81kHz Vertical 56 ~ 75kHz Display Color 16.7M Resolution Optimum resolution 1920 x 1080 @ 60 Hz Maximum resolution 1920 x 1080 @ 60 Hz Input Signal. Terminated RGB Analog. DVI(Digital Visual Interface) 0.7 Vp-p ±5 % separate H/V sync. Composite TTL level (V high ≥ 2.0 V. V low ≤ 0.
Specifications Environmental considerations Operating Temperature : 50 °F ~ 104 °F (10 °C ~ 40 °C) Humidity : 10 % ~ 80 %, non-condensing Storage Temperature : -4 °F ~ 113 °F (-20 °C ~ 45 °C) Humidity : 5 % ~ 95 %, non-condensing Plug and Play Capability This monitor can be installed on any Plug & Play compatible system. The interaction of the monitor and the computer systems will provide the best operating conditions and monitor settings.
Specifications Preset Timing Modes If the signal transferred from the computer is the same as the following Preset Timing Modes, the screen will be adjusted automatically. However, if the signal differs, the screen may go blank while the power LED is on. Refer to the video card manual and adjusts the screen as follows. Display Mode Horizontal Frequency (kHz) Vertical Frequency (Hz) Pixel Clock (MHz) Sync Polarity (H/V) IBM, 640 x 350 31.469 70.086 25.175 +/- IBM, 640 x 480 31.469 59.940 25.
Information For Better Display Adjust the computer resolution and screen injection rate (refresh rate) on the computer as described below to enjoy the best picture quality. You can have an uneven picture quality on screen if the best picture quality is not provided for TFT-LCD. • Resolution: 1920 x 1080 • Vertical frequency (refresh rate): 60 Hz TFT-LCD panels manufactured by using advanced semiconductor technology with a precision of 1ppm (one millionth) and above is used for this product.
Information and they are sent in HDTV objects appear heavier than in watching HDTV broadcast(16:9) mode. reality. ing. Note If temporary stops, mosaic screens, or jagged screens occur, this is not a TV problem. Contact your cable broadcasting company for a check-up. For information on how to connect and use your video, DVD, DVD combo, home theater, PC, etc., refer to their respective user manuals.
Information Ex) Cycle : Display Information for 1 hour followed by a Display Logo or moving image for 1 minute. Change the Color Information periodically (Use 2 different colors). Ex) Rotate the Color Information with 2 colors every 30 minutes. Avoid using a combination of characters and background color with large difference in luminance. Avoid using Grey colors, which can cause Image retention easily.
Information Image retention may not occur when a LCD panel is operated under normal conditions. Normal conditions are defined as continuously changing video patterns. When the LCD panel is operated for a long time with a fixed pattern (-over 12 hours-), there may be slight difference in voltage between electrodes that work the liquid crystal (LC) in a pixel. The voltage difference between electrodes increases with time, forcing the liquid crystal to lean.
Appendix Contact SAMSUNG WORLDWIDE Note If you have any questions or comments relating to Samsung products, please contact the SAMSUNG customer care center. North America U.S.A 1-800-SAMSUNG(726-7864) http://www.samsung.com/us CANADA 1-800-SAMSUNG(726-7864) http://www.samsung.com/ca MEXICO 01-800-SAMSUNG(726-7864) http://www.samsung.com/mx Latin America ARGENTINE 0800-333-3733 http://www.samsung.com/ar BRAZIL 0800-124-421 http://www.samsung.
Appendix Europe 0825 08 65 65 (€ 0,15/Min) GERMANY 01805 - SAMSUNG (7267864, € http://www.samsung.de 0,14/Min) HUNGARY 06-80-SAMSUNG (726-7864) http://www.samsung.com/hu ITALIA 800-SAMSUNG (726-7864) http://www.samsung.com/it LUXEMBURG 02 261 03 710 http://www.samsung.com/lu NETHERLANDS 0900-SAMSUNG (7267864, € http://www.samsung.com/nl 0,10/Min) NORWAY 3 - SAMSUNG (7267864) http://www.samsung.com/no POLAND 0-801-1SAMSUNG (172678) http://www.samsung.
Appendix Asia Pacific NEW ZEALAND 0800 SAMSUNG (0800 726 http://www.samsung.com/nz 786) PHILIPPINES 1800-10-SAMSUNG(726-7864) http://www.samsung.com/ph SINGAPORE 1800-SAMSUNG(726-7864) http://www.samsung.com/sg THAILAND 1800-29-3232, 02-689-3232 http://www.samsung.com/th TAIWAN 0800-329-999 http://www.samsung.com/tw VIETNAM 1 800 588 889 http://www.samsung.com/vn Middle East & Africa SOUTH AFRICA 0860-SAMSUNG(726-7864) http://www.samsung.com/za TURKEY 444 77 11 http://www.samsung.
Appendix Plug & Play This is a function that provides the best quality screen for the user by allowing the computer and the monitor to exchange information automatically. This monitor follows the international standard VESA DDC for the Plug & Play function. Resolution The number of horizontal and vertical dots used to compose the screen image is called the 'resolution'. This number shows the accuracy of the display.
Appendix English Caption (= Caption Setting) A kind of language selection feature that provides English subtitles (caption) or character information services from broadcasting services (ex: AFKN) or video tapes (marked CC), and which are especially useful for studying English. Multiplex Broadcasting This enables the user to enjoy the broadcasting service in both Korean and foreign (original) language as well as in stereo mode. A2 This system uses two carriers to transmit voice data.
Appendix Correct Disposal of This Product (Waste Electrical & Electronic Equipment) Europe only Business users should contact their supplier and check the terms and conditions of the purchase contract. This product should not be mixed with other commercial wastes for disposal. Correct disposal of batteries in this product - Europe only (Applicable in the European Union and other European countries with separate battery return systems.