Bottom Freezer Refrigerator Use & Care Guide Réfrigérateur à compartiment congélateur inférieur Guide d’utilisation et d’entretien DA68-01921A REV(0.0) DA99-01921A (EN-1).indd 1 Sears Canada, Inc., Toronto, Ontario, Canada M5B 2C3 ENGLISH FRANÇAIS Models/Modeles 65602, 65603, 65609, 65612, 65613, 65619 Au Canada, www.sears.ca 2010.3.
TABLE OF CONTENTS Warranty .............................................................................3 Protection Agreements .....................................................4 Safety Instructions ........................................................5–7 Grounding Requirements .................................................7 Parts and Features ............................................................8 Refrigerator Installation . ............................................
WARRANTY REFRIGERATOR WARRANTY One-Year Limited Warranty This warranty covers only defects in material and workmanship. Sears will NOT pay for: 1. Expendable items that can wear out from normal use, including but not limited to filters, belts, light bulbs, and bags. 2. A service technician to instruct the user in correct product installation, operation, or maintenance. 3. A service technician to clean or maintain this product. 4.
PROTECTION AGREEMENTS Master Protection Agreements Once you purchase the Agreement, a simple phone call is all that it takes for you to schedule service. You can call anytime day or night, or schedule a service appointment online. The Master Protection Agreement is a risk-free purchase. If you cancel for any reason during the product warranty period, we will provide a full refund or a prorated refund anytime after the product warranty period expires.
IMPORTANT SAFETY INSTRUCTIONS BASIC SAFETY PRECAUTIONS This guide contains many important safety messages. Always read and obey all safety messages. This is the safety alert symbol. It alerts you to safety messages that inform you of hazards that can kill or hurt you or others, or cause damage to the product. All safety messages will be preceded by the safety alert symbol and the hazard signal word DANGER, WARNING, or CAUTION.
IMPORTANT SAFETY INSTRUCTIONS WARNING • DO NOT install the refrigerator in a damp place or place where it may come in contact with water. Wet and/or deteriorated insulation of the internal electrical parts may cause electric shock or fire. • DO NOT store volatile or flammable substances in the refrigerator. Storing benzene, thinner, alcohol, ether, LP gas, and other such products may cause explosions. • DO NOT disassemble or repair the refrigerator by yourself.
IMPORTANT SAFETY INSTRUCTIONS CAUTION • Service Warranty and Modification Any changes or modifications performed by a third party on this finished appliance are not covered under Sears warranty service, nor can Sears be responsible for safety issues that result from third-party modifications. • If the power cord is damaged, it must be replaced by the manufacturer, a certified service agent, or qualified service personnel. • If you have a long vacation planned, empty the refrigerator and turn it off.
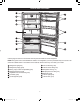
PARTS AND FEATURES A J B K C D E L F G M H I N Use this page to become more familiar with the parts and features of the refrigerator. NOTE: This guide covers several different models. The refrigerator you have purchased may have some or all of the items listed below. The locations of the features shown below may not match your model. H Pull-Out Drawer (p.20) I Freezer Drawer Bin (p.20) A Refrigerator Light(p.23) B Refrigerator (Fridge) (p.20) J Refrigerator Door (p.
REFRIGERATOR INSTALLATION GETTING READY TO INSTALL THE REFRIGERATOR CLEARANCES • Allow clearance to the right, left, back, and top when installing. This will help reduce power consumption and keep your energy bills lower. • Do not install the refrigerator where the temperature will go below 10ºC (50°F). Congratulations on your purchase of the Kenmore refrigerator. We hope you enjoy the state-of-art features and efficiencies that this new refrigerator offers.
REFRIGERATOR INSTALLATION WARNING CAUTION Excessive Weight Hazard Use two or more people to move and install the refrigerator. Failure to do so can result in back or other injury. Avoid placing the refrigerator near a heat source, direct sunlight, or moisture. REQUIRED TOOLS The following tools are needed to install and adjust the refrigerator. UNPACKING YOUR REFRIGERATOR Remove tape and any temporary labels from the refrigerator before using.
REFRIGERATOR INSTALLATION 4. With the 13/32-in. (10-mm) wrench, remove the three bolts that hold the hinge on the top of the refrigerator. WARNING Be careful not to drop the refrigerator door during removal. Scratches or door damage could occur. REFRIGERATOR DOOR REMOVAL If the refrigerator is too large to pass through your doorway easily, you can remove the refrigerator doors. 1. After removing the screw, and carefully lift up the upper right hinge cover. 2.
REFRIGERATOR INSTALLATION WARNING Be careful not to drop the freezer door during removal. Scratches or door damage could occur. FREEZER DOOR REMOVAL 1. Separate the cap on the middle hinge. 3b. Remove the freezer door by lifting it upward. Be careful not to drop or scratch the freezer door. 2. After removing one screw and two bolts, remove the middle hinge. (Unscrew the screws with the screwdriver (+) and hex bolts with the 3/16-in. [4.75-mm] hex wrench.) 4. Remove the cap on the bottom hinge.
REFRIGERATOR INSTALLATION REVERSING THE DOORS 1. Remove the refrigerator and freezer doors as described on pages 11 and 12. 6. Turn the right bracket over and reinstall the hinge shaft in the bracket. Tighten the hinge shaft with the 5/32-in. (4-mm) hex wrench. Thread the leg back into the opposite side of the hinge bracket. 2. Remove two screws and front leg cover from the bottom of the refrigerator. 3.
REFRIGERATOR INSTALLATION REVERSING THE DOORS (cont.) 9. Replace the bottom hinge cap on the left bottom hinge. 13. Replace the middle hinge cap on top of the left middle hinge. 10. Remove the cap and the screw under it, plus the two plastic screws, from the left side of the refrigerator where you will reattach the left-side middle hinge. Install the three screws and cap in the corresponding holes on the right side of the refrigerator. 14.
REFRIGERATOR INSTALLATION NOTE: The reversing door parts are supplied with the refrigerator. They are located in the bottom refrigerator door shelf. NOTE: If the reed switch is not reconnected, an alarm bell will go off in 2–3 minutes and the fridge temperature display will flash. If the housing connector is not reconnected, the entire temperature display will not come on. 17. Remove screw and cover from the front top-left corner of the refrigerator.
REFRIGERATOR INSTALLATION POSITIONING AND LEVELING THE REFRIGERATOR 3. If it is not level, adjust the front leveling legs until the refrigerator is level. Using a screwdriver, turn the leg counterclockwise to extend the leg and raise the refrigerator at that point. Turn the leg clockwise to retract the leg and lower the refrigerator at that point. It may take several turns of the leveling leg to adjust the tilt of the refrigerator.
USING YOUR REFRIGERATOR USING THE CONTROL PANEL 1 4 2 5 3 6 ENGLISH Temperature and Function Select/ Control Panel 1 Power Freeze Button – Press this button to freeze food quickly. (Power Freeze will last 2½ hours.) (p. 19) 2 Freezer Button – Freezer temperature set button. Press this button to set the freezer temp between -14ºC (7°F) and -25ºC (-13°F). (At initial power on, the default setting is -19ºC [-2°F].) (p.
USING YOUR REFRIGERATOR CONTROLLING THE TEMPERATURE Controlling the Freezer Temperature Controlling the Refrigerator Temperature To control the freezer temperature: To control the refrigerator temperature: Press the Freezer button. (Refer to the illustration.) – The temperature can be set in 1ºC (1.8°F) intervals between -25ºC (-13°F) and -14ºC (7°F). Press the Fridge button. (Refer to the illustration.) – The temperature can be set in 1ºC (1.8°F) intervals between 1ºC (34°F) and 7ºC (45°F).
USING YOUR REFRIGERATOR CONTROLLING THE TEMPERATURE (cont.) Using Power Cool Press the Power Freeze button. (Refer to the illustration.) Press the Power Cool button. (Refer to the illustration.) – The Power Freeze light on the display goes on (see the arrow below) and this function begins to operate regardless of the set freezer temperature. – The Power Cool light on the display goes on (see the arrow below) and this function begins to operate regardless of the set fridge temperature.
USING YOUR REFRIGERATOR STORING FOOD IN THE REFRIGERATOR STORING FOOD IN THE FREEZER DRAWER The refrigerator has been designed to provide you with maximum space-saving features and functions. Here are some of the customized compartments we have created to keep your food fresher longer. In order to further prevent odor from seeping into the ice compartment, stored food should be wrapped securely and as airtight as possible. Pull-Out Drawer Best used to store meats or dry foods.
USING YOUR REFRIGERATOR REMOVING THE REFRIGERATOR ACCESSORIES Door Bins Vegetable and Fruit Drawers CAUTION To remove and reinstall: 1. Pull out the drawer to full extension. Tilt up the front of the drawer and pull straight out. Pull out the glass shelf and frame rail assembly. (Refer to illustrations 1–3.) Injury may occur if the door bins are not firmly inserted. Do not allow children to play with bins. Sharp corners of the bins may cause injury. 2.
USING YOUR REFRIGERATOR REMOVING THE FREEZER ACCESSORIES Pull-Out Drawer Freezer Drawer Bin To remove and replace: To remove and replace: 1. Open the freezer door. 1. Open the freezer door. 2. Pull out the drawer to full extension. Tilt up the front of the drawer and lift straight out. 2. Pull out the freezer drawer bin. Tilt up the front of the drawer and lift straight out. Freezer Drawer Bin 3. Place the drawer onto the rails by tilting it up.
USING YOUR REFRIGERATOR CHANGING THE INTERIOR LIGHTS WARNING Electric Shock Hazard Before changing any of the interior lights, either unplug the refrigerator or turn off power at the circuit breaker or fuse box. Failure to do so could cause electric shock resulting in death, personal injury, or damage to the appliance. NOTE: Replacement LED is available from your nearest service center. If you need to change LED, contact our service center. Freezer Light Replacment 1.
CARE AND CLEANING CLEANING THE REFRIGERATOR Caring for your refrigerator prolongs the life of your appliance and helps keep it odor- and germ-free. Cleaning the Interior Cleaning the Rubber Door Seals Clean the inside walls and accessories with a mild detergent and then wipe dry with a soft cloth. You can remove the drawers and shelves for a more thorough cleaning. Just make sure to dry drawers and shelves before putting them back into place.
TROUBLESHOOTING GUIDE REFRIGERATOR DOES NOT OPERATE Check if... Then... The power supply cord is unplugged. Firmly plug the cord into a live outlet with proper voltage. A household fuse has blown or circuit breaker has tripped. Replace the fuse or reset the circuit breaker. The refrigerator is in defrost cycle. Wait about 30 minutes for the defrost cycle to end. REFRIGERATOR DOES NOT CHILL SUFFICIENTLY Check if... Then... Firmly plug the cord into a live outlet with proper voltage.
TROUBLESHOOTING GUIDE BAD SMELL IN THE REFRIGERATOR Check if... Then... Old or spoiled food is in the refrigerator and/or freezer. Clean out the freezer compartment periodically. Throw away any spoiled or suspicious food. Food is properly stored and wrapped. Foods with strong odors, like fish, should be stored in airtight containers. REFRIGERATOR DOES NOT CHILL AT ALL Check if... Then... The refrigerator is in the demo mode.
ENGLISH ® Registered Trademark / ™ Trademark / SM Service Mark of Sears Brands LLC. © 2009 Sears Brands LLC under license by Sears Canada. DA99-01921A (EN-1).indd 27 5/09 Printed in Korea 2010.3.
Bottom Freezer Refrigerator Use & Care Guide Réfrigérateur à compartiment congélateur inférieur Guide d’utilisation et d’entretien DA68-01921A REV(0.0) DA99-01921A (EN-1).indd 1 Sears Canada, Inc., Toronto, Ontario, Canada M5B 2C3 ENGLISH FRANÇAIS Models/Modeles 65602, 65603, 65609, 65612, 65613, 65619 Au Canada, www.sears.ca 2010.3.
TABLE DES MATIÈRES Garantie . ..........................................................................29 Contrats de Protection ...................................................30 Importantes Instructions de Sécurité . ....................31–33 Spécifications de Liaison à la Terre . .............................33 Pieces et Foncions ..........................................................34 Installation de Réfrigérateur ....................................
GARANTIE GARANTIE DE RÉFRIGÉRATEUR Garantie Limitee de un an Lorsqu’il est installé, utilisé et entretenu conformément à toutes les instructions fournies avec le produit, si cet appareil ménager fait défaut par suite d’un vice de matériau ou de fabrication au cours de l’année qui suit la date d’achat, composer le 1-800-4-MY-HOME® pour obtenir une réparation gratuite.
CONTRATS DE PROTECTION Contrats Principaux de Protection Couverture pour la perte de nourriture de 250 $ par an sur tout aliment altéré en raison d’une défaillance mécanique sur tout réfrigérateur ou congélateur couvert. Remboursement de location si la réparation du produit couvert prend plus de temps que promis. 10% de réduction sur le prix courant de toute intervention de réparation non-couverte et pièces de rechange.
IMPORTANTES INSTRUCTIONS DE SÉCURIÉ PRÉCAUTIONS DE BASE Vous trouverez dans le présent manuel de nombreux messages de sécurité importants. Veuillez lire et suivre à la lettre tous ces messages de sécurité. Ceci est un symbole d’avertissement de sécurité. Il désigne les messages de sécurité qui vous informent des dangers qui peuvent causer des blessures graves ou mortelles ou endommager le produit.
IMPORTANTES INSTRUCTIONS DE SÉCURIÉ AVERTISSEMENT • NE PAS installer le réfrigérateur dans un endroit humide ou dans un endroit où il peut être en contact avec • Le réfrigérateur doit être correctement relié à la terre. Assurez-vous toujours que vous avez relié le réfrigérateur à la terre avant de tenter de rechercher une panne ou réparer toute partie de l’appareil. Les fuites de puissance peuvent provoquer une décharge électrique grave.
IMPORTANT SAFETY INSTRUCTIONS ATTENTION • Garantie d’entretien et modification Tout changement ou modification effectué par un tiers sur cet appareil n’est pas couvert par le service de garantie de Samsung, et Samsung ne peut être tenu responsable des problèmes de sécurité qui résultent des modifications par des tiers. • N’obstruez PAS les trous d’aération de votre réfrigérateur.
PIÈCES ET CARACTÉRISTIQUES A J B K C D E L F G M H I N Servez-vous de la présente section pour vous familiariser avec les pièces et caractéristiques de votre appareil. REMARQUE : Le présent manuel s’applique à plusieurs modèles différents. Le réfrigérateur que vous avez acheté peut être doté de quelques-unes ou de la totalité des caractéristiques indiquées ci-dessous. Leur emplacement, qui indiqué ci-dessous, peut ne pas être le même sur votre modèle. A Lumière du réfrigérateur (p.
INSTALLATION DU RÉFRIGÉRATEUR PREPARER L’INSTALLATION DU RÉFRIGÉRATEUR CLEARANCES • Laissez le dégagement nécessaire à droite, à gauche, à l’arrière et au-dessus au moment de l’installation. Ceci aidera à réduire la puissance d’énergie et à réduire vos factures d’énergie. • Si vous installez le réfrigérateur à un endroit inférieur à 10ºC (50ºF), il peut ne pas fonctionner de façon optimale. Félicitations pour votre achat de ce réfrigérateur Kenmore.
INSTALLATION DU RÉFRIGÉRATEUR AVERTISSEMENT ATTENTION Risque dû au Poids Important du Réfrigérateur Au moins deux personnes sont requises pour déplacer et installer ce réfrigérateur. Le non-respect de cette règle peut entraîner des blessures au niveau du dos ou autre. Évitez de placer le réfrigérateur à côté d’une source de chaleur, à la lumière directe du soleil ou dans un emplacement humide. Outils nécessaires Les outils suivants sont nécessaires à l’installation et au réglage de votre réfrigérateur.
INSTALLATION DU RÉFRIGÉRATEUR 4. Avec la clé de 13/32-po (10-mm), démonter les trois boulons qui tiennent la charnière sur le dessus du réfrigérateur. AVERTISSEMENT Veillez à ne pas faire tomber la porte pendant son retrait. La porte pourrait être endommagée ou rayée. DÉMONTAGE DES PORTES DE RÉFRIGÉRATEUR Si le réfrigérateur est trop large pour passer facilement dans l’embrasure de la porte, vous pouvez retirer les portes du réfrigérateur. 1.
INSTALLATION DU RÉFRIGÉRATEUR AVERTISSEMENT Veillez à ne pas faire tomber la porte du congélateur pendant son retrait. La porte pourrait être endommagée ou rayée. Démontage de la porte de congélateur 1. Séparer le cache sur la charnière intermédiaire. 3b. Démonter la porte du congélateur en la soulevant vers le haut. Faites attention à ne pas laisser tomber ou ne pas rayer la porte de congélateur. 2. Après le démontage d’une vis et de deux boulons, démonter la charnière intermédiaire.
INSTALLATION DU RÉFRIGÉRATEUR INVERSION DU SENS D’OUVERTURE DES PORTES 6. Retournez le support droit et réinstallez l’axe de charnière dans le support. Resserrez l’axe de charnière avec la clé hexagonale de 4 mm (5/32 po). Faites passer le pied dans le côté opposé du support de charnière. 1. Retirez les portes du réfrigérateur et du congélateur comme indiqué en pages 37 et 38. 2. Retirez deux vis et le cache des pieds avant du bas du réfrigérateur. 7.
INSTALLATION DU RÉFRIGÉRATEUR INVERSION DU SENS D’OUVERTURE DES PORTES (suite) 13. Replacez le cache de la charnière centrale sur le dessus de la charnière centrale gauche. 9. Replacez le cache de la charnière inférieure sur la charnière inférieure droite. 10. Retirez le cache et la vis en dessous ainsi que les deux vis en plastique du côté gauche du réfrigérateur où vous réinstallerez la charnière centrale gauche.
INSTALLATION DU RÉFRIGÉRATEUR REMARQUE : Les pièces pour procéder à l’inversion des portes sont fournies avec le réfrigérateur. Elles sont rangées dans l’étagère inférieure dans la porte du réfrigérateur. REMARQUE : Si le commutateur à lames n’est pas rebranché, une alarme se déclenchera au bout de 2 ou 3 minutes et l’affichage de la température du réfrigérateur clignotera. Si le connecteur n’est pas rebranché, l’affichage de la température ne s’allumera pas. 17.
INSTALLATION DU RÉFRIGÉRATEUR POSITIONNEMENT ET MISE À NIVEAU DU RÉFRIGÉRATEUR 3. Si le réfrigérateur n’est pas de niveau, réglez les pieds de nivellement jusqu’à ce qu’il soit de niveau. A l’aide d’un tournevis, tournez le pied dans le sens antihoraire pour prolonger le pied et lever le réfrigérateur. Tourner le pied dans le sens horaire pour escamoter le pied et abaisser le réfrigérateur. Plusieurs tours du pied de nivellement peuvent être nécessaire pour régler l’inclinaison du réfrigérateur.
UTILISATION DE VOTRE réfrigérateur UTILISATION DU PANNEAU DE COMMANDE 1 4 2 5 3 6 La température et fonction choisies/ panneau de commande FRANÇAIS 1 Bouton Power Freeze – Appuyer sur ce bouton pour congeler la nourriture rapidement. (Power Freeze durera 2½ heures.) (p. 45) 2 Bouton de congélateur – Bouton de réglage de la température de congélateur. Appuyer sur ce bouton pour régler la température de congélateur entre -14ºC (7°F) and -25ºC (-13°F).
UTILISATION DE VOTRE réfrigérateur CONTRÔLE DE LA TEMPÉRATURE Contrôle de la température de congélateur Contrôle de la température de réfrigérateur Pour commander la température de congélateur : Pour commander la température de réfrigérateur : Appuyer sur le bouton de Freezer. (se référer à l’image.) Appuyer sur le bouton de Fridge (se référer à l’image.) – La température peut être réglée par pas de 1ºC (1.8°F) entre -25ºC (-13°F) et -14ºC (7°F). – La température peut être réglée par pas de 1ºC (1.
UTILISATION DE VOTRE réfrigérateur CONTRÔLE DE LA TEMPÉRATURE (cont.) Utilisation Power Freeze Utilisation Power Cool Appuyer sur le bouton de Power Freeze. (Se référer à l’image.) Appuyer sur le bouton Power Cool. (Se référer à l’image.) – La lumière Power cool est toujours allumée (voir l’indication de la flèche) et cette fonction commence à fonctionner indépendamment de la température de réfrigérateur réglée.
UTILISATION DE VOTRE réfrigérateur STOCKAGE DE NOURRITURE DANS LE RÉFRIGÉRATEUR STOCKAGE DE NOURRITURE DANS LE TIROIR DE CONGÉLATEUR Le réfrigérateur a été conçu pour fournir des configurations proposant des économies d’espaces maximales. Voici certains des compartiments adaptés aux besoins du client que nous avons créés pour conserver vos aliments frais plus longtemps.
UTILISATION DE VOTRE réfrigérateur DEMONTAGE DES ACCESSOIRES DU RÉFRIGÉRATEUR Bacs de porte Tiroirs de fruits et légumes ATTENTION Pour démonter et réinstaller : 1. Tirer le tiroir au maximum. Incliner l’avant du tiroir et tirer tout droit. Tirez l’étagère en verre et le rail vers vous. (Se référer aux images 1 à 3.) Des blessures peuvent se produire si les bacs de porte ne sont pas fermement insérés. Ne pas permettre aux enfants de jouer avec des bacs.
UTILISATION DE VOTRE réfrigérateur DEMONTAGE DES ACCESSOIRES DU CONGÉLATEUR Tiroir Bac-tiroir de congélateur Pour démonter et remonter : Pour démonter et remonter : 1. Ouvrir la porte du congélateur. 1. Ouvrir la porte du congélateur. 2. Tirer le tiroir au maximum. Incliner vers le haut l’avant du tiroir et le dégager tout droit. 2. Sortir le bac-tiroir du congélateur. Inclinez l’avant du tiroir vers le haut puis tirez-le pour le sortir. Bac-tiroir de congélateur 3.
UTILISATION DE VOTRE réfrigérateur CHANGEMENT DES LAMPES INTÉRIEURES AVERTISSEMENT REMARQUE: Des LED de rechange sont disponibles au service d’assistance le plus proche de chez vous. Si vous souhaitez changer la LED, contactez notre service d’assistance. Risque de Choc électrique Avant de remplacer une des lampes intérieures, débranchez le réfrigérateur ou coupez l’alimentation électrique au niveau du disjoncteur ou de la boîte à fusibles.
ENTRETIEN ET NETTOYAGE NETTOYAGE DU RÉFRIGÉRATEUR Entretenir votre réfrigérateur prolonge la vie de votre appareil et aide à le garder sans odeur et stérilisé. Nettoyage de l’intérieur Nettoyage des joints de porte en caoutchoucr Nettoyer les parois et les accessoires intérieurs avec un détergent non agressif et puis essuyer avec un chiffon sec. Vous pouvez démonter les tiroirs et les étagères pour un nettoyage plus complet.
GUIDE DE DéPANNAGE LE RÉFRIGÉRATEUR NE FONCTIONNE PAS Vérifiez si... Alors... Le cordon d’alimentation est débranché. Bien branchez ie cordon dans une prise en état de marche et de la tension appropriée. Un fusible est grillé ou le disjoncteur s’est déclenché. Remplacez le fusible ou réenclenchez le disjoncteur. Le réfrigérateur en cours de dégivrage. Attendez la fin du cycle de dégivrage, soit environ 30 minutes. LE RÉFRIGÉRATEUR NE REFROIDIT PAS SUFFISAMMENT Vérifiez si... Alors...
GUIDE DE DéPANNAGE BRUITS D’EAU Vérifiez si... Alors... Vous entendez un gargouillement à l’intérieur du réfrigérateur. Ceci est normal. La circulation du frigorigène peut être accompagné de gargouillement. LA CARROSSERIE EST CHAUDE Vérifiez si... Alors... Certaines surfaces de la carrosserie peuvent être chaudes Ceci est normal. au toucher. MAUVAISE ODEUR DANS LE RÉFRIGÉRATEUR Vérifiez si... Alors... Le réfrigérateur et/ou le congélateur contiennent des aliments trop vieux ou gâtés.
REMARQUES FRANÇAIS 53 DA99-01921A (FR-2).indd 53 2010.3.
REMARQUES 54 DA99-01921A (FR-2).indd 54 2010.3.
REMARQUES FRANÇAIS 55 DA99-01921A (FR-2).indd 55 2010.3.
® Registered Trademark / ™ Trademark / SM Service Mark of Sears Brands LLC. © 2009 Sears Brands LLC under license by Sears Canada. 56 DA99-01921A (FR-2).indd 56 5/09 Printed in Korea 2010.3.