SM-T210 User Manual www.samsung.
About this manual This device provides high quality mobile communication and entertainment using Samsung’s high standards and technological expertise. This user manual is specially designed to detail the device’s functions and features. • Please read this manual before using the device to ensure safe and proper use. • Descriptions are based on the device’s default settings. • Images and screenshots may differ in appearance from the actual product.
About this manual • Default applications that come with the device are subject to updates and may no longer be supported without prior notice. If you have questions about an application provided with the device, contact a Samsung Service Centre. For user-installed applications, contact service providers. • Modifying the device’s operating system or installing softwares from unofficial sources may result in device malfunctions and data corruption or loss.
About this manual Trademarks • SAMSUNG and the SAMSUNG logo are registered trademarks of Samsung Electronics. • The Android logo, Google™, Google Maps™, Google Mail™, YouTube™, Google Play™ Store, and Google Talk™ are trademarks of Google, Inc. • Bluetooth® is a registered trademark of Bluetooth SIG, Inc. worldwide. • Wi-Fi®, Wi-Fi Protected Setup™, Wi-Fi Direct™, Wi-Fi CERTIFIED™, and the Wi-Fi logo are registered trademarks of the Wi-Fi Alliance.
Table of Contents Getting started Communication 7 8 9 10 12 14 14 15 15 15 34 37 39 40 41 41 42 Device layout Buttons Package contents Charging the battery Inserting a memory card Turning the device on and off Holding the device Locking and unlocking the device Adjusting the volume Switching to silent mode Web & network 43 44 45 46 47 Basics 16 17 20 21 22 24 25 26 26 28 29 30 31 33 Contacts Email Google Mail Talk Google+ Messenger ChatON Indicator icons Using the touch screen Rotating the screen No
Table of Contents Application & media stores Settings 62 63 63 64 64 65 65 65 66 66 82 82 83 83 83 84 84 85 85 86 86 86 86 87 88 89 92 92 92 92 93 94 95 Play Store Samsung Apps Game Hub Music Hub Play Books Play Movies Play Music Play Magazines Video Hub Learning Hub Utilities 67 68 70 73 73 74 75 75 76 77 77 78 Memo S Planner Polaris Office Dropbox Alarm World Clock Calculator S Voice Google Voice Search My Files Downloads Troubleshooting Travel & local 79 80 81 About Settings Wi-Fi Bluetooth Dat
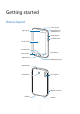
Getting started Device layout Front camera Microphone for speakerphone Light sensor Power button Volume button Touch screen Home button Back button Menu button Microphone Multipurpose jack Headset jack GPS antenna Rear camera Memory card slot Speaker Speaker 7
Getting started The microphone at the top of the device is active only when you use the speakerphone or take videos. • Do not cover the antenna area with your hands or other objects. This may cause connectivity problems or drain the battery. • Do not use a screen protector. This causes sensor malfunctions. • Do not allow water to contact the touch screen. The touch screen may malfunction in humid conditions or when exposed to water. Buttons Button Function • Press and hold to turn the device on or off.
Getting started Package contents Check the product box for the following items: • Device • Quick start guide Use only Samsung-approved software. Pirated or illegal software may cause damage or malfunctions, which are not covered by the warranty. • The items supplied with the device and any available accessories may vary depending on the region or service provider. • The supplied items are designed only for this device and may not be compatible with other devices.
Getting started Charging the battery Use the charger to charge the battery before using it for the first time. Use only Samsung-approved chargers, batteries, and cables. Unapproved chargers or cables can cause the battery to explode or damage the device. • When the battery power is low, the device emits a warning tone and displays a low battery power message. • If the battery is completely discharged, the device cannot be turned on immediately when the charger is connected.
Getting started After fully charging, disconnect the device from the charger. First unplug the charger from the device, and then unplug it from the electric socket. To save energy, unplug the charger when not in use. The charger does not have a power switch, so you must unplug the charger from the electric socket when not in use to avoid wasting power. The device should remain close to the electric socket while charging.
Getting started Inserting a memory card Your device accepts memory cards with maximum capacities of 32 GB. Depending on the memory card manufacturer and type, some memory cards may not be compatible with your device. • Some memory cards may not be fully compatible with the device. Using an incompatible card may damage the device or the memory card, or corrupt the data stored in it. • Use caution to insert the memory card right-side up. • The device supports only the FAT file system for memory cards.
Getting started Removing the memory card Before removing the memory card, first unmount it for safe removal. On the Home screen, tap Apps → Settings → Storage → Unmount SD card. Push the memory card until it disengages from the device, and then pull it out. Do not remove the memory card while the device is transferring or accessing information. Doing so can cause data to be lost or corrupted or damage to the memory card or device.
Getting started Turning the device on and off When turning on the device for the first time, follow the on-screen instructions to set up your device. Press and hold the Power button for a few seconds to turn on the device. • Follow all posted warnings and directions from authorised personnel in areas where the use of wireless devices is restricted, such as aeroplanes and hospitals. • Press and hold the Power button and tap Flight mode to disable the wireless features.
Getting started Locking and unlocking the device When not in use, lock the device to prevent unwanted operation. Pressing the Power button turns off the screen and puts the device into lock mode. The device automatically gets locked if it is not used for a specified period. To unlock the device, press the Power button or the Home button when the touch screen is turned off, tap anywhere on the screen, and then flick your finger in any direction.
Basics Indicator icons The icons displayed at the top of the screen provide information about the status of the device. The icons listed in the table below are most common.
Basics Using the touch screen Use only fingers to use the touch screen. • Do not allow the touch screen to come into contact with other electrical devices. Electrostatic discharges can cause the touch screen to malfunction. • Do not allow the touch screen to contact water. The touch screen may malfunction in humid conditions or when exposed to water. • To avoid damaging the touch screen, do not tap it with anything sharp or apply excessive pressure to it with your fingertips.
Basics Dragging To move an icon, thumbnail, or preview to a new location, tap and hold it and drag it to the target position. Double-tapping Double-tap on a webpage, map, or image to zoom in a part. Double-tap again to return.
Basics Flicking Flick left or right on the Home screen or the Applications screen to see another panel. Flick up or down to scroll through a webpage or a list, such as contacts. Pinching Spread two fingers apart on a webpage, map, or image to zoom in a part. Pinch to zoom out.
Basics Rotating the screen Many applications allow display in either portrait or landscape orientation. Rotating the device causes the display to automatically adjust to fit the new screen orientation. To prevent the display from rotating automatically, open the notifications panel and deselect Screen rotation. • Some applications do not allow screen rotation. • Some applications display a different screen depending on the orientation.
Basics Notifications Notification icons appear on the status bar at the top of the screen to report new messages, calendar events, device status, and more. Drag down from the status bar to open the notifications panel. Scroll the list to see additional alerts. To close the notifications panel, drag up the bar that is at the bottom of the screen. From the notifications panel, you can view your device’s current status and use the following options: • Wi-Fi: Activate or deactivate the Wi-Fi feature.
Basics Home screen The Home screen is the starting point to access all of the device’s features. It displays indicator icons, widgets, shortcuts to applications, and others. The Home screen can have multiple panels. To view other panels, scroll left or right. Rearranging items Adding an application icon On the Home screen, tap Apps, tap and hold an application icon, and then drag it into a panel preview. Adding an item Customise the Home screen by adding widgets, folders, or pages.
Basics Removing an item Tap and hold an item, and drag it to the rubbish bin that appears at the top of the Home screen. When the rubbish bin turns red, release the item. Rearranging panels Adding a new panel Tap → Edit page → . Moving a panel Tap → Edit page, tap and hold a panel preview, and then drag it to a new location. Removing a panel → Edit page, tap and hold a panel preview, and then drag it to the rubbish bin at the Tap bottom of the screen.
Basics Using widgets Widgets are small applications that provide convenient functions and information on your Home screen. To use them, add widgets from the widgets panel to the Home screen. • Some widgets connect to web services. Using a web-based widget may result in additional charges. • The widgets available may vary depending on the region or service provider. Adding widgets to the Home screen On the Home screen, tap Apps → Widgets.
Basics Closing an application Close applications not in use to save battery power and maintain device performance. Press and hold the Home button, tap , and then tap End next to an application to close it. To close all running applications, tap End all. Alternatively, press and hold the Home button, and then tap . Applications screen The Applications screen displays icons for all applications, including any new applications installed. On the Home screen, tap Apps to open the Applications screen.
Basics Uninstalling applications Tap → Uninstall, and then select an application to uninstall it. Default applications that come with the device cannot be uninstalled. Sharing applications Share downloaded applications with other users via email, Bluetooth, or other methods. → Share apps, select applications, tap Done, and then select a sharing method. The Tap next steps vary depending on the method selected.
Basics Using the Samsung keyboard Set options for the Samsung keyboard. Delete a preceding character. Break to the next line. Enter uppercase. Enter uppercase. Enter numerals and punctuation marks. Enter a space. Add an item from the clipboard. Entering uppercase Tap before entering a character. For all caps, tap it twice. Changing language keyboards Add languages to the keyboard, and then slide the space key left or right to change language keyboards.
Basics Connecting to a Wi-Fi network Connect the device to a Wi-Fi network to use the Internet or share media files with other devices. (p. 82) Ensure that the Wi-Fi connection is active before using Internet applications. Turning Wi-Fi on and off Open the notifications panel, and then tap Wi-Fi to turn it on or off. • Your device uses a non-harmonised frequency and is intended for use in all European countries.
Basics Setting up accounts Google applications, such as Play Store, require a Google account, and Samsung Apps requires a Samsung account. Create Google and Samsung accounts to have the best experience with the device. Adding accounts Follow the instructions that appear when opening a Google application without signing in to set up a Google account. To sign in with or sign up for a Google account, on the Applications screen, tap Settings → Add account → Google.
Basics Transferring files Move audio, video, image, or other types of files from the device to the computer, or vice versa. The following file formats are supported by some applications. Some file formats are not supported depending on the version of the device’s software or the computer operating system.
Basics Connecting as a media device 1 2 Connect the device to the computer using the USB cable. Open the notifications panel, and then tap Connected as a media device → Media device (MTP). Tap Camera (PTP) if your computer does not support Media Transfer Protocol (MTP) or not have any appropriate driver installed. 3 Transfer files between your device and the computer.
Basics Setting a pattern On the Applications screen, tap Settings → Lock screen → Screen lock → Pattern. Draw a pattern by connecting four dots or more, and then draw the pattern again to verify it. Set a backup unlock PIN to unlock the screen when you forget the pattern. Setting a PIN On the Applications screen, tap Settings → Lock screen → Screen lock → PIN. Enter at least four numbers, and then enter the password again to verify it.
Basics Upgrading the device The device can be upgraded to the latest software. This feature may not be available depending on the region or service provider. Upgrading with Samsung Kies Launch Samsung Kies and connect the device to the computer. Samsung Kies automatically recognises the device and shows available updates in a dialogue box, if any. Click the Update button in the dialogue box to start upgrading. Refer to the Samsung Kies help for details on how to upgrade.
Communication Contacts Use this application to manage contacts, including phone numbers, email addresses, and others. Tap Contacts on the Applications screen. Managing contacts Creating a contact Tap and enter contact information. • : Add an image. • / : Add or delete a contact field. Editing a contact Select a contact to edit, and then tap . Deleting a contact Tap . Searching for contacts Use one of the following search methods: • Scroll up or down the contacts list.
Communication Once a contact is selected, take one of the following actions: • : Add to favourite contacts. • : Compose an email. Importing and exporting contacts Syncing with Google Contacts Tap → Merge with Google. Contacts synced with Google Contacts appear with in the contacts list. If a contact is added or deleted on the device, it is also added to or deleted from Google Contacts, and vice versa. Syncing with Samsung Contacts Tap → Merge with Samsung.
Communication Favourite contacts Tap , and then take one of the following actions: • Search: Search for contacts. • Add to favourites: Add contacts to favourites. • Remove from favourites: Remove contacts from favourites. • Grid view / List view: View contacts in grid or list form. Contact groups Adding contacts to a group Select a group, and then tap → Add member. Select contacts to add, and then tap . Managing groups Tap , and then take one of the following actions: • Search: Search for contacts.
Communication Business card Create a business card and send it to others. Tap Set up my profile, enter details, such as phone number, email address, and postal address, and then tap . If user information has been saved when you set up the device, select the business card in ME, and then tap to edit. Tap → Share namecard via, and then select a sharing method. Email Use this application to send or view email messages. Tap Email on the Applications screen.
Communication Sending scheduled messages While composing a message, tap . Tick Schedule sending, set a time and date, and then tap Done. The device will send the message at the specified time and date. • If the device is turned off at the scheduled time, is not connected to the network, or the network is unstable, the message will not be sent. • This feature is based on the time and date set on the device.
Communication Google Mail Use this application to quickly and directly access the Google Mail service. Tap Google Mail on the Applications screen. • This application may not be available depending on the region or service provider. • This application may be labelled differently depending on the region or service provider. Sending messages In any mailbox, tap , enter recipients, a subject, and a message, and then tap SEND. Tap +CC/BCC to add more recipients. Tap to attach images.
Communication Labels Google Mail does not use actual folders, but uses labels instead. When Google Mail is launched, it displays messages labelled Inbox. To add a label to a message, select the message, tap , and then select the label to assign. Talk Use this application to chat with others via Google Talk. Tap Talk on the Applications screen. This application may not be available depending on the region or service provider.
Communication Switching between chats Scroll left or right. Deleting chat history Chats are automatically saved. To delete the chat history, tap → Clear chat history. Google+ Use this application to stay connected with people via Google’s social network service. Tap Google+ on the Applications screen. This application may not be available depending on the region or service provider. Tap All circles to change the category, and then scroll up or down to view posts from your circles.
Communication ChatON Use this application to chat with any device. To use this application, you must sign in to your Samsung account. Tap ChatON on the Applications screen. This application may not be available depending on the region or service provider. Create a buddies list by entering phone numbers or Samsung account email addresses, or by selecting buddies from the list of suggestions. Alternatively, tap Contact sync to manually sync contacts from the device.
Web & network Internet Use this application to browse the Internet. Tap Internet on the Applications screen. Viewing webpages Tap the address field, enter the web address, and then tap Go. Tap to share, save, or print the current webpage while viewing a webpage. Opening a new page Tap . To go to another webpage, scroll left or right on the title field, and tap the page to select it.
Web & network History Tap → History to open a webpage from the list of recently-visited webpages. To clear the → Clear history. history, tap Tap → History → Most visited to open a webpage from the list of most visited webpages. Links Tap and hold a link on the webpage to open it in a new page, save, or copy. To view saved links, tap → Downloads. Sharing webpages → Share page.
Web & network Searching the web by voice Tap the address field, tap , speak a keyword, and then select one of the suggested keywords that appear. Syncing with other devices Sync open tabs and bookmarks to use with Chrome on another device, when you are logged in with the same Google account. To view open tabs on other devices, tap → Other devices. Select a webpage to open. To view bookmarks, tap → Bookmarks.
Web & network Pairing with other Bluetooth devices On the Applications screen, tap Settings → Bluetooth → Scan, and detected devices are listed. Select the device you want to pair with, and then accept the auto-generated passkey on both devices to confirm. Sending and receiving data Many applications support data transfer via Bluetooth. An example is Gallery. Open Gallery, select an image, tap → Bluetooth, and then select one of the Bluetooth devices.
Web & network Playing files on a remote device Select a device or web storage, select a file, tap , and then select a device. • Supported file formats may differ depending on connected devices as a media player. • Some files may be buffered while playing depending on the network connection. Using the Group Play feature Share screens with multiple devices that are connected to the same Wi-Fi network. Select a media category, select files by ticking, and then tap → Group Play.
Media Music Player Use this application to listen to music. Tap Music Player on the Applications screen. • Some file formats are not supported depending on the software installed on the device. • Some files may not play properly depending on the encoding method used. Playing music Select a music category, and then select a song to play. Tap the album image to open the music player screen. Open the playlist. Set the file as your favourite track. View file details. Mute the sound. Select a sound effect.
Media Creating playlists Make an own selection of songs. Tap → Create playlist. Enter a title and tap OK. Select songs to include, and then tap Done. To add the currently-playing song to a playlist, tap → Add to playlist. Playing music by mood Play music grouped by mood. The playlist is automatically created by the device. When a new song is added, tap Music square → . Tap Music square and select a cell of mood. Or select multiple cells by dragging your finger.
Media Taking photos Taking a photo Tap to take a photo. Use this for delayed-time shots. Indicates which storage is in use. Switch between the front and rear camera. Switch between still and video mode. Change the shooting mode. Determine how much light the camera’s sensor receives. Open the image viewer to display photos. Change the camera settings. Select among various effects that are available. Scene mode Predefined settings make point-and-shoot photos easier to take. Tap → Scene mode.
Media • Sunset: Use this setting for richer colours and sharper contrasts. • Dawn: Use this setting for very subtle colours. • Autumn colour: Use this setting for red-shifted background scenery. • Candlelight: Use this setting for images of bright light against a dark background. • Firework: Use this setting for high-contrast scenes. • Backlight: Use this setting for subjects with bright lights behind them. • Night: Use this setting for images taken in darker conditions.
Media Taking videos Taking a video Slide the still-video switch to the video icon, and then tap recording, tap . to take a video. To stop The zoom function may not be available when recording at the highest resolution. Recording mode Use this for delayed-time shots. Indicates which storage is in use. Switch between the front and rear camera. Change recording mode. Switch between still and video mode. Select among various effects that are available. Open the video player to play videos.
Media Tap to change recording mode. • Normal: Use this mode for normal quality. • Limit for Email: Use this mode to lower quality for sending via email. Zooming in and out Use one of the following methods: • Use the Volume button to zoom in or out. • Spread two fingers apart on the screen to zoom in, and pinch to zoom out. • The zoom function may not be available when shooting at the highest resolution. • The zoom in/out effect is available when using the zoom feature while shooting video.
Media Configuring settings for Camera Tap to configure settings for Camera. Not all of the following options are available in both still camera and video camera modes. The available options vary depending on the mode used. • Edit shortcuts: Reorganise shortcuts to frequently-used options. • GPS tag: Attach a GPS location tag to the photo. • To improve GPS signals, avoid shooting in locations where the signal may be obstructed, such as between buildings or in low-lying areas, or in poor weather conditions.
Media • Guidelines: Display viewfinder guides to help composition when selecting subjects. • Image quality: Set the quality level for photos. Higher quality images require more storage space. • Video quality: Set the quality level for videos. • Storage: Select the memory location for storage. • Reset: Reset the camera settings. Shortcuts Reorganise shortcuts for easy access to the camera’s various options. Tap → Edit shortcuts. Tap and hold an option and drag it to a slot at the left of the screen.
Media Zooming in and out Use one of the following methods to zoom in an image: • Double-tap anywhere to zoom in. • Spread two fingers apart on any place to zoom in. Pinch to zoom out, or double-tap to return. Playing videos Video files show the icon on the preview. Select a video to watch it and tap . Editing images When viewing an image, tap and use the following functions: • Face tag: Register the faces in the image as face tags. • Copy to clipboard: Copy to clipboard.
Media Deleting images Use one of the following methods: • In a folder, tap → Select item, select images by ticking, and then tap • When viewing an image, tap . . Sharing images Use one of the following methods: • In a folder, tap to others. → Select item, select images by ticking, and then tap • When viewing an image, tap to send them to send it to others or share it via social network services. Setting as wallpaper When viewing an image, tap contact.
Media Video Player Use this application to play video files. Tap Video Player on the Applications screen. • Avoid locking the device’s screen while playing a DivX Video-On-Demand. Each time you lock the screen while playing a DivX Video-On-Demand, one of your available rental counts is lost. • Some file formats are not supported depending on the software installed on the device. • Some files may not play properly depending on the encoding method used. Playing videos Select a video to play.
Media Deleting videos Tap → Delete, select videos by ticking, and then tap Delete. Sharing videos Tap → Share via, select a sharing method, select videos by ticking, and then tap Share. Using Popup Video player Use this feature to use other applications without closing the video player. While watching to use the pop-up player. videos, tap Spread two fingers apart on the screen to enlarge the player or pinch to reduce it. To move the player, drag the player to another location.
Media Watching videos Tap , and then enter a keyword. Select one of the returned search results to watch a video. Rotate the device to landscape orientation to display full screen. Search for videos. Send the URL to others. Pause or resume playback. Add the video to the playlist. Move forwards or backwards by dragging the bar. Rotate the screen to portrait orientation. Change display quality. Sharing videos Select the video to view, tap , and then select a sharing method.
Media Flipboard Use this application to access your personalised magazines. Tap Flipboard on the Applications screen. This application may not be available depending on the region or service provider. To start your Flipboard, flick left on the greeting page, select news topics, and then tap Build Your Flipboard. Select a cover story or a topic, flick through the Flipboard pages, and then select an article to read. While reading an article, use the following icons: • : Go to the previous page.
Application & media stores Play Store Use this application to purchase and download applications and games that are able to run on the device. Tap Play Store on the Applications screen. This application may not be available depending on the region or service provider. Installing applications Browse applications by category, or tap to search with a keyword. Select an application to view information. To download it, tap Install.
Application & media stores Samsung Apps Use this application to purchase and download dedicated Samsung applications. For more information, visit www.samsungapps.com. Tap Samsung Apps on the Applications screen. This application may not be available depending on the region or service provider. Installing applications Browse applications by category. Tap To search for an application, tap search field. to select a category.
Application & media stores Music Hub Use this application to purchase and download songs. Tap Music Hub on the Applications screen. This application may not be available depending on the region or service provider. Tap the search field, and then enter a keyword to search for. Select one from the list of search results. To buy an album, select the price tag, and then follow on-screen instructions to complete the purchase process. Play Books Use this application to read and download book files.
Application & media stores Play Movies Use this application to watch, download, and rent movies or TV shows. Tap Play Movies on the Applications screen. This application may not be available depending on the region or service provider. Select a category at the top of the screen, and then select a movie, TV programme, or video to play or rent. Play Music Use this application to listen to music from the device or stream music from the Google cloud service. Tap Play Music on the Applications screen.
Application & media stores Video Hub Use this application to access and purchase videos. Tap Video Hub on the Applications screen. This application may not be available depending on the region or service provider. Select a category, and then select a video. Learning Hub Use this application to access learning material. Tap Learning Hub on the Applications screen. This application may not be available depending on the region or service provider. Select a category, and then select a video lecture or book.
Utilities Memo Use this application to record important information to save and view at a later date. Tap Memo on the Applications screen. Composing memos Tap , enter a memo, and then tap Done. To change the background colour, tap colour. → Colour. Each category has different background To lock the memo so that others cannot view it, tap → Lock. Browsing memos Browse memo thumbnails by scrolling up or down. To search for a memo, tap . To change the view mode, tap To delete memos, tap . .
Utilities To delete the memo, tap → Delete. To change the background colour, tap → Colour. To set a PIN to lock or unlock the memo, tap → Lock. To print the memo via a USB or Wi-Fi connection, tap compatible with some Samsung printers. To send the text to others, tap → Print. The device is only → Share text via. To send the memo to others, tap → Share via. S Planner Use this application to manage events and tasks. Tap S Planner on the Applications screen.
Utilities Enter a title and specify which calendar to use or sync with. Then tap Edit event details or Edit task details to add more details, such as how often the event repeats, when it has an advance alert, or where it takes place. Attach a map showing the location of the event. Enter the location in the Location field, tap next to the field, and then pinpoint the precise location by tapping and holding on the map that appears. Attach an image.
Utilities Polaris Office Use this application to edit documents in various formats, including spreadsheets and presentations. Tap Polaris Office on the Applications screen. Some functions may not be available, depending on the file type. Create a document. Scroll left or right to view recent documents. Browse by document formats. View and manage documents online. Browse folders. View favourite documents. Creating documents Tap , and then select a document type.
Utilities Reading documents Tap a file. Or tap Browser, Clouds, Form type, or Favourites, and then select a file to open. Tap , and then use one of the following functions: Document • Save as: Save the document with a different name. • PDF export: Save the document as a PDF file. • Find & Replace: Search for or replace text. • Page layout: Change the layout of pages. • Full width view: View the document contents only, without margins. • Zoom: Change the view size.
Utilities Spreadsheet • Save as: Save the document with a different name. • Find & Replace: Search for or replace text. • Protect worksheet: Lock the sheet so that others cannot edit it. • Freeze frame: Keep the selected row in place. • Recalculation: Recalculate the functions on the sheet. • Sort: Sort cells by specific criteria. • Filter: View cells filtered by specific criteria. • Zoom: Change the view size. • Print: Print the document via a USB or Wi-Fi connection.
Utilities Dropbox Use this application to save and share files with others via the Dropbox cloud storage. When you save files to Dropbox, your device automatically syncs with the web server and any other computers that have Dropbox installed. Tap Dropbox on the Applications screen. This application may not be available depending on the region or service provider. When running Dropbox for the first time, tap Start to activate it. Follow the on-screen instructions to complete the setup.
Utilities Setting alarms Tap , set a time for the alarm to go off, select days for the alarm to repeat, and then tap Save. • Location alarm: Set a location. The alarm goes off only when you are in the location. • Snooze: Set an interval and the number of times for the alarm to repeat after the preset time. • Smart alarm: Set a time for the alarm to go off before the preset time. Stopping alarms Drag outside the large circle to stop an alarm. Drag the alarm after a specified length of time.
Utilities Calculator Use this application for simple or complex calculations. Tap Calculator on the Applications screen. Rotate the device to landscape orientation to display the scientific calculator. If Screen → Scientific calculator. rotation is disabled, tap To see the calculation history, tap To clear the history, tap to hide the keypad. → Clear history. To change the character size for the history, tap → Text size.
Utilities Google Use this application to search not only the Internet, but also applications and their contents on the device as well. Tap Google on the Applications screen. This application may not be available depending on the region or service provider. Searching the device Tap the search field, and then enter a keyword. Alternatively, tap , speak a keyword, and then select one of the suggested keywords that appear.
Utilities Voice Search Use this application to search webpages by speaking. Tap Voice Search on the Applications screen. This application may not be available depending on the region or service provider. Speak a keyword or phrase when Speak now appears on the screen. Select one of the suggested keywords that appear. My Files Use this application to access all kinds of files stored in the device, including images, videos, songs, and sound clips. Tap My Files on the Applications screen.
Utilities Downloads Use this application to see what files are downloaded through the applications. Tap Downloads on the Applications screen. This application may not be available depending on the region or service provider. To see the files downloaded from the Internet, tap Internet downloads, otherwise, tap Other downloads to see the files downloaded from other applications, such as Email. Select a file to open it with an appropriate application.
Travel & local Maps Use this application to pinpoint the location of the device, search for places, or get directions. Tap Maps on the Applications screen. This application may not be available depending on the region or service provider. Searching for locations Tap Search Maps, enter an address, and then tap . Select a location to view the detailed → Local. location information.
Travel & local Getting directions for a destination 1 2 Tap . Tap , and then select a method to enter starting and ending locations: • My current location: Use current location for starting location. • Contacts: Select from the contacts list. • Point on map: Pinpoint by tapping on the map. • My Places: Select from the list of favourite places. 3 4 Select a travel method, such as driving, public transit, or walking, and then tap Go. Select one of the routes that appear.
Travel & local Navigation Use this application to search for a route to a destination. Tap Navigation on the Applications screen. • Navigation maps, your current location, and other navigational data may differ from actual location information. You should always pay attention to road conditions, traffic, and any other factors that may affect your driving. Follow all safety warnings and regulations while driving. • This application may not be available depending on the region or service provider.
Settings About Settings Use this application to configure the device, set application options, and add accounts. Tap Settings on the Applications screen. Wi-Fi Activate the Wi-Fi feature to connect to a Wi-Fi network and access the Internet or other network devices. To use options, tap . • Advanced: Customise Wi-Fi settings. • WPS push button: Connect to a secured Wi-Fi network with a WPS button. • WPS PIN entry: Connect to a secured Wi-Fi network with a WPS PIN.
Settings Wi-Fi Direct Wi-Fi Direct connects two devices directly via a Wi-Fi network without requiring an access point. On the Settings screen, tap Wi-Fi → Wi-Fi Direct. Bluetooth Activate the Bluetooth feature to exchange information over short distances. To use more options, tap . • Rename device: Set a Bluetooth name for the device. • Visibility timeout: Set duration that the device is visible. • Received files: View received files via the Bluetooth feature.
Settings Nearby devices • File sharing: Activate media sharing to allow other DLNA-enabled devices to access media files on your device. • Shared contents: Set the device to share your content with other devices. • Device name: Enter a media server name for your device. • Allowed devices list: View the list of devices that can access your device. • Not-allowed devices list: View the list of devices that are blocked from accessing your device. • Download to: Select a memory location for saving media files.
Settings Display Change the settings for the display. • Wallpaper: – – Home screen: Select a background image for the Home screen. – – Lock screen: Select a background image for the locked screen. – – Home and lock screens: Select a background image for the Home screen and the locked screen. • Notification panel: Customise the items that appear on the notifications panel. • Brightness: Set the brightness of the display.
Settings Power saving mode Activate power-saving mode and change the settings for power-saving mode. • CPU power saving: Set the device to limit some system resource usage. • Screen power saving: Set the device to decrease the brightness of the display. • Learn about Power saving mode: Discover how to reduce battery consumption. Battery View the amount of battery power consumed by your device. Application manager View and manage the applications on your device.
Settings Lock screen Change settings for the locked screen. • Screen lock: Activate the screen lock feature. • Lock screen options: Change the settings for the locked screen. These settings are applied only when you set the swipe lock option. – – Shortcuts: Set the device to show and edit application shortcuts on the locked screen. This feature may not be available depending on the region or service provider. – – Information ticker: Set the device to show news or stock information on the locked screen.
Settings Security Change settings for securing the device. • Encrypt device: Set a password to encrypt data saved on the device. You must enter the password each time you turn on the device. Charge the battery before enabling this setting because it may take more than an hour to encrypt your data. • Encrypt external SD card: – – Encrypt: Set the device to encrypt files when you save them to a memory card. – – Full encryption: Set the device to encrypt all files on a memory card.
Settings • Device administrators: View device administrators installed on the device. You can allow device administrators to apply new policies to the device. • Unknown sources: Choose to install applications from any source. If not chosen, download applications only from Play Store. • Trusted credentials: Use certificates and credentials to ensure secure use of various applications. • Install from device storage: Install encrypted certificates stored on the USB storage.
Settings Samsung keyboard To change the Samsung keyboard settings, tap . The available options may vary depending on the region or service provider. • Input languages: Select languages for text input. • Predictive text: Activate predictive text mode to predict words based on your input and show word suggestions. You can also customise the word prediction settings. • Continuous input: Set the device to enter text by sweeping on the keyboard.
Settings Voice search • Language: Select a language for the voice recognition. • Speech output: Set the device to provide voice feedback to alert you to the current action. • Block offensive words: Hide offensive words from voice search results. • Download offline speech recognition: Download and install language data for offline voice input. Text-to-speech output • Preferred TTS engine: Select a speech synthesis engine. To change the settings for speech synthesis engines, tap .
Settings Backup and reset Change the settings for managing settings and data. • Back up my data: Set the device to back up settings and application data to the Google server. • Backup account: Set up or edit your Google backup account. • Automatic restore: Set the device to restore settings and application data when the applications are reinstalled on the device. • Factory data reset: Reset settings to the factory default values and delete all data. Add account Add email or SNS accounts.
Settings Accessibility Accessibility services are special features for those with certain physical disabilities. Access and alert the following settings to improve accessibility to the device. • Auto-rotate screen: Set the interface to rotate automatically when you rotate the device. • Screen timeout: Set the length of time the device waits before turning off the display’s backlight. • Speak passwords: Set the device to read aloud passwords you enter with Talkback.
Settings Developer options Change the settings for application development. • Desktop backup password: Set a password to secure your backup data. • Stay awake: Set the screen to remain on while you are charging the battery. • Protect SD card: Set the device to request a confirmation when reading data from a memory card. • USB debugging: Activate USB debugging mode to connect your device to a computer with a USB cable.
Settings • Force GPU rendering: Set the device to use 2D hardware acceleration to improve graphic performance. • Strict mode: Set the device to flash the screen when applications perform long operations. • Show CPU usage: Set the device to list all active processes. • Profile GPU rendering: Set the device to check the time of GPU rendering time. • Enable traces: Set the device to capture traces of application and system performance.
Troubleshooting When you turn on your device or while you are using the device, it prompts you to enter one of the following codes: Password: When the device lock feature is enabled, you must enter the password you set for the device. Your device displays network or service error messages • When you are in areas with weak signals or poor reception, you may lose reception. Move to another area and try again. • You cannot access some options without a subscription.
Troubleshooting The device beeps and the battery icon is empty Your battery is low. Recharge or replace the battery to continue using the device. The battery does not charge properly or the device turns off The battery in the device is not user replaceable. If you have problems with the battery or need it replaced, take the device to a Samsung Service Centre.
Troubleshooting Another Bluetooth device is not located • Ensure that the Bluetooth wireless feature is activated on your device. • Ensure that the Bluetooth wireless feature is activated on the device you wish to connect to, if necessary. • Ensure that your device and the other Bluetooth device are within the maximum Bluetooth range (10 m). If the tips above do not solve the problem, contact a Samsung Service Centre.
Some content may differ from your device depending on the region, service provider, or software version, and is subject to change without prior notice. www.samsung.com English (EU). 05/2013. Rev. 1.