
User`s guide


Table Of Contents
- Contents
- Introduction
- Software overview
- Getting Started
- Loading originals and print media
- Copying
- Understanding the Copy screen
- Copying originals
- Changing the settings for each copy
- Using special copy features
- ID card copying
- Copying ID with the manual ID copy option
- 2-up or 4-up copying (N-up)
- Poster copying
- Clone copying
- Book copying
- Booklet copying
- Cover copying
- Transparency copying
- Watermark copying
- Overlay copying
- Auto crop copying
- Multi-Bin
- Erasing edges
- Erasing background images
- Shifting margins
- Gray enhance copying
- Adjusting backside images
- Faxing (Optional)
- Preparing to fax
- Sending a fax from a computer
- Understanding the Fax screen
- Sending a fax
- Receiving a fax
- Adjusting the document settings
- Setting up a fax phonebook
- Using the polling option
- Using Mailbox
- Printing a report after sending a fax
- Sending a fax in toll save time
- Adding documents to a reserved delay fax job
- Forwarding a received fax to other destination
- Forwarding a sent fax to other destination by a fax
- Forwarding a received fax to other destination by a fax
- Forwarding a sent fax to other destination by an email
- Forwarding a received fax to other destination by an email
- Forwarding a sent fax to other destination by server
- Forwarding a received fax to other destination by server
- Setting up the end fax tone
- Setting up receiving faxes in color
- Scanning
- Basic printing
- Using USB flash memory
- Machine status and advanced setup
- Maintenance
- Printing a machine report
- Monitoring the supplies life
- Finding the serial number
- Sending the imaging unit reorder notification
- Sending the toner reorder notification
- Checking Document Box
- Cleaning your machine
- Maintaining the toner cartridge
- Redistributing toner
- Replacing the toner cartridge
- Replacing the imaging unit
- Replacing the waste toner container
- Maintenance Parts
- Managing your machine from the website
- Troubleshooting
- Ordering supplies and accessories
- Installing accessories
- Specifications
- Glossary
- Index
- Software section
- Software section Contents
- Installing Printer Software in Windows
- Basic Printing
- Advanced Printing
- Using Windows PostScript Driver
- Using Direct Printing Utility
- Sharing the Printer Locally
- Scanning
- Using Smart Panel
- Using Your Printer in Linux
- Using Your Printer with a Macintosh
- Software section Index
1.5 <
Introduction>
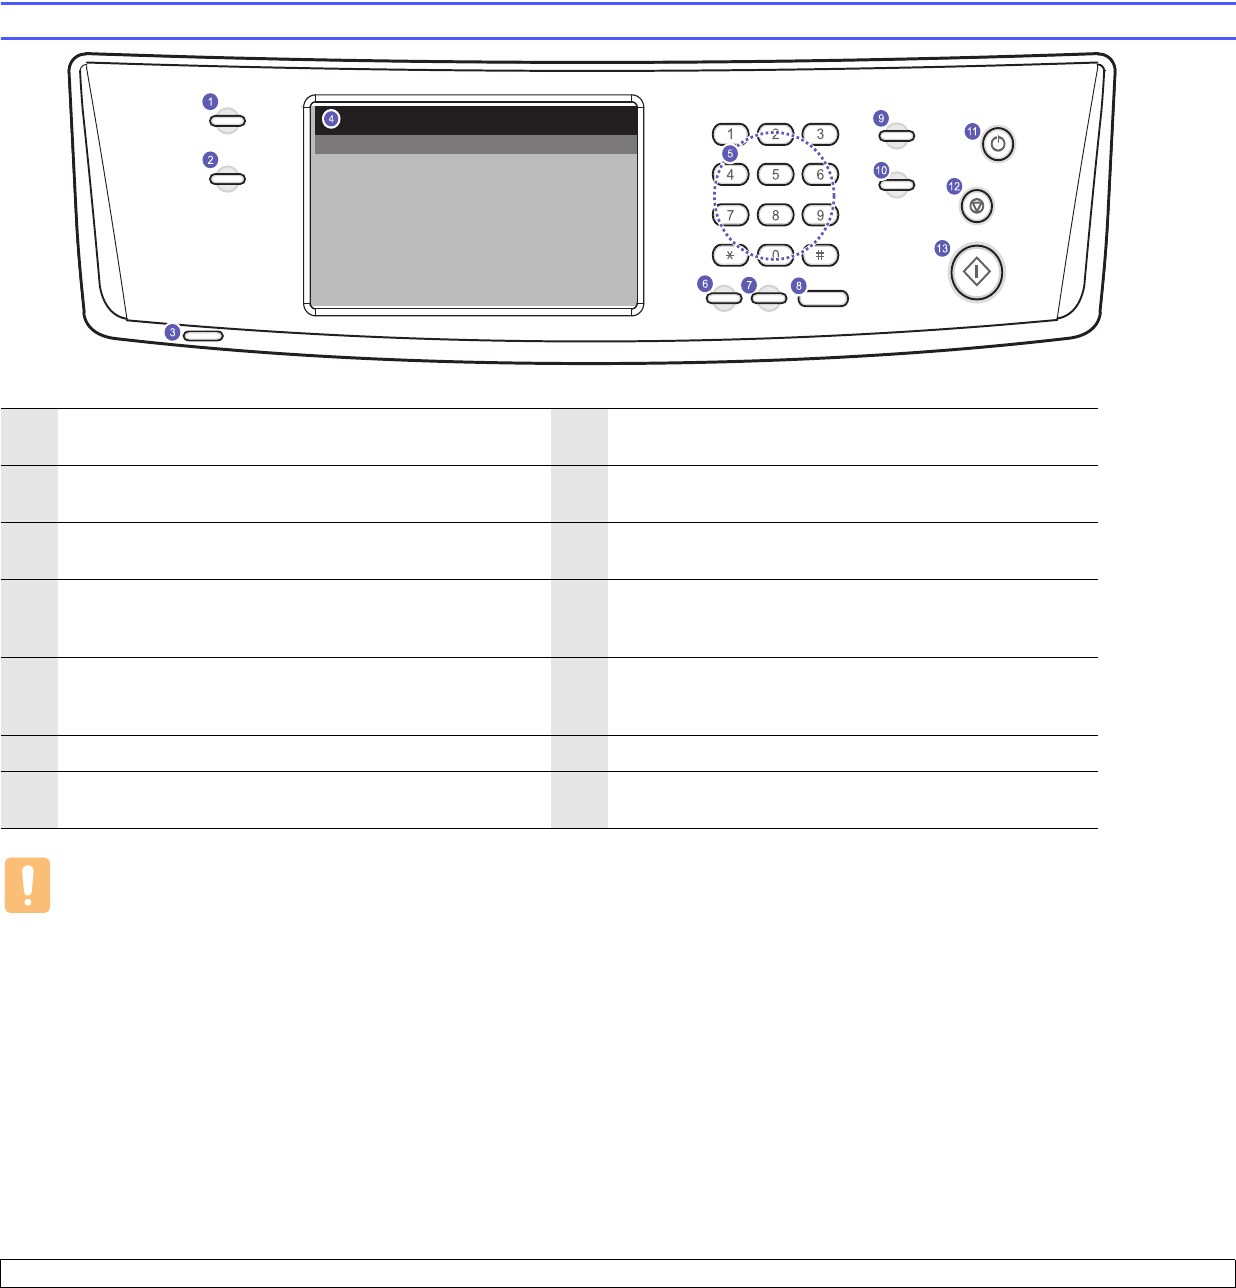
Control panel overview
Caution
When you use the touch screen, use your finger only. The screen may be damaged with a sharpen pen or anything else.
1
Machine Setup: Leads you to the machine setup and
advanced settings. (Page 10.1)
8
On Hook Dial: Engages the telephone line.
2
Job Status: Shows the jobs currently running, queued jobs
or completed jobs.
9
Interrupt: Stops a job in process to do an urgent copy job.
3
Status
: Shows the status of your machine. (Page 1.7)
10
Clear All: Reverts the current settings to the default
values.
4
Display screen
: Displays the current machine status and
prompts during an operation. You can set menus easily
using the touch screen.
11
Power Saver: Sends the machine into the power saver
mode. You can also turn the power on and off with this
button. (Page 3.6)
5
Numeric keypad
: Dials fax number, and enters the number
value for document copies or other options.
12
Stop: Stops an operation at any time. The pop up window
appears on the screen showing the current job that the
user can stop or resume.
6
Clear: Deletes characters in the edit area.
13
Start: Starts a job.
7
Redial/Pause: In standby mode, redials the last number, or
in edit mode, inserts a pause into a fax number.