Contact SAMSUNG WORLDWIDE If you have any questions or comments relating to Samsung products, please contact the SAMSUNG customer care center. Comment contacter Samsung dans le monde Si vous avez des suggestions ou des questions concernant les produits Samsung, veuillez contacter le Service Consommateurs Samsung. Country CANADA U.S.A Customer Care Center 1-800-SAMSUNG(726-7864) 1-800-SAMSUNG(726-7864) Web Site www.samsung.com/ca www.samsung.com Address Samsung Electronics Canada Inc.
Important Warranty Information Regarding Television Format Viewing Wide screen format LCD Displays (16:9, the aspect ratio of the screen width to height) are primarily designed to view wide screen format full-motion video. The images displayed on them should primarily be in the wide screen 16:9 ratio format, or expanded to fill the screen if your model offers this feature and the images are constantly moving.
English Contents General Information PC Display ■ ■ ■ ■ ■ ■ ■ Using Your TV as a Computer (PC) Display.....................42 ■ Display Modes..................................................................42 ■ Setting up the TV with your PC........................................43 List of Features...................................................................2 Accessories........................................................................2 Viewing the Control Panel...........................
General Information List of Features • • • • • • • • Adjustable picture settings that can be stored in the TV’s memory. Automatic timer to turn the TV on and off. A special sleep timer. Excellent Digital Interface & Networking : With a built-in HD digital tuner, non-subscription HD broadcasts can be viewed with no Cable Box/Satellite receiver (Set-Top Box) needed. You can listen to music files and view pictures on USB Mass Storage Class (MSC) devices. HDMI/DVI connection of your PC to this TV.
Viewing the Control Panel Buttons on the Lower-Right Part of the Panel The buttons on the lower-right panel control your TV’s basic features, including the on-screen menu. To use the more advanced features, you must use the remote control. 1 2 3 4 8 ➣ The product color and shape may vary depending on the model. 1 SOURCE Toggles between all the available input sources (TV, AV1, AV2, S-Video, Component1, Component2, PC, HDMI1, HDMI2/DVI, HDMI3, USB).
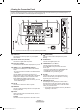
Viewing the Connection Panel Use the connection panel jacks to connect A/V components that will be connected continuously, such as DVD players or a VCR. For more information on connecting equipment, see pages 6~11. [TV Rear Panel] [TV Side Panel] ➣ The product color and shape may vary depending on the model. 1 AUDIO OUT Connects to the audio input jacks on your Amplifier/ Home theater. 8 2 DIGITAL AUDIO OUT (OPTICAL) Connects to a Digital Audio component. 9 POWER INPUT Connects the supplied power cord.
Remote Control You can use the remote control up to a distance of about 23 feet from the TV. 1 POWER Turns the TV on and off. % PRE-CH Tunes to the previous channel. 2 TV Selects the TV mode directly. ^ CH / CH Press to change channels. 3 NUMERIC BUTTONS Press to change the channel. & SOURCE Press to display and select the available video sources. 4 ress to select additional P channels (digital and analog) being broadcast by the same station.
Installing Batteries in the Remote Control 1. 2. 3. Lift the cover at the back of the remote control upward as shown in the figure. Install two AAA size batteries. ➣ Make sure to match the “+” and “–” ends of the batteries with the diagram inside the compartment. Replace the cover. ➣ Remove the batteries and store them in a cool, dry place if you won’t be using the remote control for a long time. The remote control can be used up to about 23 feet from the TV.
Connecting Cable TV To connect to a cable TV system, follow the instructions below. Cable without a Cable Box 1. Plug the incoming cable into the ANT IN terminal on the back of the TV. ➣ Because this TV is cable-ready, you do not need a cable box to view unscrambled cable channels. ANT IN Connecting to a Cable Box that Descrambles All Channels 1. 2. Find the cable that is connected to the ANT OUT terminal on your cable box. ➣ This terminal might be labeled “ANT OUT”, “VHF OUT” or simply, “OUT”.
Connecting a DVD Player or Cable Box/Satellite receiver (Set-Top Box) via HDMI This connection can only be made if there is an HDMI Output connector on the external device. 1. Connect an HDMI Cable between the HDMI IN (1, 2 or 3) jack on the TV and the HDMI jack on the DVD Player or Cable Box/Satellite receiver (Set-Top Box).
Connecting a DVD Player or Cable Box/Satellite receiver (Set-Top Box) via Component cables The rear panel jacks on your TV make it easy to connect a DVD Player or Cable Box/Satellite receiver (Set-Top Box) to your TV. 1. Connect a Component Cable between the COMPONENT IN (1 or 2) [Y, PB, PR] jacks on the TV and the COMPONENT [Y, PB, PR] jacks on the DVD Player or Cable Box/Satellite receiver (Set-Top Box). 2.
Connecting a VCR Video Connection These instructions assume that you have already connected your TV to an antenna or a cable TV system (according to the instructions on pages 6~7). Skip step 1 if you have not yet connected to an antenna or a cable system. 1. Unplug the cable or antenna from the back ANT IN of the TV. 2. Connect the cable or antenna to the ANT IN terminal on the back of the VCR. 3.
Connecting a Digital Audio System The rear panel jacks on your TV make it easy to connect a Digital Audio System (Home theater/Receiver) to your TV. 1. Connect an Optical Cable between the “DIGITAL AUDIO OUT (OPTICAL)” jacks on the TV and the Digital Audio Input jacks on the Digital Audio System. When a Digital Audio System is connected to the “DIGITAL AUDIO OUT (OPTICAL)” jack: Decrease the volume of the TV and adjust the volume level with the system’s volume control.
Operation Turning the TV On and Off Press the POWER button on the remote control. You can also use the POWER button on the TV. Plug & Play Feature When the TV is initially powered on, basic settings proceed automatically and subsequently. 1. Press the POWER button on the remote control. The message “Menu Language, Store Demo, Channels, and Time will be set.” is displayed. Press the ENTER button, then “Select language of the OSD.” menu is automatically displayed. Press the ENTER button.
6. Press the ENTER button. Press the ▲ or ▼ button to select “Auto”, then Press the ENTER The message “Set to daylight saving time.” is displayed. If you select “Manual”, “Set current date and time” is displayed. (See page 45) button. Plug & Play Set the Clock Mode. Clock Mode : Auto Auto Manual Move 7. Press the ▲ or ▼ button to select “Off” or “On”, then press the ENTER button. The message “Select the time zone in which you live.” is displayed.
Using the Button The button is used to select stations that broadcast a digital signal. 1. For example, for Channel 7-1, press 7, then , then 1. ➣ HD indicates the TV is receiving a Digital High Definition signal. SD indicates the TV is receiving a Standard Definition signal. ➣ For quick channel change, press the number buttons, then press the ENTER button. Using the PRE-CH Button to select the Previous Channel 1. Press the PRE-CH button. The TV will switch to the last channel viewed.
Using the TOOLS Button You can use the TOOLS button to select your frequently used functions quickly and easily. The “TOOLS” menu changes depending on which external input mode you are viewing. 1. Press the TOOLS button. The “TOOLS” menu will appear. 2. Press the ▲ or ▼ button to select a menu. 3. Press the ▲/▼/◄/►/ENTER buttons to display, change, or use the selected items. For a more detailed description of each function, refer to the corresponding page.
Storing Channels in Memory (Automatic Method) Channel 1. Press the MENU button to display the menu. Press the ▲ or ▼ button to select “Channel”, then press the ENTER button. 2. Press the ▲ or ▼ button to select “Auto Program”, then press the ENTER button. Antenna : Air Auto Program ► Clear Scrambled Channel Channel List Fine Tune Signal Strength 3. Press the ▲ or ▼ button to select the antenna connection, then press the ENTER button. ➣ Air: “Air” antenna signal. Cable: “Cable” antenna signal.
To Select the Source Input Use to select TV or other external input sources such as DVD players or Cable Box/Satellite receivers (Set-Top Box) connected to the TV. Use to select the input source of your choice. 1. Press the MENU button to display the menu. Press the ▲ or ▼ button to select “Input”, then press the ENTER button. 2. Press the ENTER button to select “Source List”. Press the ▲ or ▼ button to select signal source, then press the ENTER button.
Picture Control Changing the Picture Standard Picture You can select the type of picture which best corresponds to your viewing requirements. 1. Press the MENU button to display the menu. Press the ENTER button to select “Picture”. :Standard Backlight :7 Contrast : 95 Brightness : 45 Sharpness : 50 Color : 50 Tint (G/R) : G50/R50 Detailed Settings 2. Press the ENTER button to select “Mode”. Press the ▲ or ▼ button to select “Dynamic”, “Standard” or “Movie”. Press the ENTER button.
Adjusting the Detailed Settings Samsung’s new TVs allow you to make even more precise picture settings than previous models. See below to adjust detailed picture settings. Activating Detailed Settings Picture 1. Press the MENU button to display the menu. Press the ENTER button to select “Picture”. 2. Press the ENTER button to select “Mode”. Press the ▲ or ▼ button to select “Standard” or “Movie”, then press the ENTER button. ➣ “Detailed Settings” is available in “Standard” or “Movie” mode.
Adjusting the Gamma You can adjust the Primary Color (Red, Green, Blue) Intensity. (-3 ~ +3) 8. Press the ▲ or ▼ button to select “Gamma”, then press the ENTER button. 9. Press the ◄ or ► button to decrease or increase the value. Press the ENTER button.
Adjusting the White Balance You can adjust the color temperature for more natural picture colors. 17. Press the ▲ or ▼ button to select “White Balance”, then press the ENTER button. 18. Select the required option by pressing the ▲ or ▼ button, then press the ENTER button. 19. Press the ◄ or ► button to decrease or increase the value of a particular item. Press the ENTER button. • • • • • • • R-Offset: Adjusts the red color darkness. G-Offset: Adjusts the green color darkness.
Setting the xvYCC Setting the xvYCC mode to “On” increases detail and color space when watching movies from an external device (ie. DVD player) connected to the HDMI or Component IN jacks. 24. Press the ▲ or ▼ button to select “xvYCC”, then press the ENTER button. 25. Press the ▲ or ▼ button to select “Off” or “On”. Press the ENTER button. ➣ “xvYCC” is available when the picture mode is set to “Movie”, and the external input is set to “HDMI” or “Component” mode.
Configuring Picture Options Activating Picture Options Tint (G/R) Picture 1. Press the MENU button to display the menu. Press the ENTER button to select “Picture”. 2. Press the ▲ or ▼ button to select “Picture Options”, then press the ENTER button. ➣ Press the ▲ or ▼ button to select a particular item. Press the ENTER button. ➣ When you are satisfied with your setting, press the ENTER button. ➣ In PC mode, you can only make changes to the “Color Tone” and “Size” from among the items in “Picture Options”.
➣ When Double ( , ) mode has been set in PIP, the Picture Size cannot be set. ➣ Temporary image retention may occur when viewing a static image on the set for more than two hours. ➣ After selecting “Zoom1”, “Zoom2” or “Wide Fit”: Size Press the ◄ or ► button to select “Position”, then press the ENTER 16:9 button. Press the ▲ or ▼ button to move the picture up and down. Zoom1 Position Reset: Press the ◄ or ► button to select “Reset”, then press the ENTER button. You can initialize the setting.
Setting the Digital Noise Reduction If the broadcast signal received by your TV is weak, you can activate the Digital Noise Reduction feature to help reduce any static and ghosting that may appear on the screen. 1. Follow the “Activating Picture Options” instructions numbers 1 and 2. (Refer to page 23) 2. Press the ▲ or ▼ button to select “Digital NR”, then press the ENTER button. 3. Press the ▲ or ▼ button to select “Off”, “Low”, “Medium”, “High” or “Auto”. Press the ENTER button.
Setting the Film Mode Picture Options The TV can be set to automatically sense and process film signals from all sources and adjust the picture for optimum quality. 1. Follow the “Activating Picture Options” instructions numbers 1 and 2. (Refer to page 23) 2. Press the ▲ or ▼ button to select “Film Mode”, then press the ENTER button. Color Tone : Normal Size : 16:9 Digital NR : Auto DNle : Off HDMI Black Level : Normal Film Mode : Off Blue Only Mode : Off Move 3.
Viewing Picture-in-Picture You can use the PIP feature to simultaneously watch the TV tuner (analog broadcasts only) and one external video source. (See page 33 to select the PIP picture sound.) This product has one built-in tuner, which does not allow PIP to function in the same mode. Please see ‘PIP Settings’ below for details. ➣ While V-Chip (See page 49) is in operation, the PIP function cannot be used. Activating Picture-in-Picture 2. Press the ENTER button again.
Changing the PIP Channel PIP 5. Press the ▲ or ▼ button to select “Air/Cable”, then press the ENTER button. 6. Press the ▲ or ▼ button to select “Air” or “Cable”, then press the ENTER button. PIP : On Size : Position : Air/Cable Air : Air Channel : Air 11 Cable Move Enter Return PIP 7. Press the ▲ or ▼ button to select “Channel”, then press the ENTER button. 8. Press the ▲ or ▼ button to select the desired channel in the PIP window. Press the ENTER button.
Sound Control Changing the Sound Standard Sound You can select the sound mode to best suit the programming you’re watching. 1. Press the MENU button to display the menu. Press the ▲ or ▼ button to select “Sound”, then press the ENTER button. Mode : Custom ► Equalizer • • • • • Standard: Selects the normal sound mode. Music: Emphasizes music over voices. Movie: Provides the best sound for movies Speech: Emphasizes voice over other sounds. Custom: Recalls your customized sound settings.
4. Press the ▲ or ▼ button to select a particular frequency to adjust. Press the ◄ or ► button to increase or decrease the level of the particular frequency. • Mode: Selects the sound mode among the predefined settings. • Balance L/R: Adjusts the balance between the right and left speaker. • Bandwidth Adjustment (100Hz, 300Hz, 1kHz, 2kHz, 3kHz, 10kHz): To adjust the level of different bandwidth frequencies.
Choosing Preferred Language The digital-TV transmission system is capable of simultaneous transmission of many audio tracks (for example, simultaneous translations of the program into foreign languages). Select the language you would like to hear the audio track in. 1. Press the MENU button to display the menu. Equalizer Press the ▲ or ▼ button to select “Sound”, then press the ENTER button.
Automatic Volume Control Sound Reduces the differences in volume level among broadcasters. 1. Press the MENU button to display the menu. Press the ▲ or ▼ button to select “Sound”, then press the ENTER button. 2. Press the ▲ or ▼ button to select “Auto Volume”, then press the ENTER button. Preferred Language : English Multi-Track Sound : Stereo Auto Volume : Off TV Speaker : On Sound Select : Main ► Sound Reset Sound 3.
Listening to the Sound of the Sub (PIP) Picture Sound When the PIP feature is activated, you can listen to the sound of the sub (PIP) picture. 1. Press the MENU button to display the menu. Press the ▲ or ▼ button to select “Sound”, then press the ENTER button. 2. Press the ▲ or ▼ button to select “Sound Select”, then press the ENTER button. 3. Press the ▲ or ▼ button to select “Main” or “Sub”, then press the ENTER button. Press the EXIT button to exit.
Channel Control Managing Channels Using this menu, you can Add/Delete or set Favorite channels and use the program guide for digital broadcasts. Viewing All Channels Press the ◄ button to select “Added Channels”. Clear Scrambled Channel Channel List Signal Strength 2 Air 4 Air 4-2 8 13 13-1 Air Antenna All Channels 3. Press the ▲ or ▼ button to select “All Channels”. ➣ Shows all currently available channels. Press the ENTER button. ► Fine Tune Added Channels 2.
Erasing and Adding Channels 2. Auto Program Clear Scrambled Channel Channel You can delete or add a channel to display the channels you want. 1. Press the MENU button. Press the ▲ or ▼ button to select “Channel”, then press the ENTER button. Press the ▲ or ▼ button to select “Channel List”, then press the ENTER button. Channel List ► Fine Tune Signal Strength Press the ◄ button to select “Added Channels”. Added Channels 2 Air 4 Air 4-2 8 13 13-1 Air Antenna All Channels 3.
Setting Your Favorite Channels Press the ◄ button to select “Added Channels”. Channel List ► Fine Tune Signal Strength 2 Air 4 Air 4-2 ♥ TV #8 8 Air 13 Air 13-1 Air Antenna All Channels ♥ TV #3 Air 4 Air 4-2 Alice’s Adventures in Wonderland Zoom Select 2 TOOLS Option ♥ TV #8 8 Air 13 Air 13-1 Air Antenna All Channels 3. Press the ▲ or ▼ button to select “All Channels”. ➣ Shows all currently available channels. Press the ENTER button. 4.
Reserving a Program (Timer Viewing) Channel If you reserve a program you want to watch, the channel is automatically switched to the reserved channel in the Channel List; even when you are watching another channel. To reserve a program, set the current time first. See pages 45~46. Reserved channels can only be set if they are in the “Channel List” (See page 34). 1. Press the MENU button. Auto Program Press the ▲ or ▼ button to select “Channel”, then press the ENTER Clear Scrambled Channel button.
Confirming a Viewing Reservation Auto Program Clear Scrambled Channel Channel You can view, modify or delete a reservation. 1. Press the MENU button. Press the ▲ or ▼ button to select “Channel”, then press the ENTER button. Press the ▲ or ▼ button to select “Channel List”, then press the ENTER button. 2 Air 4 Air 4-2 8 13 13-1 Air Antenna Programmed 3. Press the ▲ or ▼ button to select “Programmed”. ➣ Shows all current reserved programs. Press the ENTER button.
Labeling Channels - Analog Channels can labeled so that their call letters appear whenever the channel is selected. 1. Press the MENU button. Press the ▲ or ▼ button to select “Channel”, then press the ENTER button. Press the ▲ or ▼ button to select “Channel List”, then press the ENTER button. Auto Program Clear Scrambled Channel Channel Channel List ► Fine Tune Signal Strength Added Channels 2. Press the ▲ or ▼ button to select the channel to be assigned a new name, then press the TOOLS button.
Clearing Scrambled Channels - Digital 2. Press the ▲ or ▼ button to select “Clear Scrambled Channel”, then press the ENTER button. It searches scrambled channels, which are to be removed from the list. ➣ To stop searching scrambled channels; Press the ENTER button to select “Stop”. Press the ◄ button to select “Yes”, then press the ENTER button. 3. When the scrambled channel searching is completed, press the ENTER button. Press the EXIT button to exit. ➣ This function is only available in “Cable” mode.
Checking the Digital-Signal Strength Channel Unlike analog channels, which can vary in reception quality from “snowy” to clear, digital (HDTV) channels have either perfect reception quality or you will not receive them at all. So, unlike analog channels, you cannot fine tune a digital channel. You can, however, adjust your antenna to improve the reception of available digital channels. 1. Press the MENU button to display the menu.
PC Display Using Your TV as a Computer (PC) Display Setting Up Your PC Software (Based on Windows XP) The Windows display-settings for a typical computer are shown below. The actual screens on your PC will probably be different, depending upon your particular version of Windows and your particular video card. However, even if your actual screens look different, the same basic set-up information will apply in almost all cases. (If not, contact your computer manufacturer or Samsung Dealer.) 1.
Setting up the TV with your PC How to Auto Adjust Use the Auto “Adjust function” to have the TV set automatically adjust the video signals it receives. The function also automatically fine-tunes the settings and adjusts the frequency values and positions. ➣ This function does not work in DVI-Digital mode. ➣ Preset: Press the SOURCE button to select PC mode. 1. Press the MENU button to display the menu. Press the ▲ or ▼ button to select “Picture”, then press the ENTER button.
Changing the Screen Position 2. Press the ▲ or ▼ button to select “Screen”, then press the ENTER button. Sharpness Picture Adjust the PC’s screen positioning if it does not fit the TV screen. ➣ Preset: Press the SOURCE button to select PC mode. 1. Press the MENU button to display the menu. Press the ▲ or ▼ button to select “Picture”, then press the ENTER button.
Time Setting Setting the Clock Setting the clock is necessary in order to use the various timer features of the TV. Also, you can check the time while watching the TV. (Just press the INFO button.) Option 1: Setting the Clock Manually button. button. Plug & Play Language Setup 1. Press the MENU button to display the menu.
Option 2: Setting the Clock Automatically Plug & Play button. button. Language Setup The Clock can be set automatically if you are receiving a digital signal. 1. Press the MENU button to display the menu. Press the ▲ or ▼ button to select “Setup”, then press the ENTER Press the ▲ or ▼ button to select “Time”, then press the ENTER : English Time ► V-Chip Caption External Settings Entertainment : Off Energy Saving : Off PIP SW Upgrade 2. Press the ENTER Time button to select “Clock”.
Setting the Sleep Timer Setup The sleep timer automatically shuts off the TV after a preset time (30, 60, 90, 120, 150 and 180 minutes). 1. Press the MENU button to display the menu. Plug & Play Press the ▲ or ▼ button to select “Setup”, then press the ENTER button. Language Press the ▲ or ▼ button to select “Time”, then press the ENTER button. : English Time ► V-Chip Caption External Settings Entertainment : Off Energy Saving : Off PIP SW Upgrade 2.
Setting the On/Off Timer Plug & Play button. Language Setup 1. Press the MENU button to display the menu. Press the ▲ or ▼ button to select “Setup”, then press the ENTER button. Press the ▲ or ▼ button to select “Time”, then press the ENTER : English Time ► V-Chip Caption External Settings Entertainment : Off Energy Saving : Off PIP SW Upgrade 2. Three different On/Off Timer Settings can be made. Press the ▲ or ▼ button to select “Timer 1”, “Timer 2” or “Timer 3”, then press the ENTER button.
Function Description Selecting a Menu Language Plug & Play Setup 1. Press the MENU button to display the menu. Press the ▲ or ▼ button to select “Setup”, then press the ENTER button. Press the ▲ or ▼ button to select “Language”, then press the ENTER button. Language : English ► Time V-Chip Caption External Settings Entertainment : Off Energy Saving : Off PIP 2. Plug & Play Setup Press the ▲ or ▼ button to select “English”, “Español” or “Français”. Press the ENTER button.
3. The “V-Chip” screen will appear. Press the ▲ or ▼ button to select “Change PIN”, then press the ENTER button. The Change PIN screen will appear. Choose any 4 digits for your PIN and enter them. As soon as the 4 digits are entered, the “Confirm new PIN.” screen appears. Re-enter the same 4 digits. When the Confirm screen disappears, your PIN has been memorized. Press the EXIT button to exit.
How to Set up Restrictions Using the TV Parental Guidelines Setup First, set up a personal identification number (PIN) and enable the V-Chip. (See previous section.) Parental restrictions can be set up using either of two methods: The TV guidelines or the MPAA rating. 1. Press the MENU button to display the menu. Language : English Press the ▲ or ▼ button to select “Setup”, then press the ENTER button. Time 2. Press the ▲ or ▼ button to select “V-Chip”, then press the ENTER V-Chip ► button.
How to Set up Restrictions Using the MPAA Ratings: G, PG, PG-13, R, NC-17, X, NR Setup The MPAA rating system uses the Motion Picture Association of America (MPAA) system and its main application is for movies. When the V-Chip lock is on, the TV will automatically block any programs that are coded with objectionable ratings (either MPAA or TV-Ratings). 1. Press the MENU button to display the menu. Language : English Press the ▲ or ▼ button to select “Setup”, then press the ENTER button. Time 2.
How to Set up Restrictions Using the Canadian English Language : English Time Setup 1. Press the MENU button to display the menu. Press the ▲ or ▼ button to select “Setup”, then press the ENTER button. 2. Press the ▲ or ▼ button to select “V-Chip”, then press the ENTER button. The message “Enter PIN” will appear. Enter your 4 digit PIN number. V-Chip ► Caption External Settings Entertainment : Off Energy Saving : Off PIP SW Upgrade 3. The “V-Chip” screen will appear.
How to Set up Restrictions Using the Canadian French Language : English Time Setup 1. Press the MENU button to display the menu. Press the ▲ or ▼ button to select “Setup”, then press the ENTER button. 2. Press the ▲ or ▼ button to select “V-Chip”, then press the ENTER button. The message “Enter PIN” will appear. Enter your 4 digit PIN number. V-Chip ► Caption External Settings Entertainment : Off Energy Saving : Off PIP SW Upgrade V-Chip 3. The “V-Chip” screen will appear.
Using the V-Chip for Digital channels Language : English Time Setup Parental restriction information can be used while watching DTV channels. 1. Press the MENU button to display the menu. Press the ▲ or ▼ button to select “Setup”, then press the ENTER button. 2. Press the ▲ or ▼ button to select “V-Chip”, then press the ENTER button. The message “Enter PIN” will appear. Enter your 4 digit PIN number. V-Chip ► Caption External Settings Entertainment : Off Energy Saving : Off PIP SW Upgrade 3.
Viewing Closed Captions (On-Screen Text Messages) - Analog Setup The Analog Caption function operates in either analog TV channel mode or when a signal is supplied from an external device to TV. (Depending on the broadcasting signal, the Analog Caption function may operate on digital channels.) 1. Press the MENU button to display the menu. Time Press the ▲ or ▼ button to select “Setup”, then press the ENTER button. V-Chip 2.
Viewing Closed Captions (On-Screen Text Messages) - Digital Time Setup The Digital Captions function operates on digital channels. 1. Press the MENU button to display the menu. Press the ▲ or ▼ button to select “Setup”, then press the ENTER button. 2. Press the ▲ or ▼ button to select “Caption”, then press the ENTER button. 3. Press the ENTER button to select “Caption”. Press the ▲ or ▼ button to select “On”, then press the ENTER button.
Adjusting the TV On/Off Melody Sound V-Chip Setup A melody sound can be set to come on when the TV is powered On or Off. 1. Press the MENU button to display the menu. Press the ▲ or ▼ button to select “Setup”, then press the ENTER button. 2. Press the ▲ or ▼ button to select “External Settings”, then press the ENTER button. Off: Turns off the melody function. Low: Sets the melody volume to low. Medium: Sets the melody volume to medium. High: Sets the melody volume to high.
Setting the Entertainment mode Setup The “Entertainment” mode enables you to select the optimal display and sound for sports, cinema and games. 1. Press the MENU button to display the menu. Caption Press the ▲ or ▼ button to select “Setup”, then press the ENTER button. External Settings 2. Press the ▲ or ▼ button to select “Entertainment”, then press the ENTER Entertainment : Off button. Energy Saving : Off 3.
Upgrading the Software HDMI IN3 Samsung may offer upgrades for TV's firmware in the future. Please contact the Samsung call center at 1-800-SAMSUNG (726-7864) to receive information about downloading upgrades and using a USB drive. Upgrades will be possible by connecting a USB drive to the USB port located on your TV. 1. Insert a USB drive containing the firmware upgrade into the WISELINK port TV Side Panel on the side of the TV. 2. Press the MENU button to display the menu.
WISELINK Using the WISELINK Function Connecting a USB Device TV Side Panel HDMI IN3 This function enables you to view and listen to photo (JPEG) and audio files (MP3) saved on a USB Mass Storage Class (MSC) device. 1. Press the POWER button on the remote control or front panel. ➣ The TV is powered on. 2. Connect a USB device containing JPEG and/or MP3 files to the WISELINK jack (USB jack) on the side of the TV.
Using the WISELINK Menu 1. Press the MENU button. Press the ▲ or ▼ button to select “Application”, then press the ENTER button. 2. Press the ▲ or ▼ button to select “WISELINK”, then press the ENTER button. ➣ The “WISELINK” menu is displayed. WISELINK SUM 851.98MB/995.00MB Free PHOTO Photo SUM Device Music Setup e Exit O Press the W.LINK button on the remote control to display the “WISELINK” menu.
Screen Display Photo 2 image_1.jpg Month Date Color Composition Folder Favorite 1File(s) Selected6 : Jan : Jan.01.2008 : Gray : : P-other : ★★★ 1 Preference Monthly 3 4 Jan Nov ▲ Timeline SUM5 Device Favorites Setting Select Jump TOOLS Option 7 1 Currently selected photo Shows the currently selected photo. 2 Photo Information Window Shows information about the currently selected photo. You can change the “Color”, “Composition”, and “Favorite”.
Sorting Photo List You can sort photos in the Photo List by a particular standard. 1. Press the W.LINK button on the remote control to display the “WISELINK” menu. 2. Press the ◄ or ► button to select “Photo”, then press the ENTER button. ➣ Photo files are displayed. 3. Press the ▲ or ▼ button to select a sorting standard. (“Monthly”, “Timeline”, “Color”, “Composition”, “Folder”, “Preference”) ➣ The photos are sorted according to the newly selected sorting standard. 4.
Color Sorts photos by color. ➣ You can change the photo color information. 1. Select “Color” as the sorting standard in the Photo List. 2. Press the ◄ or ► button to select from the sublist of files grouped by color. (REW) or ➣ To move to the previous / next group, press the (FF) button. 3. Press the TOOLS button. Press the ▲ or ▼ button to select “Play Current Group”. 4. Press ENTER to play the selected group of photo files from the sublist. Changing the color information 1.
Folder Sorts photos by folder. ➣ If there are many folders in USB, the photos files are shown in order in each folder. The photo file in the Root folder is shown first and the others are shown in alphabetical order by name. 1. Select “Folder” as the sorting standard in the Photo List. 2. Press the ◄ or ► button to select from the sublist of files grouped by folder. (REW) or ➣ To move to the previous / next group, press the (FF) button. 3. Press the TOOLS button.
Deleting the Photo file 1. Press the ◄ or ► button to select the desired photo in the Photo list. 2. Press the TOOLS button. 3. Press the ▲ or ▼ button to select “Delete”, then press the ENTER button. ➣ The “Selected File(s) : Delete this file?” message appear. 4. Press the ◄ or ►button to select “OK”, then press the ENTER button. ➣ The photo is deleted. ➣ When a read-only file is deleted, the “Read-only file(s). Delete the file(s)?” message appear. ➣ If you select “Cancel”, the deletion is cancelled. 5.
Viewing a Photo or Slide Show Viewing a Slide Show 1. Press the W.LINK button on the remote control to display the “WISELINK” menu. 2. Press the ◄ or ► button to move to “Photo”, then press the ENTER button. ➣ Photo files are displayed. 3. Press the ◄ or ► button to select the desired photo in the Photo list. 4. Press the TOOLS button. 5. Press the ▲ or ▼ button to select “Slide Show”, then press the button. ENTER Photo image_1.jpg Month Date Color Composition Folder Favorite : Jan Silde Show : Jan.
Viewing a photo 1. Press the W.LINK button on the remote control to display the “WISELINK” menu. 2. Press the ◄ or ► button to move to “Photo”, then press the ENTER button. ➣ Photo files are displayed. 3. Press the ◄ or ► button to select the desired photo in the Photo list. Then Press the Yellow button to select only one file. 4. Press the ENTER button over a photo icon. ➣ The currently selected photo is displayed in full screen. 20/22 image_1.jpg SUM E Slide Show Previous 440x440 Next TOOLS 2.
Zoom You can zoom into images in full screen mode. Press the ▲ or ▼ button to select “Zoom”, then press the ENTER button. Press the ◄ or ► button repeatedly to increase or decrease the Zoom effect. (x1 → x2 → x4) To move the enlarged photo image, press the ENTER button, then press the ▲/▼/◄/► buttons. ➣ Note that when the enlarged picture is smaller than the original screen size, the location change function doesn’t work. ➣ The enlarged file is not saved.
Background Music Setting You can set the background music. Press the ▲ or ▼ button to select “Background Music Setting”, then press the ENTER button. ➣ If you turn off the “Background Music”, even if the “Background Music Settings” have been set up, the background music will not be played. ➣ Loading music files is needed to change BGM mode. Play music files in music category to load. ➣ “Background Music setting” menu is displayed. Press the ◄ or ► button to select the desired BGM (Background music) mode.
Using the Music List This menu shows MP3 files from among the files saved on a USB memory device. 1. Press the W.LINK button on the remote control to display the “WISELINK” WISELINK menu. SUM 851.98MB/995.00MB Free Music Photo SUM Device 2. Press the ◄ or ► button to select “Music”, then press the ENTER button. ➣ Music files are displayed. ➣ Press the (Play) / ENTER button over a music icon to play the music. ➣ To move to the previous / next group, press the (REW) or (FF) button.
5 Item Selection Information Shows the number of music files that are selected by pressing the Yellow button. 6 Help Items • Red(Device) button: Selects a connected device. • Green(Favorites Setting) button: Changes the favorites setting for the selected music. Press this button repeatedly until the desired value appears. (Refer to page 75) • Yellow(Select) button: Selects music files from the music list. Selected music files are marked with a symbol the left.
Artist Sorts music files by the artist. ➣ It sorts the music file by artist in alphabetical order. 1. Select “Artist” as the sorting standard in the Music List. 2. Press the ◄ or ► button to select from the sublist of files grouped in alphabetical order. ➣ To move to the previous / next group, press the (REW) or (FF) button. 3. Press the TOOLS button. 4. Press the ▲ or ▼ button to select “Play Current Group”. 5. Press ENTER to play the selected group of music files from the sublist.
Genre Sorts music files by the genre. 1. Select “Genre” as the sorting standard in the Music List. 2. Press the ◄ or ► button to select from the sublist of files grouped by Genre. ➣ To move to the previous / next group, press the (REW) or (FF) button. 3. Press the TOOLS button. 4. Press the ▲ or ▼ button to select “Play Current Group”. 5. Press ENTER to play the selected group of music files from the sublist.
Deleting the Music file 1. Press the ◄ or ► button to select the desired music file in the music list. 2. Press the TOOLS button. 3. Press the ▲ or ▼ button to select “Delete”, then press the ENTER button. ➣ The (for example) “Selected File(s) : Delete this file?” message appear. 4. Press the ◄ or ► button to select “OK”, then press the ENTER button. ➣ The music is deleted. ➣ When a read-only file is deleted, the “Read-only file(s). Delete the file(s)?” message appear.
Playing a Music File Playing a music file 1. Press the W.LINK button on the remote control to display the “WISELINK” menu. 2. Press the ◄ or ► button to select “Music”, then press the ENTER button. ➣ Music files are displayed. 3. Pressing the ◄ or ► button to select a music file to be played, then press the ENTER button. ➣ This menu only shows files with the MP3 file extension. Files with other file extensions are not displayed, even if they are saved on the same USB device.
Playing the selected music files 1. Press the W.LINK button on the remote control to display the WISELINK menu. 2. Press the ◄ or ► button to select “Music”, then press the ENTER button. 3. Press the ◄ or ► button to select the desired music file, then press the yellow button. Repeat the above operation to select multiple music files. ➣ The mark appears to the left of the selected music file. Music (Play) / ENTER button. 4. Press the ➣ Only the selected file is played.
Using the Setup Menu Setup displays the user settings of the WISELINK menu. 1. Press the W.LINK button on the remote control to display the WISELINK menu. 2. Press the ◄ or ► button to select “Setup”, then press the ENTER button. 3. Press the ▲ or ▼ button to select the desired option. (Slide Show Speed, Music Repeat Mode, Screen Saver Run Time, Information, Safe Remove) 4. Press the ◄ or ► button to select the option, then press the ENTER button.
About Anynet+ What is Anynet+? Anynet+ is a function that enables you to control all connected Samsung devices that support Anynet+ with your Samsung TV’s remote. Connecting Anynet+ Devices The Anynet+ system can be used only with Samsung devices that have the Anynet+ feature. To be sure your Samsung device has this feature, check if there is an Anynet+ logo on it. To connect to a TV TV Anynet+ Device 1 HDMI 1. Cable HDMI 1.
Setting Up Anynet+ The following settings help set the Anynet+ functions. To use the Anynet+ Function, Anynet+ (HDMI-CEC) must be set to On Application 1. Press the MENU button. Press the ▲ or ▼ button to select “Application”, then press the ENTER button. 2. Press the ▲ or ▼ button to select “Anynet+ (HDMI-CEC)”, then press the ENTER button. 3. Press the ENTER button to select “Anynet+ (HDMI-CEC)”. 4. Press the ▲ or ▼ button to select “On”, then press the ENTER button.
Anynet+ Menu The Anynet+ menu changes depending on the type and status of the Anynet+ devices connected to the TV. Anynet+ Menu View TV Device List Record Menu on Device Device Operation Timer Recording Stop Recording Receiver Setup Description Switches from Anynet+ to TV broadcast mode. Displays the Anynet+ device list. Starts a recording. (This menu works only for a device supporting recording.) Shows the menu of the connected device.
Listening through a Receiver (Home theater) You can listen to sound through a receiver instead of the TV speaker. TOOLS 1. Press the TOOLS button. Press the ▲ or ▼ button to select “Receiver”. Device List Record 2. Press the ◄ or ► button to select to “On”. Timer Recording Now you can listen to sound through the receiver. Receiver ◄ Off ► 3. Press the EXIT button to exit. Picture Mode : Standard Sound Mode : Custom ➣ If your receiver supports audio only, it may not appear in the device list.
Appendix Troubleshooting If the TV seems to have a problem, first try this list of possible problems and solutions. If none of these troubleshooting tips apply, call Samsung customer service at 1-800-SAMSUNG. Problem Possible Solution Poor picture. Try another channel. Adjust the antenna. Check all wire connections. Poor sound quality. Try another channel. Adjust the antenna. No picture or sound. Try another channel. Press the SOURCE button. Make sure the TV is plugged in.
Problem Possible Solution Image is not stable and may appear to vibrate when you have a computer connected to the PC input. If the setting is not correct, use your computer utility program to change the display settings. ➣ Your TV supports multiscan display functions within the following frequency domain: Horizontal frequency (kHz) 30~60 Vertical frequency (Hz) 60~75 PC Maximum refresh rate (at 60 Hz) 1920 x 1080 Image is not centered on the screen. Adjust the horizontal and vertical position.
Installing the Stand 1. 2. Attach your LCD TV to the stand. ➣ Two or more people should carry the TV. ➣ Make sure to distinguish between the front and back of the stand when attaching it. ➣ To make sure the TV is installed on the stand at a proper level, do not apply excess downward pressure to the upper left of right sides of the TV. Fasten two screws at position 1 and then fasten two screws at position 2. ➣ Stand the product up and fasten the screws.
Auto Wall-Mount Adjustment (Sold separately) Once the auto wall mount is installed, your TV’s position can be easily adjusted. V-Chip Auto Wall-Mount Caption Setup TV Rear Panel External Settings ► Entertainment : Off Energy Saving : Off PIP SW Upgrade EX-LINK Cable (Not supplied) Entering the menu External Settings 1. Press the ▲, ▼, ◄ or ► button on your remote control. ➣ The Wall Mount Adjustment screen is displayed.
Wall Mount Kit Specifications (VESA) Install your wall mount on a solid wall perpendicular to the floor. When attaching to other building materials, please contact your nearest dealer. If installed on a ceiling or slanted wall, it may fall and result in severe personal injury. Product Family LCD-TV PDP-TV ➣ ➣ ➣ ➣ ➣ ➣ ➣ ➣ inches VESA Spec.
Using the Anti-Theft Kensington Lock The Kensington Lock is a device used to physically fix the system when using it in a public place. The appearance and locking method may differ from the illustration depending on the manufacturer. Refer to the manual provided with the Kensington Lock for proper use. The locking device has to be purchased separately. Cable Figure 2 Figure 1 ➣ The location of the Kensington Lock may be different depending on its model. 1.
Specifications Model Name LN32A550P3F LN37A550P3F LN40A550P3F Screen Size (Diagonal) 32 inches 37 inches 40 inches 1920 x 1080 @ 60 Hz 1920 x 1080 @ 60 Hz 1920 x 1080 @ 60 Hz 10W x 2 10W x 2 10W x 2 31.5 X 3.5 X 20.2 inches (801.0 X 88.3 X 513.5 mm) 31.5 X 9.9 X 22.6 inches (801.0 X 251.9 X 573.5 mm) 36.1 X 3.6 X 23.3 inches (917.5 X 91.8 X 592.0 mm) 36.1 X 11.8 X 25.6 inches (917.5 X 300.0 X 649.8 mm) 39.2 X 3.6 X 24.7 inches (996.6.X 92.4 X 628.3 mm) 39.2 X 11.8 X 27.0 inches (996.6 X 300.
Dimensions LN32A550P3F TOP VIEW JACK PANEL DETAIL 3.5"H X 9.0"W 3.5 31.5 27.5 15.5 20.2 22.6 19.8 9.9 FRONT VIEW / SIDE VIEW 7.9 (200 mm) 7.9 (200 mm) REAR VIEW NOTE: All drawings are not necessarily to scale. Some dimensions are subject to change without prior notice. Refer to the dimensions prior to performing installation of your TV. Not responsible for typographical or printed errors. © 2008 Samsung Electronics America, Inc. English - 91 BN68-01392A-00ENG.
Dimensions LN37A550P3F TOP VIEW JACK PANEL DETAIL 3.5"H X 9.0"W 3.6 36.1 32.4 18.3 23.3 25.6 23.9 11.8 FRONT VIEW / SIDE VIEW 7.9 (200 mm) 7.9 (200 mm) REAR VIEW NOTE: All drawings are not necessarily to scale. Some dimensions are subject to change without prior notice. Refer to the dimensions prior to performing installation of your TV. Not responsible for typographical or printed errors. © 2008 Samsung Electronics America, Inc. English - 92 BN68-01392A-00ENG.
Dimensions LN40A550P3F TOP VIEW JACK PANEL DETAIL 3.5"H X 9.0"W 3.6 39.2 34.9 19.7 24.7 27.0 23.9 11.8 FRONT VIEW / SIDE VIEW 7.9 (200 mm) 7.9 (200 mm) REAR VIEW NOTE: All drawings are not necessarily to scale. Some dimensions are subject to change without prior notice. Refer to the dimensions prior to performing installation of your TV. Not responsible for typographical or printed errors. © 2008 Samsung Electronics America, Inc. English - 93 BN68-01392A-00ENG.
Dimensions LN46A550P3F TOP VIEW JACK PANEL DETAIL 3.5"H X 9.0"W 3.9 44.4 40.2 22.6 27.6 30.2 25.0 11.0 FRONT VIEW / SIDE VIEW 23.6 (600 mm) 15.7 (400 mm) REAR VIEW NOTE: All drawings are not necessarily to scale. Some dimensions are subject to change without prior notice. Refer to the dimensions prior to performing installation of your TV. Not responsible for typographical or printed errors. © 2008 Samsung Electronics America, Inc. English - 94 BN68-01392A-00ENG.
Dimensions LN52A550P3F TOP VIEW JACK PANEL DETAIL 3.5"H X 9.0"W 4.3 49.4 45.6 25.7 31.1 33.7 27.6 12.8 FRONT VIEW / SIDE VIEW 23.6 (600 mm) 15.7 (400 mm) REAR VIEW NOTE: All drawings are not necessarily to scale. Some dimensions are subject to change without prior notice. Refer to the dimensions prior to performing installation of your TV. Not responsible for typographical or printed errors. © 2008 Samsung Electronics America, Inc. English - 95 BN68-01392A-00ENG.
The GNU General Public License (GPL) Version 2, June 1991 Copyright (C) 1989, 1991 Free Software Foundation, Inc. 59 Temple Place, Suite 330, Boston, MA 02111-1307 USA Everyone is permitted to copy and distribute verbatim copies of this license document, but changing it is not allowed. Preamble The licenses for most software are designed to take away your freedom to share and change it.
These requirements apply to the modified work as a whole. If identifiable sections of that work are not derived from the Program, and can be reasonably considered independent and separate works in themselves, then this License, and its terms, do not apply to those sections when you distribute them as separate works.
9. The Free Software Foundation may publish revised and/or new versions of the General Public License from time to time. Such new versions will be similar in spirit to the present version, but may differ in detail to address new problems or concerns. Each version is given a distinguishing version number.
GNU Lesser General Public License (LGPL) Version 2.1, February 1999 Copyright (C) 1991, 1999 Free Software Foundation, Inc. 59 Temple Place, Suite 330, Boston, MA 02111-1307 USA Everyone is permitted to copy and distribute verbatim copies of this license document, but changing it is not allowed. [This is the first released version of the Lesser GPL. It also counts as the successor of the GNU Library Public License, version 2, hence the version number 2.1.
TERMS AND CONDITIONS FOR COPYING, DISTRIBUTION AND MODIFICATION 0. This License Agreement applies to any software library or other program which contains a notice placed by the copyright holder or other authorized party saying it may be distributed under the terms of this Lesser General Public License (also called “this License”). Each licensee is addressed as “you”.
5. A program that contains no derivative of any portion of the Library, but is designed to work with the Library by being compiled or linked with it, is called a “work that uses the Library”. Such a work, in isolation, is not a derivative work of the Library, and therefore falls outside the scope of this License.
10. Each time you redistribute the Library (or any work based on the Library), the recipient automatically receives a license from the original licensor to copy, distribute, link with or modify the Library subject to these terms and conditions. You may not impose any further restrictions on the recipients’ exercise of the rights granted herein. You are not responsible for enforcing compliance by third parties with this License. 11.
END OF TERMS AND CONDITIONS How to Apply These Terms to Your New Libraries If you develop a new library, and you want it to be of the greatest possible use to the public, we recommend making it free software that everyone can redistribute and change. You can do so by permitting redistribution under these terms (or, alternatively, under the terms of the ordinary General Public License). To apply these terms, attach the following notices to the library.
TÉLÉVISEUR ACL Guide de l’utilisateur Imaginez les possibilités Merci d’avoir acheté un produit Samsung. Pour obtenir un service complet, veuillez enregistrer votre produit à: www.samsung.com/global/register Modèle BN68-01392B-Fre.
Remarques importantes sur la garantie relative au format de l’image du téléviseur Le format écran large des écrans ACL (16:9, soit le rapport hauteur/largeur de l’image) est conçu principalement pour les vidéos plein écran à écran large. Les images affichées devraient être en format écran large 16:9 ou agrandi afin de remplir l’écran si votre modèle offre cette caractéristique et que les images sont constamment en mouvement.
Table des matières Informations générales Affichage PC ■ ■ ■ ■ ■ ■ ■ Utilisation de votre télévision comme un écran PC................. 42 ■ Modes d’affichage.................................................................... 42 ■ Configurer votre téléviseur avec votre PC............................... 43 Liste des fonctions..................................................................... 2 Accessoires...............................................................................
Informations générales Liste des fonctions • • • • • • • • Paramètres d’image modifiables pouvant être stockés dans la mémoire du téléviseur. Minuterie automatique pour allumer ou éteindre le téléviseur. Minuterie de mise en veille spéciale. Interface numérique et de réseau exceptionnelle : Avec un syntoniseur numérique HD intégré, la vision des émissions HD sans inscription ne nécessite pas de décodeur Câble/récepteur satellite (boîtier décodeur).
Présentation du panneau de commande Boutons situés en bas à droite du panneau Les boutons situés en bas à droite du panneau commandent les fonctions de base de votre téléviseur, notamment le menu à l’écran. Pour utiliser les fonctions plus avancées, vous devez utiliser la télécom-mande. 1 2 3 4 8 8 76 5 Touches du panneau latéral ➣ La couleur et la forme du produit peuvent varier en fonction du modèle.
Présentation du panneau de branchement Utiliser les prises du panneau de connexion pour brancher des composants audiovisuels utilisés continuellement, par exemple un lecteur DVD ou un magnétoscope. Pour plus d’informations sur le branchement des appareils, voir pages 6~11. [Pannear arrière de la télévision] [Panneau latéral de la télévision] ➣ La couleur et la forme du produit peuvent varier en fonction du modèle. 1 AUDIO OUT A connecter aux prises d’entrée audio de votre amplificateur/home cinéma.
Télécommande Vous pouvez utiliser la télécommande à une distance maximale du téléviseur d’environ 7 m. 1 POWER Permet d’allumer et d’éteindre le téléviseur. 2 TV Pour sélectionner directement le mode TV. 3 Boutons numériques Permet de changer de chaîne. 4 Appuyez sur ce bouton pour sélectionner des canaux supplémentaires (numériques et analogiques) diffusées par la même station. Par exemple, pour sélectionner le canal “54-3”, appuyez sur “54”, puis sur “ ” et sur “3”.
Insertion des piles dans la télécommande 1. 2. 3. Soulevez le panneau à l’arrière de la télécommande, comme illustré. Placez deux piles AAA. ➣ Assurez-vous de faire correspon dre les pôles “+” et “-” des iles avec le schéma situé à l’intérieur du compartiment. Replacez le couvercle. ➣ Retirez les piles et stockez-les dans un endroit frais et sec si vou n’utilisez pas la télécommande pendant longtemps. La télécommande peut être util isée jusqu’à environ 7 mètres de la télévision.
Connexion du Câble TV Pour brancher un système de télévision par Câble, suivez les instructions ci-dessous. Câble sans boîte de jonction 1. Branchez le Câble d’arrivée dans la prise ANT IN située à l’arrière de la télévision. ➣ Cette télévision étant équipée d’un dispositif pour le Câble, vous n’avez pas besoin de boîte de jonction pour voir des canal câblées en clair. ANT IN Branchement d’une boîte de jonction servant à décrypter l’ensemble des canal 1.
Connexion d’un lecteur DVD ou d’un décodeur Câble/récepteur satellite (boîtier décodeur) via HDMI Ceci n’est réalisable que si le périphérique externe dispose d’un connecteur de sortie HDMI. 1. Branchez un Câble HDMI entre la prise HDMI IN (1, 2 ou 3) du téléviseur et la prise HDMI du lecteur DVD ou du décodeur Câble/récepteur satellite (boîtier décodeur).
Branchement d’un lecteur DVD, câblosélecteur ou récepteur satellite à l’aide de câbles composantes Les prises du panneau arrière de votre téléviseur ont été spécialement conçues pour faciliter le branchement d’un lecteur DVD ou d’un décodeur Câble/récepteur satellite (boîtier décodeur) à votre téléviseur. 1.
Branchement d’un magnétoscope Connexion vidéo Ces instructions supposent que vous avez déjà branché votre télévision à une antenne ou un système de télévision par Câble (en suivant les instructions pages 6-7). Sautez l’étape 1 si vous n’avez pas encore branché d’antenne ou de système de télévision par Câble. 1. Débranchez l’antenne ou le Câble de l’arrière de la ANT IN télévision. 2. Branchez le Câble ou l’antenne à la prise ANT IN située à l’arrière du magnétoscope. 3.
Branchement d’un système audio numérique Les prises du panneau arrière du téléviseur permettent de brancher facilement une chaîne audio numérique (cinéma maison/récepteur) à votre téléviseur. 1. Branchez un Câble Pannear arrière de la télévision Système Audio Numérique optique entre les prises “DIGITAL AUDIO OUT (OPTICAL)” (Sortie audio numérique/Optique) du téléviseur et les prises d’entrée numérique du système audio numérique.
Fonctionnement Mise en marche et arrêt de la télévision Appuyez sur le bouton POWER de la télécommande. Il est aussi possible d’utiliser la touche POWER du téléviseur. Fonction Prêt à l’emploi Lors de la première mise en route du téléviseur, deux paramètres individuels de base sont proposés automatiquement à la configuration : 1. Appuyez sur le bouton POWER de la télécommande. “Menu Language, Store Demo, Channels and Time will be set.” s’affiche.
6. Appuyez sur le bouton ENTER . Appuyez sur les bouton ▲ ou ▼ pour sélectionner “Auto”, puis appuyez sur le bout on ENTER . Le message “Régler l’horloge à l’heure avancée.” s’affiche. Si “Manuel” est sélectionné, “Régler la date et l’heure du jour.” s’affiche. (Voir page 45) 7. Appuyez sur les bouton ▲ ou ▼ pour sélectionner “Off” ou “On”, puis appuyez sur le bouton ENTER . Le message “Choisir le fuseau horaire dans lequel vous vivez.” s’affiche. Prêt à l’emploi Régler le mode horloge.
Utilisation du bouton Utilisez le bouton pour sélectionner les chaînes diffusant un signal numérique. 1. Par exemple, pour choisir le canal 7-1, appuyer sur 7, puis sur et sur 1. ➣ HD indique que le téléviseur reçoit un signal DHD (Digital High Definition). SD indique que le téléviseur reçoit un signal analogique standard (Standard Definition). ➣ Pour changer rapidement de canal, appuyer sur les touches numériques, puis sur la touche ENTER .
Utilisation de la touche TOOLS La touche TOOLS peut servir à sélectionner rapidement et aisément les fonctions utilisées fréquemment. Le menu “TOOLS” change selon le mode d’entrée externe choisi. 1. Appuyer sur la touche TOOLS. Le menu “TOOLS” s’affiche. 2. Appuyer sur la touche ▲ ou ▼ pour sélectionner un menu. 3. Appuyer sur la touche ▲/▼/◄/►, puis sur ENTER pour afficher, modifier ou utiliser les éléments sélectionnés. Pour une description plus détaillée de chaque fonction, voir la page correspondante.
Enregistrement des canal dans la mémoire (méthode automatique) Chaîne 1. Appuyez sur le bouton MENU pour afficher le menu. Appuyez sur les bouton ▲ ou ▼ pour sélectionner “Chaîne”, puis appuyez sur le bouton ENTER . 2. Appuyez sur les bouton ▲ ou ▼ pour sélectionner “Prog. auto”, puis appuyez sur le bouton ENTER . Antenne :Air Prog. auto ► Effacer les canaux brouillés Liste des canaux Syn. Précise Puissance signal 3.
Pour sélectionner la source Entrée Permet de sélectionner le téléviseur ou d’autres sources d’entrée externes comme les lecteurs DVD ou les décodeurs Câble/ récepteurs satellite (boîtiers décodeurs) connectés au téléviseur. Permet de sélectionner la source d’entrée de votre choix. 1. Appuyez sur le bouton MENU pour afficher le menu. Appuyez sur les bouton ▲ ou ▼ pour sélectionner “Entrée”, puis appuyez sur le bouton ENTER . Liste source 2. Appuyez sur le bouton ENTER pour sélectionner “Liste source”.
Contrôle de L’image Changement du format normal de l’image Il est possible de choisir le type d’image qui correspond le plus à ses exigences. 1. Appuyez sur le bouton MENU pour afficher le menu. Appuyez sur le bouton ENTER pour sélectionner “Image”. Image 2. Appuyez sur le bouton ENTER pour sélectionner “Mode”. Appuyez sur les bouton ▲ ou ▼ pour sélectionner “Dynamique”, “Standard” ou “Film”. Appuyez sur le bouton ENTER .
Paramétrage de la fonction Réglages des détails Le nouveau téléviseur Samsung permet d’effectuer des réglages d’image encore plus précis que les modèles précédents. Voir ci-dessous pour exécuter des réglages détaillés de l’image. Activation de la fonction Réglages des détails Mode :Film ► Contre-jour :5 Contraste : 95 Luminosité : 50 Netteté : 20 Couleur : 50 Teinte (V/R) : V50/R50 Réglages des détails Image 3.
Réglage du paramètre gamma Il est possible d’ajuster l’intensité des couleurs primaires (rouge, vert, bleu). (-3 ~ +3) 8. Appuyez sur les bouton ▲ ou ▼ pour sélectionner “Gamma”, puis appuyez sur le bouton ENTER . 9. Appuyer sur ◄ ou ► pour diminuer ou augmenter la valeur. Appuyez sur le bouton ENTER . Réglages des détails Réglage du noir : Off Contraste dynam. : Off Gamma :0 Espace couleur : Auto ► Équilibrage du blanc Ton chair :0 Améliorat. bords : Off Dépl. Retour Intro.
Réglage de l’équilibrage du blanc Vous pouvez régler la température de la couleur pour obtenir des couleurs d’image plus naturelles. 17. Appuyez sur les bouton ▲ ou ▼ pour sélectionner “Équilibrage du blanc”, puis appuyez sur le bouton ENTER . 18. Sélectionnez l’option voulue en appuyant sur les boutons ▲ ou ▼, puis appuyez sur le bouton ENTER . 19. Appuyez sur les bouton ◄ ou ► pour augmenter ou réduire la valeur de l’élément souhaité. Appuyez sur le bouton ENTER . • • • • • • • Décal.
Réglage du xvYCC Le fait de régler le mode xvYCC à “On” augmente les détails et l’espace couleur durant l’écoute de films provenant d’un appareil externe (c.-à-d., un lecteur DVD) branché aux prises HDMI ou Composante IN. 24. Appuyez sur les bouton ▲ ou ▼ pour sélectionner “xvYCC”, puis appuyez sur le bouton ENTER . 25. Appuyez sur les bouton ▲ ou ▼ pour sélectionner “Off” ou “On”. Appuyez sur le bouton ENTER .
Configuration des options d’image Activation des options d’image Teinte(V/R) Image 1. Appuyez sur le bouton MENU pour afficher le menu. Appuyez sur les boutons ENTER pour sélectionner “Image”. 2. Appuyez sur les bouton ▲ ou ▼ pour sélectionner “Options d’image”, puis appuyez sur le bouton ENTER . ➣ Appuyer sur la touche ▲ ou ▼ pour choisir un élément particulier. Appuyer sur la touche ENTER . ➣ Une fois le réglage effectué correctement, appuyer sur ENTER .
➣ Lorsque le mode Double ( , ) a été défini sur ISI, le paramètre Taille de l’image ne peut pas être réglé. ➣ Une rémanence d’image temporaire peut se produire si une image fixe est affichée sur l’écran pendant plus de deux heures. Format ➣ Après avoir sélectionné “Zoom1”, “Zoom2” ou “Format large” : 16:9 Appuyer sur la touche ◄ ou ► pour sélectionner “Position”, puis sur ENTER . Appuyer sur la touche ▲ ou ▼ pour déplacer l’image vers le Zoom1 Position Régler bas et le haut.
Réglage de la réduction numérique des bruits Si le signal de diffusion capté par votre téléviseur est faible, vous pouvez activer la fonction de réduction numérique des bruits pour aider à éliminer les parasites et les images fantômes qui apparaissent à l’écran. 1. Suivre les instructions 1 et 2 de ‘Activation des options d’image’. (Consulter la page 23) 2. Appuyez sur les boutons ▲ ou ▼ pour sélectionner “Réduct. bruit num.”, puis appuyez sur le bouton ENTER . 3.
Réglage du mode Film Il est possible de régler le téléviseur afin qu’il détecte et traite automatiquement les signaux de film provenant de toutes les sources et règle l’image pour obtenir une définition optimale. 1. Suivre les instructions 1 et 2 de ‘Activation des options d’image’. (Consulter la page 25) 2. Appuyez sur les boutons ▲ ou ▼ pour sélectionner “Mode Film”, puis appuyez sur le bouton ENTER . 3.
Visionnement Image sur Image Il est possible d’utiliser la fonction ISI afin d’écouter simultanément le syntoniseur télé (émissions analogiques seulement) et une source vidéo externe. (Reportez-vous à la page 38 pour sélectionner le son de l’image ISI.) Cet appareil est doté d’un syntoniseur intégré qui ne permet pas la fonction ISI dans le même mode. Consulter la section ‘Paramètres ISI’ ci-dessous pour les détails. ➣ lorsque V-Chip (Voir page 49) fonctionne, la fonction ISI ne peut pas être utilisée.
Changement du canal ISI 5. Appuyez sur les bouton ▲ ou ▼ pour sélectionner “Air/Câble”, puis appuyez sur le bouton ENTER . 6. Appuyez sur les bouton ▲ ou ▼ pour sélectionner “Air” ou “Câble”, puis appuyez sur le bouton ENTER . 7. Appuyez sur les bouton ▲ ou ▼ pour sélectionner “Chaîne”, puis appuyez sur le bouton ENTER . 8. Utiliser les touches ▲ ou ▼ pour sélectionner le canal à afficher dans la fenêtre ISI. Appuyez sur le bouton ENTER .
Contrôle du Son Changement du format normal du son Son Il est possible de choisir le mode sonore qui convient le mieux à l’émission écoutée. 1. Appuyez sur le bouton MENU pour afficher le menu. Appuyez sur les bouton ▲ ou ▼ pour sélectionner “Son”, puis appuyez sur le bouton ENTER . Mode : Personnel ► Égaliseur • • • • • • Son 2. Appuyer sur la touche ENTER pour sélectionner “Mode”.
4. Appuyer sur ▲ ou ▼ pour choisir une fréquence particulière à ajuster. Appuyer sur la touche ◄ ou ► pour augmenter ou réduire le niveau d’une fréquence particulière. • Mode : Choisit le mode sonore parmi des réglages prédéfinis. • Balance G/R : Règle la balance entre les haut-parleurs droit et gauche. • Réglage de la largeur de bande (100Hz, 300Hz, 1kHz, 2kHz, 3kHz, 10kHz) : Pour régler le niveau des différentes fréquences de largeur de bande.
Choix de la langue privilégiée Le système de transmission numérique du téléviseur assure la transmission simultanée de plusieurs pistes de son (par exemple, la traduction simultanée de l’émission en langues étrangères). Choisir la langue de la piste sonore. Égaliseur SRS TruSurround XT Son 1. Appuyez sur le bouton MENU pour afficher le menu. Appuyez sur les bouton ▲ ou ▼ pour sélectionner “Son”, puis appuyez sur le bouton ENTER .
Contrôle automatique du volume Langue privilégiée : English Son multi-piste : Stéréo Volume auto : Off Haut-parleur TV : On ► Sélect. son : Principale Réinitialisation du son Son 3. Appuyer sur la touche ▲ ou ▼ pour choisir “Volume auto” “Off” ou “On”, puis sur ENTER . Appuyez sur le bouton EXIT pour quitter. Son Réduit les différences de niveau volume entre les chaînes. 1. Appuyez sur le bouton MENU pour afficher le menu.
Activation du son de l’image (ISI) secondaire Son Lorsque la fonction ISI est activée, vous pouvez écouter le son de l’image (ISI) secondaire. 1. Appuyez sur le bouton MENU pour afficher le menu. Appuyez sur les bouton ▲ ou ▼ pour sélectionner “Son”, puis appuyez sur le bouton ENTER . 2. Appuyez sur les bouton ▲ ou ▼ pour sélectionner “Sélect. son”, puis appuyez sur le bouton ENTER . Son 3.
Contrôle des Chaînes Gestion des canaux Ce menu permet d’ajouter et de supprimer ou de définir les canaux favoris et d’utiliser le télé-horaire pour les diffusions numériques. Afficher tous les canaux Appuyer sur la touche ◄ pour sélectionner “Canaux ajoutés”. Effacer les canaux brouillés Liste des canaux 2 Air 4 Air 4-2 8 13 13-1 Air Antenne Tous les canaux 3. Appuyer sur la touche ▲ ou ▼ pour choisir “Tous les canaux”. ➣ Affiche tous les canaux actuellement accessibles.
Ajout et suppression de canaux 2. Prog. auto Effacer les canaux brouillés Chaîne Il est possible d’ajouter ou de supprimer un canal pour afficher seulement les canaux désirés. 1. Appuyez sur le bouton MENU. Appuyez sur les bouton ▲ ou ▼ pour sélectionner “Chaîne”, puis appuyez sur le bouton ENTER . Appuyez sur les bouton ▲ ou ▼ pour sélectionner “Liste des canaux”, puis appuyez sur le bouton ENTER . Liste des canaux ► Syn.
Sélection des canaux favoris Appuyer sur la touche ◄ pour sélectionner “Canaux ajoutés”. Effacer les canaux brouillés Liste des canaux 2 Air 4 Air 4-2 ♥ TV #8 8 Air 13 Air 13-1 Air Antenne Tous les canaux ♥ TV #3 Air 4 Air 4-2 Alice’s Adventures in Wonderland Zoom Choisir 2 Option TOOLS ♥ TV #8 8 Air 13 Air 13-1 Air Antenne Tous les canaux 3. Appuyez sur les bouton ▲ ou ▼ pour sélectionner “Tous les canaux”. ➣ Affiche tous les canaux actuellement accessibles.
Pour réserver une émission (écoute par minuterie) Si une réservation d’émission à regarder est effectuée, le téléviseur passe automatiquement au canal réservé dans la liste des canaux, même si un autre canal est écouté. Pour réserver une émission, régler d’abord l’horloge. Voir pages 45 et 46. Il est possible de régler les canaux réservés uniquement s’ils sont dans la liste des canaux (voir page 34). Effacer les canaux brouillés Liste des canaux ► Syn. Précise Puissance signal Canaux ajoutés 2.
Confirmer une réservation d’émission Appuyer sur la touche ◄ pour sélectionner “Canaux ajoutés”. Effacer les canaux brouillés Liste des canaux 2 Air 4 Air 4-2 8 13 13-1 Air Antenne 6. Appuyer sur la touche ▲/▼/◄/► pour modifier une réservation, puis sur ENTER . La modification est apportée à la réservation. Annuler une réservation 4. Appuyer sur la touche ▲ ou ▼ pour sélectionner la réservation à annuler, suivie de la touche TOOLS. 5.
Identification des canaux – analogiques Chaîne Les canaux peuvent être identifiés de sorte que leur indicatif d’appel s’affiche chaque fois que le canal est sélectionné. Prog. auto 1. Appuyez sur le bouton MENU. Effacer les canaux brouillés Appuyez sur les bouton ▲ ou ▼ pour sélectionner “Chaîne”, puis appuyez sur le bouton ENTER . Liste des canaux Appuyez sur les bouton ▲ ou ▼ pour sélectionner “Liste des canaux”, puis Syn. Précise appuyez sur le bouton ENTER . ► Puissance signal Canaux ajoutés 2.
Suppression des canaux brouillés – canaux numériques Chaîne La fonction “Effacer les canaux brouillés” permet d’éliminer les canaux brouillés une fois que la programmation automatique est terminée. Cette procédure peut prendre de 20 à 30 minutes. 1. Appuyez sur le bouton MENU pour afficher le menu. Antenne : Câble Appuyez sur les bouton ▲ ou ▼ pour sélectionner “Chaîne”, puis appuyez Prog. auto sur le bouton ENTER . 2.
Contrôle de la puissance du signal numérique Chaîne Contrairement aux chaînes analogiques, dont la qualité de réception peut varier (de “neigeuse” à claire), les chaînes numériques (HDTV) offrent soit une réception parfaite, soit aucune réception. Ainsi, contrairement aux chaînes analogiques, vous ne pouvez pas syntoniser les chaînes numériques. Cependant, vous pouvez régler votre antenne afin d’améliorer la réception des chaînes numériques disponibles. 1.
Affichage PC Utilisation de votre télévision comme un écran PC Configuration de votre logiciel PC (basée surWindows XP) Les paramètres d’affichage Windows pour un ordinateur type sont indiqués ci-dessous. Cependant, les écrans réels de votre PC auront probablement un aspect différent, en fonction de votre propre version de Windows et de votre carte vidéo. Même si vos écrans réels apparaissent différents, les informations de base s’appliquent dans la plupart des cas.
Configurer votre téléviseur avec votre PC Comment utiliser le réglage automatiq Utilisez la fonction ‘Réglage Auto’ pour que le téléviseur règle automatiquement les signaux vidéo qu’il reçoit. Cette fonction ajuste également automatiquement les paramètres, les fréquences et les positions. ➣ Cette fonction n’est pas disponible en mode numérique DVI. ➣ Préréglage : Appuyer sur la touche SOURCE pour sélectionner PC. 1. Appuyez sur le bouton MENU pour afficher le menu.
Changement de la position de l’écran 2. Appuyez sur les bouton ▲ ou ▼ pour sélectionner “Écran”, puis appuyez sur le bouton ENTER . Netteté Image Régler la position de l’écran de l’ordinateur s’il ne correspond pas à celui du téléviseur. ➣ Préréglage : Appuyer sur la touche SOURCE pour sélectionner PC. 1. Appuyez sur le bouton MENU pour afficher le menu. Appuyez sur les bouton ▲ ou ▼ pour sélectionner “Image”, puis appuyez sur le bouton ENTER .
Paramètre D’heure Régler l’horloge Régler l’horloge est nécessaire pour pouvoir utiliser les diverses fonctions relatives à l’heure de la télévision. Vous pouvez également contrôler l’heure pendant que vous regardez la télévision (appuyez juste sur le bouton INFO). Option 1 : Réglage manuel de l’horloge Prêt à l’emploi Langue Configuration 1. Appuyez sur le bouton MENU pour afficher le menu. Appuyez sur les bouton ▲ ou ▼ pour sélectionner “Configuration”, puis appuyez sur le bouton ENTER .
Option 2 : Réglage Automatiquement de l’horloge Prêt à l’emploi Langue Configuration L’horloge peut être automatiquement réglée si vous recevez un signal numérique. 1. Appuyez sur le bouton MENU pour afficher le menu. Appuyez sur les bouton ▲ ou ▼ pour sélectionner “Configuration”, puis appuyez sur le bouton ENTER . Appuyez sur les bouton ▲ ou ▼ pour sélectionner “Heure”, puis appuyez sur le bouton ENTER .
Paramétrer le minuteur Configuration Cette minuterie éteint automatiquement le téléviseur après le délai choisi (de 30, 60, 90, 120, 150 à 180 minutes). 1. Appuyez sur le bouton MENU pour afficher le menu. Prêt à l’emploi Appuyez sur les bouton ▲ ou ▼ pour sélectionner “Configuration”, puis Langue : Français appuyez sur le bouton ENTER . Heure Appuyez sur les bouton ▲ ou ▼ pour sélectionner “Heure”, puis appuyez sur le bouton ENTER .
Réglage de la minuterie de mise en marche/arrêt Prêt à l’emploi Langue Configuration 1. Appuyez sur le bouton MENU pour afficher le menu. Appuyez sur les bouton ▲ ou ▼ pour sélectionner “Configuration”, puis appuyez sur le bouton ENTER . Appuyez sur les bouton ▲ ou ▼ pour sélectionner “Heure”, puis appuyez sur le bouton ENTER . : Français Heure ► V-Chip Sous-titres Réglages externes Divertissement : Off Économiseur énergie : Off ISI Mise à niveau du logiciel 2.
Description de la Fonction Sélection d’une langue de menu Prêt à l’emploi Configuration 1. Appuyez sur le bouton MENU pour afficher le menu. Appuyez sur les bouton ▲ ou ▼ pour sélectionner “Configuration”, puis appuyez sur le bouton ENTER . Appuyez sur les bouton ▲ ou ▼ pour sélectionner “Langue”, puis appuyez sur le bouton ENTER . Langue : Français ► Heure V-Chip Caption Réglages externes Divertissement : Off Économiseur énergie : Off ISI Prêt à l’emploi Configuration 2.
3. L’écran “V-Chip” s’affiche. Appuyez sur les bouton ▲ ou ▼ pour sélectionner “Changer NIP”, puis appuyez sur le bouton ENTER . L’écran “Changer NIP” s’affiche. Choisissez un code NIP à 4 chiffres et saisissez-le. Lorsque vous avez entré le code NIP, l’écran “Confirmer NIP” apparaît. Saisissez de nouveau le code. Lorsque l’écran de confirmation disparaît, votre code NIP est mémorisé. Appuyez sur le bouton EXIT pour quitter.
Comment configurer les restrictions à l’aide des Contrôle parental TV Configuration Réglez d’abord le numéro d’identification personnel (NIP) et activez la fonction puce V. (Voir section précédente.) Les restrictions parentales peuvent être réglées à l’aide de l’une de ces deux méthodes : Les guides TV ou la Classification MPAA. 1. Appuyez sur le bouton MENU pour afficher le menu. Langue Appuyez sur les bouton ▲ ou ▼ pour sélectionner “Configuration”, puis Heure appuyez sur le bouton ENTER . V-Chip 2.
Comment configurer les restrictions à l’aide des évaluations MPAA : G, PG, PG-13, R, NC-17, X, NR Configuration Le système d’évaluation MPAA utilise le système de la Motion Picture Association of America (Association cinématographique américaine) (MPAA) dont la principale application concerne les films. (il arrive également que des vidéocassettes de films soient cryptées à l’aide des évaluations MPAA.
Comment configurer les restrictions à l’aide des Anglais canadien Langue Heure Configuration 1. Appuyez sur le bouton MENU pour afficher le menu. Appuyez sur les bouton ▲ ou ▼ pour sélectionner “Configuration”, puis appuyez sur le bouton ENTER . V-Chip ► Sous-titres Réglages externes Divertissement : Off Économiseur énergie : Off ISI Mise à niveau du logiciel 2. Appuyez sur les bouton ▲ ou ▼ pour sélectionner “V-Chip”, puis appuyez sur le bouton ENTER . Le message “Entrez NIP” s’affiche.
Comment configurer les restrictions à l’aide des Français canadien Langue Heure Configuration 1. Appuyez sur le bouton MENU pour afficher le menu. Appuyez sur les bouton ▲ ou ▼ pour sélectionner “Configuration”, puis appuyez sur le bouton ENTER . V-Chip ► Sous-titres Réglages externes Divertissement : Off Économiseur énergie : Off ISI Mise à niveau du logiciel 2. Appuyez sur les bouton ▲ ou ▼ pour sélectionner “V-Chip”, puis appuyez sur le bouton ENTER . Le message “Entrez NIP” s’affiche.
Utilisation de la fonction V-Chip pour les canaux numériques Langue Heure Configuration Il est possible d’utiliser de l’information sur le contrôle parental tout en regardant des canaux numériques. 1. Appuyez sur le bouton MENU pour afficher le menu. Appuyez sur les bouton ▲ ou ▼ pour sélectionner “Configuration”, puis appuyez sur le bouton ENTER . V-Chip Réglages externes Divertissement : Off Économiseur énergie : Off ISI 2.
Affichage des sous-titres (messages texte à l’écran) – Analogique Configuration La fonction des sous-titres analogiques fonctionne en mode canaux de télévision ou lorsqu’un signal est fourni au téléviseur à partir d’un appareil externe. (Selon le signal émetteur, la fonction de sous-titrage analogique peut fonctionner sur les canaux numériques.) Heure 1. Appuyez sur le bouton MENU pour afficher le menu.
Affichage des sous-titres (messages texte à l’écran) – Numérique 4. Appuyez sur les bouton ▲ ou ▼ pour sélectionner “Mode ss-titres codés”, puis appuyez sur le bouton ENTER . Utilisez les bouton ▲ ou ▼ pour sélectionner le sous-menu de votre choix (Par défaut, Service1 à Service6, CC1 à CC4 ou Texte1 à Texte4) puis appuyez sur ENTER . 5. Appuyez sur les bouton ▲ ou ▼ pour sélectionner “Options de sous-titrage numérique”, puis appuyez sur le bouton ENTER .
Réglage de la mélodie de marche/arrêt du téléviseur Configuration Vous pouvez choisir et configurer une mélodie qui se déclenchera à la mise en marche et à l’arrêt du téléviseur. 1. Appuyez sur le bouton MENU pour afficher le menu. V-Chip Appuyez sur les bouton ▲ ou ▼ pour sélectionner “Configuration”, puis Sous-titres appuyez sur le bouton ENTER . Réglages externes 2. Appuyez sur les bouton ▲ ou ▼ pour sélectionner “Réglages externes”, puis Divertissement : Off appuyez sur le bouton ENTER .
Réglage du mode Divertissement Configuration Le mode “Divertissement” permet de choisir l’affichage et le son optimaux pour les sports, le cinéma et les jeux. Sous-titres 1. Appuyez sur le bouton MENU pour afficher le menu. Réglages externes Appuyez sur les bouton ▲ ou ▼ pour sélectionner “Configuration”, puis appuyez sur le bouton ENTER . Divertissement : Off 2. Appuyez sur les bouton ▲ ou ▼ pour sélectionner “Divertissement”, puis Économiseur énergie : Off appuyez sur le bouton ENTER .
Mise à niveau du logiciel HDMI IN3 Ultérieurement, Samsung mettra à disposition des mises à niveau pour le logiciel du téléviseur. Contacter le centre d’appel Samsung au 1-800-SAMSUNG (726-7864) pour obtenir de l’information sur le téléchargement des mises à jour et sur l’utilisation d’une clé USB. Les mises à jour sont accessibles par le branchement d’une clé USB dans le port USB situé sur le téléviseur. 1.
WISELINK Utilisation de la fonction WISELINK Branchement d’un dispositif USB Panneau latéral de la télévision HDMI IN3 Cette fonction permet de regarder des fichiers de photos (JPEG) et d’écouter des fichiers sonores (MP3) sauvegardés sur un dispositif à mémoire de grande capacité (MSC) USB. 1. ����������������������� Appuyer sur la touche POWER de la télécommande ou sur le panneau avant. ���������������������� ➣ Le téléviseur est sous tension. 2.
Utilisation du menu WISELINK Appuyer sur la touche MENU. Appuyer sur la touche ▲ ou ▼ pour ���������������������� 1 ����������������������� sélectionner “Application”, puis sur ENTER . 2. ������������������������������������������������������������������� Appuyer sur la touche ▲ ou ▼ pour sélectionner WISELINK, puis sur ������������������������������������������������������������������ ENTER . ➣ Le menu “WISELINK” s’affiche. WISELINK 851.98MB/995.
Affichage à l’écran Photo 2 image_1.jpg Mois Date Couleur Composition Dossier Favori 1Fich. sél. 6 : Janv. : Janv.01.2008 : Gris : : P-other : ★★★ 1 P. préf. P. mois 3 4 Janv. nov. ▲ P. date SUM5 Appareil Régl. f. Choisir Saut TOOLS Option 7 1 �������������������������� Photo présentement choisie Affiche la photo présentement choisie. 2 ���������������������������������� Fenêtre d’information sur la photo Affiche les renseignements sur la photo présentement choisie.
Liste de photos triées Il est possible de trier les photos dans la liste de photos en suivant un ordre particulier. 1. ����������������������� Appuyer sur la touche W.LINKde la télécommande pour afficher le ���������������������� 851.98MB/995.00MB libre WISELINK menu “WISELINK”. SUM 2. ������������������������������������������������������������������ Appuyer sur la touche ◄ ou ► pour sélectionner “Photo”, puis sur ����������������������������������������������������������������� ENTER .
Couleur Trie les photos par couleur.� ➣ Il est possible de modifier l’information sur la couleur d’une photo. 1. Choisir “Couleur” dans les critères de classement dans la liste de photos. 2. Appuyer sur la touche ◄ ou ► pour sélectionner à partir de la sous-liste des fichiers regroupés par couleur. ➣ Pour aller au groupe précédent ou suivant, appuyer sur la touche� (REW)���� ou (FF)�. 3. ���������������������� Appuyer sur la touche TOOLS.
Dossier Trie les photos par dossier. ➣ S’il y a beaucoup de dossiers dans le dispositif USB, les fichiers photos sont affichés dans l’ordre dans chacun des dossiers. Le fichier photos dans le dossier source est affiché en premier et les autres dans l’ordre alphabétique par nom. 1. Choisir “Dossier” dans les critères de classement dans la liste de photos. 2. Appuyer sur la touche ◄ ou ► pour sélectionner à partir de la sous-liste des fichiers regroupés par dossier.
Suppression d’un fichier photo Appuyer sur la touche ◄ ou ► pour sélectionner la photo désirée dans la 1. ������������������������������������������������������������������������ image_1.jpg Photo liste de photos. Mois : Janv. Diaporama Date : Janv.01.2008 Lire groupe cour. 2. Appuyer sur la toucheTOOLS. Couleur : Gris Composition : Supprimer Dossier : P-other 3.
Visualisation d’une photo ou d’un diaporama Visualiser un diaporama Appuyer sur la touche W.LINK de la télécommande pour afficher le menu ���������������������� 1. ����������������������� “WISELINK”. 2. �������������������������������������������������������������� Appuyer sur la touche ◄ ou ► pour passer à “Photo”, puis sur ������������������������������������������������������������� ENTER . ➣ Les fichiers photos sont affichés. 3.
Visionnement d’une photo Appuyer sur la touche W.LINK de la télécommande pour afficher le menu ���������������������� 1. ����������������������� “WISELINK”. 2. �������������������������������������������������������������� Appuyer sur la touche ◄ ou ► pour passer à “Photo”, puis sur ������������������������������������������������������������� ENTER . ➣ Les fichiers de photos sont affichés. 3.
Zoom Il est possible de zoomer les images en mode Plein écran. Appuyer sur la touche ▲ ou ▼ pour sélectionner “Zoom”, puis sur ENTER . Appuyer plusieurs fois sur la touche ◄ ou ► pour augmenter ou diminuer l’effet du zoom. (x1 → x2 → x4) Pour déplacer la photo agrandie, appuyer sur ENTER , puis sur les touches ▲/▼/◄/►. ➣ Notons que lorsque la photo agrandie est plus petite que la taille d’écran initiale, la fonction de déplacement ne fonctionne pas.� ➣ Le fichier agrandi n’est pas sauvegardé.
Sélection musique de fond Il est possible de choisir une musique de fond. Appuyer sur la touche ▲ ou ▼ pour choisir “Sélection musique de fond”, puis sur ENTER . ➣ Si la “Musique de fond” est désactivée, même si “Sélection musique de fond” est configurée, la musique de fond ne sera pas lue. ➣ Il faut charger des fichiers musicaux pour pouvoir modifier le mode de musique de fond. Lire les fichiers musicaux dans la catégorie musicale à charger. ➣ Le menu “Sélection musique de fond” s’affiche.
Utilisation de la liste musicale Ce menu présente les fichiers musicaux qui se touvent parmi les fichiers sauvegardés sur un dispositif à mémoire USB. 1. ����������������������� Appuyer sur la touche W.LINK de la télécommande pour afficher le menu ���������������������� 851.98MB/995.00MB libre WISELINK SUM “WISELINK”.
5 Information sur la sélection d’éléments Affiche le nombre de fichiers musicaux sélectionnés à l’aide de la touche jaune. 6 ��������������� Éléments d’aide • Touche (�Appareil) rouge: ����� Sélectionne �������������������������������� un appareil branché. • Touche (�Régl. f.) verte: ����� Modifie ��������������������������������������������������������������������������������������������� les réglages favoris pour la musique choisie.
P. artis. Trie les fichiers musicaux par artiste. ➣ Les fichiers musicaux sont classés par artiste par ordre alphabétique. 1. Choisir “P. artis.” dans les critères de classement dans la liste de fichiers musicaux. 2. Appuyer sur la touche ◄ ou ► pour sélectionner à partir de la sous-liste des fichiers regroupés par ordre alphabétique. ➣ Pour aller au groupe précédent ou suivant, appuyer sur la touche� (REW)���� ou (FF)�. 3. ���������������������� Appuyer sur la touche TOOLS. 4.
Genre Trie les fichiers musicaux par genre. 1. Choisir “Genre” dans les critères de classement dans la liste de fichiers musicaux. 2. Appuyer sur la touche ◄ ou ► pour sélectionner à partir de la sous-liste des fichiers regroupés par genre. ➣ Pour aller au groupe précédent ou suivant, appuyer sur la touche� (REW)���� ou (FF)�. 3. ���������������������� Appuyer sur la touche TOOLS. 4.
Suppression d’un fichier musical 1. Appuyer sur la touche ◄ ou ► pour sélectionner le fichier musical désiré dans la liste de fichiers musicaux. 2. Appuyer sur la toucheTOOLS. 3. ���������������������������������������������������������������������� Appuyer sur la touche ▲ ou ▼ pour sélectionner “Supprimer”, puis sur ��������������������������������������������������������������������� ENTER .
Lecture d’un fichier musical Lecture d’un fichier musical Musique Appuyer sur la touche W.LINK de la télécommande pour afficher le menu ���������������������� 1. ����������������������� “WISELINK”. Thanks I Love You Better than yesterday 2. �������������������������������������������������������������������� Appuyer sur la touche ◄ ou ► pour sélectionner “Musique”, puis sur ������������������������������������������������������������������� Jee Darby Catherine ENTER .
Lecture des fichiers musicaux sélectionnés Appuyer sur la touche W.LINKde la télécommande pour afficher le menu ���������������������� 1. ����������������������� “WISELINK”. 2. �������������������������������������������������������������������� Appuyer sur la touche ◄ ou ► pour sélectionner “Musique”, puis sur ������������������������������������������������������������������� ENTER . 3.
Utilisation du menu de configuration La configuration affiche les paramètres d’utilisateur du menu “WISELINK”. 1. ����������������������� Appuyer sur la touche W.LINK de la télécommande pour afficher le menu ���������������������� “WISELINK”. 2. �������������������������������������������������������������������������� Appuyer sur la touche ◄ ou ► pour sélectionner “Configuration”, puis sur ������������������������������������������������������������������������� ENTER . 3.
À propos d’Anynet+ Qu’est-ce qu’Anynet+? Anynet+ est une fonction qui vous permet de contrôler tous les appareils Samsung connectés compatibles Anynet+ avec votre télécommande Samsung. Branchement d’appareils Anynet+ Le système Anynet+ peut être utilisé uniquement avec les appareils Samsung disposant de la fonction Anynet+. Afin de vérifier que votre appareil Samsung dispose de cette fonction, assurez-vous qu’il comporte le logo Anynet+. Connexion à un téléviseur TV Anynet+ Appareil 1 Câble HDMI 1.
Configuration d’Anynet+ Les réglages suivants permettent de configurer les fonctions Anynet+. Pour utiliser la fonction Anynet+, le Anynet+ (HDMI-CEC) doit être activé. Application 1. Appuyer sur la touche MENU. Appuyer sur la touche ▲ ou ▼ pour sélectionner “Application”, suivie de la touche ENTER . 2. Appuyer sur la touche ▲ ou ▼ pour sélectionner “Anynet+ (HDMI-CEC)”, suivie de la touche ENTER . 3. Appuyez sur le bouton ENTER pour sélectionner “Anynet+ (HDMI-CEC)”. 4.
Menu Anynet+ Le menu Anynet+ varie selon le type et l’état des appareils Anynet+ branchés au téléviseur. Menu Anynet+ Regarder la télévision Liste appareils Enregistrer Menu de l’appareil Fonctionnement de l’appareil Enregistrement par minuterie Arrêter l’enregistrement Récepteur Configuration Description Permuter d’Anynet+ vers le mode d’émission télévisuel. Affiche la liste des appareils Anynet+. Démarre l’enregistrement. (Ce menu fonctionne uniquement avec un appareil pouvant enregistrer.
Écoute par l’intermédiaire d’un récepteur Il est possible d’écouter le son par l’intermédiaire d’un récepteur, plutôt que par les haut-parleurs du téléviseurs. 1. Appuyer sur la touche TOOLS. OUTILS Appuyer sur la touche ▲ ou ▼ pour sélectionner “Récepteur”. Liste appareils 2. Appuyer sur la touche ◄ ou ► pour sélectionner “On”. Enregistrer Enr. minuterie Il à présent possible d’écouter le son par l’intermédiaire du récepteur. Récepteur ◄ Off ► 3. Appuyer sur la touche EXIT pour quitter le menu.
Annexe Identification des problèmes Le tableau ci-dessous dresse la liste des problèmes courants et suggère des solutions. Si aucun de ces conseils ne permet de corriger le problème, communiquer avec le service à la clientèle de Samsung en composant le 1-800-SAMSUNG. Problème Solution possible Image de qualité médiocre. Essayez une autre canal. Réglez l’antenne. Vérifiez tous les branchements. Son de qualité médiocre. Essayez une autre canal. Réglez l’antenne. Aucune image ou aucun son.
Problème Solution possible L’écran est noir et l’Indicateur d’alimentation clignote. A partir de votre ordinateur, vérifiez: l’alimentation, le câble signal. La télévision est en mode gestion d’énergie. Déplacez la souris de l’ordinateur ou appuyez sur n’importe quelle touche du clavier. Il est possible que l’image ne soit pas stable et qu’elle donne l’impression de vibrer lorsqu’un ordinateur est connecté à l’entrée PC.
Installation du support 1. 2. Connecter le téléviseur et le support. ➣ Deux personnes ou plus devraient porter le téléviseur. ➣ S’assurer de bien distinguer le devant et l’arrière du support lors de l’assemblage. ➣ Pour être sûr que le téléviseur est installé sur le support au niveau approprié, ne pas exercer de pression excessive sur les côtés supérieurs droit et gauche du téléviseur. Resserrer les deux vis à la position 1 puis resserrer les deux (2) vis à la position 2.
Support mural à réglage automatique (vendu séparément) Lorsque le support mural à réglage automatique est installé, la position du téléviseur peut être facilement ajustée. Panneau arrière du téléviseur Support mural automatique V-Chip Configuration Sous-titres Réglages externes ► Divertissement : Off Économiseur énergie : Off ISI Mise à niveau du logiciel Câble EX-LINK (non fourni) Pour entrer dans le menu 1. Appuyez sur la touche ▲, ▼, ◄ ou ► de la télécommande.
Spécifications du jeu d’installation murale (VESA) Installez votre support mural sur un mur massif perpendiculaire au plancher. Pour le fixer à d’autres matériaux, veuillez communiquer avec votre détaillant. Si vous l’installez au plafond ou sur un mur incliné, il risque de tomber et de causer des blessures. Type de produit LCD-TV PDP-TV pouces Spéc.
Utilisation du verrouillage Kensington antivol Le verrouillage Kensington est un dispositif utilisé pour fixer physiquement le système dans le cas d’une utilisation dans un endroit public. Le dispositif de verrouillage doit être acheté séparément. L’aspect et la méthode de verrouillage peuvent différer de l’illustration en fonction du fabricant. Reportez-vous au manuel fourni avec le verrouillage Kensington pour une utilisation correcte.
Spécifications Modéle Taille de l’écra (diagonale) Résolution PC Son Sortie Dimensions (WxDxH) TV Avec support Poids Avec support Sans support LN32A550P3F LN37A550P3F LN40A550P3F 32 pouces 37 pouces 40 pouces 1920 x 1080 @ 60 Hz 1920 x 1080 @ 60 Hz 1920 x 1080 @ 60 Hz 10W x 2 10W x 2 10W x 2 31,5 X 3,5 X 20,2 pouces (801,0 X 88,3 X 513,5 mm) 31,5 X 9,9 X 22,6 pouces (801,0 X 251,9 X 573,5 mm) 36,1 X 3,6 X 23,3 pouces (917,5 X 91,8 X 592,0 mm) 36,1 X 11,8 X 25,6 pouces (917,5 X 300,0 X 649,8 mm
Dimensions LN32A550P3F VUE DU HAUT DETAILS DU PANNEAU DES PRISES 3,5"H X 9,0"W 3,5 31,5 27,5 15,5 20,2 22,6 19,8 9,9 VUE AVANT/VUE LATERALE 7,9 (200 mm) 7,9 (200 mm) VUE ARRIERE REMARQUE : Les dessins ne sont pas nécessairement tous à l’échelle. Certaines dimensions sont susceptibles de changer sans préavis. Consultez les dimensions avant d’installer votre téléviseur. Aucune responsabilité ne saurait être acceptée en cas d’erreur typographique ou d’impression.
Dimensions LN37A550P3F VUE DU HAUT DETAILS DU PANNEAU DES PRISES 3,5"H X 9,0"W 3,6 36,1 32,4 18,3 23,3 25,6 23,9 11,8 VUE AVANT/VUE LATERALE 7,9 (200 mm) 7,9 (200 mm) VUE ARRIERE REMARQUE : Les dessins ne sont pas nécessairement tous à l’échelle. Certaines dimensions sont susceptibles de changer sans préavis. Consultez les dimensions avant d’installer votre téléviseur. Aucune responsabilité ne saurait être acceptée en cas d’erreur typographique ou d’impression.
Dimensions LN40A550P3F VUE DU HAUT DETAILS DU PANNEAU DES PRISES 3,5"H X 9,0"W 3,6 39,2 34,9 19,7 24,7 27,0 23,9 11,8 VUE AVANT/VUE LATERALE 7,9 (200 mm) 7,9 (200 mm) VUE ARRIERE REMARQUE : Les dessins ne sont pas nécessairement tous à l’échelle. Certaines dimensions sont susceptibles de changer sans préavis. Consultez les dimensions avant d’installer votre téléviseur. Aucune responsabilité ne saurait être acceptée en cas d’erreur typographique ou d’impression.
Dimensions LN46A550P3F VUE DU HAUT DETAILS DU PANNEAU DES PRISES 3,5"H X 9,0"W 3,9 44,4 40,2 22,6 27,6 30,2 25,0 11,0 VUE AVANT/VUE LATERALE 23,6 (600 mm) 15,7 (400 mm) VUE ARRIERE REMARQUE : Les dessins ne sont pas nécessairement tous à l’échelle. Certaines dimensions sont susceptibles de changer sans préavis. Consultez les dimensions avant d’installer votre téléviseur. Aucune responsabilité ne saurait être acceptée en cas d’erreur typographique ou d’impression.