To avoid injuries or damage to property, please read the following precautions carefully and use the product accordingly. The images here are for reference only, and are not applicable in all cases (or countries). Failure to follow the instructions marked with this symbol may cause personal injury or even fatality. Failure to follow the instructions marked with this symbol may cause personal injury or damage to the product or property.
mains socket, therefore the mains plug shall be readily operable. z There is a danger of electric shock or fire. Always unplug the unit by holding the power plug. Pulling the power cable may damage the inside of it. z There is a danger of fire. Unplug the power plug before cleaning the product. z There is a danger of electric shock or fire.
Do not install on an unstable location, or on a stand smaller than the product. z If the product falls it may harm children. Install on a flat and stable location as the front part is heavy. In case of thunder/lightning, disconnect the power cord from the wall outlet. z There is a danger of electric shock or fire. Make sure the product's vents are not blocked by a table cloth or curtain. z An increase in the internal temperature may cause a fire. Place the product on the ground carefully.
z This may cause electric shock or fire. If water or an alien substance enters the product, turn the product off, disconnect the power cord from a wall outlet and contact a Service Center. Do not disassemble, or attempt to fix or modify the product. z When the product requires repairs, contact a Service Center. Do not use or keep the product near flammable sprays or other such substances. z There is a danger of fire or explosion.
Ask a Service Center to clean the product internally at least once a year. (Charged) z Dust which has accumulated in the interior over an extended period of time may cause fire or a malfunction. When cleaning the product, disconnect the power cord and wipe the product using a soft dry cloth. z Do not use any chemicals such as wax, benzene, alcohol, thinners, insecticide, air freshener, lubricant or detergent. When not using the product for an extended period of time, disconnect the power plug.
(Applicable in the European Union and other European countries with separate collection systems) This marking shown on the product or its literature, indicates that it should not be disposed with other household waste at the end of its working life. To prevent possible harm to the environment or damage to health from uncontrolled waste disposal, please separate this from other types of waste and recycle it responsibly to promote the sustainable reuse of material resources.
| Product Features | Product Views | Remote Control | Product Specifications | Optical engine adopting advanced DLP technology - A full 1920x1080 HD panel has been adapted. - A 6 segment color wheel has been used to implement optimal colors. - 300W Lamp designed to improve luminance Vivid colors - Quality picture tuning focused on improving color - this unit aims at realizing color coordinates that meet broadcasting standards on video production.
1. Indicators 7. Zoom Knob - TEMP (Red LED) Used to enlarge or reduce image size. - LAMP (Blue LED) 8. POWER( - STAND BY (Blue LED) ※ Refer to the LED Indications. ) Button Used to turn the projector on or off. 2. Focus Ring 9. SOURCE Button Used for Focus Adjustment. Used to select input signals from the external sources. 3. Lens 10.MENU Button 4. Lens Position Moving Dial Use this button to enter or exit a menu or to You can adjust screen images up and down move forward in a menu.
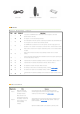
Power Cable Remote Control/ 2 Batteries Cleaning Cloth LED Indications ●:Light is On ◐:Light is Blinking ○:Light is Off TEMP LAMP STAND BY Information ○ ○ ● ○ ● ● ○ ◐ ● ○ ◐ ○ ◐ ○ ◐ ◐ ◐ ○ ◐ ○ ○ ◐ ◐ ● A problem has occurred when operating the DDP IC in the product. Refer to Action 4. ◐ ◐ ◐ A problem has occurred with the operation of the lamp. Refer to Action 5. ● ◐ ● The lifetime of the lamp has expired. Refer to Action 6.
Action 3 Action 4 When temperature inside installation precautions listed above. Cool down your projector of the projector becomes sufficiently and then operate it again. If the same problem occurs too high. continually, contact your product distributor or service center. When the DDP IC or color wheel fails to operate. Disconnect and reconnect the power cord and start the projector again. If the same symptom still occurs, contact your product distributor or service center.
| Product Features | Product Views | Remote Control | Product Specifications | 1. ON ( 2. COMP1 Button 3. VIDEO Button 4. S-VIDEO Button 5. PC Button 6. MENU Button 7. Move (▲ ▼ ◀ ▶)/ENTER Button 8. INFO Button 9. P.SIZE Button ) Button 10. STILL Button 11. P.MODE Button 12. OFF ( 13. ) Button LIGHT ( ) Button 14. HDMI1 Button 15. HDMI2 Button 16. COMP2 Button 17. RETURN Button 18. EXIT Button 19. D.BLACK Button 20. USER Button 21. INSTALL Button 1.
10. STILL Used to see still images. 11. P.MODE Used to select Picture Mode. 12. OFF ( ) Used to turn off the projector. 13. LIGHT ( ) Used to operate remote control in dark room. 14. HDMI1 Used to switch to HDMI 1 Mode. 15. HDMI2 Used to switch to HDMI 2 Mode. 16. COMP2 Used to switch to COMPONENT 2 Mode. 17. RETURN Returns to the previous menu. 18. EXIT Used to make Menu Screen disappear. 19. D.BLACK Alter the screen brightness and contrast by adjusting the iris in the optical system. 20.
Diagonal screen size 1016 mm ~ 7620 mm (16:9, Diagonal) Projection Range 1.5 m ~ 14 m Power Consumption Power Voltage Less than 410 W 110/220 Vac +/-10 %, 50/60 Hz +/-3 Hz Noise Theater : 24dB, Bright : 30dB 431.3 mm(W) x 468.5 mm(D) x 198.8 mm(H) Dimensions 17.0 inch(W) x 18.4 inch(D) x 7.8 inch(H) Weight 9.8 Kg / 21.
1280x720 1280x768 P 74.5 Sep. 70.0 N 89.0 Sep. 1696x751 54.1 N 72.0 N 91.7 Sep. 1696x755 56.5 N 74.0 P 95.8 Sep. 1664x798 47.8 N 59.9 P 79.5 Sep. 1696x805 60.3 N 74.9 P 102.3 Sep. Sep. N 84.8 P 117.5 60.0 P 60.0 P 108.0 Sep. 1728x999 69.9 N 70.0 P 120.8 Sep. 1728x1001 72.1 N 72.0 N 124.5 Sep. 1728x1005 75.2 N 74.9 P 130.0 Sep. 1728x1011 85.9 P 85.0 P 148.5 Sep. 1688x1066 64.0 P 60.0 P 108.5 Sep. 1728x1066 74.6 N 70.
O : Size & Overscan can be configured, x : Size & Overscan cannot be configured, △: Size can be configured Source Input Type HD HDMI SD HD Component SD Video & S- Video SD HD PC SD PC Picture Size Mode 16:9 Zoom1 Zoom2 4:3 Wide fit 1080p O O O O O 1080i O O O O O 720p O O O O O 576p O O O O x 480p O O O O x 576i O O O O x 480i O O O O x 1080p O O O O O 1080i O O O O O 720p O O O O O 576p O O O O x 480p O O O O x 576i
HD SD HDMI DVI HD Component SD Video & S- Video SD HD PC SD PC 1080p x x O O 1080i x x O O O O 720p x x O O O 576p x x O O x 640 x 480p x x O O x 720 x 480p x x O O x 576i x x O O x 480i x x O O x 1280 x 1024/60 x x x x x 1024 x 768/60 x x x x x 800 x 600/60 x x x x x 720 x 400/70 x x x x x 640 x 350/70 x x x x x 1080p O O O O O 1080i O O O O O 720p O O O O O 576p O O O O x 480p O O O O x 57
| Basic Settings | Connecting the Power | Connecting to video equipment | Installing the Projector Install the projector so that the beam from the projector is perpendicular to the screen. Place the projector so that the lens is at the center of the screen. If the screen is not vertically installed, the picture on the screen may not be a rectangle. Do not install the screen in bright surroundings. If the screen is too bright, the picture on the screen will not be displayed clearly.
Zoom Knob Focus Ring You can adjust the size of image within zoom range by manipulating the Zoom Knob. Focus the picture on the screen using the Focus Ring. If your product is installed at a location out of the specified projection distance (refer to Screen Size and Projection Distance), the focus cannot be adjusted correctly. Leveling with Adjustable Feet For level placing of the projector, adjust the Adjustable Feet of the projector. You may adjust the level of the projector up to 3 degrees.
Screen size Horizental (M:inch) (X:mm) 40 Vertical(Y:mm) Min(Z:mm) Max(Z:mm) Offset (Y':mm) 886 498 1983.6 1523.1 50 50 1107 623 2479.5 1903.9 62 60 1328 747 2975.3 2284.6 75 70 1550 872 3471.2 2665.4 87 80 1771 996 3967.1 3046.2 100 90 1992 1121 4463 3427 112 100 2214 1245 4958.9 3807.7 125 110 2435 1370 5454.8 4188.5 137 120 2657 1494 5950.7 4569.3 149 130 2878 1619 6446.6 4950.1 162 140 3099 1743 6942.5 5330.
2. Click on [Settings] tab and set the by referring to described in the display mode table supported by this projector. You do not have to change setup. 3. Press the [Advanced] button. Another property window will appear. 4. Click on [Monitor] tab and set the by referring to described in the display mode table supported by this projector.
to “Video” mode using the [VIDEO] buttons or check whether your PC is connected correctly. When connecting the projector to PC, check that PC setup complies to display settings supported by this projector. If not, there may be signal problems. | Basic Settings | Connecting the Power | Connecting to video equipment | 1. Rear of Projector Plug the power cord into the power terminal on the rear side of the projector.
Connect [VIDEO IN(yellow)] input port of the projector to the VIDEO (yellow) OUT port of video equipment using the video cable. - If the video equipment has S-VIDEO OUT port, connect it to [S-VIDEO IN] input port of the projector. Using the S-VIDEO connection, provides a higher visual quality. When finishing connecting the devices, connect the power of the projector and the VCR. Using the Projector Turn on the projector and press the [Video] button to select
Connect the [COMPONENT IN 1 (Y/PB/ PR)] or [COMPONENT IN 2 (Y/P B/ PR)] input port at the back of the projector to the Component port at the back of the DVD with the component cable. When the connection is finished, connect the power of your projector and DVD (or the device connected to the digital output terminal). Using the Projector Turn on the projector and press the [COMP1] button to select . Press the [COMP2] button to select if [COMPONENT IN 2] is connected.
Connect antenna cable to antenna signal input terminal of the receiver. Connect the COMPONENT 1 [COMPONENT IN 1 (Y/PB/ PR)] or [COMPONENT IN 2 (Y/PB/ PR)] input port at the back of the projector to the Component port at the back of the digital broadcast receiver with the component cable. - If the digital broadcast receiver provides a PC output port, you can connect a digital broadcast receiver using the [PC IN] input port of the projector.
Connect [PC IN] port on the rear side of the projector to the monitor output port of PC using PC video cable. When connections are all completed, connect both power codes of the projector and the PC. This product supports plug and play and therefore, if you use Window XP you do not need to setup the driver on your PC. Using the Projector Turn on the projector and press the [PC] button to select . If PC Mode is not available, check PC video cable is in place.
- Connecting using a HDMI/DVI cable Connect the [HDMI 1/DVI IN] terminal on the back of the projector and the DVI output terminal of the digital output device using a HDMI/DVI cable. - Connecting using a HDMI cable Connect the [HDMI 1/DVI IN] or [HDMI IN 2] terminal on the back of the projector and the HDMI output terminal of the digital output device using a HDMI cable. When the connection is finished, connect the power of your projector and DVD (or the device connected to the digital output terminal).
| Input | Picture | Setup | Option | * Click the Play( Screen ) button in the table below to view the video file. Description Adjustment Source List )/Stop( Play/Stop You can select a device connected to the projector to display. 1) Component 1 5) PC 2) Component 2 6) HDMI 1 3) S-Video 7) HDMI 2 4) Video Edit Name You can edit the names of devices connected to the projector.
* Click the Play( Screen ) button in the table below to view the video file. Description Adjustment Mode )/Stop( Play/Stop Select a screen state which is customized to your projector or change the screen mode as required. 1) Mode - Dynamic Select this if you want the screen quality to be clearer than standard screen quality. - Standard You can comfortably view the projection screen if the surrounding is somewhat Mode bright. - Movie1, Movie2 Select this if your surroundings are dark.
2) R-Gain 6) G-Offset 3) G-Gain 7) B-Offset 4) B-Gain 8) Gamma : An image compensation function that controls the settings according to the video properties. - Film : Picture Adjustment Film gamma. Gamma - Video : The Gamma mode normal that matches a TV screen. - Graphic : The Gamma mode that matches a PC screen. 9) DynamicBlack™ : Adjusts the brightness and contrast of the screen by adjusting the tightening thread in the optical system.
4) Green : Shows the picture in green by filtering out the red and blue color signals. 5) Blue : Shows the picture in blue by filtering out the red and green color signals. Overscan Using this function, you can cut the edge of the picture when unnecessary information, images or noise on the edge of the picture. ▶ Refer to "Size Support Mode".
2) Front-Ceiling : Horizontally Reversed Image 3) Rear-Floor : Vertically Reversed Image 4) Rear-Ceiling : Horizontal/Vertical Reversed Image Light Setting Used to set the image brightness by adjusting the amount of light generated by the lamp. 1) Theater : Using this function, you can adjust the light level of the lamp so that you can comfortably watch pictures on the screen even when watching under dark Theater conditions. It also lowers power consumption and extends the life of the lamp.
* Click the Play( Screen )/Stop( ) button in the table below to view the video file. Description Adjustment language You can select the language used for the menu screen. Menu Position You can move Menu Position to up/down/left/right. Menu You can set the translucency of menu. Translucency 1) Opaque 2) High 3) Medium 4) Low Menu Display You can set the display time of the menu.
requirements. 1) Off : LED will not come on. 2) In Standby : Turns the LED on in standby mode. 3) In Watching TV : Turns the LED on while watching TV. 4) Always : LED will come on after you turn the TV off. Appears as an ellipse at the top at the back of your projector. Blue screen The Blue screen function causes the screen to change to the Blue screen if there is no signal input from the external device connected to your projector.
| Before Contacting Service Personnel | Installation and Connection Symptoms Troubleshooting No Power. z I want to install my projector to z Check the power cable connections. The ceiling installation support is sold separately. Contact your local product distributor. the ceiling. External Source is not selected. z Be sure that the connection cable (video) is properly connected to the proper port. Unless they are connected properly, the device is not available.
adjustment items, such as the Brightness and the Contrast have been changed correctly in the command screen of the Projector menu. Only blue screen appears. z Be sure to properly connect the external devices. Check the connection cables again. Screen appears in black and white or z bright. As mentioned above, check the adjustment items such as the Brightness, Contrast and Color in the menu. odd color.
| Care and Maintenance | Contact SAMSUNG WORLDWIDE | Other | Authority | To clean the exterior and lens of the projector Clean the projector using a soft dry cloth. Do not clean the projector with flammable substances such as benzene, thinners or a wet cloth, as these may cause problems. Do not touch the projector with a nail or any other sharp objects, as this may scratch the surface.
When handling the lamp, avoid touching any part of it except for the handles. If you handle the lamp incorrectly, it may affect the screen quality and shorten its lifetime. LAMP(S) INSIDE THIS PRODUCT CONTAIN MERCURY AND MUST BE RECYCLED OR DISPOSED OF ACCORDING TO LOCAL STATE OR FEDERAL LAWS. For details see lamprecycle. org, eiae.org, or call 1-800-Samsung Lamp Replacement Procedure The lamp is very hot and operates The lamp is located at the left Open the cover by holding down with a high voltage.
ARGENTINE BRAZIL 0800-333-3733 http://www.samsung.com/ar 0800-124-421 http://www.samsung.com/br 4004-0000 CHILE 800-SAMSUNG(726-7864) http://www.samsung.com/cl COLOMBIA 01-8000112112 http://www.samsung.com.co COSTA RICA 0-800-507-7267 http://www.samsung.com/latin ECUADOR 1-800-10-7267 http://www.samsung.com/latin EL SALVADOR 800-6225 http://www.samsung.com/latin GUATEMALA 1-800-299-0013 http://www.samsung.com/latin JAMAICA 1-800-234-7267 http://www.samsung.
CIS ESTONIA 800-7267 http://www.samsung.ee LATVIA 800-7267 http://www.samsung.com/lv LITHUANIA 8-800-77777 http://www.samsung.lt KAZAKHSTAN 8-10-800-500-55-500 http://www.samsung.kz KYRGYZSTAN 00-800-500-55-500 RUSSIA 8-800-555-55-55 http://www.samsung.ru UKRAINE 8-800-502-0000 http://www.samsung.ua UZBEKISTAN 8-800-120-0-400 http://www.samsung.uz Asia Pacific AUSTRALIA CHINA HONG KONG INDIA 1300 362 603 http://www.samsung.com/au 800-810-5858 010-6475 1880 3698-4698 http://www.
Analog Broadcast An existing broadcasting signal transmitted by a broadcasting station in accordance with the NTSC standard. ANTENNA IN Port This is the port for connecting a TV aerial using a coaxial cable. It is generally used to watch public broadcast programs. AV Receiver An AV Receiver provides a number of input and output interfaces for audio and video so as to enable the user to connect and use various input and output devices.
communication standard. S-Video IN Port This is called super video. S-Video is a type of video signal which has the video brightness and color signal separated in order to provide a better image quality. Satellite Broadcast Satellite Broadcast broadcasts programs via satellite so that the program can be viewed in all area in a high visual and sound quality. Approximately 100 channels including public broadcast channels are provided. To view satellite broadcasts, you have to install an additional receiver.