
Digital Home Cinema System Instruction Manual


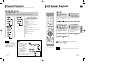
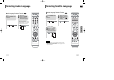


Table Of Contents
- Safety Warnings
- Precautions
- Features
- Contents
- Notes on Discs
- Description
- Connecting the Speakers
- Connecting the Video Out to TV
- P.SCAN(Progressive Scan) Function
- Connecting External Components
- Connecting the FM Antenna
- Before Using Your Home Theater
- Disc Playback
- MP3/WMA-CD Playback
- Displaying Disc Information
- JPEG File Playback
- DivX Playback
- Checking the Remaining Time
- Fast/Slow Playback
- Skipping Scenes/Songs
- Repeat Playback
- A-B Repeat Playback
- Step Function
- Zoom (Screen Enlarge) Function
- EZ VIEW Function
- Selecting Audio Language
- Selecting Subtitle Language
- Moving Directly to a Scene/Song
- Using Disc Menu
- Using the Title Menu
- Setting the Language
- Setting TV Screen type
- Setting Parental Controls (Rating Level)
- Setting the Password
- Setting the Wallpaper
- DivX (R) registration
- Setting the Speaker Mode
- Setting the Delay Time
- Setting the Test Tone
- Setting the DRC (Dynamic Range Compression)
- Setting the Audio
- AV SYNC Setup
- Sound Field (DSP)/EQ Function
- Dolby Pro Logic II Mode
- Dolby Pro Logic II Effect
- Listening to Radio
- Presetting Stations
- Convenient Functions
- Connecting Microphone (OPTION)
- Before Calling for Service
- Cautions on Handling and Storing Discs
- Language Code List
- Specifications

GB
30
DVD VCD
DVD
2
Press Cursor , ,
, buttons to
move to the area
you want to enlarge.
1
Press ZOOM but-
ton.
•
Each time the button is pressed,
the zoom level changes as follows:
3
Press ENTER
button.
Press EZ VIEW button.
•
Each time the button is pressed, the zoom function will switch between On and Off.
•
When a movie is played in Widescreen format, black bars at the top and
bottom of the TV screen can be removed by pressing the EZ VIEW button.
OPERATION
EZ VIEW OFFEZ VIEW
SELECT ZOOM POSITION
This function allows you to enlarge a particular area of the displayed image.
Zoom (Screen Enlarge) Function
EZ VIEW Function
•
This function will not work if the DVD is recorded with multi-camera angle format.
•
Black bars may not disappear because some DVD discs have a built-in horizontal to vertical ratio.
•
This feature is not supported for DivX discs.
Note
•
When a DivX disc is being played, only the 2:1 zoom-in is available.
Note
29
DVD
2
Press Cursor
button to move to
ANGLE ( ) display.
Press INFO button.
1/3
•
Each time the button is pressed, the angle changes as follows:
3
Press Cursor , or numeric buttons to
select the desired angle.
2/3
3/3
1/3
1/3
•
The Angle function works only with discs on which multiple
angles have been recorded.
Note
Step Function
DVD VCD
Press STEP button.
•
The picture moves forward one frame each time the button is pressed
during playback.
This function allows you to view the same scene in different angles.
Angle Function
1
HT-Q9(1~40P) GB 2006.5.8 4:18 PM Page 32