
User manual


18
Refrigerant pipe installation
Refrigerant pipe work on DVM Hydro unit
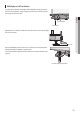
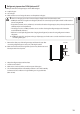
Wet cloth
Gas pipe
Liquid pipe
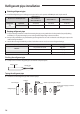
t Caution for welding the pipe to a DVM Hydro unit
- When welding the pipe to the product, the unit may get damaged by the heat and ame from welding. Use a
ame proong cloth to protect the unit from a brazing re or ame.
- Wrap the pipe with a wet cloth and weld it as shown in the illustration. Also, water dripping from the wet cloth
may interrupt the welding so make sure the water does not drip from the wet cloth.
- Make sure that connected pipes of DVM Hydro unit and the outdoor unit does not interrupt each other or make
contact with the product. (Vibration may cause damage to the pipes.)
- When removing the sealed pipe on the bottom side of the service valve, cut it with a pipe cutter rst and then
start the welding. When the sealed pipe is welded without cutting, you may get injured by the refrigerant
within the pipe.
CAUTION
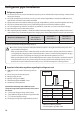
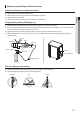
1. Remove the copper cap of the refrigerant pipe and eliminate the sludge or foreign substances on the welded part and
then weld the connecting pipe on each port.
- Since nitrogen gas is sealed within the pipe, you must discharge the nitrogen gas from the liquid pipe. Then remove the
copper cap and check for existence of the nitrogen gas.
- Check the pressure of the nitrogen gas before welding. If the nitrogen gas is not being purged, product is not normal so
do not install it.
Gas side
Copper cap
Liquid side
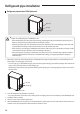
2. Cover the refrigerant pipe well with an insulator.
- It prevents the water, on the outer surface of the pipe, from dripping and increase the eciency of the DVM Hydro unit.
3. Cut o the leftover insulator.
4. Check for cracks on the bent part of the pipes.
5. When the DVM Hydro unit is installed in a hot and humid place, water may form on the outer surface of the insulator so it
would be necessary to double the insulation thickness (10mm or more).