AP50Q1C Series AP55Q1C Series AP55Q1D Series Air Conditioner user & installation manual imagine the possibilities Thank you for purchasing this Samsung product. To receive more complete service, please register your product at www.samsung.com/register E A DB98-32202A(3) AP50Q1C_IBIM_E 32202-3.
Register your product at www.samsung.com/register Safety Precautions The following safety precautions must be taken when using your air conditioner. WARNING During operation • Risk of electric shock can cause injury or death. • Disconnect all remote electric power supplies before servicing, installing or cleaning. • This must be done by the manufacturer or its service agent or a similar qualified person in order to avoid a hazard.
Contents u Preparing your air conditioner Safety Precautions . . . . . . . . . . . . . . . . . . . . . . . . . . . . . . . . . . . . . . . . . . . . . . . . . . . . . . . . . . . . . . . . . . . 2 View of the Unit . . . . . . . . . . . . . . . . . . . . . . . . . . . . . . . . . . . . . . . . . . . . . . . . . . . . . . . . . . . . . . . . . . . . . 4 Remote Control-Buttons . . . . . . . . . . . . . . . . . . . . . . . . . . . . . . . . . . . . . . . . . . . . . . . . . . . . . . . . . . . . .
View of the Unit Indoor Unit Air flow blades (up/down orientation) Air flow blades (right/left orientation) Air outlet Remote control holder Air filter To open the grille u Hold the upper part of the grille, then pull it slightly forward. Air inlet Control Panel You can operate the air conditioner with the control panel when you do not wish to or cannot operate the air conditioner with the remote control.
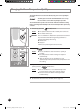
Remote Control-Buttons All air conditioner features except Lock function can be controlled from your seat by using the remote control. You must operate the Turbo, Long function and Off Timer with the remote control.
Getting Started You have just purchased a floor stand type air conditioner and it has been installed by your installation specialist. Your Manual contains valuable information on using your air conditioner. Please take the time to read it as it will help you take full advantage of the unit’s features. The booklet is organized as follows.
Cooling Your Room You must select the Cool mode if you wish to adjust the : Cooling temperature Fan speed when cooling 1 If necessary, press the Result: (On/Off) button. u The power indicator on the control panel comes on. u The indoor unit beeps. The air conditioner is fitted with a protection mechanism IMPORTANT to prevent the unit from being damaged when it is started immediately after being: Switched on Stopped lt will start up normally after three minutes.
Heating Your Room You must select the Heat mode if you wish to adjust the : Heating temperature Fan speed when heating 1 If necessary, press the Result: (On/Off) button. u The power indicator on the control panel comes on. u The indoor unit beeps. The air conditioner is fitted with a protection mechanism IMPORTANT to prevent the unit from being damaged when it is started immediately after being: Switched on Stopped lt will start up normally after three minutes.
Selecting the Automatic Operating Mode You can start the air conditioner in the Automatic mode. In the Automatic mode, the temperature and the optimum fan speed is selected automatically. 1 If necessary, press the Result: (On/Off) button. u The power indicator on the control panel comes on. u The indoor unit beeps.
Changing the Room Temperature Quickly The Turbo function is used to Cool /Auto(cool) your room as quickly as possible. Example : You have just come home and find that the room is very hot. You wish to cool it down as quickly as possible. The Turbo function operates for 30 minutes with the maximum setting before returning automatically to the mode and temperature previously selected. 1 If necessary, press the Result: (On/Off) button. u The power indicator on the control panel comes on.
Operating to the Long Distance The Long function is used to Cool /Auto(cool) your room as far as possible. In the Long function, the up/down orientation of air flow and fan speed are selected automatically. 1 If necessary, press the Result: (On/Off) button. u The power indicator on the control panel comes on. u The indoor unit beeps.
Removing Excess Humidity If the atmosphere in your room is very humid or damp, you can remove excess humidity without lowering the room temperature too much. 1 If necessary, press the Result: (On/Off) button. u The power indicator on the control panel comes on. u The indoor unit beeps.
Airing Your Room If the atmosphere in your room is stale, you can air the room using the Fan feature. 1 If necessary, press the Result: (On/Off) button. u The power indicator on the control panel comes on. u The indoor unit beeps. IMPORTANT The air conditioner is fitted with a protection mechanism to prevent the unit from being damaged when it is started immediately after being: Switched on Stopped lt will start up normally after three minutes.
Adjusting the Air Flow Direction Vertically Depending on the position of the indoor unit in your room, you can adjust the position of the outer air flow blade on the upper part of the unit, thus increasing the efficiency of the air conditioner. 1 Press the button. Result: The outer blade moves up and down. RECOMMENDATION When... Cooling Adjust the blade to face... Upwards. Heating Downwards. 2 To stop the blade moving up and down, press the again.
Setting the Off Timer The Off Timer enables you to switch off the air conditioner automatically after a given period of time. You can set the period of time from 1 to 8 hours. You can select the Off Timer only when the air conditioner is on. To set the operating time, press the button one or more times until the required time is displayed. Possible time is between 1 hour and 8 hours inclusive. Result: u After blinking of the timer indicator for 5 seconds, it will be changed to temperature setting.
Other Function You can use the Lock function on the control panel of the indoor unit. 1 Press the buttons simultaneously for 3 seconds. Result: u indicates on the control panel. u The control panel is locked. Note You can use the remote control even if the control panel is locked. 2 To cancel the Lock function, press the simultaneously for 3 seconds once again. buttons Operating Recommendations Here are a few recommendations that you should follow when using your air conditioner.
Temperature and Humidity Ranges The following table indicates the temperature and humidity ranges, within which the air conditioner can be used. If the air conditioner is used at... Then... High temperature The automatic protection feature may be triggered and the air conditioner stopped. Low temperature A water leakage or some other malfunction may happen if the heat exchanger freezes.
Cleaning Your Air Conditioner For the best use of your air conditioner, you must clean it every other week regularly to remove the dust that accumulates on the air filter. Before cleaning your air conditioner, ensure that you IMPORTANT have switched off the breaker for the unit. 1 Open the front grille, then pull out the air filter. 2 Remove all dust on the air filter with a vacuum cleaner or brush. 3 When you have finished, insert the air filter into the original position and close the front grille.
Solving Common Problems Before contacting the after-sales service, perform the following simple checks. They may save you the time and expense of an unnecessary call. Problem Explanation/Solution The air conditioner does not operate at all Check that the breaker used for the air conditioner is switched on. Check that the indoor unit is turned on; if necessary press the (On/Off ) button on the remote control. Check whether the Timer indicator on the indoor unit is switched on.
Technical Specifications Model Power Supply AP50Q1C Series 3N~, 380V, 50Hz AP55Q1C Series AP55Q1D Series 3~, 220V, 60Hz E-20 AP50Q1C_IBIM_E 32202-2.
Be sure to read the manual carefully to ensure sufficient realization of the excellent performance of the unit. Be sure to drill a hole in the wall necessary for installation before attempting to install the unit. After completion of installation, be sure to perform a test operation of the unit to check for any problem, and then deliver the unit to the customer if the test results are acceptable. After completion of test operation, hand over the manual and warranty card to the customer.
Selection of Installation Place Indoor Unit Top view Install the unit at a place close to the wall facing the outside as it is necessary to perform piping connection with the outdoor unit. - It is effective to install the unit at a window side to ensure uniform distribution of indoor temperature. Install the unit at a place where there is no obstacle against the wind around the air inlet and air outlet. Install the unit horizontally at a stable, rigid place.
Electrical Work The electrical work should be performed by a specialist qualified for the work. Use the three phase power supply, and be sure to install the sub power distribution board for exclusive use with the unit(separately purchased by the user). Do not connect multiple plugs to an outlet at once because it can cause a drop in voltage, resulting in poor performance of the automatic control circuit. Be sure to install circuit breaker (Extra purchased by the user).
Electrical Work (Continued) AP50Q1C Series When connecting 3Phase 4wires 380V AC When using NFB (No Fuse Breaker) The outdoor unit circuit is shipped based on the NFB power source wiring. 1. Remove the cover of electric box on side panel of the outdoor unit. 2. Connect the electric input wires (R,S,T,N) to each terminal (R,S,T,N) of the electric box on the outdoor unit respectively. (Input wires are purchased by the user separately.) 3.
AP55Q1C/AP55Q1D Series When connecting 3Phase 3wires 220V AC 1. Remove the cover of electric box on side panel of the outdoor unit. 2. Connect the electric input wires(R, S, T) to each terminal(R, S, T) of the electric box on the outdoor unit respectively. (Input wires are purchased by the user separately.) 3. Connect the electric wires to each terminal on the indoor and outdoor unit respectively.
Installation Procedures 1. Open the front panel, and remove the flare nut. 2. Bend the connection pipe to an appropriate length using the spring bender depending upon the installation place. - Allowable pipe length : Maximum 25m - Allowable pipe drop distance : Maximum 15m - Make no more than ten bending points on the pipe When the pipe length is in excess of the standard pipe length of 5m, add the refrigerant (R22) of 75g(AP50Q1C Series) / 80g(AP55Q1C/AP55Q1D Series) for each additional 1m.
Connection of Refrigerant Piping When installing, make sure there is no leakage. When recovering the refrigerant, ground the compressor first before removing the connection pipe. If the refrigerant pipe is not properly connected and the compressor works with the service valve open, the pipe inhales the air and it makes the pressure inside of the refrigerant cycle abnormally high. It may cause explosion and injury. Flare Processing 1. Cut the pipe using the pipe cutter. 90 Oblique Roughness Burr 2.
Drilling a Hole in the Wall D rill a hole of 70mm in diameter to the outside. The drilling should be done at a distance of less than 150mm from the floor facing the indoor unit. ø70mm Less than 150mm Drain Hose E xtend the drain hose to the drain hose connected to the drain pan, and fix it with the tape or a cable-tie to prevent separation. Then make a covering of it so that water cannot flow outwardly.
Air Purge Be sure that all valve cocks are closed. T he air in the indoor unit and in the pipe must be purged. If air remains in the refrigeration pipes, it will affect the compressor, reduce cooling capacity and could lead to a malfunction. Use Vacuum Pump as shown at the figure. 1. Connect each assembly pipe to the appropriate valve on the outdoor unit and tighten the flare nut. 2.
Refrigerant Charging Air purge(at the time of new installation only) Close the gas pipe side valve by turning it clockwise. Connect the pressure gauge to the low pressure side service valve, and then open the gas pipe side valve again. Connect it to the refrigerant filling tank. OUTDOOR UNIT Gas pipe side Liquid pipe side Start cooling operation. Check the pressure of the pressure gauge. Check whether the low pressure side is within the range of 4.5~5.6kg/cm2G (outside temperature 35°C).
Check and Test Operation Check Be sure to check the following again after completion of installation. 1. Check the piping connection area for any gas leakage. Outdoor connection area Indoor connection area 2. Is the drain hose properly connected? Drain hose 3. Is the insulation of the piping in good condition? Indoor and outdoor unit connection 4. Is grounding properly made? Insulation E-31 AP50Q1C_IBIM_E 32202-2.
Check and Test Operation (Continued) Test Operation A fter checking, read the manual carefully, and perform a test operation. Then deliver the unit to the customer. ( When delivering the unit, be sure to read carefully and follow the contents of the manual.) 1. Be sure to check whether the service valve is opened before attempting to perform the test operation. 2. Never attempt to start test operation by force pressing the electronic contactor as it is very dangerous.
Packing and Unpacking Guide Indoor unit Cushion-top Packing case Cushion-mid Indoor unit Cushion-bottom Packing the unit as below procedure 1. Put the indoor unit onto the cushion-bottom. 2. Assemble cushion-mid of indoor unit. 3. Put the cushion-top onto the indoor unit. 4. Put the packing case from the top of set. 5. Seal the packing case. Unpacking the unit as below procedure 1. Take out the packing case from the set. 2. Take out the cushion-top. 3. Take out the cushion-mid.
Packing and Unpacking Guide (Continued) Outdoor unit Cushion-top Outdoor unit Packing case 4 screws Wood palette Packing the unit as below procedure 1. Fix the outdoor unit and the wood palette by 4 screws. 2. Put the cushion-top onto the outdoor unit. 3. Put the packing case from the top of set. 4. Seal the packing case. Unpacking the unit as below procedure 1. Take out the packing case from the set. 2. Take out the cushion-top. 3.
How to connect your extended power cables ※ Items to prepare (compressor and insulation tape should be prepared by an installation technician.) Tools Spec Crimping plier Connection sleeve (mm) Insulation tape Contraction tube (mm) MH-14 20xØ7.0(HxOD) Width 18mm 50xØ8.0(LxOD) Shape 1. As shown in the figure, peel off the shields from the rubber/wire of the power cable. - Peel off 20 mm of the wire shields of the tube installed already.
QUESTIONS OR COMMENTS? COUNTRY CALL OR VISIT US ONLINE AT 021-8255 www.samsung.com www.samservice.com 800-SAMSUNG(726-7864) www.samsung.com KUWAIT 183-2255 www.samsung.com BAHRAIN 8000-4726 www.samsung.com 08000-726786 www.samsung.com IRAN OMAN EGYPT JORDAN MOROCCO SAUDI ARABIA TURKEY U.A.E AP50Q1C_IBIM_E 32202-3.indd 36 800-22273 www.samsung.com 080 100 2255 www.samsung.com 9200-21230 www.samsung.com 444 77 11 www.samsung.com 800-SAMSUNG (726-7864) www.samsung.