
Specifications
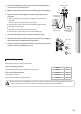


32
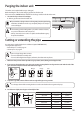
Cutting or extending the pipe
Outer Diameter Torque (kgf•cm)
ø6.35 mm 140~170
ø9.52 mm 250~280
ø12.70 mm 380~420
ø15.88 mm 440~480
ø19.05 mm 990~1210
ø22.23 mm 990~1210
Indoor outlet pipe Connecting pipe
Flare nut
Wall
Indoor unit
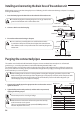
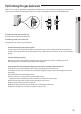
Drain hose
The drain hose must NOT
slant upwards.
The end of the drain hose must NOT
be placed under water.
The drain hose must not
be bent.
Keep a clearance of at least
5cm between the end of the
drain hose and the ground.
5cm
less
Do not place the end of the
drain hose in a hollow.
Ditch
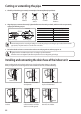
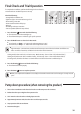
5. Check if you ared the pipe correctly (see examples of incorrectly ared pipes below).
6. Align the pipes to connect them easily. Tighten the are nuts rst with your hands, and then with a torque wrench,
applying the following torque:
7. For further details on how to connect to the outdoor unit and purge the air, refer to page 34~36.
Correct
Uneven
Thickness
Cracked
Damaged
Surface
Inclined
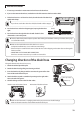
• Excessivetorquecanbecauseofgasleakage.Incasebrazingthepipe,thenitrogengasmustbeblownintothe
pipe (50 Pa). The joint must be accessible and serviceable.
• Tightenthearenutwithtorquewrenchaccordingtospeciedmethod.
If the are nut is over-tightened, the are may break and cause refrigerant gas leakage.
Installing and connecting the drain hose of the indoor unit
When installing the drain hose for the indoor unit, check if condensation draining is adequate.
Whenpassingthedrainhosethroughthe65-mmholedrilledinthewall,checkthefollowings: