Boracay ET_AR09FSFT@_IBIM_DB68-03377A_EN-7.
Features of your new air conditioner Contents USING PARTS Cool Summer Offer On those hot sweltering summer days and long restless nights, there is no better escape from the heat than the cool comforts of home. Your new air conditioner brings an end to exhausting hot summer days and lets you rest. Beat the heat with your own air conditioner this summer.
USING PARTS Safety precautions WARNING CAUTION ENGLISH Before using your new air conditioner, please read this manual thoroughly to ensure that you know how to safely and efficiently operate the extensive features and functions of your new appliance. Because the following operating instructions cover various models, the characteristics of your air conditioner may differ slightly from those described in this manual.
Safety precautions Do not install this appliance near a heater, inflammable material. Do not install this appliance in a humid, oily or dusty location, in a location exposed to direct sunlight and water (rain drops). Do not install this appliance in a location where gas may leak. This may result in electric shock or fire. Never install the outdoor unit in a location such as on a high external wall where it could fall. If the outdoor unit falls, it may result in injury, death or property damage.
FOR POWER SUPPLY WARNING When the circuit breaker is damaged, contact your nearest service center. ENGLISH Do not pull or excessively bend the power line. Do not twist or tie the power line. Do not hook the power line over a metal object, place a heavy object on the power line, insert the power line between objects, or push the power line into the space behind the appliance. This may result in electric shock or fire.
Safety precautions Do not touch the circuit breaker with wet hands. This may result in electric shock. Do not turn the air conditioner off with the circuit breaker while it is operating. Turning the air conditioner off and then on again with the circuit breaker may cause a spark and result in electric shock or fire. After unpacking the air conditioner, keep all packaging materials well out of the reach of children, as packaging materials can be dangerous to children.
FOR USING WARNING FOR USING ENGLISH Do not place an object near the outdoor unit that allows children to climb onto the machine. This may result in children seriously injuring themselves. Do not use this air conditioner for long periods of time in badly ventilated locations or near infirm people. Since this may be dangerous due to a lack of oxygen, Open a window at least once an hour.
Safety precautions Do not stand on top of the appliance or place objects (such as laundry, lighted candles, lighted cigarettes, dishes, chemicals, metal objects, etc.) on the appliance. This may result in electric shock, fire, problems with the product, or injury. Do not operate the appliance with wet hands. This may result in electric shock. Do not spray volatile material such as insecticide onto the surface of the appliance.
FOR CLEANING ENGLISH For use in Europe : This appliance can be used by children aged from 8 years and above and persons with reduced physical, sensory or mental capabilities or lack of experience and knowledge if they have been given supervision or instruction concerning use of the appliance in a safe way and understand the hazards involved. Children shall not play with the appliance. Cleaning and user maintenance shall not be made by children without supervision.
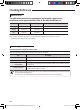
Checking before use Operation ranges The table below indicates the temperature and humidity ranges the air conditioner can be operated within. Refer to the table for efficient use. Mode Indoor temperature Outdoor temperature Indoor humidity Cooling 16˚C~32˚C -10˚C~46˚C Relative humidity 80% or less Heating 27˚C or less -15˚C~24˚C - Dry 18˚C~32˚C -10˚C~46˚C - If the air conditioner operates in cooling mode for long period of time in high humidity area, dew may be formed.
Checking the name of the parts Your air conditioner may slightly look different from illustration shown above depending on your model. Main parts ENGLISH Room temperature sensor Air filter (under the panel) Air intake Air flow blade (up and down) Blade pin lever Air flow blade (left and right) Display indicator Timer/Auto clean indicator Operation indicator Power button Remote controller receiver 11 Boracay ET_AR09FSFT@_IBIM_DB68-03377A_EN-7.
Checking the remote controller • Point the remote controller towards the remote controller receiver of the indoor unit. • When you properly press the button on the remote controller, you will hear beep sound from the indoor unit and a transmit indicator( ) appears on the remote controller display. Remote controller buttons Smart Saver Less energy usage makes your space cool between the temperature range of 24°C~30°C. Turbo Operate in auto fan speed to cool quickly.
Remote controller display On Timer indicator Off Timer indicator indicator ENGLISH Turbo indicator Quiet indicator Smart Saver indicator Operation mode indicator Low battery indicator Transmit indicator Air swing indicator Fan speed indicator Auto (Turbo) Low Medium High Battery changing time When the battery is exhausted, ( ) will be displayed in the remote controller display. When the icon appears, change the batteries. The remote controller requires two 1.5V AAA type batteries.
ork on all Basic function Basic operation is an operation mode that can be selected by pressing the Mode button. Auto In Auto mode, the air conditioner will automatically set the temperature and fan speed depending on the room temperature detected by the room temperature. • If using a multi system, in Auto operation, the system selects a temperature setting and an appropriate operation mode (COOL or HEAT) based on the room temperature at the start of the operation.
Press the button to turn on the air conditioner. Press the button to set the operating mode. ENGLISH • Each time you press the Mode button, the mode will change in order of Auto, Cool, Dry, Fan and Heat. Press the button to set the desired fan speed. Auto (Auto) Cool (Auto), Dry Fan Heat Press the (Low), (Med), (High) (Auto) (Low), (Auto), (Med), (Low), (High) (Med), (High) button to adjust the temperature.
Adjusting the air flow direction Air flow can be directed to your desired position. Vertical air flow Air flow blades move up and down. Press the Air swing button on the remote controller. Air swing indicator will be on and air flow blades move up and down continuously to circulate the air. Press the Air swing button on the remote controller again, to keep the air flow direction in a constant position.
mode For a comfortable sleep, the air conditioner will operate it Fall asleep Sound sleep Wake up from mode. When the air conditioner is on and in cool/heat mode button on the remote controller. indicator appears and Off timer indicator starts blinking on the remote controller display. ENGLISH 1. Press the 2. Press the Time Up or Time Down button to set the time. You can set the time in half hourly unit from 30 minutes ~ 3 hours and hour unit from 3 hours ~ 12 hours.
Setting the On/Off timer You can set the air conditioner to turn on/off automatically at desired time. Setting On timer while the air conditioner is off / Off timer while the air conditioner is on Setting On timer 1. Press the On Timer/Off Timer button. On/Off timer indicator will blink on the remote controller display. 2. Press the Time Up or Time Down button to set the time. You can set the time in half hourly unit from 30 minutes ~ 3 hours and hour unit from 3 hours ~ 24 hours.
Combining On Timer and Off Timer If the air conditioner is on If the air conditioner is off Preset time on On timer is shorter than Off timer Ex) On timer : 3 hours, Off timer : 5 hours - The air conditioner will operate On timer after 3 hours from the moment you have set the timer. Your air conditioner will remain on for 2 hours and then turn off automatically.
Using the Quiet function You can reduce the noise generated from an indoor unit. Press the Quiet button on the remote controller while the air conditioner is operating in Cool/Heat mode. Quiet indicator appears on the remote controller display. The indoor unit will operate more quietly. Cancel Press the Quiet button once again. • I f using a multi system, this function will work only when the Quiet function is set on all operated indoor units.
Cleaning the air conditioner • Make sure the power is turned off and unplugged from CAUTION the wall socket when cleaning the air conditioner. ENGLISH Cleaning the indoor unit Wipe the surface of the unit with a slightly wet or dry cloth when needed. • C ontact the service center when you clean the indoor unit heat exchanger because it needs to be disassembled. • Do not clean the display using alkaline detergent.
Cleaning the air conditioner Removing the Air filter Grab the handle and lift it up. Then, pull the Air filter towards you and slide it down. Air filter Cleaning the air filter Washable foam based air filter captures large particles from the air. The filter is cleaned with a vacuum or by hand washing. Open the panel and put the Air filter out. Clean the Air filter with a vacuum cleaner or soft brush. If dust is too heavy, rinse it with running water.
Maintaining the air conditioner If the air conditioner will not be used for an extended period of time, dry the air conditioner to maintain it in best condition. 2. Before using the air conditioner again, dry the inner components of the air conditioner again by running in Fan mode for 3 to 4 hours. This helps remove odors which may have generated from dampness. ENGLISH 1. Dry the air conditioner thoroughly by operating in Fan mode for 3 to 4 hours and cut-off the power supply.
Troubleshooting Refer to the following chart if the air conditioner operates abnormally. This may save time and unnecessary expenses. PROBLEM SOLUTION The air conditioner does not work at all. • Check power status and then operate the air conditioner again. • Plug in or switch on the circuit breaker and then operate the air conditioner again. • Check if you have set the Off Timer. Operate the air conditioner again by pressing the Power button. The temperature adjustment is not working.
SOLUTION Air flow adjustment is not working. •C heck if you have selected Auto/Dry/ mode. In these modes, desired temperature is set to auto and you cannot adjust the temperature. Fan speed adjustment is not working. •C heck if you have selected Auto/Dry/Turbo/ mode. In these mode, fan speed is set to Auto and you cannot adjust the fan speed. Remote controller is not working. • Check if your batteries are depleted. • Make sure nothing is blocking your remote controller sensor.
INSTALLATION PARTS ※ In this manual, you may find model names written in simplified forms as indicated in following table. Model Names ARFSFT Included Models AR09FSFT, AR12FSFT, AR18FSFT, AR24FSFT ARHSFT AR09HSFT, AR12HSFT 09 AR09FSFT, AR09HSFT 12 AR12FSFT, AR12HSFT 18 AR18FSFT 24 AR24FSFT Remark Grouping was done by series. Grouping was done by capacity.
Installing the unit IMPORTANT: When installing the unit, always remember to connect first the refrigerant tubes, then the electrical lines. Always disassemble the electric lines before the refrigerant tubes. Upon receipt, inspect the product to verify that it has not been damaged during transport.
Choosing the installation location Outdoor Unit Where it is not exposed to strong wind Well ventilated and dustless places Out of the direct sunlight and rain Where neighbors are not annoyed by operation sound or hot air Solid wall or support that prevents vibration and is strong enough to hold the product weight Where there is no risk of flammable gas leakage When installing the unit at a high place be sure to fix the unit legs 3m or more away from the TV or radio (to prevent the screen from being distorte
Space Requirements for Outdoor Unit When installing 1 outdoor unit Top view ENGLISH Figure Description Side view Air intake Air outlet Air intake Air outlet , Air flow direction.
600 or more When front and rear side of the outdoor unit is towards the wall 1500 or more 600 or more 3000 or more 3000 or more 500 or more 600 or more (Unit : mm) When the upper part of the outdoor unit and the air outlet is opposite the wall 1500 or more 300 or more When the walls are blocking front and the rear side of the outdoor units 300 or more 500 or more Choosing the installation location 300 or more 200 or more • I f installation is done in inappropriate space, unit may g
Optional accessories The following connection accessories are optional. If they are not supplied, you should obtain them before installing the air conditioner. Insulated Assembly Pipe, Ø9.52mm (1) 09/12 Rubber Legs (4) Pipe Clamps A (3) Insulated Assembly Pipe, Insulated Assembly Pipe, PE T3 Foam Tube Ø12.70mm (1) Ø15.
Fixing the installation plate 2. Fix the indoor unit. If you fix the indoor unit on a wall (1) Fix the installation plate to the wall giving attention to the weight of the indoor unit. • I f you mount the plate to a concrete wall using plastic anchors, make sure that gaps between the wall and the plate, created by projected anchor, is less than 20mm. If you fix the indoor unit on a window frame (1) Determine the positions of the wooden uprights to be attached to the window frame.
• F or the terminal block wiring, use a wire with a ring terminal socket only. Regular wires without a ring terminal socket may become a fire hazard due to overheating of the electrical contact during a wiring work. ENGLISH When you install the unit, make first refrigerant connections and then electrical connections. Connect the air conditioner to grounding system before performing the electrical connection. If unit is uninstalled, first disconnect electrical cables, then refrigerant connections.
Installing and connecting the assembly pipe of the indoor unit Connect indoor and outdoor units with field-supplied copper pipes by means of flare connections. Use insulated seamless refrigeration grade pipe only, (Cu DHP type according to ISO1337), degreased and deoxidized, suitable for operating pressures of at least 4200 kPa and for burst pressure of at least 20700 kPa. Under no circumstances must sanitary type copper pipe be used.
Purging the indoor unit The indoor unit is supplied with inert gas (nitrogen). Before installing the unit, check if nitrogen gas flow out of indoor unit. If this one isn’t true, DO NOT INSTALL THE UNIT since leakage could be inside the indoor unit. ENGLISH 1. Unscrew the caps at the end of each pipe. All inert gas exhausts from the indoor unit.
Cutting or extending the pipe 5. Check if you flared the pipe correctly (see examples of incorrectly flared pipes below). Correct Inclined Damaged Surface Cracked Uneven Thickness 6. Align the pipes to connect them easily. Tighten the flare nuts first with your hands, and then with a torque wrench, applying the following torque: Outer Diameter ø6.35 mm ø9.52 mm ø12.70 mm ø15.88 mm ø19.05 mm ø22.
Drain hose installation 1. If necessary, connect the 2-meter extension drain hose to the drain hose. 2. If you use the extension drain hose, insulate the inside of the extension drain hose with a shield. 3. Fit the drain hose into 1 of 2 drain hose holes, then fix the end of the drain hose tightly with a clamp. • I f you do not use the other drain hose hole, block it with a rubber stopper. ENGLISH 4.
Installing and connecting the drain hose of the outdoor unit While heating, ice may accumulate. During the process of defrosting, check if condensation draining is adequate. For adequate draining, do the following: 1. Insert the drain plug into the drain hole on the underside of the outdoor unit. • T o avoid drain plug from contacting the ground, secure gap between the ground and the bottom surface of the outdoor unit. Drain hole Drain plug Bottom surface of outdoor unit 2.
3. Connect the charging hose of the low-pressure side of manifold gauge to a gas service port as seen in the picture. 4. Open the valve of the low pressure side of manifold gauge counterclockwise. Valve ENGLISH 5. Purge the air in the connected pipes using the vacuum pump for about 15 minutes. Manifold gauge Gas service port Make sure that pressure gauge shows -0.1MPa(-76cmHg) after about 10 minutes. This procedure is very important to avoid a gas leak.
Purging the connected pipes Important information regulation regarding the refrigerant used This product contains fluorinated greenhouse gases covered by the Kyoto Protocol. Do not vent gases into the atmosphere. 1. Please fill in with indelible ink, Refrigerant type R-410A GWP value 2088 GWP=Global Warming Potential the factory refrigerant charge of the product, Indoor unit the additional refrigerant amount charged in the field and + the total refrigerant charge.
Performing the gas leak tests Make sure to check for gas leaks before completing the installation process (connecting the assembly pipe and hose between indoor unit and outdoor unit, insulating the cables, hose and pipe, and fixing the indoor unit to the installation plate). ENGLISH A C D B To check for gas leaks on the outdoor unit, Check the valve A and B using a leak detector. To check for gas leaks on the indoor unit, Check the flare nut C and D using a leak detector.
Fixing the indoor unit in place Perform the following work on the area where gas leak test was done priorly. After checking for gas leaks in the system, insulate the pipe, hose and cables. Then place the indoor unit on the installation plate. Insulation 1. To avoid condensation problems, wrap foam insulation (as shown in the figure) on a part without insulation on the end of the pipes. Pipes 2. Wind the pipe, assembly cable and drain hose with vinyl tape. 3.
Final Check and Trial Operation To complete the installation, perform the following checks and tests to ensure that the air conditioner operates correctly. 1.
How to connect your extended power cables Items to prepare (compressor and insulation tape should be prepared by an installation technician.) Tools Spec Crimping plier Connection sleeve (mm) Insulation tape Contraction tube (mm) MH-14 20xØ7.0(HxOD) Width 18mm 50xØ8.0(LxOD) Shape 1. As shown in the figure, peel off the shields from the rubber/wire of the power cable. - Peel off 20 mm of the wire shields of the tube installed already.
ENGLISH 45 Boracay ET_AR09FSFT@_IBIM_DB68-03377A_EN-7.
QUESTIONS OR COMMENTS? COUNTRY CALL OR VISIT US ONLINE AT UK EIRE www.samsung.com/uk/support www.samsung.com/ie/support PORTUGAL LUXEMBURG NETHERLANDS 0330 SAMSUNG (7267864) 0818 717100 0180 6 SAMSUNG bzw. 0180 6 7267864* (*0,20 €/Anruf aus dem dt. Festnetz, aus dem Mobilfunk max. 0,60 €/Anruf) [HHP] 0180 6 M SAMSUNG bzw. 0180 6 67267864* (*0,20 €/Anruf aus dem dt. Festnetz, aus dem Mobilfunk max. 0,60 €/Anruf) 01 48 63 00 00 800-SAMSUNG (800.7267864) [HHP] 800.Msamsung (800.
AR09FSFT Series AR12FSFT Series AR18FSFT Series AR24FSFT Series AR09HSFT Series AR12HSFT Series Air Conditioner user & installation manual imagine the possibilities Thank you for purchasing this Samsung product. EN ES FR IT PT EL DE DB68-03377A-9 Boracay ET_AR09FSFT@_IBIM_DB68-03377A_EN-8.