
User manual


31
ENGLISH
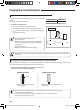
• Makesuretodrillonlyone
hole after choosing the
direction of the pipe.
Fixing the installation plate
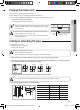
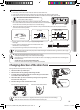
The following connection accessories are optional. If they are not supplied, you should obtain them before installing the air
conditioner.
Optional accessories
Tools required for installation
Insulated
Assembly Pipe,
Ø6.35mm (1)
Insulated Assembly
Pipe, Ø9.52mm (1)
09/12
Insulated Assembly Pipe,
Ø12.70mm (1)
18
Insulated Assembly Pipe,
Ø15.88mm (1)
24
PE T3 Foam Tube
Insulation (1)
Vinyl Tapes (2) Drain Plug (1)
Rubber Legs (4) Pipe Clamps A (3) Pipe Clamps B (3) Cement Nails (6)
M4 x 25 Tapped
Screws (6)
Drain Hose,
length 2m (1)
Putty 100g (1)
Foam
Insulation(1)
• Iftheseaccessoriesaresupplied,theywillbeintheaccessorybox.
General Tools
•VacuumPump(Backwardowingprevention) •ManifoldGauge •StudFinder
•TorqueWrench •PipeCutter •Reamer •PipeBender •SpiritLevel
•ScrewDriver •Spanner •Drill •LWrench •MeasuringTape
Tools for test operations
•Thermometer •ResistanceMeter •Electroscope
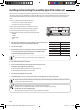
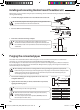
You can select the direction of the drain hose depending on where you want to install the indoor unit. Therefore before xing
the installation plate to a wall or a window frame, you must determine the position of the 65mm hole through which the cable,
pipe and hose pass to connect the indoor unit to the outdoor unit.
Whenfacingthewall,thepipeandcablecanbeconnectedfromthe:
•Right(A)
•Left(B)
•Underside_right(C)
•Rear_rightorleft(D)
BA
D
C
D
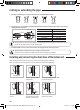
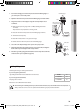
Direction of pipe
1. Determine the position of the pipe and drain hose hole as seen in the picture and drill the hole with an inner diameter
of 65mm so that it slants slightly downwards.
B
A
D
C
Pipe hole
(
Ø
65mm)
(Unit:mm)
Model A B C D
09/12
27 120 68 27
18/24
34 140 68 34
Boracay ET_AR09FSFT@_IBIM_DB68-03377A_EN-7.indd 31 2014/12/11 17:23:08