BD-C5500 BD-C5500C Blu-ray Disc Player user manual imagine the possibilities Thank you for purchasing this Samsung product. To receive more complete service, please register your product at www.samsung.
Key features Blu-ray Disc Features Subtitles Blu-ray Discs support the highest quality HD video available in the industry - Large capacity means no compromise on video quality. Furthermore, a Blu-ray Disc has the same familiar size and look as a DVD. Depending on what is contained on the Blu-ray Disc, you may be able to select different font styles, sizes and colors for the subtitles. Subtitles may also be animated, scrolled or faded in and out.
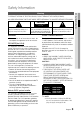
Safety Information 02 Warning CAUTION RISK OF ELECTRIC SHOCK DO NOT OPEN The lighting flash and Arrowhead within the CAUTION: TO REDUCE THE RISK OF ELECTRIC The explanation point within the triangle triangle is a warning sign alerting you of SHOCK, DO NOT REMOVE COVER (OR BACK) is a warning sign alerting you of important dangerous voltage inside the product. NO USER SERVICEABLE PARTS INSIDE. REFER instructions accompanying the product. SERVICING TO QUALIFIED SERVICE PERSONNEL.
Safety Information Precautions Important Safety Instructions Read these operating instructions carefully before using the unit. Follow all the safety instructions listed below. Keep these operating instructions handy for future reference. 1. Read these instructions. 2. Keep these instructions. 14. Refer all servicing to a qualified service personnel.
Handling Cautions • Do not write on the printed side with a ball-point pen or pencil. • Do not use record cleaning sprays or antistatic. Also, do not use volatile chemicals, such as benzene or thinner. • Do not apply labels or stickers to discs. (Do not use discs fixed with exposed tape adhesive or leftover peeled-off stickers.) • Do not use scratch-proof protectors or covers. • Do not use discs printed with label printers available on the market. • Do not load warped or cracked discs.
Contents Key features 2 2 Blu-ray Disc Features Blu-ray Disc Player Features Safety Information 3 4 4 4 4 Warning Precautions Important Safety Instructions Disc Storage & Management Disc Handling Getting Started 10 10 10 11 11 12 13 13 14 14 15 16 17 18 18 19 19 Before Using the user manual Disc Types and Contents that can be played.
24 24 26 26 27 Connecting to an Audio System Case 1 : Connecting to an Audio System (HDMI Supported Amplifier) - Best Quality (Recommended) Case 2 : Connecting to an Audio System (Dolby Digital, DTS Amplifier) - Better Quality Case 3 : Connecting to an Audio System (2 Channel Amplifier) - Good Quality Connecting to the Network Cable Network Wireless Network 28 29 30 30 30 30 32 32 32 32 32 32 32 33 34 34 34 34 34 34 34 35 35 35 36 36 36 39 39 Before Starting (Initial Settings) Setting the Menu Display T
Contents English Setup 40 40 40 40 40 40 41 41 41 41 41 42 Language Security Parental Rating Change Password General Background Energy Saving Front Display Power On/Off Sound Support Software Upgrade Contact Samsung Basic Functions 43 43 43 43 43 43 43 44 44 44 44 44 44 44 45 45 45 45 45 46 46 46 46 47 Playing a Disc Playback Disc Structure Using the Disc menu/Title menu/Popup menu Using the Disc Menu Using the Title Menu Playing the Title List Using the Popup Menu Using the Search and Skip Functi
47 47 48 48 48 49 49 49 50 Listening to Music Buttons on the Remote Control used for Music Playback Playing an Audio CD (CD-DA)/MP3 Repeat an Audio CD (CD-DA)/MP3 Playlist Playing back a Picture Playing a JPEG Disc Using the TOOLS button Playing back a USB Storage Device Network Services 51 51 53 54 55 55 55 Using Internet@TV Getting Started with Internet@TV Settings Samsung AppS BD-LIVE™ Software Upgrade Notification Using the AllShare Function Appendix 57 60 61 62 62 63 64 Troubleshooting Index Spe
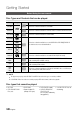
Getting Started Before Using the user manual Disc Types and Contents that can be played. Term Logo Icon h � Z BD-ROM BD-RE/-R DVD-VIDEO Definition This involves a function available on a BD-ROM. This involves a function available on a BD-RE/-R disc recorded in the BD-RE format. This involves a function available on a DVD-VIDEO. DVD-RW(V) DVD-R � DVD+RW This involves a function available on recorded DVD+RW or DVD-RW(V)/DVD-R/+R discs that have been recorded and finalized.
▪ ▪ ▪ ▪ ▪ ▪ Do not allow the disc to become dirty or scratched. Fingerprints, dirt, dust, scratches or deposits of cigarette smoke on the recording surface may make it impossible to use the disc for playback. Discs with PAL programs recorded on them cannot be played using this player. This player is compatible with the NTSC color system only. When a BD-J title is played, loading may take longer than a normal title, or some functions may perform slowly.
Getting Started DVD+R CD-RW/-R • This player can play back a DVD+R disc recorded and finalized with a DVD Video recorder. Ability to play back may depend on recording conditions. • Use a 700MB(80 minutes) CD-RW/-R disc. If possible, do not use a 800MB(90 minutes) or above disc, as the disc may not play back. • If the CD-RW/-R disc was not recorded as a closed session, you may experience delays when playing back the beginning of the disc or all recorded files may not play.
Container Audio Codec *.mp3 MP3 MP3 - WMA Compliant with WMA version 10 * Sampling rates (in kHz) - 8, 11, 16, 22, 32, 44.1, 48 * Bit rates - All bitrates in the range 5kbps to 384kbps *.wma WMA Support Range AVCHD (Advanced Video Codec High Definition) • This player can playback AVCHD format discs. These discs are normally recorded and used in camcorders. • The AVCHD format is a high definition digital video camera format. • The MPEG-4 AVC/H.
Getting Started Logos of Discs that can be played Blu-ray Disc DTS-HD Master Audio Dolby TrueHD NTSC broadcast system in U.S.A, Canada, Korea, Japan DivX BD-LIVE Java Accessories Check for the supplied accessories below.
03 Front Panel Getting Started a b c def g h 1 DISC TRAY Opens to accept a disc. 2 REMOTE CONTROL SENSOR Detects signals from the remote control. 3 DISPLAY Displays the playing status, time, etc. 4 OPEN/CLOSE BUTTON Opens and closes the disc tray. 5 STOP BUTTON Stops disc playback. 6 PLAY/PAUSE BUTTON Plays a disc or pauses playback. 7 POWER BUTTON Turns the player on and off.
Getting Started Front Panel Display a b c 1 IN DISC INDICATOR Lights when a disc is inserted or played back. 2 CURRENT TIME AND STATUS INDICATOR Displays the play time and the current status. 3 WIFI INDICATOR Lights when the wireless network is connected.
Getting Started ab c 03 Rear Panel d g f e 1 WIRELESS LAN ADAPTER Connect the optional Wireless LAN Adapter (WIS09ABGN) here to use the Wireless network. 2 LAN Can be used for network based services (See pages 51~56), BD-LIVE and software upgrades using a network connection. 3 HDMI OUT Using an HDMI cable, connect this HDMI output terminal to the HDMI input terminal on your TV for the best quality picture or to your Receiver for the best quality sound.
Getting Started Remote Control Tour of the Remote Control Turn the player on and off. To open and close the disc tray. POWER TV POWER BONUSVIEW SOURCE Turn the TV on and off. (To operate your TV, please refer to page 19) After setup, allows you to set the input source on your TV. Press this to use Bonusview function. Press numeric buttons to operate options. Press this to switch the Blu-ray Disc/DVD’s subtitle language.
Button Function TV POWER Used to switch the television on and off. TV SOURCE Used to select an external source connected to the TV. TV VOL (+/–) Used to adjust the volume of the television. TV CH (,/.) Used to select the desired channel. TV MUTE ✎ Used to toggle the sound on and off. NOTE ▪ The functions listed above will not necessarily work on all televisions. If you encounter problems, operate the television directly.
Connections Connecting to a TV Case 1 : Connecting to a TV with an HDMI Cable - Best Quality (Recommended) 1. Using an HDMI cable, connect the HDMI OUT terminal on the rear of the player to the HDMI IN terminal of your TV. 2. Turn on the player and TV. 3. Press the input selector on your TV remote control until the HDMI signal from the player appears on your TV screen.
04 Case 2 : Connecting to a TV with DVI Cable - Best Quality (Recommended) 2. Using the audio cables, connect the AUDIO OUT (red and white) terminals on the rear of the player to the AUDIO IN (red and white) terminals of your TV. 3. Turn on the player and TV. 4. Press the input selector on your TV remote control until the DVI signal from the player appears on your TV screen.
Connections Case 3 : Connecting to a TV (Component) - Better Quality - Connecting to your TV using Component video cables. - You will enjoy high quality images with accurate color reproduction. Component video separates the picture element into black and white(Y), blue(PB) and red(PR) signals to present clear and clean images. (Audio signals are delivered through the audio output.) 1.
04 Case 4 : Connecting to a TV (Video) - Good Quality 2. Turn on the player and TV. 3. Press the input selector on your TV remote control until the “VIDEO” signal from the player appears on the TV screen. • If you have set the remote control to operate your TV (See page 19), press the TV SOURCE button on the remote control and select VIDEO as the external source of the TV. Audio/Video cable Red White Yellow ✎ NOTE ▪ Noise may be generated if the audio cable is placed too close to the power cable.
Connections Connecting to an Audio System • Please turn the volume down when you turn on the Amplifier. Sudden loud sound may cause damage to the speakers and your ears. • Please set the audio in the menu screen according to the Amplifier. (See pages 32~34) • The position of HDMI terminals may vary depending on the Amplifier. Please refer to the user manual of your Amplifier. Case 1 : Connecting to an Audio System (HDMI Supported Amplifier) - Best Quality (Recommended) 1.
1. Using an optical cable, connect the DIGITAL AUDIO OUT (OPTICAL) terminal on the rear of the player to the DIGITAL AUDIO IN (OPTICAL) terminal of your Amplifier. 1. Using the audio cables, connect the AUDIO OUT (red and white) terminals on the rear of the player to the AUDIO IN (red and white) terminals of your Amplifier. 2. Using the video signal cable(s), connect the HDMI, COMPONENT or VIDEO OUT terminals on the rear of the player to the HDMI, COMPONENT or VIDEO IN terminal of your TV.
Connections Connecting to the Network This player enables you to view network based services (See pages 51~56) such as Internet@TV and BD-LIVE, as well as receive software upgrades when a network connection is made. We recommend using an AP (Access Point) or IP router for the connection. For more information on router connection, refer to the user manual of the router or contact the router manufacturer for technical assistance. Cable Network 1.
04 Wireless Network 1. A wireless AP/IP router is required to make a wireless network connection. Connect the wireless LAN adapter to the Wireless LAN Adapter on the rear panel of the player. 2. Set the network options. (See pages 36~39) Broadband service Wireless IP sharer Wireless LAN Adapter (not included) Networking with PC for AllShare function (See pages 55~56) ✎ NOTE ▪ Use only the optional Samsung wireless LAN adapter with this player. (Model name: WIS09ABGN).
Setup Before Starting (Initial Settings) 1. Turn on your TV after connecting the player. (When the player is connected to TV for the first time, player will turn on automatically and the Initial Settings screen will be displayed.) Initial Settings I On-Screen Language Select a language for the on-screen displays. English 5. Press the ◄► buttons to the select the desired Network Settings: Wired, Wireless or PBC (WPS), then press the ENTER button.
TV POWER BONUSVIEW SOURCE DISC MENU MENU RETURN Displays buttons available. 2. Press the ◄► buttons to select Settings, then press the ENTER button. 5. Press the EXIT button to exit the menu. INFO ✎ NOTE ▪ When the player is connected to the network, select 3 2 6 4. Press the ▲▼ buttons to select the desired item, then press the ENTER button. TITLE MENU POPUP TOOLS Selects the Settings. 3. Press the ▲▼ buttons to select the desired submenu, then press the ENTER button.
Setup Display ▪ You can configure various display options such as the TV Aspect, Resolution, etc. If you select the 16:9 Normal, 4:3 Pillarbox may displayed. In this case, you can’t see full screen by pressing the FULL SCREEN button on the remote control. TV Aspect BD Wise (Samsung Players only) Depending on the type of television you have, you may want to adjust the screen setting. BD Wise is Samsung’s latest inter-connectivity feature.
05 Resolution according to the output mode HDMI / connected Output Setup Setup • Blu-ray Disc playback HDMI / not connected HDMI Mode Component/VIDEO Mode Component Mode VIDEO Mode Auto Optimal Resolution 480i - - 1080p, Movie Frame(24Fs) off 1080p@60F 480i - - 1080p/1080i, Movie Frame(24Fs) on 1080p@24F 480i - - 1080i, Movie Frame(24Fs) off 1080i 480i 1080i 480i 720p 720p 480i 720p 480i 480p 480p 480i 480p 480i 480i - - 480i 480i HDMI Mode Component/VIDEO Mode
Setup HDMI Format HDMI Deep Color You can optimize the color setting from the HDMI output. Select a connected device Type. • TV : Select if connected to a TV via HDMI. • Monitor : Select if connected to a Monitor via HDMI. Set to output the picture from the HDMI OUT jack with Deep Color or not. Deep Color allows more accurate color reproduction with deeper color depth. • Auto : The picture will be output with Deep Color to the connected TV which supports HDMI Deep Color.
05 Digital Output Selection Setup Audio Stream Setup Definition PCM Decodes Primary, Secondary and Effect audio streams together into PCM audio. Decodes Primary, Secondary and Effect audio streams together Bitstream into PCM (Re-encode) audio, then reencodes the PCM audio into DTS bitstream. Bitstream (Audiophile) Outputs only the Primary audio soundtrack (main soundtrack of the movie) so that your receiver can decode the audio bitstream. You will not hear Secondary and Effect audio.
Setup HDMI • If your TV is not compatible with compressed multi-channel formats (Dolby Digital, DTS), the player may output PCM 2ch downmixed audio even though you set Bitstream(either Re-encode or Audiophile) on your setup menu. • If your TV is not compatible with PCM sampling rates over 48kHz, the player may output 48kHz downsampled PCM audio even though you set PCM Downsampling to Off. • Cinema : Select this if you want to play 2-channel movie sound over multi-channels.
▪ not support CEC. If your Samsung TV has an n logo, then it supports the Anynet+ function. Depending on your TV, certain HDMI output resolutions may not work. Please refer to the user manual of your TV. BD Data Management Enables you to manage the downloaded contents from a Blu-ray disc that supports the BD-LIVE service. You can check the device information including the storage size, delete the BD data or change the Flash memory device.
Setup DivX(R) Deactivation Wired Network Select this to get a new registration code. 1. In the Network Settings menu, press the ▲▼ buttons to select Network Settings, and then press the ENTER button. The Internet Protocol Setup screen appears. Settings Display Audio System Network Language Security General Support ✎ Initial Setting Disc Menu : Audio : Subtitle : Do you want to deactivate your device? Yes No This function can be operated when DivX(R) Registration function is deactivated.
10. Run a Network Test to ensure the player has connected to your network (See page 39). 1. Right click the Network icon on the bottom right of the screen. You can setup the wireless network three ways: • Using PBC (WPS) • Using the Auto Network Search function. • Manually. Each method is described below. 2. In the pop-up menu, click Status. 3. On the dialog that appears, click the Support tab. 4. On the Support tab, click the Details button. The Network settings are displayed.
Setup Setting Up the Wireless Network Connection - Auto Network Search Most wireless networks have an optional security system that requires devices that access the network to transmit an encrypted security code called an Access or Security Key. The Security Key is based on a Pass Phrase, typically a word or a series of letters and numbers of a specified length you were asked to enter when you set up security for your wireless network.
Setting Up the Wireless Network Connection - Manual 8. Press the ▼ button to go to the first DNS entry field. Enter the numbers as above. If the Auto Setting does not work, you need to enter the Network settng values manually. To get the Network setting values from most Windows computers, follow these steps: 1. Right click the Network icon on the bottom right of the screen. 2. In the pop-up menu, click Status. 3. On the dialog that appears, click the Support tab. 4.
Setup ✎ NOTE ▪ What is a valid certificate? ▪ When the player uses BD-LIVE to send the disc data and a request to the server to certify the disc, the server uses the transferred data to check if the disc is valid and sends the certificate back to the player. The Internet connection may be restricted while you are using BD-LIVE contents. Language You can select the language you prefer for home menu, disc menu, etc. • On-Screen Menu : Select the language for the on-screen displays.
Front Display Change the brightness of the front panel. • Auto : Dim during playback. • Dim : Dim the display window. • Bright : Brighten the display window. Setup You can reduce power consumption by setting the front panel to turn off automatically when there is no operation for 5 seconds. • On : The front panel will automatically turn off when there is no operation for 5 seconds. • Off : Energy Saving function is not used.
Setup You can also update software in any of the two ways as follows: Software update is the same as in the By Internet menu. • USB : Visit www.samsung.com/bluraysupport, then download and store the latest software (RUF file) into a USB flash drive. Connect the USB flash drive to the USB port of the player (disc tray must be empty) to update the software, then follow the on-screen instructions. • CD/DVD : Visit www.samsung.com/ bluraysupport, download and write the latest software (RUF file) onto a disc.
Basic Functions Playback 1. Press the OPEN/CLOSE ( open the disc tray. ) button to 2. Place a disc gently into the tray with the disc’s label facing up. 3. Press the OPEN/CLOSE ( close the disc tray. 4. Press the PLAY ( ) button to ) button. STOP ( PAUSE ( ) Starts playback. ) Stops playback. • If pressing the button once : The stop position will be memorized. • If pressing the button twice : The stop position will be not memorized.
Basic Functions Using the Popup Menu Skipping Chapters h 1. During playback, press the POPUP MENU button on the remote control. 2. Press the ▲▼◄► buttons or ENTER button to select the desired menu. ✎ NOTE ▪ Depending on the disc, the menu items may differ and this menu may not be available. Using the Search and Skip Functions During play, you can search quickly through a chapter or track, and use the skip function to jump to the next selection.
hzZy Repeat the disc title or chapter. Depending on the disc, the Repeat function may not be available. 1. During playback, press the REPEAT button on the remote control. 2. Press the ▲▼ buttons to select Chapter or Title, then press the ENTER button. 5. To return to normal play, press the REPEAT button again. 6. Press the ENTER button. ✎ NOTE ▪ If you set point (B) before 5 seconds has lapsed, the prohibition message will appear.
Basic Functions Selecting the Audio Language hzZx You can also operate this function by pressing the AUDIO button on the remote control. 1. During playback, press the TOOLS button. 2. Press the ▲▼ buttons to select Audio. 3. Press the ◄► buttons to select the desired audio language. ✎ NOTE ▪ The ◄► indicator will not be displayed on the ▪ ▪ ▪ ▪ ▪ screen if the BONUSVIEW section does not contain any BONUSVIEW audio settings.
• Movie : This is the best setting for watching movies. • User : The user can adjust the sharpness and noise reduction function respectively. Setting BONUSVIEW ow Buttons on the Remote Control used for Music Playback POWER TV TV POWER POWER BONUSVIEW BONUSVIEW SOURCE SOURCE SUBTITLE SUBTITLE AUDIO AUDIO ! h The BONUSVIEW feature allows you to view additional content (such as commentaries) in a small screen window while the movie is playing.
Basic Functions SKIP button : During playback, moves to the previous page in the Music List or moves to the previous track in the Playlist. If you press this button after three seconds of playback in the Playlist, the current track will be replayed from the beginning. But, if you press this button within three seconds after playback starts in the Playlist, the previous track will be played. 0 NUMBER button : During the Playlist playback, press the desired track number. The selected track will be played.
G Playing a JPEG Disc 3 files selected 1/2 Page TRACK 003 TRACK 001 TRACK 002 TRACK 003 TRACK 004 TRACK 005 TRACK 006 TRACK 007 TRACK 008 1. Insert a JPEG disc into the disc tray. 2. Press the ◄► buttons to select the Photos, and then press the ENTER button. 00:04:27 00:05:57 00:03:41 00:04:07 3. Press the ▲▼◄► buttons to select the folder you want to play, and then press the ENTER button.
Basic Functions • Zoom : Select this if you want to enlarge the current picture. (Enlarged up to 4 times) • Rotate : Select this if you to rotate the picture. (This will rotate the picture either clockwise or counter clockwise.) • Information : Shows the picture information including the name and size, etc. 5. Press the ▲▼ buttons to select the USB, then press the ENTER button. 6. Press the ◄► buttons to select the desired Videos, Music or Photos, then press the ENTER button. 4-1. Press the BLUE(D) button.
Network Services 1. Connect the player to the network. (See pages 26~27) Internet@TV at a Glance 2. Configure the network settings. (See pages 36~39) 1 2 3 Recommended Contents 1 Using Internet@TV Connect this player to the network to download various chargeable or free-of-charge applications. Internet@TV brings useful and entertaining contents and services directly from the web to your player. And enjoy the applications such as news, weather forecast, stock market, games, movies and music.
Network Services Using the Keypad Pressing the SUBTITLE button on the remote while you are using the Screen Keypad enables you to change the text fields to lower case, upper case, numbers and icons. You can use this Screen Keypad in a several Internet@TV applications. 1 2 abc 3 def 4 ghi 5 jkl 6 mno 7 pqrs 8 tuv 9 wxyz a A 1 1. Press the ENTER button on the remote at the Google Maps icon at the Internet@TV. 2. Press Green(B) button to use the SEARCH function. 3.
System Setup 1. Press the ▲▼◄► buttons to select the desired application and press the RED(A) button. Login Reset Resets Internet@TV settings to factory default settings. ✎ NOTE ▪ If you forgot your password, press the STOP ( ) button on the front panel of the player for more than 5 seconds with no disc inserted. Internet@TV ID User Account : adgim Password : a Create [0~9] Enter PIN ' Cancel You can use this menu when creating, deleting the account.
Network Services Service Manager Delete and lock applications installed to Internet@ TV. Lock Lock the application. Accessing a locked application requires the password. Delete Using the color buttons with the Samsung Apps • RED(A) (Login) : To log in to the internet service. • GREEN(B) (Thumbnail View) : To change the view mode. • BLUE(D) (Sort By) : To sort the applications by Featured, Most Downloaded, Most Recent or Name. Delete the application.
1. Check the size of the remaining memory. The memory device must have at least 1GB of free space to accommodate the BD-LIVE services. AllShare enables you to play music, video and photo files in your PC using the player. To use AllShare, you must connect the player to your PC via the network (See pages 26~27) and install the SAMSUNG PC Share Manager on the PC. 2. Insert a Blu-ray disc that supports BD-LIVE. 1. Visit the Samsung website at www.samsung. com. 3.
Network Services 7 Shared Folder : Displays a list of the shared folders. 8 My Computer : Displays a list of the folders and files in the PC. 4. Select a folder to share from the My computer pane, and click the Share Folder Enabled icon ( ). (To remove a shared folder : Select a folder to remove from the shared folders, and click the Share Folder Disabled icon ( ).) 5.
Appendix 08 Troubleshooting PROBLEM Appendix Before requesting service, please check the following. SOLUTION No operation can be performed with the remote control. • Check the batteries in the remote control. They may need replacing. • Operate the remote control at a distance of no more than 20 feet. • Remove batteries and hold down one or more buttons for several minutes to drain the microprocessor inside the remote control to reset it. Reinstall batteries and try to operate the remote control again.
Appendix PROBLEM SOLUTION Forgot password • Press the STOP ( ) button (on front panel) for more than 5 seconds with no disc inside. All settings including the password will revert to the factory settings. Don’t use this unless absolutely necessary. • When the factory default settings are restored, all the user data stored in the BD data will be deleted. If you experience other problems.
SOLUTION 08 PROBLEM I cannot connect to the BD-LIVE server. • Check whether the network connection is successful or not by using Network Test menu. (See page 39) • Check whether the USB memory device is connected with player or not. • The memory device must have at least 1GB of free space to accommodate the BD-LIVE service. You can check the available size in BD Data Management. (See page 35) • Please check whether the BD-LIVE Internet Connection menu is set to Allow(All).
Appendix Index J A Accessories Ad-hoc Anynet+ (HDMI-CEC) Audio Language AllShare 14 27 34 46 55~56 B 49 M Movie Frame (24F) MP3 32 48~49 30 35 39, 55 47 49 Network Setup 36~38 30~31 P C Component Cable Network Camera Angle 22 26 46 PCM Downsampling Popup Menu Picture Setting R D Digital Output 32~33 Dynamic Range Control 34 Downmixing Mode 34 DTS Neo:6 34 DST (Daylight Saving Time) 35 DivX 35~36 Disc Menu 43 Disc Structure 43 H HDMI 20, 34 HDMI Supported Amplifier 24 HDMI Deep Color 32 I I
Power Requirements AC 120V, 60Hz Power Consumption 14W Weight 3.8 Ibs Dimensions 17.1 (W) × 8.1 (D) × 1.7 (H) inches Operating Temperature Range +41°F to +95°F Operating Humidity Range 10 % to 75 % BD (Blu-ray Disc) Reading Speed : 4.917m/sec DVD (Digital Versatile Disc) Disc CD : 5 inches (COMPACT DISC) CD : 3 1/2 inches (COMPACT DISC) Composite Video Video Output Component Video Video/Audio Audio Output Appendix General 08 Specifications HDMI Reading Speed : 3.49 ~ 4.06 m/sec.
Appendix Compliance and Compatibility Notice NOT ALL discs are compatible • Subject to the restrictions described below and those noted throughout this Manual, including the Disc Type and Characteristics section of this user manual, disc types that can be played are: pre-recorded commercial BD-ROM, DVD-VIDEO, and Audio CD (CD-DA) discs; BD-RE/-R, DVD-RW/-R discs; and CD-RW/-R discs. • Discs other than the above cannot and/or is not intended to be played by this player.
All content and services accessible through this device belong to third parties and are protected by copyright, patent, trademark and/or other intellectual property laws. Such content and services are provided solely for your personal noncommercial use. You may not use any content or services in a manner that has not been authorized by the content owner or service provider.
Appendix License • Manufactured under license from Dolby Laboratories. “Dolby” and the double-D symbol are trademarks of Dolby Laboratories. • Manufactured under license under U.S. Patent #’s : 5,451,942; 5,956,674; 5,974,380; 5,978,762; 6,226,616; 6,487,535; 7,212,872; 7,333,929; 7,392,195; 7,272,567 & other U.S. and worldwide patents issued & pending. DTS and the Symbol are registered trademarks, & DTS-HD, DTS-HD Master Audio, and the DTS logos are trademarks of DTS, Inc. Product includes software.
LIMITED WARRANTY TO ORIGINAL PURCHASER This SAMSUNG brand product, as supplied and distributed by SAMSUNG ELECTRONICS AMERICA, INC.
Contact SAMSUNG WORLD WIDE If you have any questions or comments relating to Samsung products, please contact the SAMSUNG customer care center. Region North America Latin America Europe CIS Asia Pacific Area Canada Mexico U.S.A Argentine Brazil Chile Nicaragua Honduras Costa Rica Ecuador El Salvador Guatemala Jamaica Panama Puerto Rico Rep.
QUESTIONS OR COMMENTS? COUNTRY IN THE US CALL 1-800-SAMSUNG (7267864) OR VISIT US ONLINE AT WRITE www.samsung.com Samsung Electronics America, Inc.