BD-H8500/H8900 BD-H8500M/H8900M BD-H8500N/H8900N BD-H8500A/H8900A BD-H8509S/H8909S E-MANUAL E-MANUAL imagine the possibilities Thank you for purchasing this Samsung product. To receive more complete service, please register your product at www.samsung.
Contents Connections Connecting to a TV Connecting to an Audio System 8 8 Method 1: Connecting to an HDMI supported AV receiver 10 14 15 17 17 17 18 18 18 27 29 29 29 13 3D Blu-ray Playback Mode 30 30 13 Screen Size 30 TV Aspect Ratio 32 32 HDMI Colour Format 32 32 Speaker Settings 20 Multiroom Link 20 Speaker Test 20 Edit Name Audio Sync Connected Device Auto Tuning 28 Auto Tuning 29 Wake-up Timer Aerial Channel List Guide Schedule Manager Edit Channel Edit Favourites Channel Sett
3 34 34 34 Teletext Language 33 Primary Teletext Language RF Bypass Gain Aerial Connection Type 35 42 43 43 44 44 Network Settings 46 46 46 47 47 49 49 Anynet+ (HDMI-CEC) DivX® Video On Demand Wi-Fi Direct Content Sharing 43 Multimedia Device Settings 52 52 Device Name BD-Live Settings 44 BD-Live Internet Connection Apps Settings 45 Auto Ticker 45 Channel-Bound Apps VOD Rating Lock Terms & Policy Samsung account Terms and Conditions, Privacy Policy Reset Smart Hub Setup Language D
Controlling Music Playback Advanced Function 67 82 67 68 Buttons on the Remote Control used for Music Playback Using the Options Menu (During the Playback) Using the View & Options Menus (On a file screen) 68 Using the View Menu 69 69 70 71 73 83 Shuffling Tracks on an Audio CD 83 Playback control during recording 83 To stop recording Repeating Tracks on an Audio CD Creating a Playlist from an Audio CD Ripping 84 Using the View & Options Menus 86 78 Using the remote control buttons EPG & S
Using Samsung Apps 96 98 The Samsung Apps Screen at a Glance Starting an Application 98 The Option Menu Screen Mirroring Using the Web Browser 101 Link Browsing and Pointer Browsing 102 The Control Panel at a Glance 103 Using the Keyboard Pop-up 104 Options on the Keyboard Pop-Up 105 Using the Setting Menu Linking Your Internet Service Accounts to the product Appendix Supported Formats 108 Video File Support 110 Supported Subtitle File Formats 111 Music File Support 112 Picture File Support 112
Connecting to a TV Except for H8509S, H8909S model For H8509S, H8909S model "" Depending on your model, rear panel may be different. For more details, please refer to the user manual of product. "" The RF cable connection of this product sends only signals of TV. You must connect the HDMI cable to watch output from your product. "" If you use an HDMI-to-DVI cable to connect to your display device, you must also connect the Digital Audio Out on the product to audio system to hear audio.
"" HDMI outputs only a pure digital signal to the TV. If your TV does not support HDCP (High-bandwidth Digital Content Protection), random noise appears on the screen. "" Do not connect the power cord until you have made all the other connections. When you change the connections, turn off all devices before you start. "" If connecting with 2 RF cables from the same satellite dish, you can watch and record different channels. Twin LNB is recommended.
Connecting to an Audio System Method 1: Connecting to an HDMI supported AV receiver Method 2: Connecting to an AV receiver with Optical input "" After finishing the connections, press the input selector of the connected audio system and TV until the video signal from the product appears on your TV and you hear the audio signal through your audio system. "" Do not connect the power cord until you have made all the other connections. When you change the connections, turn off all devices before you start.
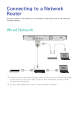
Connecting to a Network Router You can connect your product to your network router using one of the methods illustrated below. Wired Network "" Internet access to Samsung’s software update server may not be allowed, depending on the router you use or your ISP’s policy. For more information, contact your ISP (Internet Service Provider). "" For DSL users, please use a router to make a network connection.
Wireless Network "" If the wireless router supports DHCP, your product can use a DHCP or static IP address to connect to the wireless network. "" Set your wireless router to Infrastructure mode. Ad-hoc mode is not supported. "" The product supports only the following wireless security key protocols: WEP (OPEN/ SHARED), WPA-PSK (TKIP/AES), WPA2-PSK (TKIP/AES) "" Select a channel on the wireless router that is not currently being used.
The Home Screen PLAY DISC FILMS AND TV SHOWS MULTIMEDIA SAMSUNG APPS Audio CD RECOMMENDED 1 MY APPS 2 3 WebBrowser e-Manual 3 Recorded Schedule Screen TV Manager Mirroring Settings PLAY DISC : Lets you play photos, videos, or music content from Disc. FILMS AND TV SHOWS : Lets you view Films and TV Shows from the Internet. "" Depending on your country, this menu function may not be supported. MULTIMEDIA : Lets you play photos, videos, or music content from USB or mobile devices, or PCs.
Picture Picture UHD Output Auto 3D Settings TV Aspect Ratio 16:9 Original BD Wise Off Resolution Auto DTV Smart Resolution Off Movie Frame (24fps) UHD Output Auto For BD-H89 series This option outputs HDMI video at UHD (Ultra High definition) resolution. This is only available when Movie Frame is set to Auto. "" To use this feature, you must connect the product to a device that supports UHD resolution and you must have content that plays at 24fs (film speed).
3D Blu-ray Playback Mode Try Now Set whether to play 3D Blu-ray disc in 3D or 2D image. ●●Auto : Automatically detect if a connected TV has 3D capability and play a Blu- ray 3D disc in 3D or 2D accordingly or a 3D only disc in 3D if the TV supports 3D. 3D only discs will not be played if your TV does not support 3D. ●●3D → 3D : Play 3D only and Blu-ray 3D discs in 3D mode at all times. ●●3D → 2D : Play Blu-ray 3D discs in 2D mode at all times. 3D only discs will not be played.
TV Aspect Ratio Try Now Lets you adjust the output of the product to the screen size of your TV. ●●16:9 Original : Select when you connect the product to a 16:9 TV screen. The product will display all content in its original aspect ratio. Content formatted in 4:3 will be displayed with black bars on the left and right. ●●16:9 Full : Select when you connect the product to a 16:9 TV screen. All content will fill the full screen. Content formatted in 4:3 will be stretched.
"" When BD Wise is on, the Resolution setting automatically defaults to BD Wise and BD Wise appears in the Resolution menu. "" If the product is connected to a device that does not support BD Wise, you can not use the BD Wise function. "" For proper operation of BD Wise, set the BD Wise menu of both the product and the TV to On. Resolution Try Now Set the output resolution of the HDMI video signal. The number indicates the number of lines of video per frame.
Resolution according to the output mode ●●Blu-ray Disc/E-contents/Digital Contents/DTV/DVD playback For BD-H85 series Resolution BD Wise Auto 1080p 1080i 720p 576p/480p Blu-ray Disc E-contents/Digital contents/DTV DVD Resolution of Blu-ray 1080p 576i/480i Disc Max. Resolution of TV Max. Resolution of TV Max.
DTV Smart Resolution Try Now Use this function to automatically optimise screen resolution for digital broadcasts. ●●Auto : Screen resolution is automatically optimised for digital broadcast. ●●Off : Turn off DTV Smart Resolution. "" When you change your TV channel with this function set to Auto, according your TV, the display time of next channels may take longer than the function set to Off. "" DTV smart resolution is activated only when resolution option is set to Auto.
HDMI Colour Format Try Now Set the colour space format for HDMI output, depending on the connected device. ●●Auto : Automatically set the optimum format supported by the connected display device. ●●YCbCr (4:4:4) : Recommended when connected to a display that supported YCbCr (4:4:4) because most films are in this format. ●●RGB (Standard) : Recommended when connected to a display that does not support the YCbCr format. Select this for output of the normal range of RGB colours.
Sound Sound Speaker Settings Digital Output PCM PCM Downsampling On Dynamic Range Control Downmixing Mode Auto Normal Stereo DTS Neo:6 Mode Audio Sync Off 0 ms Speaker Settings Connect the product to a Samsung Network speakers for a richer, clearer sound. Refer to the Samsung Network speaker's operating manual for more information on pairing. "" To use this feature, at least one network speaker must be connected. "" Only a Samsung Network Speaker that supports Multiroom Link can be connected.
Multiroom Link Set the configuration of the network speaker(s) you connected to your product. Speaker Test Send a test sound to each speaker to make sure your system is working properly. Edit Name You can give each speaker a name. Digital Output Try Now You set the Digital Output to match the capabilities of the AV receiver you’ve connected to the product : ●●PCM : Choose if you have connected an HDMI supported AV receiver.
Digital Output Selection Audio Stream on Blu-ray Disc Setup Connection Audio source stream Outputs PCM Dolby Digital Dolby Digital Plus Up to PCM 7.1ch Up to PCM 7.1ch Up to PCM 7.1ch HDMI supported Avreceiver Dolby TrueHD Up to PCM 7.1ch Up to PCM 6.
Setup Bitstream (Reencoded DTS) Bitstream (Reencoded Dolby D) Connection HDMI supported AV receiver or Optical HDMI supported AV receiver or Optical Audio source stream Outputs PCM Dolby Digital Dolby Digital Plus Re-encoded DTS Re-encoded DTS Re-encoded DTS Dolby TrueHD Re-encoded DTS DTS DTSHD High Resolution Audio DTS-HD Master Audio PCM Dolby Digital Dolby Digital Plus Re-encoded DTS Re-encoded DTS Re-encoded Dolby Digital * Re-encoded Dolby Digital * Re-encoded Dolby Digital * Dolby True
Setup Connection Bitstream (Reencoded Dolby D) HDMI supported AV receiver or Optical Audio source stream Outputs PCM PCM 2ch Dolby Digital Dolby Digital DTS DTS Audio source stream Outputs Dolby Digital Dolby Digital Plus Up to PCM 5.1ch Up to PCM 5.1ch MPEG1 Layer 2 Up to PCM 5.
Definition for Blu-ray Disc Setup Connection PCM HDMI supported AVreceiver Audio source stream Outputs Any Decodes the main feature audio and BONUSVIEW audio stream together into PCM audio and adds Navigation Sound Effects. Any Outputs only the main feature audio stream so that your AV receiver can decode the audio bitstream. You will not hear BONUSVIEW audio or Navigation Sound Effects.
PCM Downsampling Try Now Set whether to use downsampling processing or not. ●●Off : Select when the AV receiver connected to the product is 96kHz compatible. ●●On : Select when the AV receiver connected to the product is not 96kHz compatible. 96kHz signals will be down converted to 48kHz. "" Even when PCM Downsampling is set to Off, some discs will only output downsampled audio through the optical digital outputs.
Downmixing Mode Try Now Select Downmix method for stereo output. ●●Normal Stereo : Downmixes the multi-channel audio into two channel stereo. Choose when connected to equipment that does not support virtual surround functions such as Dolby Pro Logic. ●●Surround Compatible : Downmixes multi-channel audio into surround compatible stereo. Choose when connected to equipment that supports virtual surround functions such as Dolby Pro Logic.
Connected Device Try Now Choose an equipment that you have connected to this product to hear the sound in addition to your TV. Loudness of DTV Programme will be adjusted according to your equipment. ●●AV Receiver : Select this If you use a general AV Receiver / Home Theatre Equipment or a Television to hear sound. ●●AV Receiver (Offset Mode) : Select this if your case is one of two shown below. –– If you use THX Certified AV Receiver / Home Theatre Equipment.
Broadcasting You can configure your TV channels with features such as country and auto tune. Broadcasting Auto Tuning Aerial Terrestrial Channel List Guide Schedule Manager Edit Channel Edit Favourites Auto Tuning Try Now Scans all channels and stores them in the product’s memory. Auto Tuning Configure auto-tuning settings to scan and store channels. Standby Auto Tuning Auto-tune channels while your device is in standby mode.
Cable Search Option Except for H8509S, H8909S, H8500A, H8900A model Configure search settings, such as frequency and symbol rate, for cable network. Wake-up Timer Schedule timer to turn the TV on and scan channels automatically. "" This menu can be available when country set to Hungary, Finland and Italy and TV mode is Astra HD + or Sky. Aerial Except for H8500A, H8900A, H8509S, H8909S model Selects an appropriate type of aerial for digital broadcasts.
Schedule Manager Try Now It can manager lists for schedule viewing or recording. "" Depending on your country, this menu function may not be supported. Edit Channel Try Now It is provided to edit functions for channel. Edit Favourites Try Now It is provided to make and edit favourite lists for channel. Channel Settings Country (Area) Try Now Select your country so that the TV can correctly auto-tune the broadcasting channels.
Manual Tuning Try Now Scans for a channel manually and stores in the product. When scanning has finished, channels are updated in the channel list. Transfer Channel list Try Now This function can import or export the channel map. You should connect a USB storage to use this function. ●●Import from USB : Import channel list from USB. ●●Export to USB : Export channel list to USB. "" If you set the country to Netherlands and Antenna source set to cable, this menu will not appear.
Channel Lock Try Now Prevent your children from accessing harmful content by locking channels. When "Channel Lock" set to "on", navigate to the "Edit Channel" Screen, select the channels you wish to lock, select the "Lock", and then enter the PIN code. This locks the selected channels. Subtitle Try Now Configures the subtitle options. Primary Subtitle Language Try Now Select the Primary Subtitle language. Secondary Subtitle Language Try Now Select the Secondary Subtitle language.
Secondary Audio Language Try Now Select the Secondary Audio language. Programme Rating Lock Try Now Block some programmes. (Depending on the country) "" Password : Enter the desired 4-digit password using the number buttons. 1) Belgium, France, Italy, Norway : You can not set the password to "0000". Please choose other numbers. 2) Others : Default password is set to 0000. Data Service Activates or deactivates the data service.
RF Bypass Gain For BD-H8500N, H8900N model When the TV and product are connected together with a RF cable, this function prevents the distortion of the broadcast signal when watching a TV channel while the product is powered off. "" Power consumption will be increased when you use this function. Aerial Connection Type For H8509S, H8909S model Choose Single or Dual depending on the number of aerial cables connected.
Network When you connect this product to a network, you can use network based applications and functions, and upgrade the product's software through the network connection. To use network services, you must connect the product to the network. Network Network Status Network Settings Wi-Fi Direct Content Sharing Set Remote Access Device Name [BD]H8900 BD-Live Settings Network Status Try Now Lets you check the current network and Internet status.
Wired Network Wired - Automatic 1. 2. 3. 4. In the Home screen, select Settings, and then press the E button. Select Network, and then press the E button. Select Network Settings, and then press the E button. Select Wired in the Network Settings screen, and then press the E button. Network Settings Select your network type. Network type Wired Connect Plug a network cable into the back of your Blu-ray player. 5. Select the Connect, and then press the E button.
Wired - Manual If you have a static IP address or the Automatic procedure does not work, you'll need to set the Network Settings values manually. Follow Steps 1 and 2 in Wired - Automatic and then follow these steps: 1. Select Network Status. The product searches for a network, and then displays the connection failed message. 2. On the bottom of the screen, select IP Settings, and then press the E button. The IP Settings screen appears. 3. Select the IP Setting field, and then press the E button. 4.
Wireless Network You can setup a wireless network connection in four ways: –– Wireless Automatic –– Wireless Manual –– WPS(PBC) –– WPS(PIN) When you configure the wireless network connection, any wireless network devices currently connected through the product or, if applicable, the product's current wired connection, will be disconnected. Wireless - Automatic 1. 2. 3. 4. In the Home screen, select Settings, and then press the E button. Select Network, and then press the E button.
5. Select the desired network, and then press the E button. 6. On the Security screen, enter your network's Security Code or Pass Phrase. Enter numbers directly using the number buttons on your remote control. Enter letters by selecting a letter with an arrow button, and then pressing E button. "" To view the password as you enter it, use the arrow buttons to select Show Password on the right side, and then press E button. 7. When finished, select Done and then press the E button.
8. Repeat Steps 6 and 7 until you have filled in all values. "" You can get the Network values from your Internet provider. 9. When finished, select OK, and then press the E button. The Security Screen appears. 10. On the Security screen, enter your network's Security Code or Pass Phrase. Enter numbers directly using the number buttons on your remote control. Enter letters by selecting a letter with the ▲▼◀▶ buttons, and then pressing the E button. 11.
WPS(PIN) Before you begin, open the router's setup menu on your PC and access the screen with the WPS PIN entry field. 1. 2. 3. 4. In the Home screen, select Settings, and then press the E button. Select Network, and then press the E button. Select Network Settings, and then press the E button. Select Wireless in the Network Settings screen, and then press the E button. The product searches for and then displays a list of the available networks. 5. Select the desired network, and then press the E button.
Wi-Fi Direct The Wi-Fi Direct function allows you to connect Wi-Fi Direct devices to the product and each other using a peer-to-peer network, without a wireless router. "" Bluetooth transmissions can interfere with the Wi-Fi Direct signal. Before you use the Wi-Fi Direct function, we strongly recommend that you turn off the Bluetooth function of any active mobile device. 1. 2. 3. 4. Turn on the Wi-Fi Direct device and activate its Wi-Fi Direct function.
Content Sharing Multimedia Device Settings Allow other devices on your network, like smart phones and tablets, to share content with your product. Share Hard Drive Set whether to share content from this product with other network connected devices, such as smart phone. "" If this menu is set to On, Auto Power Off function is not available. Set Remote Access Remote access allows you to access and control your product from other devices.
Device Name Lets you input a name for the product that will identify it on your networks. BD-Live Settings Try Now Set various BD-Live function. BD-Live allows you to access extra features available on some Blu-ray discs if you are connected to the Internet. BD-Live Internet Connection Try Now Lets you fully allow, partly allow, or prohibit a BD-Live Internet connection.
Smart Hub Set your preferences for using Apps. Smart Hub Apps Settings VOD Rating Lock Off Terms & Policy Samsung account Terms and Conditions, Privacy Policy Reset Smart Hub Apps Settings Lets you configure App notification settings and view basic info about your Apps. Auto Ticker This automatically turns on the selected ticker service. Channel-Bound Apps Enable or disable Channel-Bound Apps. Channel-Bound Apps are found on certain channels and provide additional information or services.
VOD Rating Lock You can lock access to Video on Demand (VOD) content based on its rating. "" Depending on your country, this menu function may not be supported. "" If you haven't logged into your Samsung account, this function is not available. Terms & Policy You must review and agree to both the App Terms & Conditions and the privacy policy to use App services.
System System Setup Language Device Manager Clock Storage Device Manager Auto Power Off Off Security Setup Try Now Sets the channels and the time when setting up this product for the first time or when resetting it. Language Try Now You can select the language you prefer for the On-screen menu, disc menu, etc. "" The selected language will only appear if it is supported. Device Manager Try Now Setup input devices to use with this product.
Keyboard Settings Try Now Lets you configure a wireless USB keyboard connected to the product. Mouse Settings Try Now Lets you configure a wireless USB mouse connected to the product. You can use the mouse in the product's menu in the same way you use a mouse on your PC. To use a mouse with the product's menu: 1. Connect the USB mouse to the product. 2. Click the primary button you selected in Mouse Settings. The Simple Menu appears. 3. Click the menu options you want.
Clock Try Now Sets the current date and time. "" If Schedule Viewing and Schedule Recording is set using GUIDE, Channel List, or Info menu, It will work based on the time information of the TV programme. If you set the Clock Mode to Manual and change time manually, Schedule Viewing and Schedule Recording function can be limited or work abnormally. Storage Device Manager Format Device Try Now Try Now Format selected device. All contents will be deleted from that device.
Select Device for Recording Change the location of where you store recorded files. Auto Power Off Try Now Saves power by turning off your product automatically when no user operation is received for setting time(4hours, 6hours, 8hours). "" This function isn't available when Share Hard Drive is set to On. Security Try Now This function works in conjunction with Blu-ray Disc/DVDs that have been assigned an age rating or numeric rating that indicates the maturity level of the content.
General Try Now You can change the options listed below to match your preferences. Advanced Music Copy Try Now When you copy music files, information can be updated automatically. The copying time may be increased. "" This feature is available only when the product is connected to the network. Menu Transparency Try Now Adjust the transparency of the menu box.
Support Support Remote Management e-Manual Software Update Contact Samsung Reset Remote Management Try Now Remote management lets our Call Centre access your Samsung product remotely to troubleshoot a problem. e-Manual Check the E-manual stored in the device to get troubleshooting tips. Software Update Try Now The Software Update menu allows you to upgrade the product's software for performance improvements or additional services. 1.
4. To download update software and update now, select Update Now, and then press the E button. 5. To let the product download update software automatically when available, select Auto Update, and then press the E button. "" The upgrade is complete when the product turns off, and then turns on again by itself. "" Samsung Electronics shall takes no legal responsibility for product malfunction caused by an unstable Internet connection or consumer negligence during a software Update.
Auto Update You can set the Auto Update function so that the product downloads new upgrade software when it is in Auto Update mode. In Auto Update mode, the product is off, but its Internet connection is active. This allows the product to download upgrade software automatically, when you are not using it. 1. Press the ▲▼ buttons to select Auto Update, and then press the E button. 2. Select "Off" or "On".
9. Unzip the zip archive to your computer. You should have a single folder with the same name as the zip file. 10. Copy the folder to a USB flash drive. 11. Make sure no disc is inserted in the product, and then insert the USB flash drive into the USB port of the product. 12. In the product’s menu, go to Settings > Support > Software Update. 13. Select Update Now. 14. The product searches for the software on the USB drive. When it finds the software,the Update Request pop-up appears. 15. Select OK.
Your product can play content located on Blu-ray/DVD/CD discs, USB devices, and PCs. To play content located on your PC, you must connect your PC and the product to your network and Visit the http://link.samsung.com site to download and install the Samsung-link program. Playing Commercial Discs 1. Press the button to open the disc tray. 2. Place a disc gently into the disc tray with the disc’s label facing up. 3. Press the button to close the disc tray. Playback starts automatically.
Playing Photos, Videos, and Music (Multimedia) You can play media content saved on a USB device, built-in HDD, smartphone, camera, computer, or cloud service on the product. "" However, you cannot play media content if the content or the storage device are not supported by the product. "" Backup important files before connecting a USB device. Samsung shall not be held responsible for damaged or lost files. Playing Media Content Saved on a USB Device 1. Connect your USB device to the product. 2.
Playing Media Content Saved in a Computer/Mobile Device You can play media content on the product with a computer or mobile device connected to the same network as the product. "" Only available with Samsung phones supporting DLNA functionality. "" Samsung Link software should have been installed on the computer. The mobile device should support Samsung Link. For more information, visit Samsung’s content and service portal at http://link.samsung.com.
Allowing Connection with a Mobile Device (HOME → Settings → Network → Content Sharing) To play the media content stored on a mobile device, you must allow the connection between the mobile device and the product. "" You can connect to a mobile device on any DLNA DMC device. DLNA DMC function enables users to connect a mobile device to the product, search for media content, and control play operations on the product. 1. Navigate to Settings > Network and select Content Sharing.
Playing Media Content Saved in a Cloud Service Cloud service saves user content such as photos, videos, and music files on a server so that it can be played on the product connected to the network. You can view the media content saved in a cloud service such as Dropbox and OneDrive on the product. "" To play the content in a cloud service, you must log into your Samsung account and link the Samsung account to the cloud service account.
Samsung Link For more information, visit the Samsung Content & Service portal (http:// link.samsung.com). "" You may experience compatibility issues when attempting to play media files via a third-party DLNA server. Controlling Video Playback You can control the playback of video content located on a Disc, USB, mobile device or PC. Depending on the disc or contents, some of the functions described in this manual may not be available.
●●Fast Motion Play : During playback, press the † or … button. Each time you press the † or … button, the playback speed will change. ●●Slow Motion Play : In pause mode, press the … button. Each time you press the … button, the playback speed will change. ●●Step Motion Play : In pause mode, press the ∑ button. Each time you press the ∑ button, a new frame appears. ●●Skip Motion Play : During playback, press the € or ‚ button.
Using the Settings Menu (During the Playback) During playback or in pause mode, press the TOOLS button. Use the ▲▼◀▶ buttons to select the button, and then press the E button. ●●Play from the beginning : Select to return to the beginning of the movie, and then press the E button ●●Select Scene –– Search Titles : If there is more than one movie on the disc or device, select to start a different title. 1. Select Search Titles, and then press the E button. 2.
●●Search –– Search Scene : You can use the Search Scene function during playback to view or start a movie from the scene of your choice. –– Search Titles : If there is more than one movie on the disc or device, select to start a different title. –– Search Time Bar : Select to play the movie from a selected time point. ●●Subtitle Settings : Lets you set the desired subtitle options. ●●Repeat Mode : Lets you repeat a title, chapter, or specific section. ●●Rotate : Lets you rotate the picture.
●●Angle : Lets you view a scene from another angle. The Angle option displays the number of angles available to view. When a Blu-ray Disc/DVD contains multiple angles of a particular scene, you can change angle. ●●Information : Lets you to view video file information. ●●BONUSVIEW Video, BONUSVIEW Audio : Use to set the desired bonusview option. "" Depending on the disc or storage device, the Settings menu may differ.
Using the Options Menu On a file screen containing video files, select and then press the E button. ●●Play Selected : Play Selected lets you select specific file to play. It works essentially the same for all media. ●●Send : Select Send to upload selected files to a web site (Picasa, Facebook etc) or device. To use Send, you need to establish an account with the on-line site, and then log in using the Log In function.
Buttons on the Remote Control used for Music Playback ●●NUMBER buttons : Press the number of a track. The selected track is played. ●●€ ‚ button : Move to the previous/next track. ●●' button : Stops a track. ●●Fast Play (Audio CD (CD-DA) only) : During playback, press the † or … button. Each time you press the † … button, the playback speed will change. ●●∑ button : Pauses a track. ●●∂ button : Plays the currently selected track.
Using the View & Options Menus (On a file screen) Using the View Menu On the playback screen, button and then press the E button. ●●Track : Displays all the music tracks on the media or storage device in alphabetical order. ●●Album : Displays all music on the media or storage device by album. ●●Artist : Displays all the the music files on the media or storage device by artis. ●●Genre : Displays all the music on the media or storage device by genre.
Repeating Tracks on an Audio CD You can set the product to repeat tracks on an audio CD (CD-DA/MP3). 1. On the Playback screen, use the ▲▼◀▶ buttons to select in the lower left corner of the screen, and then press the E button. 2. Use the ▲▼ to select the repeat mode you want - Off, One Song, or All - and then press the E button. Off One Song All Shuffling Tracks on an Audio CD You can set the product to play tracks on an audio CD (CD-DA/MP3) at random. 1.
Creating a Playlist from an Audio CD 1. With the Playback screen displayed, select the button and then press the E button. The Settings menu appears. 2. Use the ▲▼ buttons to select Play Selected, and then press the E button. The Selection Play screen appears. 3. Use the ▲▼ buttons to select a track, and then press the E button. A check appears to the left of the track. 4. Repeat Step 3 to select and check additional tracks. 5.
Ripping 1. Insert a USB device into the USB jack on the front of the product. button and then press the 2. With the Playback screen displayed, select the E button. The Settings menu appears. 3. Use the ▲▼ buttons to select Ripping, and then press the E button. The Ripping screen appears. 4. Use the ▲▼ buttons to select a track, and then press the E button. A check appears to the left of the track. 5. Repeat Step 3 to select and check additional tracks. 6.
Playing Photo Contents You can play photo contents located on a DVD, USB, mobile device or PC. Using the Tools Menu (During Playback) During playback or in pause mode, press the TOOLS button. Use the ▲▼◀▶ buttons to select the button, and then press the E button. ●●Slideshow Settings : Select to change the Slide Show settings. –– Speed : Select to set the slide show speed. –– Effect : Select to set the slide show effect. ●●Rotate : Select to rotate the picture.
Using the View & Options Menus Using the View Menu On a file screen containing photo files, button and then press the E button. ●●Date : Groups all the the photo files on the media or storage device by date. Click a group to see the photos in that group. ●●Title : Displays all the photo files on the media or storage device by title. ●●Folder : Displays all the folders on the media or storage device. "" Depending on the disc or storage device, the View menu may differ or not appear.
Watching TV Channels After Tuning is completed, you can watch TV channel. (Please refer to "Broadcasting" to search channel.) Using the channel option Using the remote control buttons Press the below buttons while you are viewing a channel. ●●NUMBER buttons : To move TV channel directly, press the channel numbers of desired TV channel. ●●PROG button : Press this button to change TV channels. ●●INFO button : Press this button to display detailed information of selected channel.
Using the Tools Button Press the TOOLS button while you are viewing a channel. ●●Picture Mode : Select this to set the picture mode. –– Dynamic : Choose this setting to increase Sharpness. –– Standard : Choose this setting for most viewing applications. –– Movie : This is the best setting for watching movies. –– User : Lets you adjust the sharpness and noise reduction function respectively. "" This menu can not be displayed when you use the BD Wise function.
Watching Pay channels Except for BD-H8500A, H8900A model To watch a paid channel, the CI or CI+ card must be inserted. After channel tuning is completed, follow the instructions. 1. Purchase a CI CAM at your nearest dealer or by phone. 2. Firmly insert the "CI CAM with CI or CI+ CARD". 3. Insert the CAM with the "CI CAM with CI or CI+ CARD" into the common interface slot, in the direction of the arrow so that it aligns parallel with the slot. 4.
Channel List 1. Press the CH LIST button on the remote control to see all channels searched. The Channel List will be displayed. 2. Press the ◀ button to sort channels. You can change the list ordered. (Aerial, Category, Sorting, Genre, Edit Favourites) Edit Channel You can manage the stored channels. (HOME → Settings → Broadcasting → Edit Channel) 1. In the Home screen, select Settings, and then press the E button. 2. Select Broadcasting, and then press the E button. 3.
Using the remote control buttons When the Edit Channel Screen is displayed, you can manage the stored channels. ●●Change Number : Select this to change the channel number. ●●Lock / Unlock : Select this to lock or unlock channels. ●●Delete : Select this to deletes selected channel. ●●Options –– Select All : Select this to check all channels. –– Deselect All : Select this to deselect all channels. –– Sorting : Select this to sorting channels. –– Category : Select this to display category.
EPG & Schedule Manager The EPG (Electronic Programme Guide) information is provided by broadcasters. Using channel schedules provided by broadcasters, you can specify channels you want to watch in advance so that the channel automatically changes to the selected channel at the specified time. Channel entries may appear blank or out of date depending on a channel status. Using the Guide Screen option 1. Press the GUIDE button on the remote control. 2.
Using the Teletext Service If DTV programme supports teletext signal, you can use teletext service. For Teletext information is displayed correctly, channel reception must be stable. Otherwise, information may be missing or some pages may not be displayed. 1. Press TTX/MIX button while you are viewing a TV channel. 2. By pressing the TTX/MIX button repeatedly, you can change or exit the teletext mode. ●●8 : Stores the Teletext pages.
Typical Teletext page Part Contents A B C D E F Selected page number. Broadcasting channel identity. Current page number or search indications. Date and time. Text. Status information. FASTEXT information. "" Teletext TTX/MIX control is available only when the DTV programme support teletext signal.
Recording Checking Available Storage Size Please check the default recording device and available storage size in storage device for recording. (please refer to "Storage Device Manager".) "" At least 100 MB of free space is required for recording. "" Recording will stop if the storage's free space becomes less than 50 MB. Notes on HDD capacity This product reserves HDD capacity internally as described below, for function implementations and this reserved portion is not used for recording.
Recording the current TV channel you are watching 1. Press the PROG or number buttons to select a TV Channel you want to record. 2. Press the REC button. 3. Select the desired length of the recording, then press the E button. "" Maximum length of one recording is limited to 360 minutes. If recording reached the limit of 360 minutes, it will stop automatically. To pause recording 1. Press the REC PAUSE button to pause a recording in progress. 2. Press the REC button to resume recording.
6. ∑ button : Pause the scene while keeping recording progress. 7. ' button : If you are watching the past scene, the playback point will jump to the same scene with Live TV. If you are watching same scene with Live TV, recording will be stopped. Watching other channels during Recording a TV channel While a TV programme is being recorded, you can also watch TV channels. During the recording, press the PROG or number buttons to change the channel you want to watch.
Watching different TV channels that is not under recording You can watch yet another channel while recording two TV channels at the same time. 1. Press the CH LIST button to check which TV channel is possible to watch. Blue coloured TV Channel in Channel List is what you can move without stopping the recordings already started. 2. Press the E button to watch the possible TV Channel. To watch a channel that is not displayed in Blue, you need to stop at least one of currently recording.
Timeshift function You can pause a live TV or start watching the TV programme from the beginning point you started Timeshift function. Start Timeshift with PLAY button 1. When you are watching a TV channel, press the ∂ button. 2. The Timeshift function starts and the Timeshift bar will appear. Live TV is displayed on the left side of Timeshift bar. Start Timeshift with PAUSE button 1. When you are watching a TV channel, press the ∑ button. 2.
Playback control button during Timeshift function is enabled 1. † … buttons : Search the desired scene. Each time this button is pressed, playback speed will change. …1→…2→…3→…4→…5 †1→†2→†3→†4→†5 2. 3. 4. 5. 6. 7. € button : Return to the beginning of Timeshift. ‚ button : Shows same scene with Live TV. l button : Jump to - 10 sec from current position. r button : Jump to + 10 sec from current position. ∑ button : Pause the scene while keeping Timeshift operation.
Playing the Recorded Title 1. Select the Recorded TV on the Home screen, then press the E button. The Recorded TV List will be displayed. 2. Select the desired device, then press the E button. 3. Select the title you want to play, then press the E button. The selected title will be played back. "" Press the REC TV LIST button on the remote to display the Recorded TV List.
Using the Options Menu On playback screen or a file screen containing Recorded TV files, select the press the E button. and ●●Play Selected : Play Selected lets you select specific tract to play. It works essentially the same for all media. See the "Repeating tracks on an Audio CD". ●●Lock : Select this menu to lock the file editing. ●●Unlock : Select this menu to unlock the file editing. ●●Delete : You can delete the file from the list. ●●Partial Delete : You can delete a title partially.
Editing the Recorded Title Splitting a Section of a Title (Divide into two) (Recorded TV → Options → Split) 1. 2. 3. 4. In the Recorded TV screen, select the Options, then press the E button. Select the Split, then press the E button. Select the title you want to edit. Using the playback-related buttons, move to a point for splitting and then press the E button. . 5. Press the E button to select 6. Press the E button to select Save.
Send files Copying Videos, Music or Photos Contents DISC/HDD/ Network Device/ Cloud Service → USB DISC/USB/ Network Device/ Cloud Service → HDD DISC/HDD/ Network Device → Cloud Service DISC/HDD/ Cloud Service → Cloud Network Device Music Photos Videos Supported Supported Supported Supported Supported Supported Supported Supported Supported Supported Supported Supported ●●Disc (CD-DA/CD-R/CD-RW, DVD±R(Finalise)/ DVD+RW/DVD-RW(Finalise)) → HDD or USB ●●PTP USB is not available when you copy to USB.
3D Functions Viewing DTV with the 3D effect You can experience 3D effect with live TV and recorded TV programme with 3D contents. 1. During watching the TV programme or playing recorded TV programme, press the 3D button on your remote control. The 3D menu will appear. ●●Side by Side : Displays two images next to each other. ●●Top and Bottom : Displays one image above another. 2. Press the ◀▶ buttons to select the desired 3D mode, then press the E button. 3.
Creating a Samsung Account Create a Samsung account so you can take advantage of all Samsung has to offer on line. Set up accounts for each household member so each member can access their own accounts on Facebook, Twitter, etc. You also need a Samsung account if you want to download for-pay apps and rent Films. 1. On the Home screen, press the button. The Sign In screen appears. 2. Select Create Account on the bottom right, and then press the E button.
Before Using Samsung Apps If you haven’t set up Smart Hub, when you use Samsung Apps for the first time, the product will ask you to perform the Smart Hub set up procedure. 1. On the Home screen, select either SAMSUNG APPS, and then press the E button. If you have selected SAMSUNG APPS, go to Step 4. 2. If you selected SAMSUNG APPS, the Smart Hub pop-up appears asking if you want to set up Smart Hub. Select Yes, and then press the E button. The Welcome screen appears. 3.
Using Films and TV Shows If you haven’t set up Smart Hub, when you use Films and TV Shows for the first time, the product will ask you to perform the Smart Hub set up procedure. You can stream Films and TV Shows and view them on your TV. FILMS AND TV SHOWS Recommended Favourites Featured Films TV Shows Trailers Trending 1. On the Home screen, select FILMS AND TV SHOWS, and then press the E button. 2. 1) Select one of the Recommended Films, and then press the E button.
4. Follow the directions on the screen to start the movie. "" Contents items and the corresponding bottom menu in Films and TV Shows differ between countries. "" When you activate Films and TV Shows for the first time, the listed apps may not be displayed. The listed apps is displayed after you download a video contents App for use. If the listed apps button is not displayed, you cannot watch contents. "" Favorites will not appear unless you have tagged one or more films or TV shows as a favorite.
●●Recommended : Displays recommended contents managed by Samsung. You cannot delete Recommended Apps. ●●My Apps : Displays your personal gallery of applications modifiable on the My Apps screen. ●●Most Popular, What’s New and Categories : Select to view and download additional apps. The first time you open the Samsung Apps screen, the product automatically downloads a group of free apps. Once these apps have been downloaded, they appear on the Samsung Apps screen.
Starting an Application 1. Select SAMSUNG APPS on the Home screen, and then press the E button. 2. On the SAMSUNG APPS screen, use the ▲▼◀▶ buttons to select an app, and then press the E button. The app starts. The Option Menu Move 1. On the My Apps screen, select the app you want to move on the My Apps screen, and then press the E button for 3 seconds. The Option menu appears. 2. Select Move, and then press the E button. 3. Use the ▲▼◀▶ buttons to move the app. 4.
Delete Multiple 1. On the My Apps screen, select an app you want to delete and then press the E button for 3 seconds. The Options menu appears. 2. Select Delete Multiple, and then press the E button. 3. Use the ▲▼◀▶ buttons to select apps you want to delete, and then press the E button. 4. Use the ▼ buttons to select Delete, and then press the E button. View Details 1. On the My Apps screen, select the app you want to see detailed information for, and then press the E button for 3 seconds.
Screen Mirroring The Screen Mirroring function lets you view the screen of your smart phone or android tablet on the TV you have connected to the product. 1. In the Home screen, select Screen Mirroring, and then press the E button. 2. Launch AllShare Cast or Screen Mirroring on your device. 3. On your device, find the name of the product in the list of available devices and then select it. 4. The TV displays a connecting message (for example, Connecting to Android_92gb...
Using the Web Browser You can access the Internet using the Web Browser application. Select WebBrowser on the Home screen, and then press the E button. "" When you run the Web Browser with the product connected by HDMI to a BD Wise compatible TV - and BD Wise is on - the browser is maximized to fill the screen and the TV's resolution is set to the optimal resolution automatically. "" The Web Browser is not compatible with Java applications.
The Control Panel at a Glance The Control Panel, which runs across the top of the screen, has a series of icons which start a number of useful functions. The icons are described below, starting with the icon on the far left of the screen. ●● : Moves to the previous page. ●● : Moves to the next web page. ●● ●● : Displays the Bookmarks and History screen. You can bookmark the current page, select an existing bookmark, and edit and delete bookmarks.
●● : Lets you search for information by entering words or characters using the keyboard pop-up. See "Using the Keyboard Pop-up". ●● : Lets you enlarge or shrink the screen by various percentages. ●● / : Lets you switch between Pointer Browsing and Link Browsing. ●● : Lets you configure the Browser’s settings. See Using the Settings Menu. ●● : Closes the Web Browser. ●● : Opens a new web browser tab.
4. To access symbols and additional punctuation marks, highlight the 123#& button on the left, and then press the E button. 5. To delete a character you entered, move the highlight to the ← button, and then press the E button. 6. To delete all the characters you entered, move the highlight to the Clear button, and then press the E button. 7. When finished entering, move the highlight to the Done button, and then press the E button.
Using the Setting Menu The Setting menu contains functions that control how the Browser operates and Browser security functions. To open the Setting menu, highlight the icon in the Control Panel, and then press the E button. To select an option in the setting menu, highlight the option, and then press the E button. ●●Enable/Disable Grabbing : Turns the Grabber function on and off. When the Grabber function is on, you can move a web page up and down without dragging the scroll bar.
●●Web Browser Setting –– Set as homepage : You can set the Browser's home page. –– Pop-up Block : Turns the Popup Block on and off. –– Page Block : You can determine whether to block advertisements and select the URLs for which advertisements are blocked. –– General : You can delete personal information such as website history and browsing data (cookies, etc.), and reset all web browser settings to their factory defaults. You can also set the Security Mode.
Linking Your Internet Service Accounts to the product The Link Service Accounts function lets you link your product to your accounts with Internet services such as Pandora so that the product can log you in to the service automatically when you start the app for that service. Register your account by going to HOME → Sign In → Create with Facebook.
Supported Formats Video File Support File Extention Container Video Codec Resolution MVC *.avi Bit rate (Mbps) 24/25/30 60 Audio Codec Motion JPEG *.mkv *.asf H.264 BP/MP/ HP *.wmv *.mp4 AVI *.mov *.3gp MKV ASF *.vro MP4 *.mpg 3GP *.mpeg MOV *.ts FLV *.tp VRO *.trp VOB *.mov *.flv PS TS *.vob SVAF Divx 3.
Limitations –– Even when a file is encoded by a supported codec listed in the Video File Support table, the file might not play if its content has a problem. –– Normal playback is not guaranteed if the file’s container information is wrong or the file itself is corrupted. –– Files having a higher Bit rate/frame rate than indicated in the Video File Support table may stutter when played back. –– Seek (Jump) function is not available if the file’s index table is damaged.
Audio decoder –– Supports WMA 10 PRO (Up to 5.1). –– Does not support WMA lossless audio. –– Also supports the M2 profile. –– The RealAudio 10 lossless format is not supported by models made for China and Hong Kong. –– Does not support QCELP/AMR NB/WB. –– Supports vorbis (Up to 2ch). –– Supports DD+ (Up to 5.1ch) –– The DTS LBR codec is supported only for MKV / MP4 / TS containers. Supported DivX subtitle file formats *.ttxt, *.smi, *.srt, *.sub, *.
Music File Support File Extension Type Codec Support Range *.mp3 *.m4a MPEG MPEG1 Audio Layer 3 - *.mpa MPEG4 AAC - *.flac FLAC FLAC *.ogg OGG Vorbis Supports up to two channels. Supports up to two channels. For WMA. Supports up to 10 Pro 5.1 channels. *.wma WMA WMA WMA lossless audio is not supported. wav wav midi midi Supports up to M2 profile. Type 0, type 1 and Seek is not supported. ape ape AIFF AIFF - ALAC ALAC - *.aac *.wav *.mid *.midi *.ape *.aif *.aiff *.
Picture File Support File Extension *.jpg *.jpeg *.png *.bmp *.mpo Type Resolution JPEG 15360x8640 PNG BMP MPO 4096x4096 4096x4096 15360x8640 AVCHD (Advanced Video Codec High Definition) ●●This product can play back AVCHD format discs. These discs are normally recorded and used in camcorders. ●●The AVCHD format is a high definition digital video camera format. ●●The MPEG-4 AVC/H.264 format compresses images with greater efficiency than the conventional image compressing format.
Troubleshooting Before requesting service, please try the following solutions. PROBLEM SOLUTION Check the batteries in the remote control. They may need replacing. Operate the remote control at a distance of no more than No operation can be performed 6.1m. with the remote control. Remove the batteries and hold down one or more buttons for several minutes to drain the microprocessor inside the remote control to reset it. Reinstall the batteries and try to operate the remote control again.
PROBLEM SOLUTION Go to the contents and find the section of the user manual that contains the explanations regarding the current probIf you experience other problem, and follow the procedure once again. lems. If the problem still cannot be solved, please contact your nearest Samsung authorised service centre. The picture is noisy or distort- Make sure that the disc is not dirty or scratched. ed Clean the disc. Check the connection between the TV and the HDMI jack of the product. No HDMI output.
PROBLEM SOLUTION BD-Live Check whether the network connection is successful or not by using the Network Status menu. Check whether the USB memory device is connected to the product. The memory device must have at least 1 GB of free space I cannot connect to the BDto accommodate the BD-Live service. You can check the Live server. available size in Delete BD Data. Check whether the BD-Live Internet Connection menu is set to Allow(All).