
Owner's manual


Quick Reference Guide
Impact printer SRP-275
◈ Check that all Items are Present
The following items are packed in the box. If any items appear to have
shipping damage or are missing, please contact your dealer.
• Impact Printer SRP-275
• AC Adapter & Power Cord
• Ribbon Cassette
• Paper Roll
• User’s Manual & Quick Reference Guide
◈ Startup Information
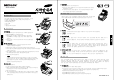
■ Connecting the Cables
1. Plug the AC adapter and power cord to the power connector of
the printer.
2. Turn off printer and the host ECR(host computer).
3. Plug the interface cable(serial, parallel, USB or Ethernet) into the
interface connector on the printer then fasten the screw on both
sides of the connector.
4. Plug the drawer kick-out cable into the drawer kick-out connector
on the printer.
■ Installing the New Ribbon Cassette
1. Before inserting the ribbon cassette, turn the knob clockwise to
prevent twisting the ribbon.
2. Open the front cover of printer.
3. Insert the new ribbon cassette as shown below and pay particular attention to the
placement of the ribbon behind the Print Head.
4. During inserting the ribbon cassette, turn the knob clockwise again to make sure
the ribbon moves freely in the cassette.
5. Close front cover of printer
Note
Malfunctions and other problems may arise if other than specified ribbon
cassettes are used in the printer. The Warranty may be void if other than specified
ribbon cassettes are used. Contact your dealer or place of purchase for more
information about proper ribbon cassettes.
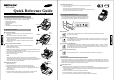
■ Changing the paper width
1. Open the rear cover.
2. Remove the frame paper control by loosing the two screws(3×6).
3. Reattach the frame paper control in you want. (Insert and tighten two
screws(3×6) to reattach. See the instructions "1.7 Changing the paper width" in
User’s manual.)
4. Close the rear cover.
5. Change the Memory Switch setting for changing paper roll width. (See the
instructions "3.1 Setting the Memory Switches" in User’s manual.)
Drawer kick-out
connector
Interface
connector
Serial/ Parallel/ USB/ Ethernet
Interface cable
Drawer kick-out
cable
AC Adaptor
Power
connector
Power cord
Screw(3x6)
(2pieces)
Frame paper
control
E
n
g
l
i
s
h
■ Loading New Paper Roll
1. Turn on the printer and open the rear cover by pressing open button.
2. Insert new paper roll.
Be sure to note the correct direction of the paper roll.
3. Pull out a small amount of paper, then close the cover and tear off the extra
paper by pulling it toward the front of the printer.
◈ Using the Operation Panel
Most of the functions of this printer are governed by software, but
you can monitor the printer’s status by looking at the lights on the
control panel and for some procedures you will use the buttons.
■ Feed Button
The feed button is used to feed paper or to start self test and for hexadecimal dump mode.
(See the User’s manual)
■ Power Indicator Light (Green color)
This indicator light is on when the power is turned on. It blinks when the printer is in the self test
printing standby state. Always wait until this indicator light stops blinking before you start using the
printer and before you turn it off.
■ Error Indicator Light (Red color)
When this indicator light is on(but not blinking), it means that the printer is out of paper or almost
out of paper or the printer covers are open. When this light blinking, there is an error. If you see
this light blinking, turn off the printer for a few seconds and then turn it back on. If the light is still
blinking, call your supervisor or a service person.
■ Paper Indicator Light (Red color)
When this indicator light is on, it means that the paper end. Replace the new paper roll.
◈ Self Test
The self test lets you know if your printer is operating properly. It checks the print quality, ROM version, DIP switch
settings, memory switch settings and statistic data. The test is independent of any other equipment or software, so it
is a good idea to run it when you first set up the printer or if you have any trouble. If the self test works correctly, the
problem is in the other equipment or the software, not the printer.
■ Running the self test
1. Make sure the printer is turned off and the printer cover is closed properly.
2. While holding down the Feed button, turn on the printer and continue to hold until the paper begins to feed. The
self test prints the printer DIP switch settings and memory switch settings. And cuts the paper and pauses.
(The power light blinks.)
3. Press the Feed button to continue printing the statistic data.
4. Press the Feed button to continue printing the rolling ASCII pattern.
5. The self test mode terminates after printing the rolling ASCII pattern automatically.
E
n
g
l
i
s
h
KN02-00008A Rev. 2.0