
User Manual


6
GB
Installing Your Microwave Oven
This microwave oven can be placed almost anywhere (kitchen work
surface or shelf, movable trolley, table).
☛ Never block the air vents as the oven may overheat and
automatically switch itself off. It will remain inoperable until it has
cooled sufficiently.
☛ For your personal safety, plug the cable into a 3-pin, 230 Volt,
50Hz, AC earthed socket. If the power cable of this appliance is
damaged, it must be replaced by a special cable (I-SHENG
SP022, KDK KKP4819D, EUROELECTRIC 3410, SAMIL SP-
106B, MOONSUNG EP-48E, HIGH PROJECT H.P 3). Contact
your local dealer to have it replaced. The power cable of ISRAEL
is PENCON(ZD16A), S/AFRICA APEX LEADS SA16 and
NIGERIA, GHANA, KENYA and U.A.E is PENCON(UD13A1).
☛ Do not install the microwave oven in hot or damp surroundings
like next to a traditional oven or radiator. The power supply
specifications of the oven must be respected and any extension
cable used must be of the same standard as the power cable
supplied with the oven. Wipe the interior and the door seal with a
damp cloth before using your microwave oven for the first time.
Setting the Time
Your microwave oven has an inbuilt clock. The time can be displayed
in either the 24-hour or 12-hour notation. You must set the clock:
• When you first install your microwave oven
• After a power failure
✉ Do not forget to reset the clock when you switch to and from
summerorwintertime.
Checking that Your Oven is Operating Correctly
The following simple procedure enables you to check that your oven is
working correctly at all times. If you are in doubt, refer to the section
entitled “What to Do if You are in Doubt or Have a Problem” on the
page.
✉ The oven must be plugged into an appropriate wall socket. The
turntable must be in position in the oven. If a power level other
than the maximum (100% - 900 W) is used, the water takes
longer to boil.
Open the oven door by pulling the handle on the right side of the door.
Place a glass of water on the turntable. Close the door.
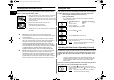
1. When you install your oven, make sure there is adequate
ventilation for your oven by leaving at least 10 cm (4
inches) of space behind, and on the sides of the oven and
20 cm (8 inches) of space above the oven and 85 cm (33
inches) of the floor.
2. Remove all packing materials inside the oven.
Install the roller ring and turntable.
Check that the turntable rotates freely.
3. This microwave oven has to be positioned so that plug is
accessible.
20cm
above
10cm
behind
10cm on
the side
85 cm
of the floor
1. To display the time in Then press the Clock( )
the... button...
12-hour notation Once
24-hour notation Twice
2. Turn the dial knob to set the hour.
3. Press the Clock( ) button.
4. Turn the dial knob to set the minute.
5. When the right time is displayed, press the Clock()
buttontostarttheclock.
Result:
The time is displayed whenever you are not
using the microwave oven.
1. Press the Start ( )buttonandsetthetimeto4or5
minutes, by pressing the Start ( ) button the appropriate
number of times.
Result:
The oven heats the water for 4 or 5 minutes.
The water should then be boiling.
C105_GB.fm Page 6 Monday, November 4, 2002 10:46 AM