Index 1. Safety Precautions 3 Notational 3 Installation 4 While Operating 5 Other 6 2. Introduction 7 Front 7 Rear 8 3. Setup 9 Installing the COMBO Drive 9 Connecting the Cables 9 Installing the CD Record Utility 12 Installing the Device Driver 12 Setting Up the Device Driver 12 4. Using the Drive 13 Using the COMBO Drive 13 Storing and Cleaning Your Discs 13 Upgrading the Firmware Flash Memory 14 System Requirements 14 5.
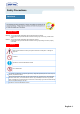
Safety Precautions Notational Warning / Caution Warning : This symbol indicates explanations about extremely dangerous matters. If users ignore this symbol and handle the device the wrong way, serious injury or death could result. Caution : This symbol indicates explanations about dangerous matters. If users ignore this symbol and handle the device the wrong way, damage to home or property could result.
Safety Precautions Installation Place the drive on a level surface. - Failure to do so may cause the device to fall onto a hard surface, resulting in damage or malfunction. Do not place the drive in direct sunlight. Avoid low- or high-temperature environments. Avoid high-humidity environments.
Safety Precautions While Operating Handle with caution to prevent damage from external shock. Do not drop the drive, and protect it fromsevere shocks. - It can damage the drive or cause it to malfunction. Do not move the drive while in operation and do not attempt to open the disc tray byforce. Make sure to close all working programs before attempting to open the tray and always usethe open/close button. - Do not insert a pin into the emergency opening while in operation.
Safety Precautions Other Never allow food particles or foreign substances to enter the drive casing. To protect against the risk of fire, do ot spill such liquids as alcohol and benzene on the drive. Do not disassemble, attempt to repair or modify the device without express approval as directed in the manual.
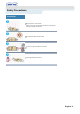
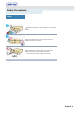
Introduction Front 1. Connector for stereo headphones with a 3.6 mm stereo mini-jack. 2. Headphone volume control. 3. Emergency eject hole. (if the compartment does not open when you press the Eject button, power off the computer, insert a pin or unfolded paper clip in the hole and push firmly) 4. Indicator Light. 5. Eject button. 6. Disc compartment. (the compartment opens and closes automatically when you press the Eject button) Design and specifications are subject to change without prior notice.
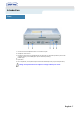
Introduction Rear 1. Two-pin digital audio output terminal for use with a sound or MPEG card supporting digital audio features. 2. Four-pin sound output terminal for use with a sound card. (refer to the sound card documentation for further details) 3. Master/slave select terminal. 4. 40pin host E-IDE interface connector. 5. 4pin power terminal.
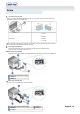
Setup Installing the COMBO Drive To install your COMBO Drive in the PC, proceed as follows. Make sure that the PC is powered off and disconnected from any power source. If necessary, attach a horizontal bracket to both sides of the drive. Remove the cover from a free expansion slot and install the COMBO drive, as shown in the illustration.
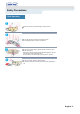
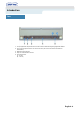
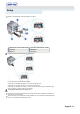
Setup Connecting the power cable The 4-pin power cable from the internal power unit of your computer must be connected to the power terminal on the rear of the COMBO drive. 1 +5V DC 2 Ground 3 Ground A - Cut Side 4 +12V DC Note: An improperly connected power cable may cause trouble. Check the direction of the power connector and the incline side of the COMBO drive before connecting. Connecting the E-IDE cable Insert the IDE cable (40-pin), which is connected to the hard disk to the interface terminal.
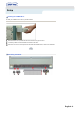
Setup If there is two COMBO drive, select MA (Master) / SL (Slave). a : Master Drive (Choose the MA Jumper) b : Slave Drive (Choose the SL Jumper) c : Hard Drive d : MainBoard e : Primary 1 f : Secondly 1 Installing a jumper on the master/slave select terminal Connect a jumper to the rear side of the COMBO. If the jumper is connected to MA (Master), it will work in the Master mode. If the jumper is connected to SL (Slave), it will work in the Slave mode.
Setup Installing the CD Record Utility To record data on a CD-R or CD-RW disc in the COMBO drive, you must first install the CD record utility. For compatibility reasons, you are recommended to uninstall any existing software of the same type before installing this utility. Insert the disc supplied with the COMBO drive in the drive. Follow the instructions displayed on the screen to install the utility. Refer to the separate utility documentation for further details. Store the utility disc in a safe place.
Using the Drive Using the COMBO Drive To play audio or video CDs and / or DVDs in your COMBO drive, proceed as follows. Push the power button and boot the computer. After booting the computer, open the disc compartment by pressing the Eject button. Insert the disc (CD/DVD) with the label on the disc facing upwards and close the disc compartment by pressing the Eject button. The indicator light comes on. Play the disc (CD/DVD). Playing Audio CDs Run the CD player supplied with Windows or your sound card.
Using the Drive Upgrading the Firmware Flash Memory The product firmware can be upgraded by downloading the updated file from the following Web site: http://www.samsung-ODD.com http://www.samsungelectronics.com/odd System Requirements Before you install the COMBO drive, we strongly recommend that you check that your setup meets the system requirements listed below.
Troubleshooting If you have any problems recording via your COMBO drive, follow the appropriate instructions below for the source that you are using. Hard Drive Check whether the source file is corrupted. Optimize the hard disk by using the Windows defragmenter feature: START / PROGRAMS / ACCESSORIES / SYSTEM TOOLS / DISC DEFRAGMENTER Decompress the hard disk if it is compressed. Make sure that the space available on the hard disk is at least twice the size of the largest file to be recorded on the disc.
Troubleshooting Caution with errors Every CD-R or CD-RW drive records data by applying recording laser onto a CD. If the CD is damaged or recording data is not possible, you need to remove the following causes of the error before using the CD. It is recommended to set a CD-R or CD-RW drive as follows. Do not work on a multi-tasking environment and remove screen savers. If you work on a multi-tasking environment while the CD-RW drive is recording/deleting data, Buffer Under-Run may occur.
Troubleshooting Recommended Disc Types RICOH, DAIYO-YUDEN, MITSUI, FUJI, SKC, ACER, BEALL CD-R CD-RW RICOH, SONY, MITSUI, ACER, NANYA General DMA Installation Guide Windows 98/Me Important! Please read the entire DMA installation guide before installing your COMBO drive. About DMA Installation For stable writing performance at high speeds, Installation of DMA transfer mode for E-IDE/ATAPI interface is strongly recommended. We recommend DMA mode for fast writing.
Troubleshooting Problem Meaning / Solution The COMBO drive is not detected by the computer. Check that the power, audio and IDE cables are correctly connected to the computer. After installing the COMBO drive, the PC gets slower. Change the IDE cable and reconnect it to the computer. Preferably, connect a second IDE cable to the COMBO drive in master mode. Check the position of the jumper in the master/slave select terminal. The COMBO drive is not recognized by MS-DOS.
Specifications SAMSUNG continually strives to improve its products. Both the design specifications and these user instructions are thus subject to change without notice.