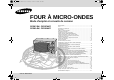
jlY`^[TmUGGwGXGG{ SGvG_SGYWWYGGYaW\Gwt FOUR À MICRO-ONDES Mode d’emploi et conseils de cuisson CE2974N / CE2974NT CE2914N / CE2914NT Code No.: DE68-02473A Aide-mémoire.................................................................................................2 Four ................................................................................................................3 Panneau de commande.................................................................................
jlY`^[TmUGGwGYGG{ SGvG_SGYWWYGGYaW\Gwt Aide-mémoire F Model : CE2974N/CE2974NT Si vous souhaitez cuire un plat Si vous souhaitez ajouter 30 secondes de cuisson Laissez le plat dans le four. Positionnez le bouton de sélection du mode de cuisson sur l’icône de cuisson manuelle ( ) . Appuyez sur le bouton +30s chaque fois que vous souhaitez ajouter 30 secondes. 1. Mettez le plat dans le four. Positionnez le bouton de sélection du mode de cuisson sur l’icône de cuisson manuelle ( ) .
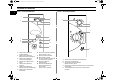
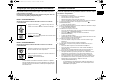
jlY`^[TmUGGwGZGG{ SGvG_SGYWWYGGYaW\Gwt Aide-mémoire(Cautionued) (suite) Four Model : CE2914N/CE2914NT Si vous souhaitez cuire un plat Model : CE2974N/CE2974NT ORIFICES DE VENTILATION POIGNÉE 1. Mettez le plat dans le four. Sélectionnez le niveau de puissance en tournant le bouton de sélection du niveau de puissance. F ÉLÉMENT CHAUFFANT DU GRIL(RÉSISTANCE) AFFICHEUR ÉCLAIRAGE 2. Choisissez le temps de cuisson en tournant le bouton de sélection du temps.
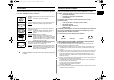
jlY`^[TmUGGwG[GG{ SGvG_SGYWWYGGYaW\Gwt Panneau de commande F Model : CE2974N/CE2974NT Model : CE2914N/CE2914NT 2 3 1 1 4 2 5 3 4 6 7 8 9 10 11 12 5 1. SÉLECTION DU MODE DE CUISSON MANUEL 2. SÉLECTION DU MODE DE RÉCHAUFFAGE AUTOMATIQUE 3. SÉLECTION DU MODE DE CUISSON AUTOMATIQUE 4. SÉLECTION DU MODE “DEUX PLATS” 5. SÉLECTION DU MODE DE CUISSON 6. SÉLECTION DU MODE DE DÉCONGÉLATION AUTOMATIQUE 7. SÉLECTION DU NIVEAU DE PUISSANCE 8. SÉLECTION DU MODE COMBINÉ (MICRO-ONDES + GRIL) 9.
jlY`^[TmUGGwG\GG{ SGvG_SGYWWYGGYaW\Gwt Accessoires Utilisez ce mode d’emploi Selon le modèle de four à micro-ondes acheté, vous disposez de plusieurs accessoires utilisables de diverses manières. Vous venez d’acquérir un four à micro-ondes SAMSUNG. Le mode F d’emploi contient de nombreux conseils et instructions sur son utilisation : • précautions d’emploi, • récipients et ustensiles recommandés, • conseils utiles.
jlY`^[TmUGGwG]GG{ SGvG_SGYWWYGGYaW\Gwt Précautions d’emploi F 8. Pour réduire le risque de feu à l’intérieur du four : • n’y rangez aucun produit inflammable, • retirez les attaches métalliques des sacs en papier ou en plastique, • n’utilisez pas votre four à micro-ondes pour sécher des journaux, • en cas d’apparition de fumée, laissez la porte du four fermée et arrêtez le four ou débranchez-le de la prise électrique. 9.
jlY`^[TmUGGwG^GG{ SGvG_SGYWWYGGYaW\Gwt Précautions d’emploi (suite) Installez votre four à micro-ondes Installez le four sur une surface plane, horizontale et suffisamment solide F pour supporter le poids du four. 13. Un “cliquettement” peut se faire entendre pendant le fonctionnement du four, et plus particulièrement pendant la décongélation. Raison : ce bruit indique un changement de puissance. Ce phénomène est normal.
jlY`^[TmUGGwG_GG{ SGvG_SGYWWYGGYaW\Gwt F Réglez l’horloge (CE2974N/CE2974NT) Comment fonctionne un four à micro-ondes Votre four à micro-ondes est équipé d’une horloge grâce à laquelle vous pouvez afficher l’heure sur 24 heures ou sur 12 heures. Vous devez régler l’horloge à l’installation initiale et après une coupure de courant. • à l’installation initiale, • après une coupure de courant.
jlY`^[TmUGGwG`GG{ SGvG_SGYWWYGGYaW\Gwt Vérifiez que votre four fonctionne correctement Problèmes et solutions La procédure suivante vous permet de vérifier à tout moment que votre four fonctionne correctement. Ouvrez la porte en tirant la poignée située à droite sur la porte. Posez un verre d’eau sur le plateau, puis fermez la porte. Si vous êtes confronté à l’un des problèmes énumérés ci-dessous, essayez les solutions correspondantes.
jlY`^[TmUGGwGXWGG{ SGvG_SGYWWYGGYaW\Gwt Cuisez et réchauffez un plat par micro-ondes F Model : CE2914N/CE2914NT Suivez les instructions ci-dessous pour cuire ou réchauffer des aliments. Vérifiez TOUJOURS les réglages de cuisson avant de laisser les aliments cuire sans surveillance. Posez le plat au centre du plateau, puis fermez la porte. 1. Sélectionnez la puissance de cuisson maximale en tournant le bouton de sélection du niveau de puissance.
jlY`^[TmUGGwGXXGG{ SGvG_SGYWWYGGYaW\Gwt Niveaux de puissance Arrêtez la cuisson Vous pouvez choisir entre les niveaux suivants. Vous pouvez arrêter la cuisson à tout moment afin d’examiner les aliments.
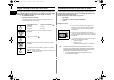
jlY`^[TmUGGwGXYGG{ SGvG_SGYWWYGGYaW\Gwt Ajustez le temps de cuisson F Réchauffez ou cuisez un plat en mode automatique (CE2974N/CE2974NT) Model : CE2974N/CE2974NT Vous pouvez augmenter le temps de cuisson en appuyant sur le bouton +30s chaque fois que vous souhaitez ajouter 30 secondes. La fonction de réchauffage et de cuisson en mode automatique propose six recettes préprogrammées.
jlY`^[TmUGGwGXZGG{ SGvG_SGYWWYGGYaW\Gwt Temps pour le réchauffage en mode automatique(CE2974N/CE2974NT) Le tableau suivant présente les divers programmes de réchauffage et de cuisson en mode automatique, les quantités, temps de repos et autres recommandations.
jlY`^[TmUGGwGX[GG{ SGvG_SGYWWYGGYaW\Gwt Réchauffez ou cuisez un plat en mode instantané(CE2914N/CE2914NT) Décongelez un plat automatiquement (CE2974N/ CE2974NT) Posez le plat au centre du plateau, puis fermez la porte. La décongélation automatique vous permet de décongeler des aliments, tels que de la viande, de la volaille ou du poisson. Il vous suffit de sélectionner le programme et le poids, le temps de décongélation et le niveau de puissance étant réglés automatiquement. F 1.
jlY`^[TmUGGwGX\GG{ SGvG_SGYWWYGGYaW\Gwt Temps pour la décongélation automatique (CE2974N/CE2974NT) Décongelez un plat manuellement (CE2914N/ CE2914NT) Le tableau suivant présente les divers programmes de décongélation automatique, les quantités, temps de repos et autres recommandations. Retirez les emballages des aliments avant de commencer la décongélation. Mettez l’aliment congelé au centre du plateau.
jlY`^[TmUGGwGX]GG{ SGvG_SGYWWYGGYaW\Gwt Réchauffez deux plats en même temps (CE2974N/ CE2974NT) Utilisez un plat croustilleur (CE2974NT/ CE2914NT) Le mode “deux plats” vous permet de cuire ou de réchauffer deux assiettes garnies en même temps. Votre four à micro-ondes SAMSUNG est fourni avec un plat croustilleur.
jlY`^[TmUGGwGX^GG{ SGvG_SGYWWYGGYaW\Gwt Conseils de cuisson pour le plat croustilleur(CE2974NT/CE2914NT) Nous vous conseillons de préchauffer le plat croustilleur directement sur le plateau du four en choisissant le mode combiné micro-ondes (puissance de cuisson de 600 W) + gril ( ) et en respectant les temps et recommandations du tableau ci-dessous. Mini-pizzas (réfrigérées) 100 à 150g 200 à 250g 600W +Grill 5min.
jlY`^[TmUGGwGX_GG{ SGvG_SGYWWYGGYaW\Gwt F Choisissez la position de l’élément chauffant Choisissez les accessoires L’élément chauffant (ou résistance) est utilisé lorsque la cuisson s’effectue à l’aide du gril. Vous avez le choix entre deux positions : • horizontale pour le mode gril ou le mode combiné microondes + gril, • oblique (inclinaison de 45°) pour le nettoyage. Utilisez des récipients garantis micro-ondes.
jlY`^[TmUGGwGX`GG{ SGvG_SGYWWYGGYaW\Gwt Cuisez un plat au gril Le gril vous permet de chauffer et de faire dorer des aliments rapidement, sans utiliser les micro-ondes. À cet effet, une grille métallique est fournie avec le four. Model : CE2914N/CE2914NT 1. Préchauffez le gril à la température appropriée en positionnant le bouton de sélection du niveau de puissance sur l’icône de gril ( ) et en indiquant le temps de préchauffe à l’aide du bouton de sélection du temps.
jlY`^[TmUGGwGYWGG{ SGvG_SGYWWYGGYaW\Gwt Combinez la cuisson aux micro-ondes et le gril F Model : CE2914N/CE2914NT Vous pouvez également combiner la cuisson aux micro-ondes et le gril pour cuire les aliments rapidement et les dorer en même temps. ☛ ☛ 1. Assurez-vous que l’élément chauffant est en position horizontale. Pour plus de renseignements, reportez-vous à la page 18. Utilisez TOUJOURS des récipients et ustensiles garantis à la fois four à micro-ondes et four classique.
jlY`^[TmUGGwGYXGG{ SGvG_SGYWWYGGYaW\Gwt Supprimez le signal sonore (CE2974N/CE2974NT) Verrouillez votre four à micro-ondes (CE2974N/CE2974NT) F Votre four à micro-ondes est doté d’un programme de sécurité vous permettant de verrouiller le four, de telle sorte qu’un enfant ou une personne ne connaissant pas son fonctionnement ne puisse pas l’actionner par mégarde. Le four peut être verrouillé à tout moment. 1. Appuyez simultanément sur les boutons et .
jlY`^[TmUGGwGYYGG{ SGvG_SGYWWYGGYaW\Gwt Utilisez la fonction de mémorisation de cuisson (CE2974N/CE2974NT) Désactivez la rotation du plateau Le bouton de désactivation de la rotation du plateau( ) empêche le plateau de tourner et vous permet ainsi de cuire, réchauffer ou décongeler des aliments dans des plats de grande taille occupant toute la cavité du four.
jlY`^[TmUGGwGYZGG{ SGvG_SGYWWYGGYaW\Gwt Guide des récipients Pour cuire des aliments dans le four à micro-ondes, ces dernières doivent pénétrer la nourriture sans être réfléchies ou absorbées par le plat utilisé. Veillez donc à choisir des récipients garantis four à micro-ondes. Le tableau suivant énumère différents types de récipients et de plats de cuisson, en indiquant si et comment ils peuvent être utilisés en mode micro-ondes.
jlY`^[TmUGGwGY[GG{ SGvG_SGYWWYGGYaW\Gwt Conseils de cuisson F Conseils de cuisson pour les légumes congelés MICRO-ONDES Utilisez un saladier en verre avec couvercle. Appliquez le temps de cuisson minimum indiqué dans le tableau ci-dessous et laissez le couvercle pendant la cuisson. Prolongez la cuisson selon vos goûts. Remuez deux fois en cours de cuisson, puis une fois lorsque la cuisson est terminée. Ajoutez du sel, des fines herbes et du beurre lorsque la cuisson est terminée.
jlY`^[TmUGGwGY\GG{ SGvG_SGYWWYGGYaW\Gwt Conseils de cuisson(suite) Conseils de cuisson pour les légumes frais Conseils de cuisson pour le riz et les pâtes Utilisez un saladier en verre avec couvercle. Ajoutez 30 à 45 ml d’eau froide (2 à 3 cuillères à soupe) pour 250 g de légumes, à moins qu’une autre quantité ne soit spécifiée dans le tableau ci-dessous. Appliquez le temps de cuisson minimum indiqué dans le tableau ci-dessous et laissez le couvercle pendant la cuisson.
jlY`^[TmUGGwGY]GG{ SGvG_SGYWWYGGYaW\Gwt Conseils de cuisson(suite) F Réchauffer des liquides et des aliments relativement bas lorsqu’il s’agit d’un aliment délicat, de quantités importantes ou si l’aliment risque de se réchauffer très rapidement (tartelettes sucrées, par exemple). Pour obtenir un résultat optimal, remuez ou retournez pendant le réchauffage. Si possible, remuez de nouveau avant de servir.
jlY`^[TmUGGwGY^GG{ SGvG_SGYWWYGGYaW\Gwt Conseils de cuisson(suite) Réchauffer deux plats en même temps Aliment Reportez-vous au tableau ci-dessous pour les réglages du niveau de puissance et du temps de cuisson.
jlY`^[TmUGGwGY_GG{ SGvG_SGYWWYGGYaW\Gwt Conseils de cuisson(suite) F Tous les aliments congelés doivent être décongelés en réglant votre four sur le niveau de puissance de décongélation (180 W).
jlY`^[TmUGGwGY`GG{ SGvG_SGYWWYGGYaW\Gwt Conseils de cuisson(suite) Conseils pour faire griller des aliments frais Faites préchauffer le gril en activant le mode gril pendant quatre minutes. Reportez-vous au tableau ci-dessous pour les réglages du niveau de puissance et du temps de cuisson.
jlY`^[TmUGGwGZWGG{ SGvG_SGYWWYGGYaW\Gwt Conseils de cuisson(suite) Conseils pour faire griller des aliments congelés F Astuces micro-ondes Reportez-vous au tableau ci-dessous pour les réglages du niveau de puissance et du temps de cuisson.
jlY`^[TmUGGwGZXGG{ SGvG_SGYWWYGGYaW\Gwt Nettoyez votre four à micro-ondes Rangez ou réparez votre four à micro-ondes Pour empêcher l’accumulation de graisses et de particules d’aliments, vous devez nettoyer régulièrement les éléments suivants du four à microondes : • l’intérieur et l’extérieur, • la porte et les joints d’étanchéité, • le plateau et l’anneau de guidage. Pour le rangement ou le dépannage de votre four à micro-ondes, vous devez respecter quelques précautions.
jlY`^[TmUGGwGZYGG{ SGvG_SGYWWYGGYaW\Gwt Spécifications techniques F Remarque Les descriptions et caractéristiques figurant dans ce mode d’emploi sont données à titre d’information et sans engagement. Soucieux de la qualité de ses produits, SAMSUNG se réserve le droit d’effectuer des modifications sans préavis.
jlY`^[TmUGGwGZZGG{ SGvG_SGYWWYGGYaW\Gwt Remarque F 33
jlY`^[TmUGGwGZ[GG{ SGvG_SGYWWYGGYaW\Gwt Remarque F 34
jlY`^[TmUGGwGZ\GG{ SGvG_SGYWWYGGYaW\Gwt Remarque F 35
jlY`^[TmUGGwGZ]GG{ SGvG_SGYWWYGGYaW\Gwt
jlY`^[TniUGGwGXGGt SGvG^SGYWWYGG`a[[Ght MICROWAVE OVEN Owner’s Instructions and Cooking Guide CE2974N / CE2974NT CE2914N / CE2914NT Quick Look-up Guide..............................................................................2 Oven .......................................................................................................3 Control Panel..........................................................................................4 Accessories .....................................
jlY`^[TniUGGwGYGGt SGvG^SGYWWYGG`a[[Ght Quick Look-up Guide GB Model : CE2974N/CE2974NT If you want to add an extra minute If you want to cook some food 1. Place the food in the oven. Turn the Cooking Control knob to Manual Cook( symbol. 2. Select the power level by pressing the more times. Leave the food in the oven. Turn the Cooking Control knob to Manual Cook( ) symbol. Press +30s once or more times for each extra 30 seconds that you wish to add.
jlY`^[TniUGGwGZGGt SGvG^SGYWWYGG`a[[Ght Quick Look-up Guide(Cautionued) Oven Model : CE2914N/CE2914NT Model : CE2974N/CE2974NT GB VENTILATION HOLES If you want to cook some food LIGHT DOOR HANDLE 1. Place the food in the oven. Select the power level by rotating the COOKING POWER CONTROL knob. DISPLAY HOLES 2. Select the cooking time by rotating the TIMER knob. If you want to defrost some food 1. Turn the COOKING POWER CONTROL knob to defrost ( ) symbol.
jlY`^[TniUGGwG[GGt SGvG^SGYWWYGG`a[[Ght Control Panel GB Model : CE2974N/CE2974NT Model : CE2914N/CE2914NT 2 3 1 1 4 2 13 3 4 5 6 7 9 8 10 5 11 12 1. 2. 3. 4. 5. MANUAL COOK SELECTION AUTO REHEAT SELECTION AUTO COOK SELECTION DUAL COOK SELECTION AUTO DEFROST FEATURE SELECTION 6. POWER LEVEL SETTING 7. COMBI MODE SELECTION 8. 9. 10. 11. 12. GRILL MODE SELECTION CLOCK SETTING TURNTABLE ON/OFF STOP/CANCEL BUTTON START BUTTON/DIAL KNOB (cook time, weight and serving size) 13.
jlY`^[TniUGGwG\GGt SGvG^SGYWWYGG`a[[Ght Accessories Using this Instruction Booklet Depending on the model that you have purchased, you are supplied with several accessories that can be used in a variety of ways. You have just purchased a SAMSUNG microwave oven. Your Owner’s GB Instructions contain much valuable information on cooking with your microwave oven: • Safety precautions • Suitable accessories and cookware • Useful cooking tips 1.
jlY`^[TniUGGwG]GGt SGvG^SGYWWYGG`a[[Ght Safety Precautions GB 8. Take particular care when heating liquids and baby foods. • ALWAYS allow a standing time of at least 20 seconds after the oven has been switched off so that the temperature can equalize. • Stir during heating, if necessary, and ALWAYS stir after heating. • Take care when handling the container after heating. You may burn yourself if the container is too hot. • A risk of delayed eruptive boiling exists.
jlY`^[TniUGGwG^GGt SGvG^SGYWWYGG`a[[Ght Safety Precautions(continued) Installing Your Microwave Oven IMPORTANT SAFETY INSTRUCTIONS Place the oven on a flat, level surface that strong enough to safely bear GB the weight of the oven. During cooking, you should look into the oven from time to time when food is being heated or cooked in disposable containers of plastic, paper or other combustible materials.
jlY`^[TniUGGwG_GGt SGvG^SGYWWYGG`a[[Ght GB Setting the Time (CE2974N/CE2974NT) How a Microwave Oven Work Your microwave oven has an inbuilt clock. The time can be displayed in either the 24-hour or 12-hour notation. You must set the clock: • When you first install your microwave oven • After a power failure Microwaves are high-frequency electromagnetic waves; the energy released enables food to be cooked or reheated without changing either the form or the colour.
jlY`^[TniUGGwG`GGt SGvG^SGYWWYGG`a[[Ght Checking that Your Oven is Operating Correctly What to Do if You are in Doubt or Have a Problem The following simple procedure enables you to check that your oven is working correctly at all times. GB If you have any of the problems listed below, try the solutions given. Open the oven door by pulling on the handle on the right side of the door. Place a glass of water on the turntable. Then, close the door. ◆ This is normal.
jlY`^[TniUGGwGXWGGt SGvG^SGYWWYGG`a[[Ght Cooking / Reheating GB Model : CE2914N/CE2914NT The following procedure explains how to cook or reheat food. ALWAYS check your cooking settings before leaving the oven unattended. 1. Set the power level to maximum by turning COOKING POWER CONTROL knob. (MAXIMUM POWER : 900 W) First, place the food in the centre of the turntable. Then, close the door. 2. Set the time by turning TIMER knob.
jlY`^[TniUGGwGXXGGt SGvG^SGYWWYGG`a[[Ght Power Levels Stopping the Cooking You can choose among the power levels below. You can stop cooking at any time to check the food.
jlY`^[TniUGGwGXYGGt SGvG^SGYWWYGG`a[[Ght Adjusting the Cooking Time GB Using the Auto Reheat/Cook Feature (CE2974N/ CE2974NT) Model : CE2974N/CE2974NT The Auto Reheat/Cook feature has six pre-programmed cooking time, you do not need to set either the cooking time or power level. You can adjust the number of servings by turning the dial knob. You can increase the cooking time by pressing the +30s button once for each 30 seconds to be added.
jlY`^[TniUGGwGXZGGt SGvG^SGYWWYGG`a[[Ght Auto Reheat / Cook Settings(CE2974N/CE2974NT) The following table presents the various Auto Reheat & Cook Programmes, quantities, standing times and appropriate recommendations.
jlY`^[TniUGGwGX[GGt SGvG^SGYWWYGG`a[[Ght Using the Instant Reheat/Cook Feature(CE2914N/ CE2914NT) Using the Auto Defrost Feature (CE2974N/ CE2974NT) First, place the food in the centre of the turntable and close the door. The Auto Defrost feature enables you to defrost meat, poultry and fish. The defrost time and power level are set automatically. You simply select the programme and the weight. GB 1. Turn the COOKING POWER CONTROL knob to Max Power.
jlY`^[TniUGGwGX\GGt SGvG^SGYWWYGG`a[[Ght Auto Defrost Settings(CE2974N/CE2974NT) Manual Defrosting Food(CE2914N/CE2914NT) The following table presents the various Auto Defrost programmes, quantities, standing times and appropriate recommendations. The Defrost feature enables you to defrost meat, poultry or fish. Remove all kinds of package material before defrosting. Place meat, poultry and fish on a turntable. Code Food Portion Standing Time 1 Meat 0.
jlY`^[TniUGGwGX]GGt SGvG^SGYWWYGG`a[[Ght Using the Dual Cook Feature(CE2974N/ CE2974NT) Using the Crusty Plate (CE2974NT/CE2914NT) Your Samsung microwave oven has a crusty plate as an additional accessory. This crusty plate allows you to brown food not only on the top with the grill, but also the bottom of the food turns crispy and brown due to the high temperature of the crusty plate. Several items which you can prepare on the crusty plate can be found in the chart (see next page).
jlY`^[TniUGGwGX^GGt SGvG^SGYWWYGG`a[[Ght Crusty Plate Setting (CE2974NT/CE2914NT) We recommend to preheat the crusty plate directly on the turn-table. Preheat the crusty plate with the 600W+Grill( ) function and follow the times and instructions in the table. Food Portion Power Preheati Cooking ng Time Time Bacon 4 slices (80g) 8 slices (160g) 600W+ Grill 3min. 3-3½min. Preheat crusty plate. Put slices side by side on 4½ -5min. crusty plate. Put crusty plate on the rack.
jlY`^[TniUGGwGX_GGt SGvG^SGYWWYGG`a[[Ght GB Choosing the Heating Element Position Choosing the Accessories The heating element is used when grilling. It can be placed in one of two positions: • Horizontal position for grilling or combined microwave +grill cooking Use microwave-safe recipients; do not use plastic containers, dishes, paper cups, towels, etc. ☛ If you wish to select the combined cooking mode (grill and microwave), use only dishes that are microwave-safe and ovenproof.
jlY`^[TniUGGwGX`GGt SGvG^SGYWWYGG`a[[Ght Grilling The grill enables you to heat and brown food quickly, without using microwaves. To this aim, a grill rack(metal rack) is supplied with your microwave oven. Model : CE2914N/CE2914NT 1. Preheat the grill to the required temperature, by the turning the cooking power control knob to grill symbol( ) and turning the timer knob to the appropriate. Model : CE2974N/CE2974NT 1. Turn the Cooking Control knob to Manual Cook( symbol. ) 2.
jlY`^[TniUGGwGYWGGt SGvG^SGYWWYGG`a[[Ght Combining Microwaves and the Grill GB Model : CE2914N/CE2914NT You can also combine microwave cooking with the grill, to cook quickly and brown at the same time. ☛ 1. Make sure that the heating element is in the horizontal position; refer to page 18 for further details. ALWAYS use microwave-safe and oven-proof cookware. Glass or ceramic dishes are ideal as they allow the microwaves to penetrate the food evenly.
jlY`^[TniUGGwGYXGGt SGvG^SGYWWYGG`a[[Ght Switching the Beeper Off (CE2974N/CE2974NT) Safety-Locking Your Microwave Oven (CE2974N/ CE2974NT) 1. Press the and buttons at the same time. Result: The following indication is displayed. GB Your microwave oven is fitted with a special Child Safety programme, which enables the oven to be “locked” so that children or anyone unfamiliar with it cannot operate it accidentally. The oven does not beep each time you press a button or cooking ends.
jlY`^[TniUGGwGYYGGt SGvG^SGYWWYGG`a[[Ght GB Remembering Function (CE2974N/CE2974NT) Manual Stop Turntable Function This oven remembers the last cooking power level for your convenience. The turntable on/off( ) button enables you to use large dishes which fill the whole oven by stopping the turntable from rotating. ☛ 1. Set the add some cooking time by turning the dial knob. ☛ 2. Press the button. The results will be less satisfactory in this case as the cooking is less even.
jlY`^[TniUGGwGYZGGt SGvG^SGYWWYGG`a[[Ght Cookware Guide To cook food in the microwave oven, the microwaves must be able to penetrate the food, without being reflected or absorbed by the dish used. Metal • Dishes • Freezer bag twist ties Care must therefore be taken when choosing the cookware. If the cookware is marked microwave-safe, you do not need to worry.
jlY`^[TniUGGwGY[GGt SGvG^SGYWWYGG`a[[Ght Cooking Guide GB MICROWAVES Cooking Guide for frozen vegetables Microwave energy actually penetrates food, attracted and absorbed by its water, fat and sugar content. The microwaves cause the molecules in the food to move rapidly. The rapid movement of these molecules creates friction and the resulting heat cooks the food. Use a suitable glass pyrex bowl with lid. Cook covered for the minimum time - see table.
jlY`^[TniUGGwGY\GGt SGvG^SGYWWYGG`a[[Ght Cooking Guide Cooking Guide for fresh vegetables Cooking Guide for rice and pasta Use a suitable glass pyrex bowl with lid. Add 30-45 ml cold water (2-3 tbsp.) for every 250 g unless another water quantity is recommended - see table. Cook covered for the minimum time - see table. Continue cooking to get the result you prefer. Stir once during and once after cooking. Add salt, herbs or butter after cooking. Cover during a standing time of 3 minutes.
jlY`^[TniUGGwGY]GGt SGvG^SGYWWYGG`a[[Ght Cooking Guide GB Reheating Liquids and Food Take particular care when heating liquids and baby foods. To prevent eruptive boiling of liquids and possible scalding , stir before, during and after heating. Keep them in the microwave oven during standing time. We recommend putting a plastic spoon or glass stick into the liquids. Avoid overheating (and therefore spoiling) the food.
jlY`^[TniUGGwGY^GGt SGvG^SGYWWYGG`a[[Ght Cooking Guide Guide for Dual Reheating DEFROSTING Use the power levels and times in this table as a guide lines for reheating. Microwaves are an excellent way of defrosting frozen food. Microwaves gently defrost frozen food in a short period of time. This can be of great advantage, if unexpected guests suddenly show up.
jlY`^[TniUGGwGY_GGt SGvG^SGYWWYGG`a[[Ght Cooking Guide GB All frozen food should be defrosted using defrosting power level (180 W). Food Meat Minced beef Pork steaks Poultry Chicken pieces GRILL The grill-heating element is located underneath the ceiling of the cavity. It operates while the door is closed and the turntable is rotating. The turntable’s rotation makes the food brown more evenly. Preheating the grill for 4 minutes will make the food brown more quickly.
jlY`^[TniUGGwGY`GGt SGvG^SGYWWYGG`a[[Ght Cooking Guide Grill Guide for fresh food Grill Guide for fresh food Preheat the grill with the grill-function for 4 minutes. Use the power levels and times in this table as guide lines for grilling. Fresh Food Fresh Food Portion Power 1. Side Time (min) 2. Side Time (min) Instructions Toast Slices 4pcs Grill (each25g) only 3½-4½ 3-4 Put the toast slices side by side on the rack.
jlY`^[TniUGGwGZWGGt SGvG^SGYWWYGG`a[[Ght Cooking Guide GB Grill Guide for frozen food SPECIAL HINTS Use the power levels and times in this table as guide lines for grilling. MELTING BUTTER Put 50 g butter into a small deep glass dish. Cover with plastic lid. Heat for 30-40 seconds using 900 W, until butter is melted. Fresh Food Portion Bread Rolls (each ca. 50 g) Power 1. Side Time (min) 2.
jlY`^[TniUGGwGZXGGt SGvG^SGYWWYGG`a[[Ght Cleaning Your Microwave Oven Storing and Repairing Your Microwave Oven The following parts of your microwave oven should be cleaned regularly to prevent grease and food particles from building up: • Inside and outside surfaces • Door and door seals • Turntable and Roller rings A few simple precautions should be taken when storing or having your GB microwave oven serviced.
jlY`^[TniUGGwGZYGGt SGvG^SGYWWYGG`a[[Ght Technical Specifications GB Note SAMSUNG strives to improve its products at all times. Both the design specifications and these user instructions are thus subject to change without notice.
jlY`^[TniUGGwGZZGGt SGvG^SGYWWYGG`a[[Ght Note GB 33
jlY`^[TniUGGwGZ[GGt SGvG^SGYWWYGG`a[[Ght Note GB 34
jlY`^[TniUGGwGZ\GGt SGvG^SGYWWYGG`a[[Ght Note GB 35
jlY`^[TniUGGwGZ]GGt SGvG^SGYWWYGG`a[[Ght